前端-js开发
课堂完结后欲复习巩固也方便后续-重游-故写此篇
从实现功能过渡到涉及的相关知识点
| 知识点 |
1、 JS 是前端语言,是可以被浏览器“看到”的,当然也可以被修改啊,被浏览器禁用网页的 JS 功能啊之类的。所以一般都是前后端分离开发,前端只负责显示与提醒用户。
2、 JS 是可以在浏览器里调试的,断点之类的都行,浏览器里也有控制台可以执行命令。
3、 浏览器不可能看到所有的 JS 文件,但是断点也带来了其他可能,只要断在你想知道参数的地方,那么没有显示的 JS 文件也不行影响到你,毕竟你只需要它们运行而非一定得拿到源码。
登录验证
简单流程:(最初实验版)前端 js 发送用户名和密码给后端,后端判断是否正确后返回参数,js依据参数决定是否进行页面跳转与弹窗
分析问题:
1、 前端语言是可以看到的,是可以被改变的,所以不能给前端跳转页面的权力,只能做提醒,不然会导致安全问题。
前端语言应只供展示与简单提醒
Code:
前端 js 部分代码如下:
<!-- 采用js传输,php验证-->
<body><h3>用户登录</h3><div><label for="username">用户名:</label><input type="text" class="username" name="username" required></div><br><div><label for="password">密码:</label><input type="password" class="password" name="password" required></div><br><button>登录</button>
</body><!-- //导入jquery --><script src="./js/js/jquery-3.7.1.js"></script>
<!-- 都是键值对!!! -->
<script>$('button').click(function(){$.ajax({url: "check_login.php",data: {user:$('.username').val(),passwd:$('.password').val()},type: "POST",dataType: "json",success: function(data) {console.log(data);if(data.info==1){alert('登陆成功!');// location.href="index.php";/*** 安全漏洞出现,原因:前端代码不可进行操作,只需要提示就可以了* * 小写,哦~*/}else{console.log('登陆失败!');}},error: function(text) {alert('登陆失败!');}});});</script>
文件上传
简单流程:前端 js 判断文件格式等是否正确,然后发送给后端 php 进一步处理文件。
简单模拟了已下前端部分,并没有写后端 php。
分析问题:
1、 前端先做第一步判断减轻服务器压力,但是也容易被绕过,所以后端还是得判断一次(也许可以优化法子?)
2、 但是并没有赋予前端任何权利并没有安全问题,压力给到后端。
Code:
前端部分 js 代码如下:
<body><div class="upload-container"><h2>上传文件</h2><form action="upload.php" method="post" enctype="multipart/form-data"><input type="file" name="fileToUpload" id="file"  onchange="check_upload(this.value)"><button type="submit">上传文件</button></form></div>
</body><!-- 使用js来实现前端的文件格式过滤 -->
<script>//文件后缀白名单let list_write=['jpg','png','gif','jpeg','webp'];//文件上传时发生改变触发方法function check_upload(file_name){//取出后缀let idx=file_name.lastIndexOf('.');let val=file_name.substring(idx+1,file_name.length);if(list_write.indexOf(val)!=-1){console.log('文件格式无误');//将文件发送后端……}else{//刷新网页取消文件输入location.reload(true);alert('文件格式有误');    }}
</script>
打包器webpack
基本的目录结构如下:
D:\VSCODE\WEBPACK-DEMO
│ package.json(版本控制及脚本配置)
│ webpack.config.js(配置文件)
│
├─dist(打包后的成品code)
├─node_modules(依赖包)
└─src(存自己写的code)
├─index.html
└─index.js
接下来通过简单使用来复习功能,并引入其作用。
开始之前先复习一下其概念:
Webpack 是一个现代 JavaScript 应用程序的静态模块打包工具。它分析项目结构,找到 JavaScript 模块以及其他一些浏览器不能直接运行的扩展语言(如 Scss,TypeScript 等),并将其转换和打包为合适的格式供浏览器使用。
然后使其使用与感悟:
就举个最简单的 js 方面的例子:一个html页面可能需要引入非常多的 js 文件,不但太多了不好维护,也会导致访问的速度变慢,为了解决这一问题,可以用打包器 webpack 将任意多个 js 文件打包成一个或几个 js 文件。流程大致如下:
1、打包器分析 js 文件之间的依赖关系(通过import/require语句)
2、构建依赖图
3、打包、优化、合并成一/几个 JS 文件
一、 新建文件夹 ‘js’,存放两个 js 文件
代码分别如下:
function divide(a,b){return a-b;
}
export default divide;
export default function add(a,b){return a+b;
}
二、 在 src 目录下新建一个 JS 文件用于联系多个 JS 文件(上面两)
import one from '../js/_1';
import two from '../js/_2';console.log(one(1,2))
console.log(two(1,2))
三、 配置 webpack.config.js 文件如下
const path = require('path');module.exports = {mode:"development",//开发模式// mode:"production" 生产模式entry: './src/index.js',//入口文件output: {filename: 'bundle.js',//结果文件path: path.resolve(__dirname, 'dist')//结果文件的位置},
}
| 知识点 |
1、 上面配置 code 中的 mode
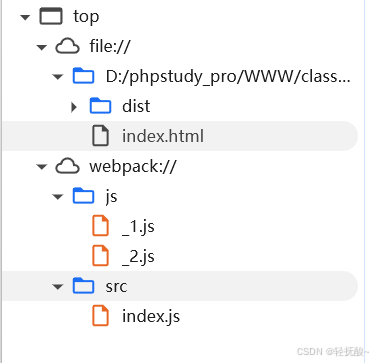
开发模式用于网站开发过程中,生产模式用于网站部署后。至于弄混会咋样,如图,源码漏泄给浏览器
四、 执行打包命令
首先在
package.json文件里添加下面代码,然后移动终端的路径到webpack根目录下,运行命令npm run build
"scripts":{"build":"webpack"}
这里也贴上两种模式产生的结果 JS 文件代价量的区别
生产模式code:
(()=>{"use strict";console.log(1-2),console.log(3)})();
开发模式code:
是的,1行和100行的区别
/** ATTENTION: The "eval" devtool has been used (maybe by default in mode: "development").* This devtool is neither made for production nor for readable output files.* It uses "eval()" calls to create a separate source file in the browser devtools.* If you are trying to read the output file, select a different devtool (https://webpack.js.org/configuration/devtool/)* or disable the default devtool with "devtool: false".* If you are looking for production-ready output files, see mode: "production" (https://webpack.js.org/configuration/mode/).*/
/******/ (() => { // webpackBootstrap
/******/ 	"use strict";
/******/ 	var __webpack_modules__ = ({/***/ "./js/_1.js":
/*!******************!*\!*** ./js/_1.js ***!\******************/
/***/ ((__unused_webpack_module, __webpack_exports__, __webpack_require__) => {eval("{__webpack_require__.r(__webpack_exports__);\n/* harmony export */ __webpack_require__.d(__webpack_exports__, {\n/* harmony export */   \"default\": () => (__WEBPACK_DEFAULT_EXPORT__)\n/* harmony export */ });\nfunction divide(a,b){\r\n    return a-b;\r\n}\r\n/* harmony default export */ const __WEBPACK_DEFAULT_EXPORT__ = (divide);\n\n//# sourceURL=webpack:///./js/_1.js?\n}");/***/ }),/***/ "./js/_2.js":
/*!******************!*\!*** ./js/_2.js ***!\******************/
/***/ ((__unused_webpack_module, __webpack_exports__, __webpack_require__) => {eval("{__webpack_require__.r(__webpack_exports__);\n/* harmony export */ __webpack_require__.d(__webpack_exports__, {\n/* harmony export */   \"default\": () => (/* binding */ add)\n/* harmony export */ });\nfunction add(a,b){\r\n    return a+b;\r\n}\n\n//# sourceURL=webpack:///./js/_2.js?\n}");/***/ }),/***/ "./src/index.js":
/*!**********************!*\!*** ./src/index.js ***!\**********************/
/***/ ((__unused_webpack_module, __webpack_exports__, __webpack_require__) => {eval("{__webpack_require__.r(__webpack_exports__);\n/* harmony import */ var _js_1__WEBPACK_IMPORTED_MODULE_0__ = __webpack_require__(/*! ../js/_1 */ \"./js/_1.js\");\n/* harmony import */ var _js_2__WEBPACK_IMPORTED_MODULE_1__ = __webpack_require__(/*! ../js/_2 */ \"./js/_2.js\");\n\r\n\r\n\r\nconsole.log((0,_js_1__WEBPACK_IMPORTED_MODULE_0__[\"default\"])(1,2))\r\nconsole.log((0,_js_2__WEBPACK_IMPORTED_MODULE_1__[\"default\"])(1,2))\n\n//# sourceURL=webpack:///./src/index.js?\n}");/***/ })/******/ 	});
/************************************************************************/
/******/ 	// The module cache
/******/ 	var __webpack_module_cache__ = {};
/******/
/******/ 	// The require function
/******/ 	function __webpack_require__(moduleId) {
/******/ 		// Check if module is in cache
/******/ 		var cachedModule = __webpack_module_cache__[moduleId];
/******/ 		if (cachedModule !== undefined) {
/******/ 			return cachedModule.exports;
/******/ 		}
/******/ 		// Create a new module (and put it into the cache)
/******/ 		var module = __webpack_module_cache__[moduleId] = {
/******/ 			// no module.id needed
/******/ 			// no module.loaded needed
/******/ 			exports: {}
/******/ 		};
/******/
/******/ 		// Execute the module function
/******/ 		__webpack_modules__[moduleId](module, module.exports, __webpack_require__);
/******/
/******/ 		// Return the exports of the module
/******/ 		return module.exports;
/******/ 	}
/******/
/************************************************************************/
/******/ 	/* webpack/runtime/define property getters */
/******/ 	(() => {
/******/ 		// define getter functions for harmony exports
/******/ 		__webpack_require__.d = (exports, definition) => {
/******/ 			for(var key in definition) {
/******/ 				if(__webpack_require__.o(definition, key) && !__webpack_require__.o(exports, key)) {
/******/ 					Object.defineProperty(exports, key, { enumerable: true, get: definition[key] });
/******/ 				}
/******/ 			}
/******/ 		};
/******/ 	})();
/******/
/******/ 	/* webpack/runtime/hasOwnProperty shorthand */
/******/ 	(() => {
/******/ 		__webpack_require__.o = (obj, prop) => (Object.prototype.hasOwnProperty.call(obj, prop))
/******/ 	})();
/******/
/******/ 	/* webpack/runtime/make namespace object */
/******/ 	(() => {
/******/ 		// define __esModule on exports
/******/ 		__webpack_require__.r = (exports) => {
/******/ 			if(typeof Symbol !== 'undefined' && Symbol.toStringTag) {
/******/ 				Object.defineProperty(exports, Symbol.toStringTag, { value: 'Module' });
/******/ 			}
/******/ 			Object.defineProperty(exports, '__esModule', { value: true });
/******/ 		};
/******/ 	})();
/******/
/************************************************************************/
/******/
/******/ 	// startup
/******/ 	// Load entry module and return exports
/******/ 	// This entry module can't be inlined because the eval devtool is used.
/******/ 	var __webpack_exports__ = __webpack_require__("./src/index.js");
/******/
/******/ })()
;
express实现服务端
服务器,也就是访问特定ip与端口会返回特定数据
由此
1、模拟网页刷新(渲染特定网页)
2、模拟网页传输用户名密码需要连接数据库并返回结果
3、依据get、post方式不同返回不同(路由)
由于是简单模拟,所以都集合在了一个server.js里,还有一个返回/渲染网页用的html文件。
html 文件为渲染用登录页面,code:
<!DOCTYPE html>
<html lang="zh-CN">
<head><meta charset="UTF-8"><title>登录页面</title><style>body {display: flex;justify-content: center;align-items: center;height: 100vh;font-family: sans-serif;}.login-form {padding: 20px;border: 1px solid #ccc;border-radius: 8px;width: 300px;}.error-message {color: red;display: none;}</style>
</head>
<body><form action="http://127.0.0.1:3001/login" method="POST" ><h3>用户登录</h3><div><label for="username">用户名:</label><input type="text" id="username" name="username" required></div><div><label for="password">密码:</label><input type="password" id="password" name="password" required></div><input type="submit" value="登录"></form>
</body>
</html>
server.js文件code:
// 引入模块
const express = require('express');
const bodyParser = require('body-parser');
const mysql = require('mysql');
// 创建一个express应用
const app = express();
// 定义端口号
const port = 3001;
// 提供静态文件服务
// app.use(express.static('public'));// 解析 application/x-www-form-urlencoded 数据
app.use(bodyParser.urlencoded({ extended: false }));// 初始页面
app.get('/',(req, res) => {// res.send('GET请求成功!');//还可以渲染(返回)html文件!!res.sendFile(__dirname+"/html/login.html");
});// 1、get 方式传输表单数据
app.get('/login',(req, res) => {//参数获取const u=req.query.username;const p=req.query.password;//连接数据库……//判断if(u=="admin" && p=="123456"){res.send("欢迎管理员!get");}else{res.send("闲杂人等不得入内!get");}
});
// 2、post 方式传输表单数据
app.post('/login',(req, res) => {//参数获取const u=req.body.username;const p=req.body.password;//数据库设置const connection = mysql.createConnection({host     : 'localhost',user     : 'root',password : 'password',database : 'user_all',port     :'3307'});//连接数据库connection.connect((error)=>{if(error){console.log("连接失败");}else{console.log("连接成功");}})//语句let sentence='SELECT * FROM admin where username="'+u+'" and password="'+p+'"';console.log(sentence);connection.query(sentence, (error, results, fields)=>{if(error){console.log("数据库连接失败")}console.log(results);try{//判断if(u==results[0]["username"] && p==results[0]["password"]){res.send("欢迎管理员!post");}else{res.send("闲杂人等不得入内!post");}}catch{console.log("语句有误!");}});// //判断// if(u=="admin" && p=="123456"){//     res.send("欢迎管理员!post");// }else{//     res.send("闲杂人等不得入内!post");// }
});// 启动服务器并监听指定端口
app.listen(port, () => {console.log(`Server is running on http://localhost:${port}`);
});
(如有不恰当的地方欢迎指正哦 ~o(●’◡’●)o)
参考blogs:
【webpack超详细教程,学webpack看这一篇就够了!(上)】
【【Webpack】三种模式详解】
【Webpack三种打包方式:(以下所有命令都是windows下执行的)】


如何进行MySQL的全局变量设置?)


