HTTPS服务
一、常见的端口
http ------ 80 明文
https ------ 443 数据加密
dns ------ 53
ssh ------ 22
telent ------ 23
HTTPS = http + ssl或者tls (安全模式)
二、原理:
c(客户端):
1、clienthello:支持哪些版本、支持哪些加密算法,随机生成一组32字节数据random_c
3、clientkeyexchange:公钥加密数据pre_master
s(服务器):
2、serverhello:确定版本、确定加密算法,随机生成一组32个字节得数据random_s,生成公钥和私钥
servercertificate:证书、公钥
4、data:服务端收到pre_master—私钥进行解密
最后得会话密钥:random_c+random_s+pre_master
三、实现安全------认证/鉴权
1、CA机构:认证某网站是安全的,给服务器的证书进行授权(相当于中介)
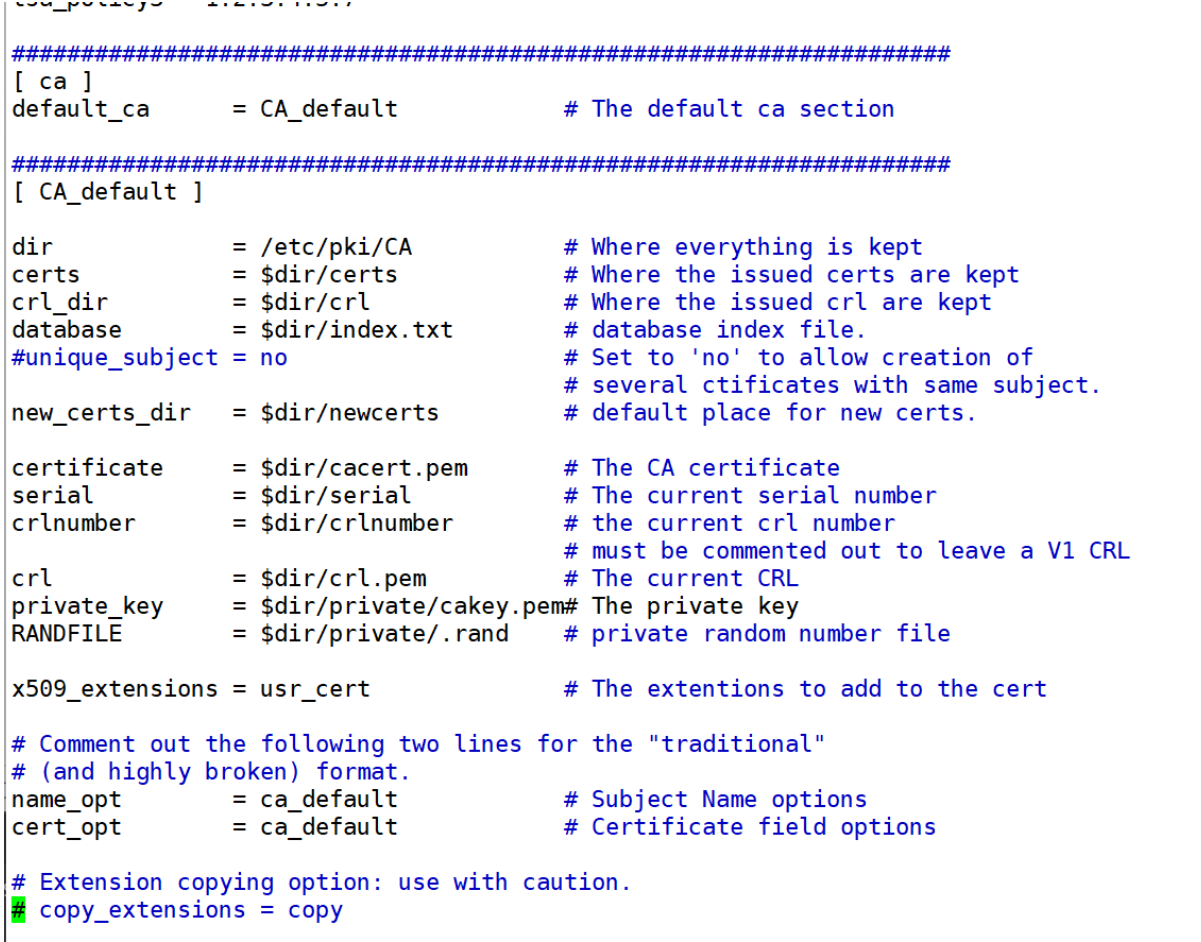
[root@stw ~]# vim /etc/pki/tls/openssl.cnf
dir = /etc/pki/CA(默认的CA的工作目录)
certs = $dir/certs(/etc/pki/CA/certs,证书所在的目录)
database = $dir/index.txt(/etc/pki/CA/index.txt,数据库位置,现在没有,需要生成)
certificate = $dir/cacert.pem(/etc/pki/CA/cacert.pem,CA的根证书,目前没有,需要生成)
serial = $dir/serial( /etc/pki/CA/serial,序列号,目前不存在)
private_key = $dir/private/cakey.pem(私钥,目前不存在,需要生成)
四、配置https服务
openssl: 命令的选项
-x509 :生成自签名证书格式,专用于创建私有CA
-new :生成新证书的签署请求
-key :生成请求时用到的私钥文件路径
-out :生成后的文件存放路径,如果是自签名操作,将直接生成签署过的证书
-days :证书有效期 默认是365天
CA服务器:
1、生成私钥
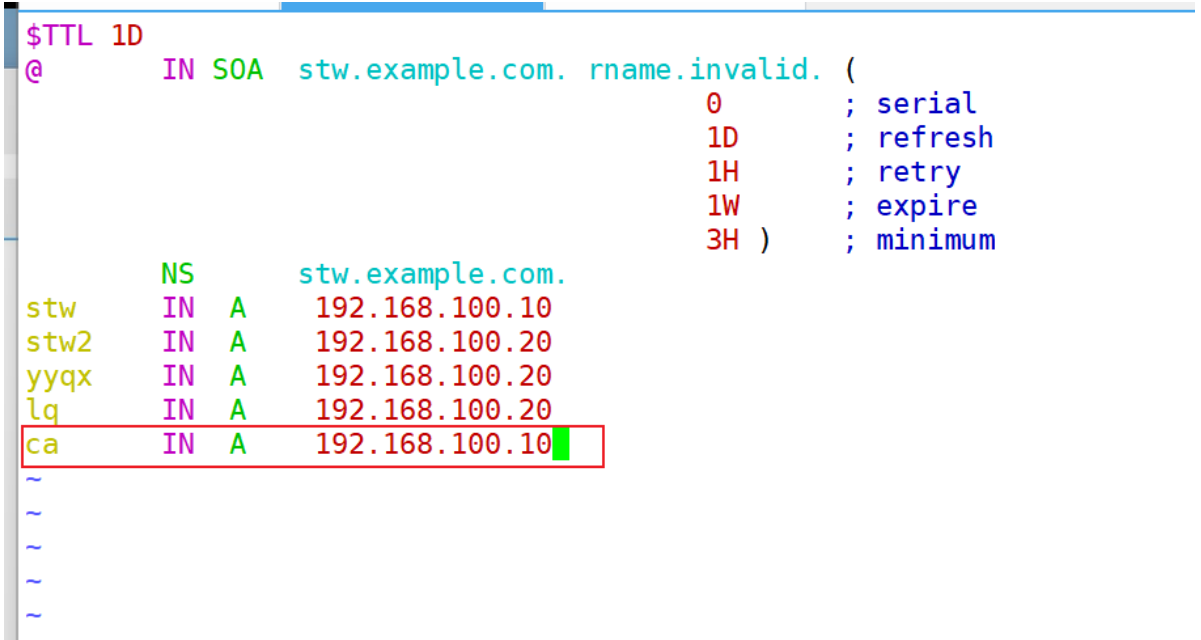
前提:在DNS服务器上的正向解析数据库中添加ca.example.com的解析内容
[root@stw ~]# cd /var/named
[root@stw named]# vim stw.com
[root@stw named]# systemctl restart named
[root@stw named]# systemctl enable named
在主机CA上为主机CA生成私钥
(umask 077;openssl genrsa -out /etc/pki/CA/private/cakey.pem)
root用户生成的文件默认的umask值是644,我们需要只让自己能读写此文件,所以需要umask值为600,所以应该设置umask值为066(文件的最大执行权限为666,666-066=600,目录的最大执行权限为777,777-077=700),对于文件来说给077和给066没有区别,都是只让自己读取此文件。
[root@stw ~]# (umask 077;openssl genrsa -out /etc//pki/CA/private/cakey.pem)
Generating RSA private key, 2048 bit long modulus
....................+++
...........................+++
e is 65537 (0x10001)
2、生成自签名证书
[root@stw ~]# openssl req -new -x509 -key /etc/pki/CA/private/cakey.pem -out /etc/pki/CA/cacert.pem -days 365
You are about to be asked to enter information that will be incorporated
into your certificate request.
What you are about to enter is what is called a Distinguished Name or a DN.
There are quite a few fields but you can leave some blank
For some fields there will be a default value,
If you enter '.', the field will be left blank.
-----
Country Name (2 letter code) [XX]:CN
State or Province Name (full name) []:HB
Locality Name (eg, city) [Default City]:WH
Organization Name (eg, company) [Default Company Ltd]:LQ
Organizational Unit Name (eg, section) []:IT
Common Name (eg, your name or your server's hostname) []:ca.example.com
Email Address []:root@example.com
3、创建index.txt文件和serial文件
[root@stw ~]# cd /etc/pki/CA/
[root@stw CA]# ls
cacert.pem  certs  crl  newcerts  private
[root@stw CA]# touch index.txt
[root@stw CA]# echo 01 > serial     //序列号里面不能为空
[root@stw CA]# ls
cacert.pem  certs  crl  index.txt  newcerts  private  serial
Web(https)服务器:
1、关联DNS
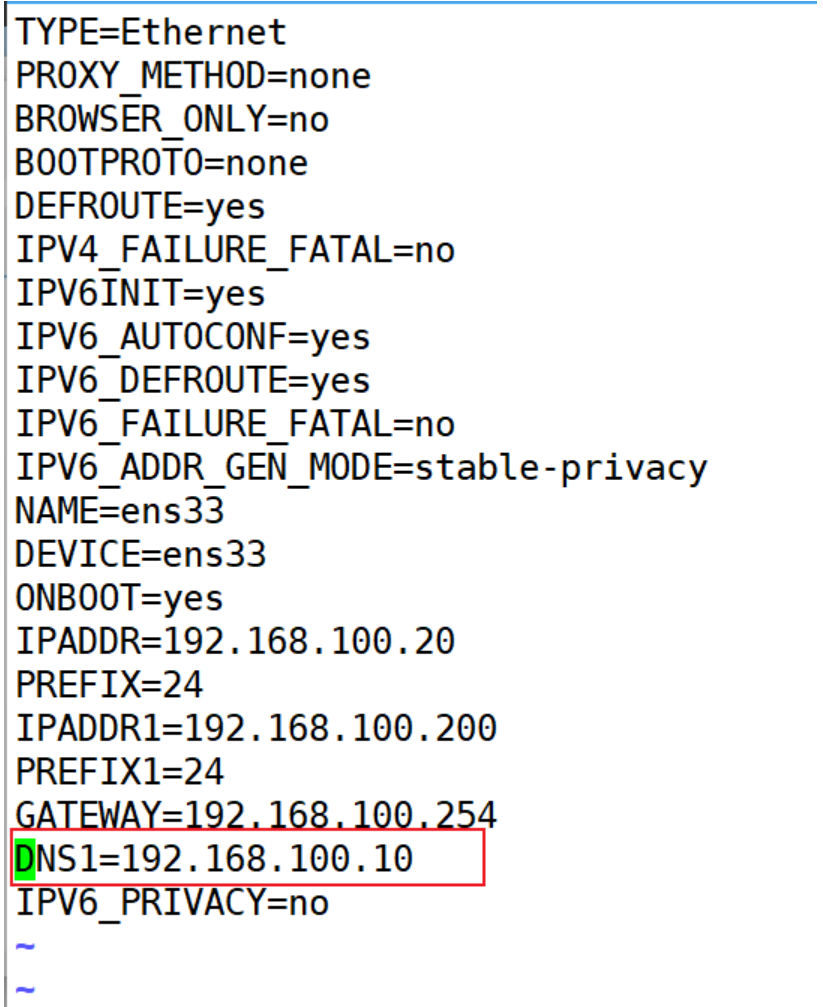
[root@stw2 ~]# cd /etc/sysconfig/network-scripts/
[root@stw2 network-scripts]# vim ifcfg-ens33
[root@stw2 network-scripts]# systemctl restart network
[root@stw2 ~]# nslookup ca.example.com
Server:		192.168.100.10
Address:	192.168.100.10#53Name:	ca.example.com
Address: 192.168.100.10
2、生成私钥放在对应的位置
[root@stw2 ~]# cd /etc/httpd
[root@stw2 httpd]# ls
conf  conf.d  conf.modules.d  logs  modules  run
[root@stw2 httpd]# mkdir ssl
[root@stw2 httpd]# cd ssl
[root@stw2 ssl]# (umask 077;openssl genrsa -out /etc/httpd/ssl/httpd.key)
Generating RSA private key, 2048 bit long modulus
..............................................................+++
..........................................................+++
e is 65537 (0x10001)
3、生成自签名证书放在对应位置
[root@stw2 ssl]# openssl req -new -key /etc/httpd/ssl/httpd.key -out /etc/httpd/ssl/httpd.csr -days 365
You are about to be asked to enter information that will be incorporated
into your certificate request.
What you are about to enter is what is called a Distinguished Name or a DN.
There are quite a few fields but you can leave some blank
For some fields there will be a default value,
If you enter '.', the field will be left blank.
-----
Country Name (2 letter code) [XX]:CN
State or Province Name (full name) []:HB
Locality Name (eg, city) [Default City]:WH
Organization Name (eg, company) [Default Company Ltd]:LQ
Organizational Unit Name (eg, section) []:IT
Common Name (eg, your name or your server's hostname) []:stw2.example.com
Email Address []:root@example.comPlease enter the following 'extra' attributes
to be sent with your certificate request
A challenge password []:
An optional company name []:
[root@stw2 ssl]#
4、把刚刚生成的证书发送给CA机构,让CA机构为Web服务器的证书进行签名
Web服务器:
[root@stw2 ssl]# scp httpd.csr root@ca.example.com:/etc/pki/CA
The authenticity of host 'ca.example.com (192.168.100.10)' can't be established.
ECDSA key fingerprint is SHA256:R7/1dpul7cu8SnefsN2wQw5hKDL+xekk0ffasLS6OGI.
ECDSA key fingerprint is MD5:81:88:a1:16:52:83:c0:d5:59:ad:2b:3a:d5:52:02:bc.
Are you sure you want to continue connecting (yes/no)? yes
Warning: Permanently added 'ca.example.com,192.168.100.10' (ECDSA) to the list of known hosts.
root@ca.example.com's password:
httpd.csr                                                                      100% 1033   339.7KB/s   00:00
CA服务器查看:
[root@stw CA]# ls
cacert.pem  certs  crl  httpd.csr  index.txt  newcerts  private  serial
对Web服务器发送过来的证书进行认证授权
[root@stw CA]# openssl ca -in /etc/pki/CA/httpd.csr -out /etc/pki/CA/httpd.crt -days 365
Using configuration from /etc/pki/tls/openssl.cnf
Check that the request matches the signature
Signature ok
Certificate Details:Serial Number: 1 (0x1)ValidityNot Before: Aug 12 10:19:54 2025 GMTNot After : Aug 12 10:19:54 2026 GMTSubject:countryName               = CNstateOrProvinceName       = HBorganizationName          = LQorganizationalUnitName    = ITcommonName                = stw2.example.comemailAddress              = root@example.comX509v3 extensions:X509v3 Basic Constraints: CA:FALSENetscape Comment: OpenSSL Generated CertificateX509v3 Subject Key Identifier: 5B:8A:BD:D6:43:41:51:D0:6A:60:4D:4E:BD:8B:58:7C:F6:94:BD:A7X509v3 Authority Key Identifier: keyid:63:9E:05:A1:DA:A1:DA:74:9D:75:8D:B4:DF:D1:21:14:65:F9:DB:C6Certificate is to be certified until Aug 12 10:19:54 2026 GMT (365 days)
Sign the certificate? [y/n]:y1 out of 1 certificate requests certified, commit? [y/n]y
Write out database with 1 new entries
Data Base Updated
[root@stw CA]# ls
cacert.pem  crl        httpd.csr  index.txt.attr  newcerts  serial
certs       httpd.crt  index.txt  index.txt.old   private   serial.old
再把已经完成认证的证书发送回到Web服务器:
要先确认DNS中有stw2.example.com(Web服务器)的条目(这里已经存在此条目)
并且把DNS指向DNS服务器(这里的DNS服务器是自己)
[root@stw CA]# cd /etc/sysconfig/network-scripts/
[root@stw network-scripts]# vim ifcfg-ens33
[root@stw network-scripts]# systemctl restart network
[root@stw ~]# cd /etc/pki/CA
[root@stw CA]# scp httpd.crt root@stw2.example.com:/etc/httpd/ssl/
The authenticity of host 'stw2.example.com (192.168.100.20)' can't be established.
ECDSA key fingerprint is SHA256:R7/1dpul7cu8SnefsN2wQw5hKDL+xekk0ffasLS6OGI.
ECDSA key fingerprint is MD5:81:88:a1:16:52:83:c0:d5:59:ad:2b:3a:d5:52:02:bc.
Are you sure you want to continue connecting (yes/no)? yes
Warning: Permanently added 'stw2.example.com,192.168.100.20' (ECDSA) to the list of known hosts.
root@stw2.example.com's password:
httpd.crt                                                                               100% 4557     1.1MB/s   00:00
[root@stw CA]#
Web服务器查看:
[root@stw2 ssl]# ls
httpd.crt  httpd.csr  httpd.key
安装apche http扩展模块mod_ssl
[root@stw2 ~]# yum -y install mod_ssl
修改主配置文件
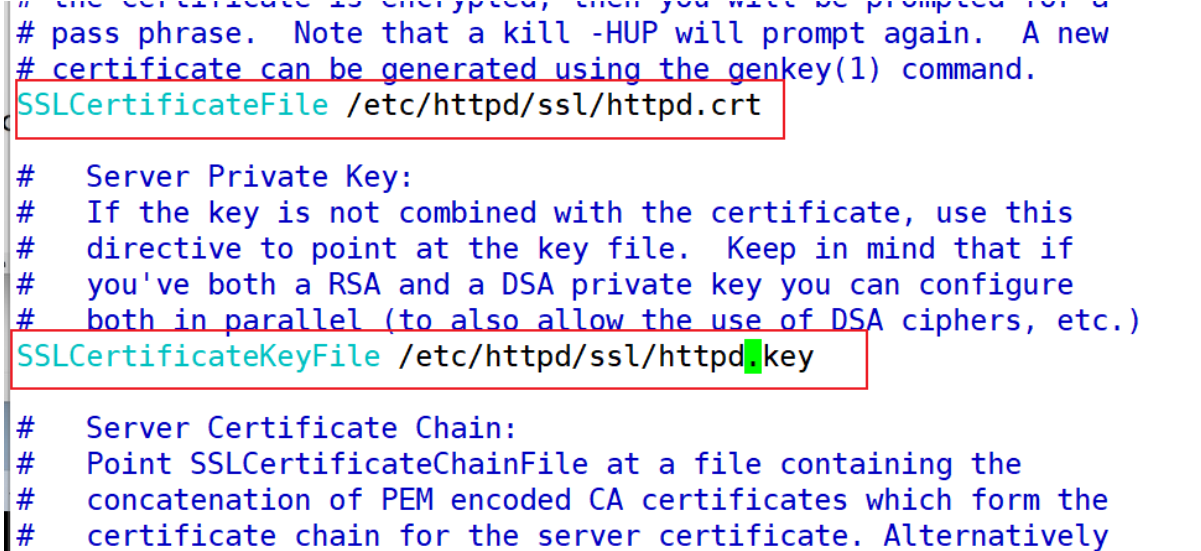
[root@stw2 ~]# vim /etc/httpd/conf.d/ssl.conf
部署网页(虚拟主机中部署)
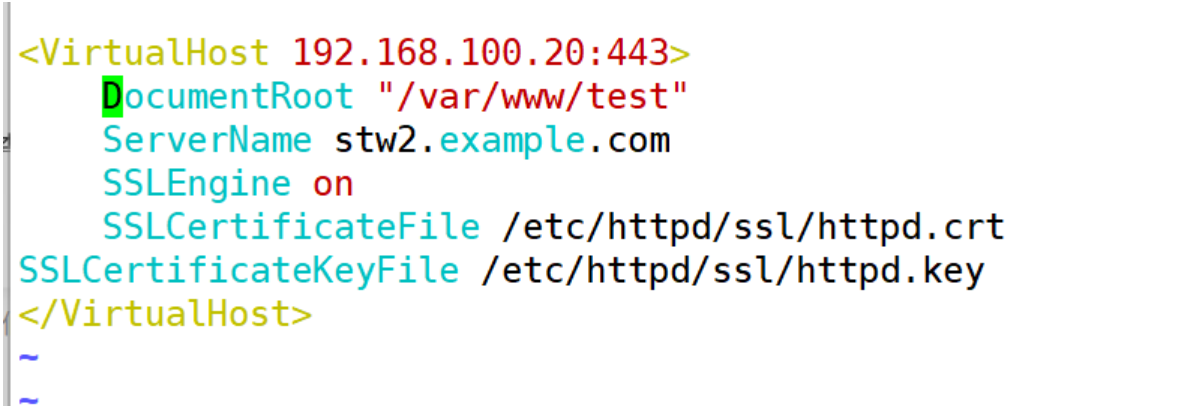
[root@stw2 conf.d]# vim httpd-vhosts.conf
[root@stw2 conf.d]# systemctl restart httpd
客户端:
查看是否能解析到Web服务器
[root@stw3 ~]# nslookup
> stw2.example.com
Server:		192.168.100.10
Address:	192.168.100.10#53Name:	stw2.example.com
Address: 192.168.100.20
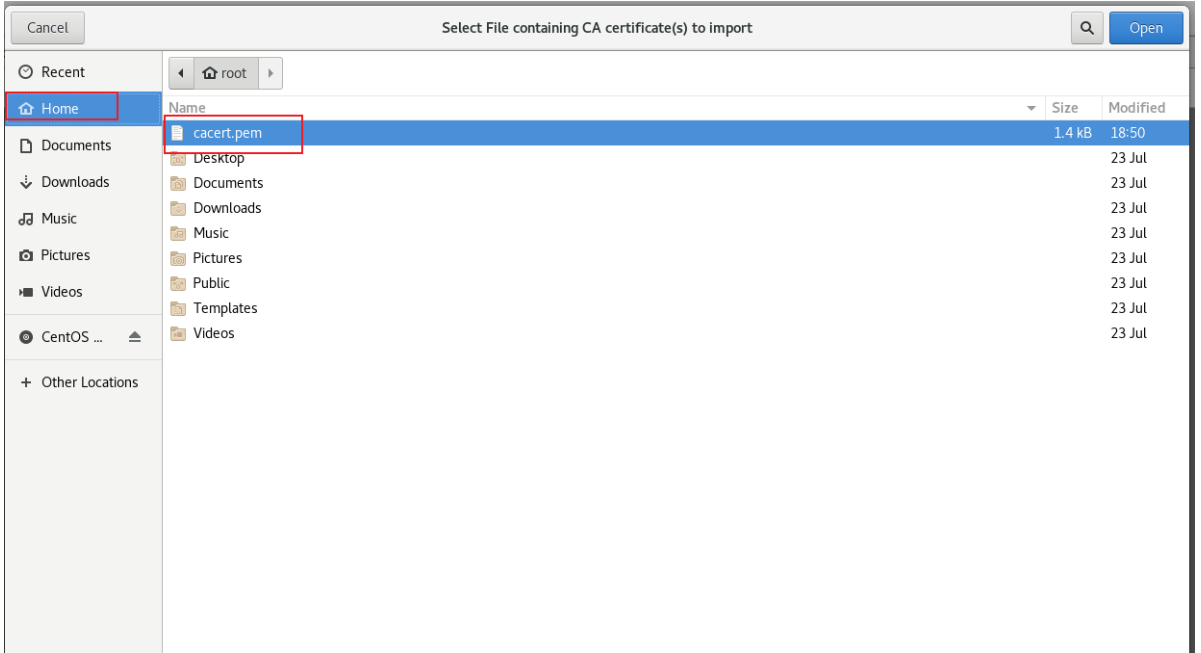
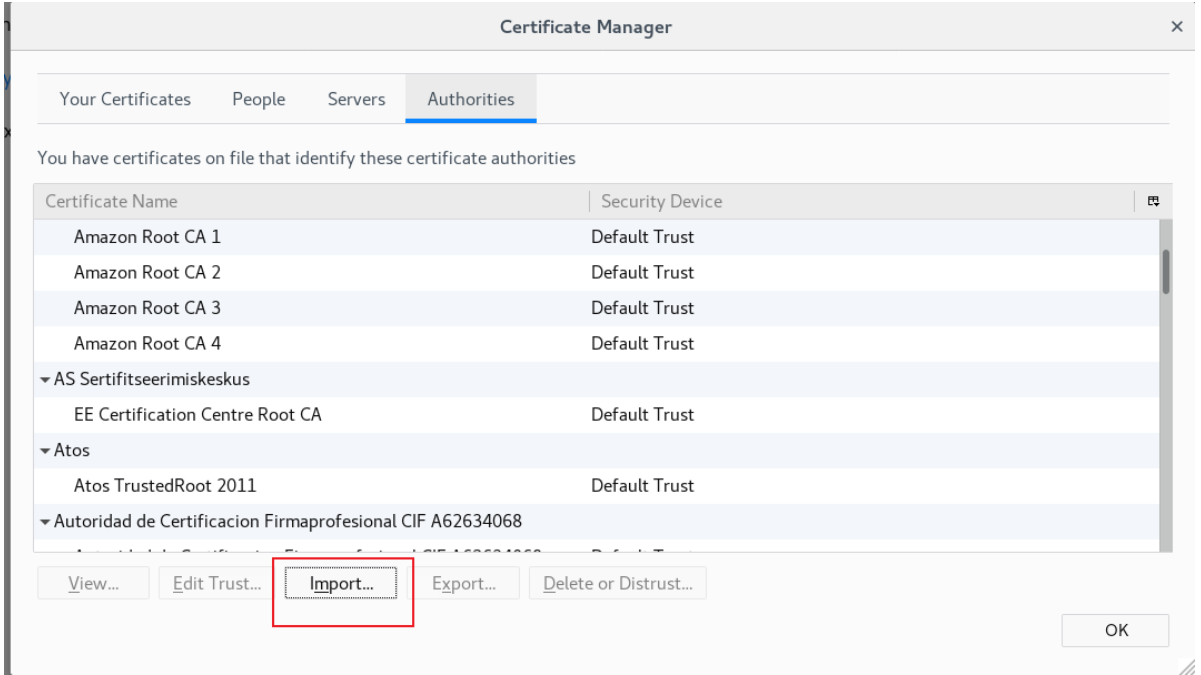
将根证书传递到客户端
[root@stw3 ~]# scp root@192.168.100.10:/etc/pki/CA/cacert.pem .
The authenticity of host '192.168.100.10 (192.168.100.10)' can't be established.
ECDSA key fingerprint is SHA256:R7/1dpul7cu8SnefsN2wQw5hKDL+xekk0ffasLS6OGI.
ECDSA key fingerprint is MD5:81:88:a1:16:52:83:c0:d5:59:ad:2b:3a:d5:52:02:bc.
Are you sure you want to continue connecting (yes/no)? yes
Warning: Permanently added '192.168.100.10' (ECDSA) to the list of known hosts.
root@192.168.100.10's password: cacert.pem                                    100% 1375   324.9KB/s   00:00
[root@stw3 ~]# ls
anaconda-ks.cfg  Desktop    Downloads             Music     Public     Videos
cacert.pem       Documents  initial-setup-ks.cfg  Pictures  Templates
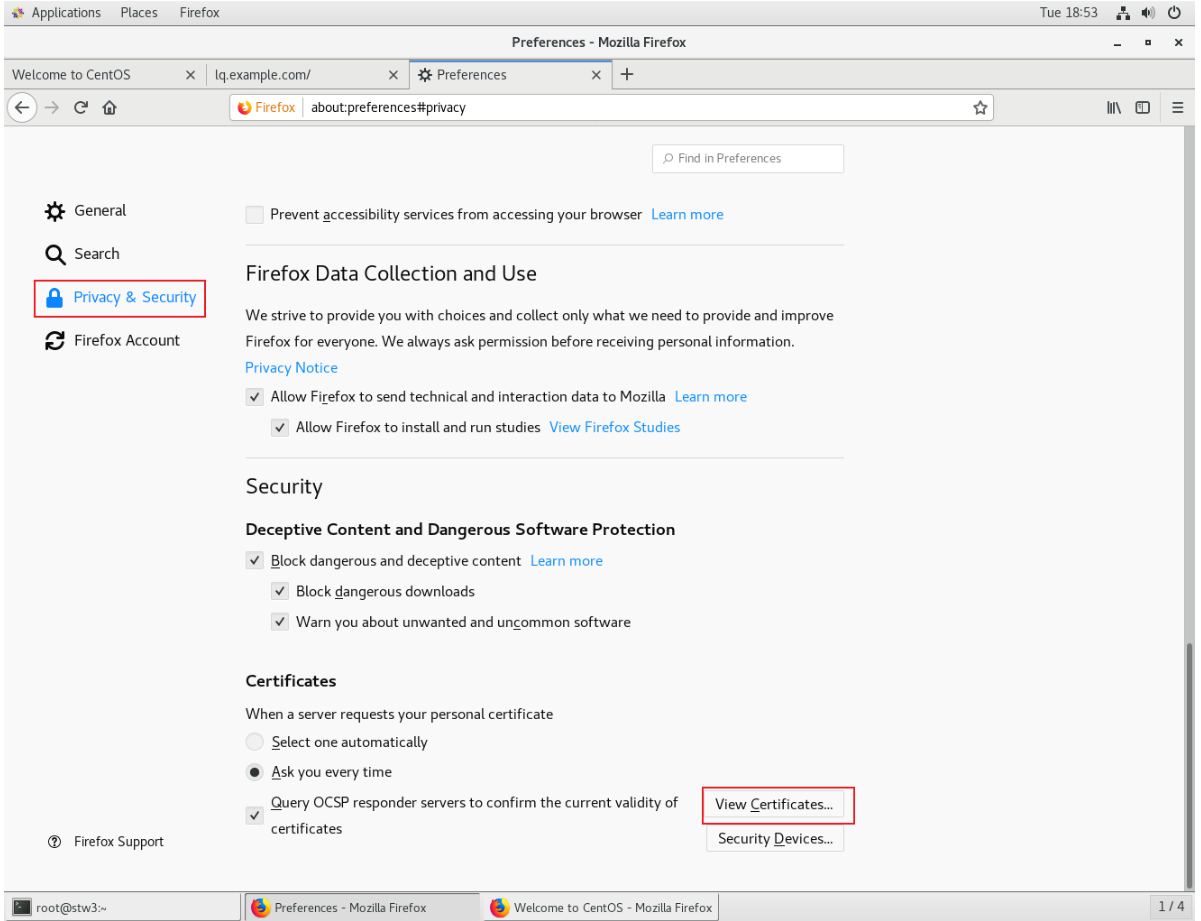
在浏览器中上传,让浏览器知道这个站点是安全的

Web服务器:
在刚刚设置的网页中写入内容
[root@stw2 ~]# cd /var/www
[root@stw2 www]# ls
cgi-bin  html  luoqi  yyqx
[root@stw2 www]# mkdir test
[root@stw2 www]# ls
cgi-bin  html  luoqi  test  yyqx
[root@stw2 www]# cd test
[root@stw2 test]# echo ssstttwww > index.html
客户端访问
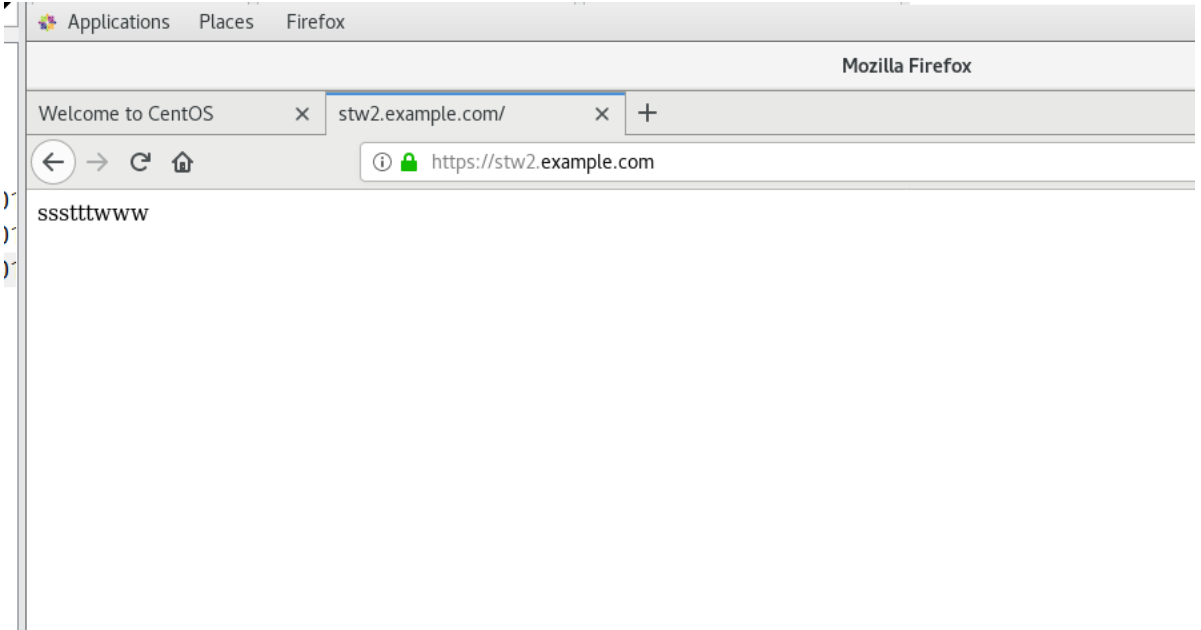
也可以命令访问
[root@stw3 ~]# curl -k https://192.168.100.20
ssstttwww
五、访问动态网页
Web服务器:
1、安装服务
[root@stw2 ~]# yum -y install mod_swgi
2、创建目录并且导入文件
[root@stw2 ~]# mkdir /var/www/wsgi
[root@stw2 ~]# cd /var/www/wsgi
[root@stw2 wsgi]# ls
cacert.pem  css  images  index.html  python.txt
DNS服务器:
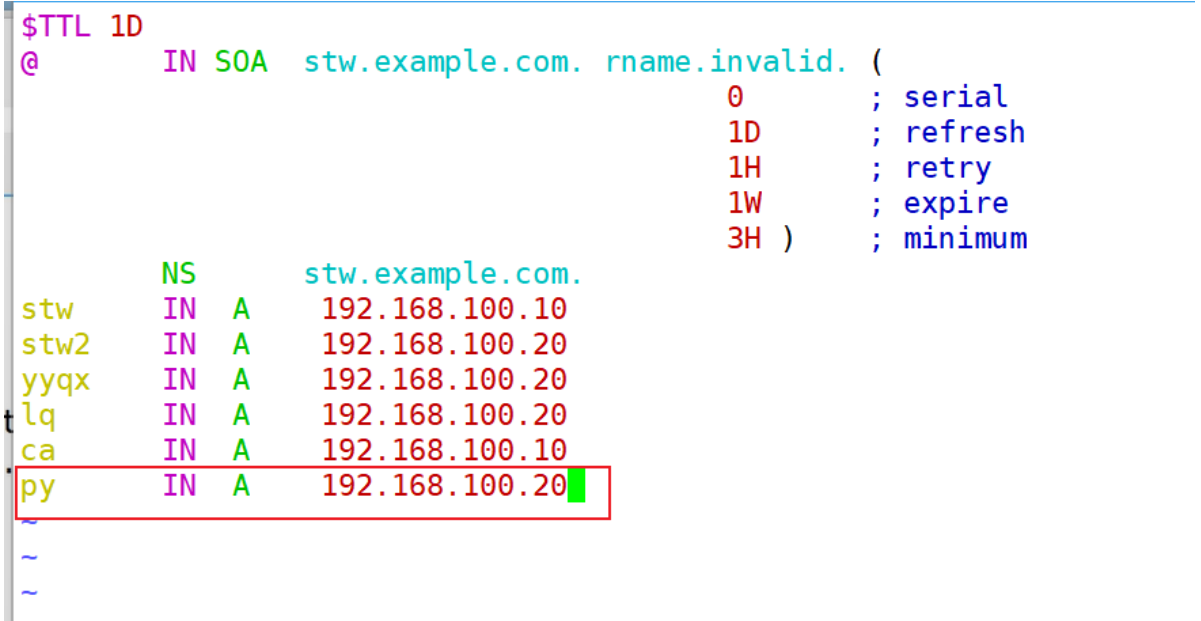
1、将Web服务器的条目添加到DNS
[root@stw ~]# vim /var/named/stw.com
[root@stw ~]# systemctl restart network
Web服务器:
1、将导入进来的脚本更改后缀名并加上执行权限
[root@stw2 wsgi]# ls
cacert.pem css images index.html python.txt
[root@stw2 wsgi]# cat python.txt
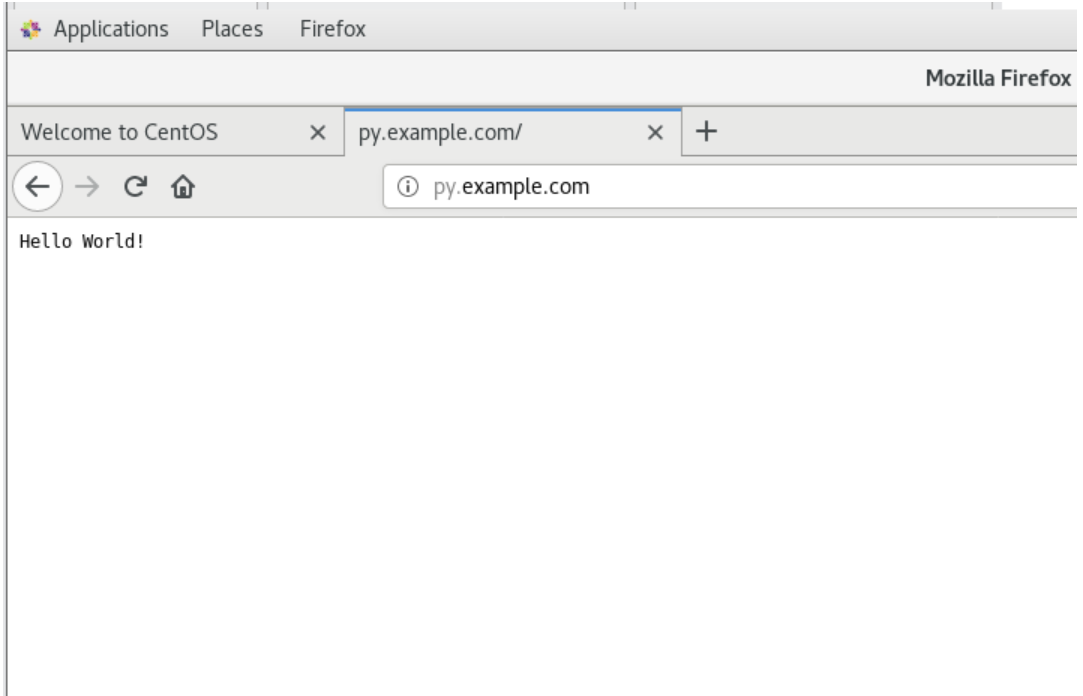
def application(environ, start_response):status = '200 OK'output = 'Hello World!'response_headers = [('Content-type', 'text/plain'),('Content-Length', str(len(output)))]start_response(status, response_headers)return [output]
[root@stw2 wsgi]# mv python.txt test.py
[root@stw2 wsgi]# ll
total 12
-rw-r--r--. 1 root root 1375 Aug 12 19:27 cacert.pem
drwxr-xr-x. 2 root root 23 Aug 12 19:27 css
drwxr-xr-x. 2 root root 68 Aug 12 19:27 images
-rw-r--r--. 1 root root 2251 Aug 12 19:27 index.html
-rw-r--r--. 1 root root 282 Aug 12 19:27 test.py
[root@stw2 wsgi]# chmod +x test.py
[root@stw2 wsgi]# ll
total 12
-rw-r--r--. 1 root root 1375 Aug 12 19:27 cacert.pem
drwxr-xr-x. 2 root root 23 Aug 12 19:27 css
drwxr-xr-x. 2 root root 68 Aug 12 19:27 images
-rw-r--r--. 1 root root 2251 Aug 12 19:27 index.html
-rwxr-xr-x. 1 root root 282 Aug 12 19:27 test.py
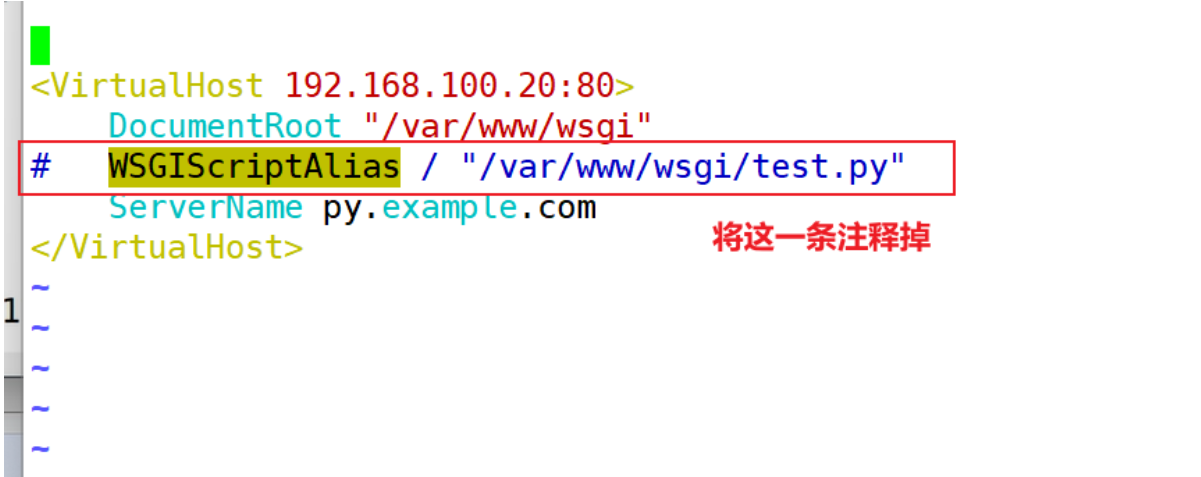
2、更改配置文件
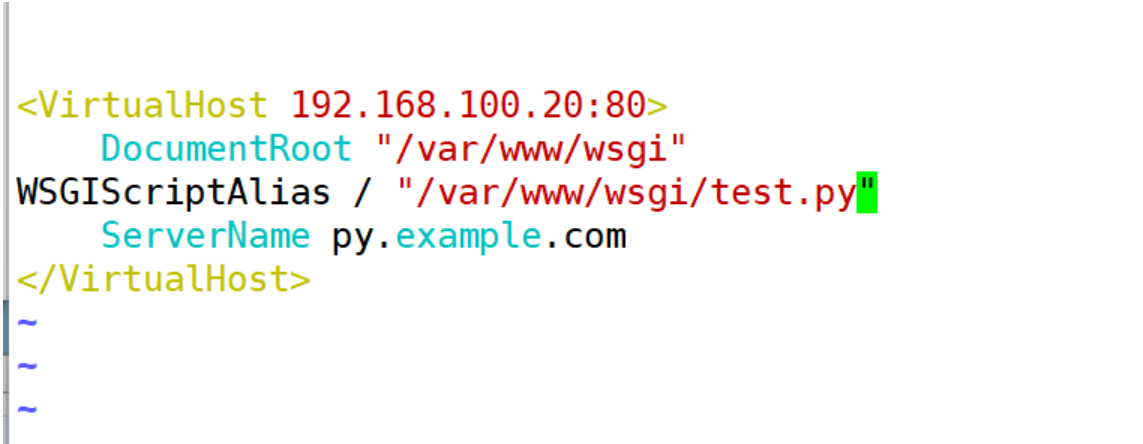
[root@stw2 wsgi]# vim /etc/httpd/conf.d/httpd-vhosts.conf
[root@stw2 wsgi]# systemctl restart httpd
客户端访问hello world
web服务器:
更改配置文件
[root@stw2 wsgi]# vim /etc/httpd/conf.d/httpd-vhosts.conf
[root@stw2 wsgi]# systemctl restart httpd
客户端测试
)


)


)


:动手实操,基于STC8编写单任务执行程序,感悟MCU指令的执行过程)


![面试经典150题[001]:合并两个有序数组(LeetCode 88)](http://pic.xiahunao.cn/面试经典150题[001]:合并两个有序数组(LeetCode 88))

