一、配置Jasypt
1.在pom.xml中导入依赖
<!-- Jasypt 加密工具 --><dependency><groupId>com.github.ulisesbocchio</groupId><artifactId>jasypt-spring-boot-starter</artifactId><version>3.0.5</version></dependency>注释:项目使用了@SpringBootApplication或@EnableAutoConfiguration注解,可以直接使用starter依赖,否则要用其他方法。其他方法见参考文章里。
2.配置Jasypt信息
2.1 使用@Configuration配置信息
package com.xj.util.jasypt;import org.jasypt.encryption.StringEncryptor;
import org.jasypt.encryption.pbe.PooledPBEStringEncryptor;
import org.jasypt.encryption.pbe.config.SimpleStringPBEConfig;
import org.springframework.beans.factory.annotation.Value;
import org.springframework.context.annotation.Bean;
import org.springframework.context.annotation.Configuration;
/*** @Author: xjfu* @Create: 2025/07/16 15:13* @Description: Jastpt配置信息*/@Configuration
public class JasyptConfig {@Value("${jasypt.encryptor.password:default-secret-key}")private String password;/*** 配置Jasypt加密器** @return StringEncryptor加密器实例*/@Bean("jasyptStringEncryptor")public StringEncryptor stringEncryptor() {PooledPBEStringEncryptor encryptor = new PooledPBEStringEncryptor();SimpleStringPBEConfig config = new SimpleStringPBEConfig();// 设置加密密钥 通过配置阐述,安全config.setPassword(password);//设置加密秘钥 直接写死,但是不安全//config.setPassword("xj20250716");// 设置加密算法// 注意:Jasypt 3.0.0之后默认算法为PBEWITHHMACSHA512ANDAES_256// 需要JDK 9+或添加JCE支持,否则可能报错// 如果使用较低版本的JDK,可以选择兼容的算法如PBEWithMD5AndDESconfig.setAlgorithm("PBEWithMD5AndDES");// 设置密钥获取迭代次数config.setKeyObtentionIterations("1000");// 设置加密器的池大小config.setPoolSize("1");// 设置随机盐生成器config.setIvGeneratorClassName("org.jasypt.iv.RandomIvGenerator");// 设置字符串输出格式config.setStringOutputType("base64");encryptor.setConfig(config);return encryptor;}
}
2.2 使用配置文件方式
# Jasypt配置(必须放在最前面)
jasypt:encryptor:bean: jasyptStringEncryptor# 可以使用环境变量或命令行参数传入密钥password: ${JASYPT_ENCRYPTOR_PASSWORD:default-secret-key}algorithm: PBEWithMD5AndDESiv-generator-classname: org.jasypt.iv.RandomIvGenerator
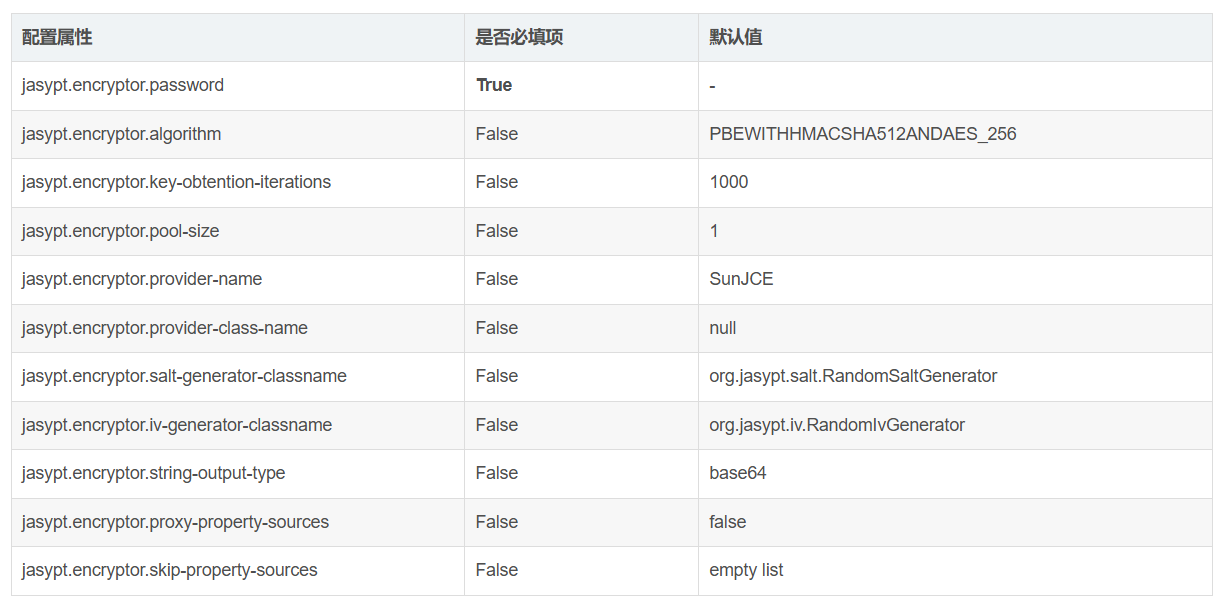
2.3 配置文件详解
3.Jasypt工具类
package com.xj.util.jasypt;import org.jasypt.encryption.StringEncryptor;
import org.springframework.beans.factory.annotation.Autowired;
import org.springframework.beans.factory.annotation.Qualifier;
import org.springframework.stereotype.Component;
/*** @Author: xjfu* @Create: 2025/07/16 15:15* @Description: Jasypt工具类*/
@Component
public class JasyptUtil {private final StringEncryptor encryptor;@Autowiredpublic JasyptUtil(@Qualifier("jasyptStringEncryptor") StringEncryptor encryptor) {this.encryptor = encryptor;}/*** 加密方法** @param value 待加密的字符串* @return 加密后的字符串*/public String encrypt(String value) {return encryptor.encrypt(value);}/*** 解密方法** @param value 待解密的字符串* @return 解密后的字符串*/public String decrypt(String value) {return encryptor.decrypt(value);}
}
4.配置Jasypt的秘钥
4.1 IDEA中配置
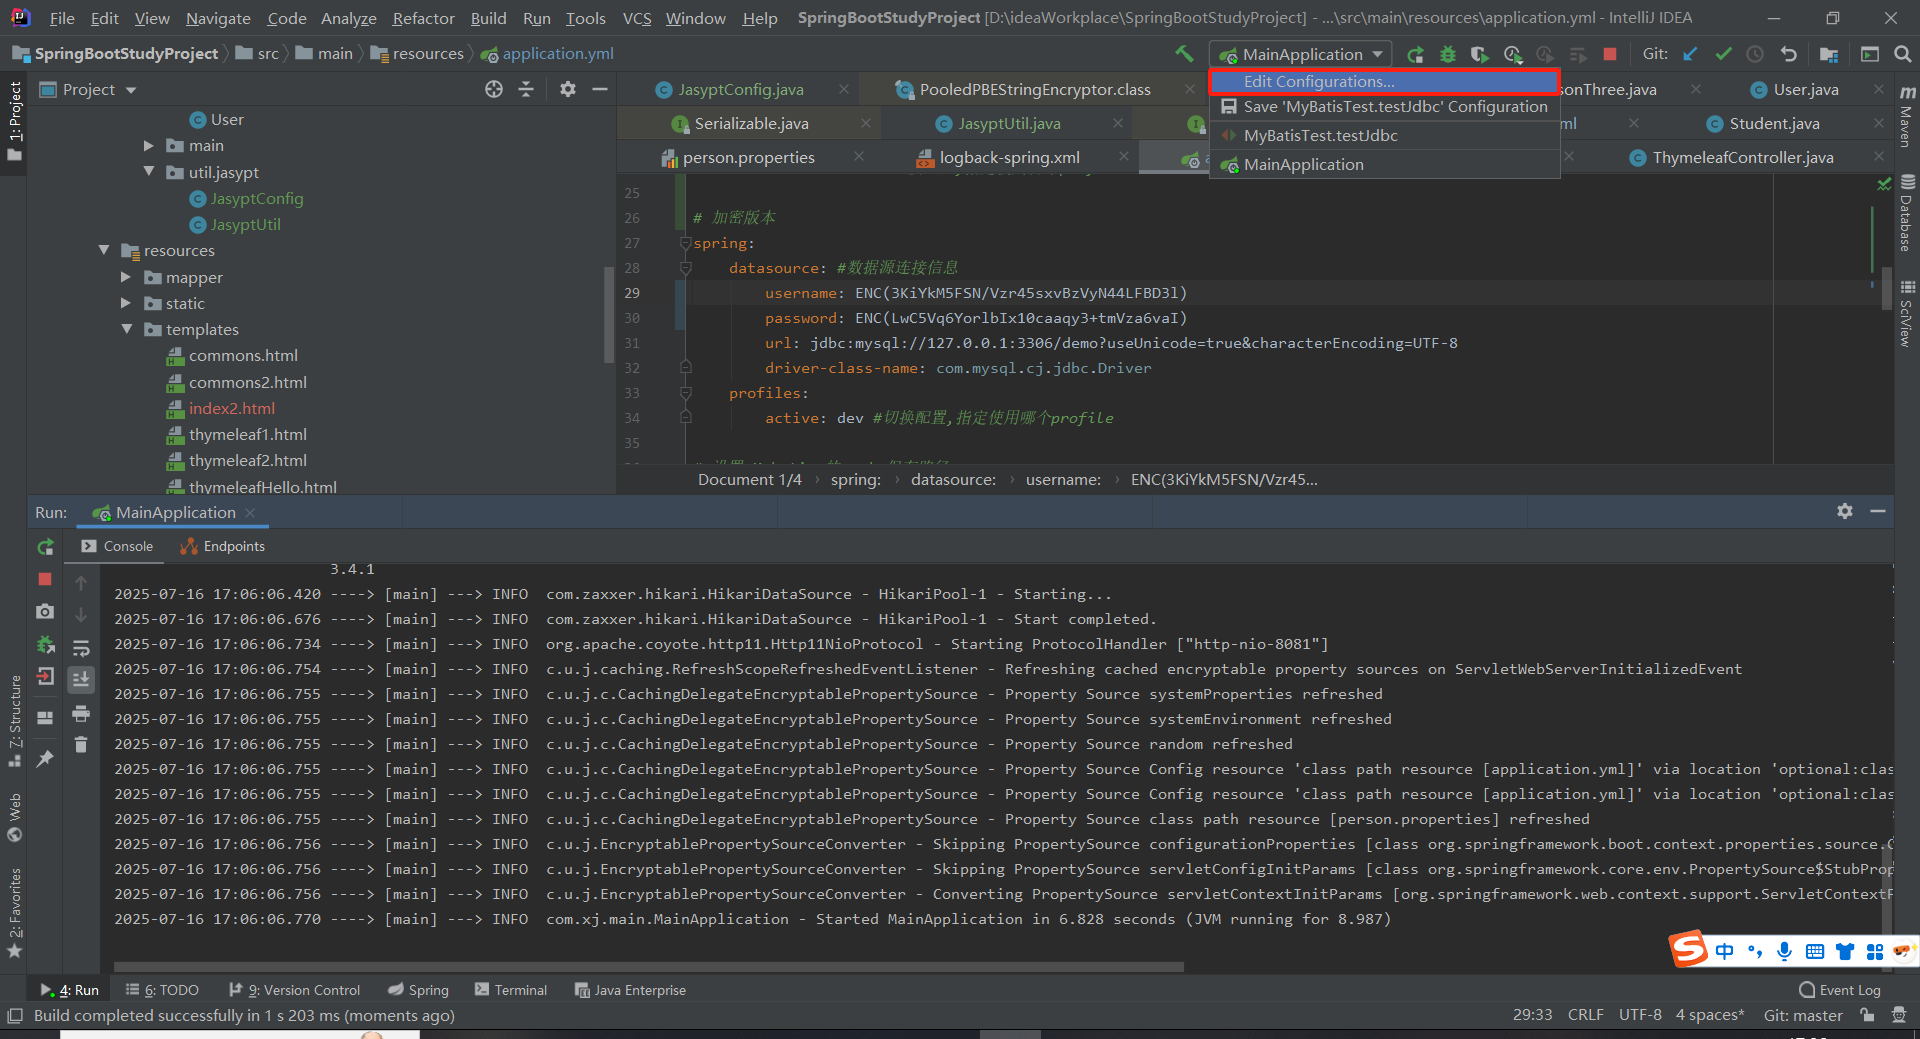
4.1.1 配置方法一
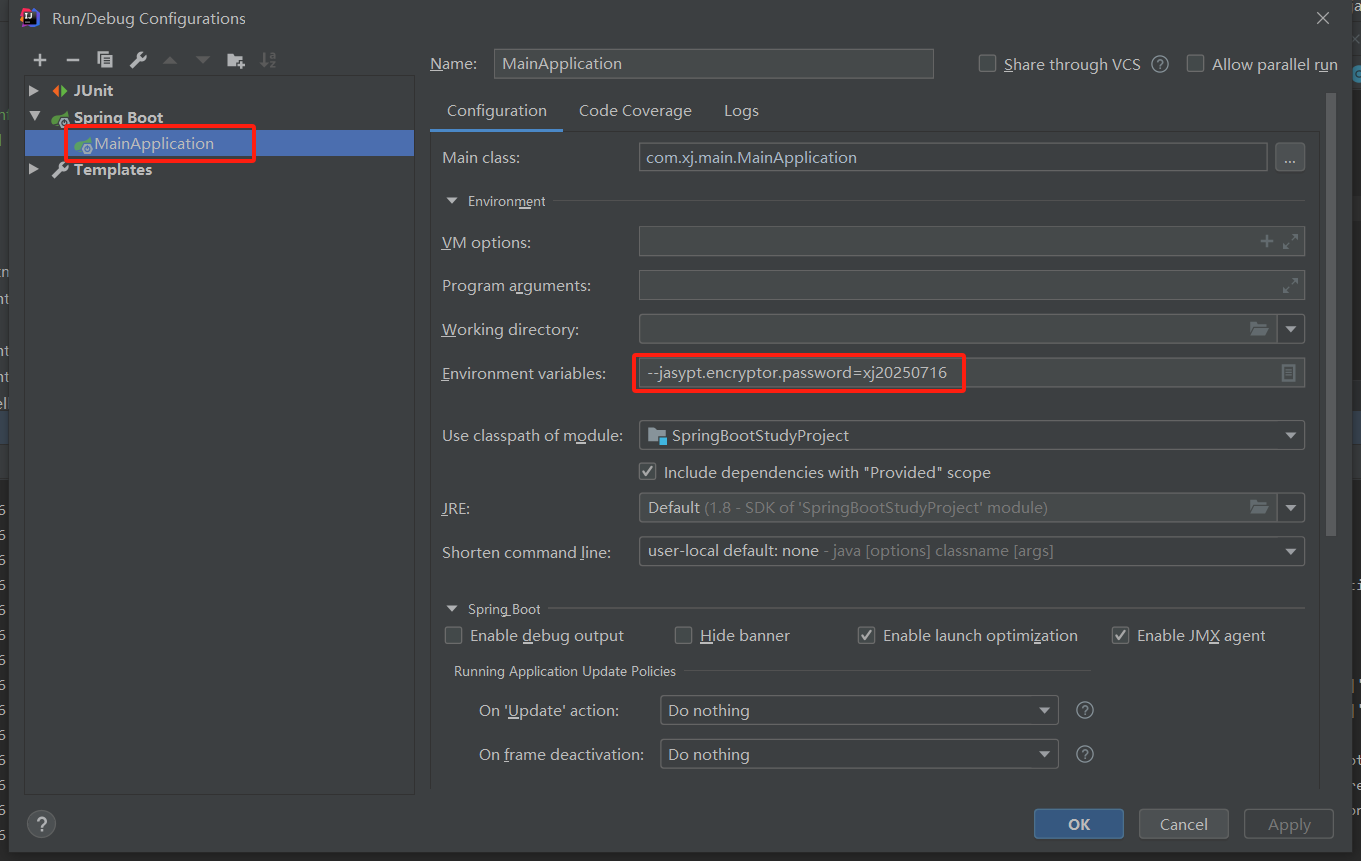
--jasypt.encryptor.password=xj20250716
4.1.2 配置方法二
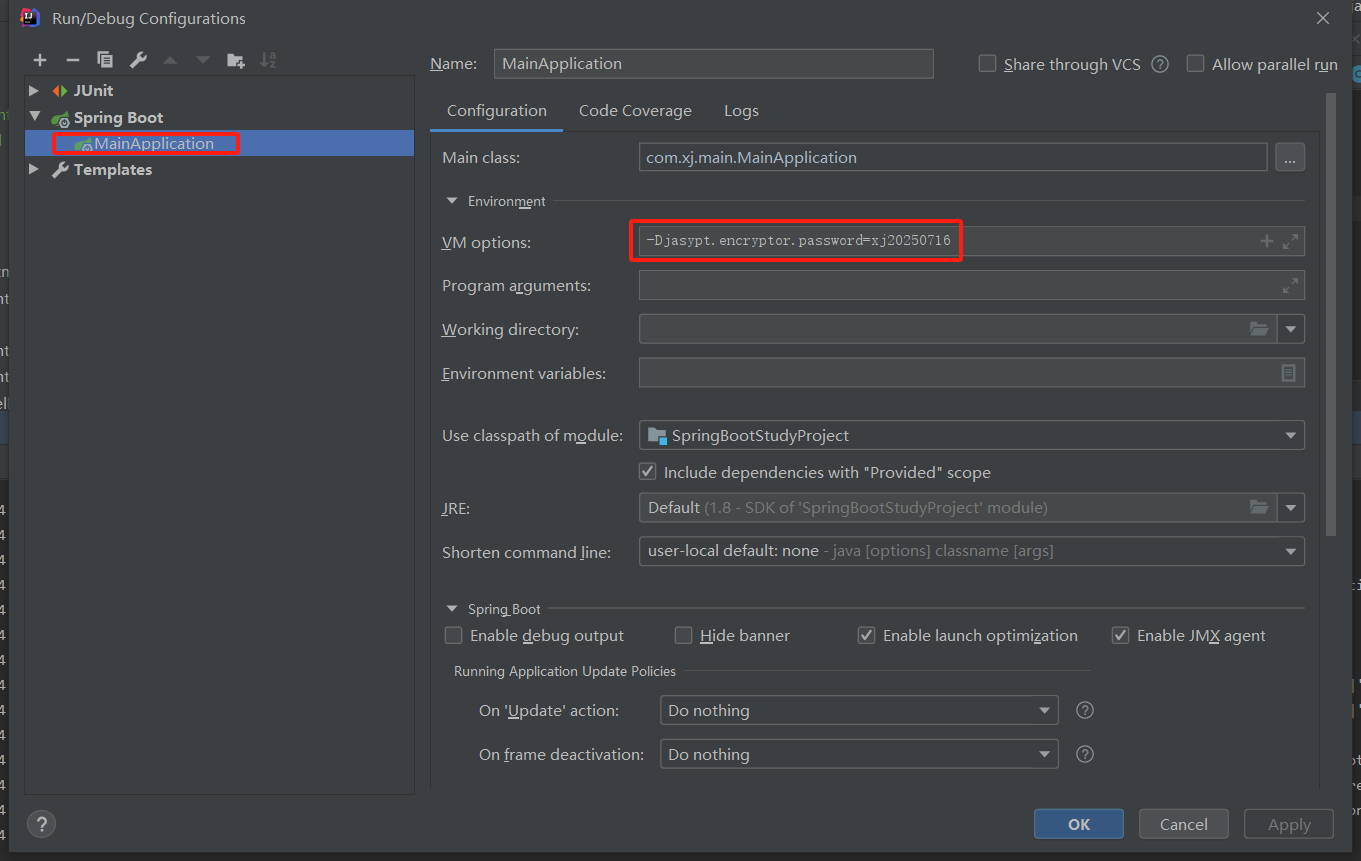
-Djasypt.encryptor.password=xj20250716
4.2 程序启动时命令行中带入
方式一:作为程序启动时的命令行参数来带入
java -jar app.jar --jasypt.encryptor.password=xxxxxx
方式二:作为程序启动时的应用环境变量来带入
java -Djasypt.encryptor.password=xxxxxx -jar app.jar
5.使用ENC()包裹加密密文
Jasypt使用特定格式来标识加密的属性值。在配置文件中,加密的值需要使用ENC(加密后的值)格式。
二、项目举例
1.项目架构
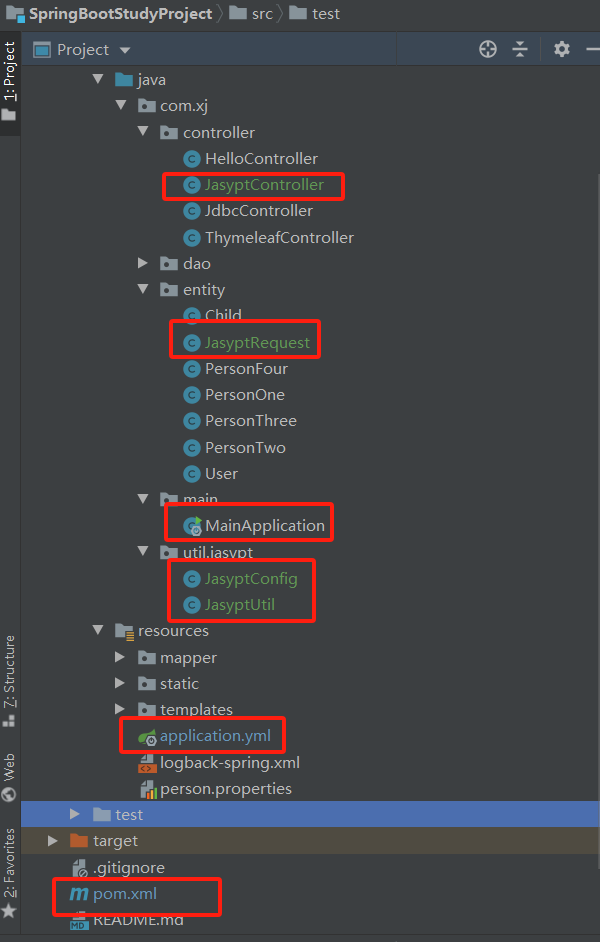
2.代码实现
MainApplication.java:
package com.xj.main;import org.mybatis.spring.annotation.MapperScan;
import org.springframework.boot.SpringApplication;
import org.springframework.boot.autoconfigure.SpringBootApplication;
import org.springframework.context.annotation.ComponentScan;/*** @Author : xjfu* @Date : 2022/6/8 8:38* @Description :Spring Boot 启动类*/
@ComponentScan("com.xj")
@SpringBootApplication
@MapperScan("com.xj.dao.mapper")
public class MainApplication {public static void main(String[] args) {try{SpringApplication.run(MainApplication.class, args);}catch (Exception e){e.printStackTrace();}}
}
JasyptConfig.java:
package com.xj.util.jasypt;import org.jasypt.encryption.StringEncryptor;
import org.jasypt.encryption.pbe.PooledPBEStringEncryptor;
import org.jasypt.encryption.pbe.config.SimpleStringPBEConfig;
import org.springframework.beans.factory.annotation.Value;
import org.springframework.context.annotation.Bean;
import org.springframework.context.annotation.Configuration;
/*** @Author: xjfu* @Create: 2025/07/16 15:13* @Description: Jastpt配置信息*/@Configuration
public class JasyptConfig {@Value("${jasypt.encryptor.password:default-secret-key}")private String password;/*** 配置Jasypt加密器** @return StringEncryptor加密器实例*/@Bean("jasyptStringEncryptor")public StringEncryptor stringEncryptor() {PooledPBEStringEncryptor encryptor = new PooledPBEStringEncryptor();SimpleStringPBEConfig config = new SimpleStringPBEConfig();// 设置加密密钥 通过配置阐述,安全config.setPassword(password);//设置加密秘钥 直接写死,但是不安全//config.setPassword("xj20250716");// 设置加密算法// 注意:Jasypt 3.0.0之后默认算法为PBEWITHHMACSHA512ANDAES_256// 需要JDK 9+或添加JCE支持,否则可能报错// 如果使用较低版本的JDK,可以选择兼容的算法如PBEWithMD5AndDESconfig.setAlgorithm("PBEWithMD5AndDES");// 设置密钥获取迭代次数config.setKeyObtentionIterations("1000");// 设置加密器的池大小config.setPoolSize("1");// 设置随机盐生成器config.setIvGeneratorClassName("org.jasypt.iv.RandomIvGenerator");// 设置字符串输出格式config.setStringOutputType("base64");encryptor.setConfig(config);return encryptor;}
}
JasyptUtil.java:
package com.xj.util.jasypt;import org.jasypt.encryption.StringEncryptor;
import org.springframework.beans.factory.annotation.Autowired;
import org.springframework.beans.factory.annotation.Qualifier;
import org.springframework.stereotype.Component;
/*** @Author: xjfu* @Create: 2025/07/16 15:15* @Description: Jasypt工具类*/
@Component
public class JasyptUtil {private final StringEncryptor encryptor;@Autowiredpublic JasyptUtil(@Qualifier("jasyptStringEncryptor") StringEncryptor encryptor) {this.encryptor = encryptor;}/*** 加密方法** @param value 待加密的字符串* @return 加密后的字符串*/public String encrypt(String value) {return encryptor.encrypt(value);}/*** 解密方法** @param value 待解密的字符串* @return 解密后的字符串*/public String decrypt(String value) {return encryptor.decrypt(value);}
}
JasyptController.java:
package com.xj.controller;import com.xj.entity.JasyptRequest;
import com.xj.util.jasypt.JasyptUtil;
import org.springframework.beans.factory.annotation.Autowired;
import org.springframework.beans.factory.annotation.Value;
import org.springframework.web.bind.annotation.*;/*** @Author: xjfu* @Create: 2025/07/16 15:18* @Description: Jasypt控制类,用于对铭文进行加密或者解密以及验证数据库密码*/
@RequestMapping(value = "/jasypt",method = RequestMethod.POST)
@RestController
public class JasyptController {@Autowiredprivate JasyptUtil jasyptUtil;@Value("${spring.datasource.password}")private String databasePassword;/*** 加密接口*/@RequestMapping(value = "/encrypt", method = RequestMethod.GET)public String encrypt(@RequestParam String encryptStr) {return jasyptUtil.encrypt(encryptStr);}/*** 解密接口*/@RequestMapping(value = "/decrypt", method = RequestMethod.POST)public String decrypt(@RequestBody JasyptRequest jasyptRequest) {return jasyptUtil.decrypt(jasyptRequest.getDecryptStr());}/*** 测试配置文件中的加密属性是否正确解密*/@GetMapping("/test")public String test() {return "Database password: " + databasePassword;}
}
JasyptRequest.java:
package com.xj.entity;import com.fasterxml.jackson.annotation.JsonProperty;
import lombok.Data;import java.io.Serializable;/*** @Author: xjfu* @Create: 2025/07/16 15:25* @Description: Jasypt解密请求体*/
@Data
public class JasyptRequest implements Serializable {private static final long serialVersionUID = -256451235446545L;/***  待解密字符串*/@JsonProperty(value = "decryptStr")private String decryptStr;public String getDecryptStr() {return decryptStr;}public void setDecryptStr(String decryptStr) {this.decryptStr = decryptStr;}
}
application.yml
#默认配置
server:port: 8080# Jasypt配置(必须放在最前面)
#jasypt:
# encryptor:
# bean: jasyptStringEncryptor
# # 可以使用环境变量或命令行参数传入密钥
# password: ${JASYPT_ENCRYPTOR_PASSWORD:default-secret-key}
# algorithm: PBEWithMD5AndDES
# iv-generator-classname: org.jasypt.iv.RandomIvGenerator# 未加密版本
#spring:
# datasource: #数据源连接信息
# username: root
# password: 12345
# url: jdbc:mysql://127.0.0.1:3306/demo?useUnicode=true&characterEncoding=UTF-8
# driver-class-name: com.mysql.cj.jdbc.Driver
# profiles:
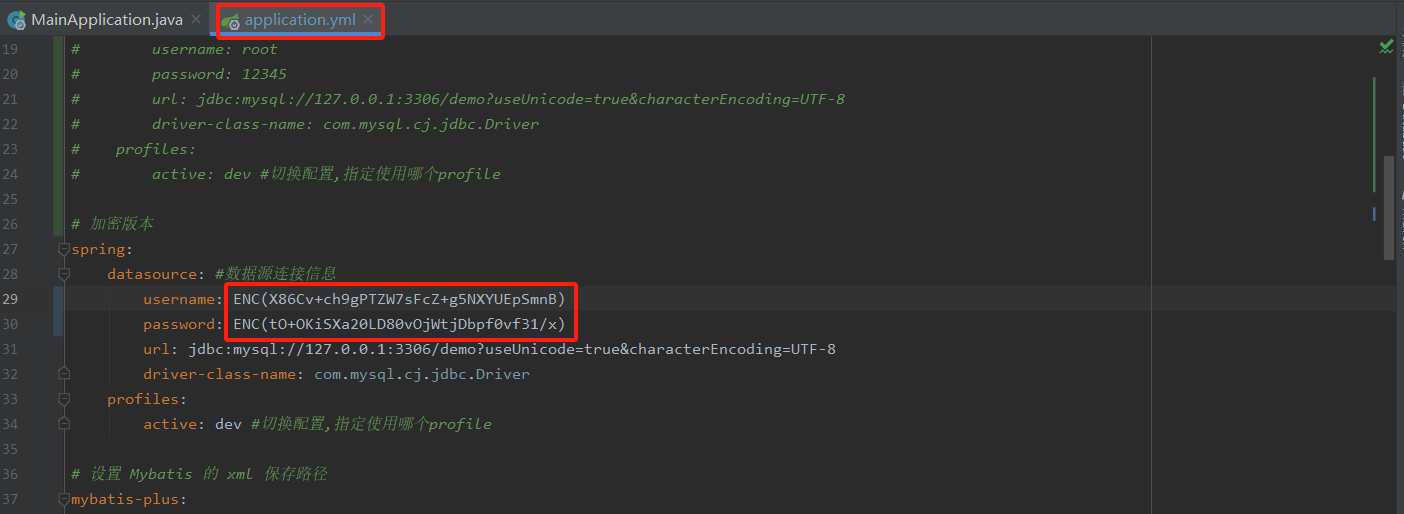
# active: dev #切换配置,指定使用哪个profile# 加密版本
spring:datasource: #数据源连接信息username: ENC(X86Cv+ch9gPTZW7sFcZ+g5NXYUEpSmnB)password: ENC(tO+OKiSXa20LD80vOjWtjDbpf0vf31/x)url: jdbc:mysql://127.0.0.1:3306/demo?useUnicode=true&characterEncoding=UTF-8driver-class-name: com.mysql.cj.jdbc.Driverprofiles:active: dev #切换配置,指定使用哪个profile# 设置 Mybatis 的 xml 保存路径
mybatis-plus:mapper-locations: classpath:mapper/*Mapper.xmltype-aliases-package: com.xj.dao.modelconfiguration: # 配置打印 MyBatis 执行的 SQLlog-impl: org.apache.ibatis.logging.stdout.StdOutImpl #需要lombok框架支持,可以添加# 配置打印 MyBatis 执行的 SQL
logging:level:com:example:demo: debug---
#开发环境
server:port: 8081spring:config:activate:on-profile: dev
---
#测试环境
server:port: 8082spring:config:activate:on-profile: test
---
#生产环境
server:port: 8083spring:config:activate:on-profile: prodlogging:config: classpath:logback-spring.xml #指定使用哪个日志配置文件pom.xml
<?xml version="1.0" encoding="UTF-8"?><project xmlns="http://maven.apache.org/POM/4.0.0" xmlns:xsi="http://www.w3.org/2001/XMLSchema-instance"xsi:schemaLocation="http://maven.apache.org/POM/4.0.0 http://maven.apache.org/xsd/maven-4.0.0.xsd"><modelVersion>4.0.0</modelVersion><groupId>com.xj</groupId><artifactId>SpringBootStudyProject</artifactId><version>1.0-SNAPSHOT</version><parent><groupId>org.springframework.boot</groupId><artifactId>spring-boot-starter-parent</artifactId><version>2.4.5</version><relativePath/></parent><dependencies><dependency><groupId>org.springframework.boot</groupId><artifactId>spring-boot-starter-web</artifactId></dependency><dependency><groupId>org.springframework.boot</groupId><artifactId>spring-boot-starter-test</artifactId><scope>test</scope></dependency><!--导入JDBC的场景启动器--><dependency><groupId>org.springframework.boot</groupId><artifactId>spring-boot-starter-data-jdbc</artifactId></dependency><dependency><groupId>org.springframework.boot</groupId><artifactId>spring-boot-configuration-processor</artifactId><optional>true</optional></dependency><!--jquery引入--><dependency><groupId>org.webjars</groupId><artifactId>jquery</artifactId><version>3.6.0</version></dependency><!--Thymeleaf 启动器--><dependency><groupId>org.springframework.boot</groupId><artifactId>spring-boot-starter-thymeleaf</artifactId></dependency><!--导入数据库驱动--><dependency><groupId>mysql</groupId><artifactId>mysql-connector-java</artifactId><scope>runtime</scope></dependency><!-- MyBatis Plus--><dependency><groupId>com.baomidou</groupId><artifactId>mybatis-plus-boot-starter</artifactId><version>3.4.1</version></dependency><!-- junit测试依赖 --><dependency><groupId>junit</groupId><artifactId>junit</artifactId><scope>test</scope></dependency><!-- lombok依赖 为了简化实体类的编写代码量 --><dependency><groupId>org.projectlombok</groupId><artifactId>lombok</artifactId></dependency><!-- Jasypt 加密工具 --><dependency><groupId>com.github.ulisesbocchio</groupId><artifactId>jasypt-spring-boot-starter</artifactId><version>3.0.5</version></dependency></dependencies><!--build标签描述了如何来编译及打包项目,而具体的编译和打包工作是通过build中配置的 plugin 来完成--><build><plugins><!--使用SpringBoot的打包插件--><plugin><groupId>org.springframework.boot</groupId><artifactId>spring-boot-maven-plugin</artifactId><executions><execution><goals><goal>repackage</goal></goals></execution></executions></plugin></plugins></build>
</project>
3.运行结果
3.1 先将数据库按明文启动,然后获取对应的加密密文
3.1.1 加密
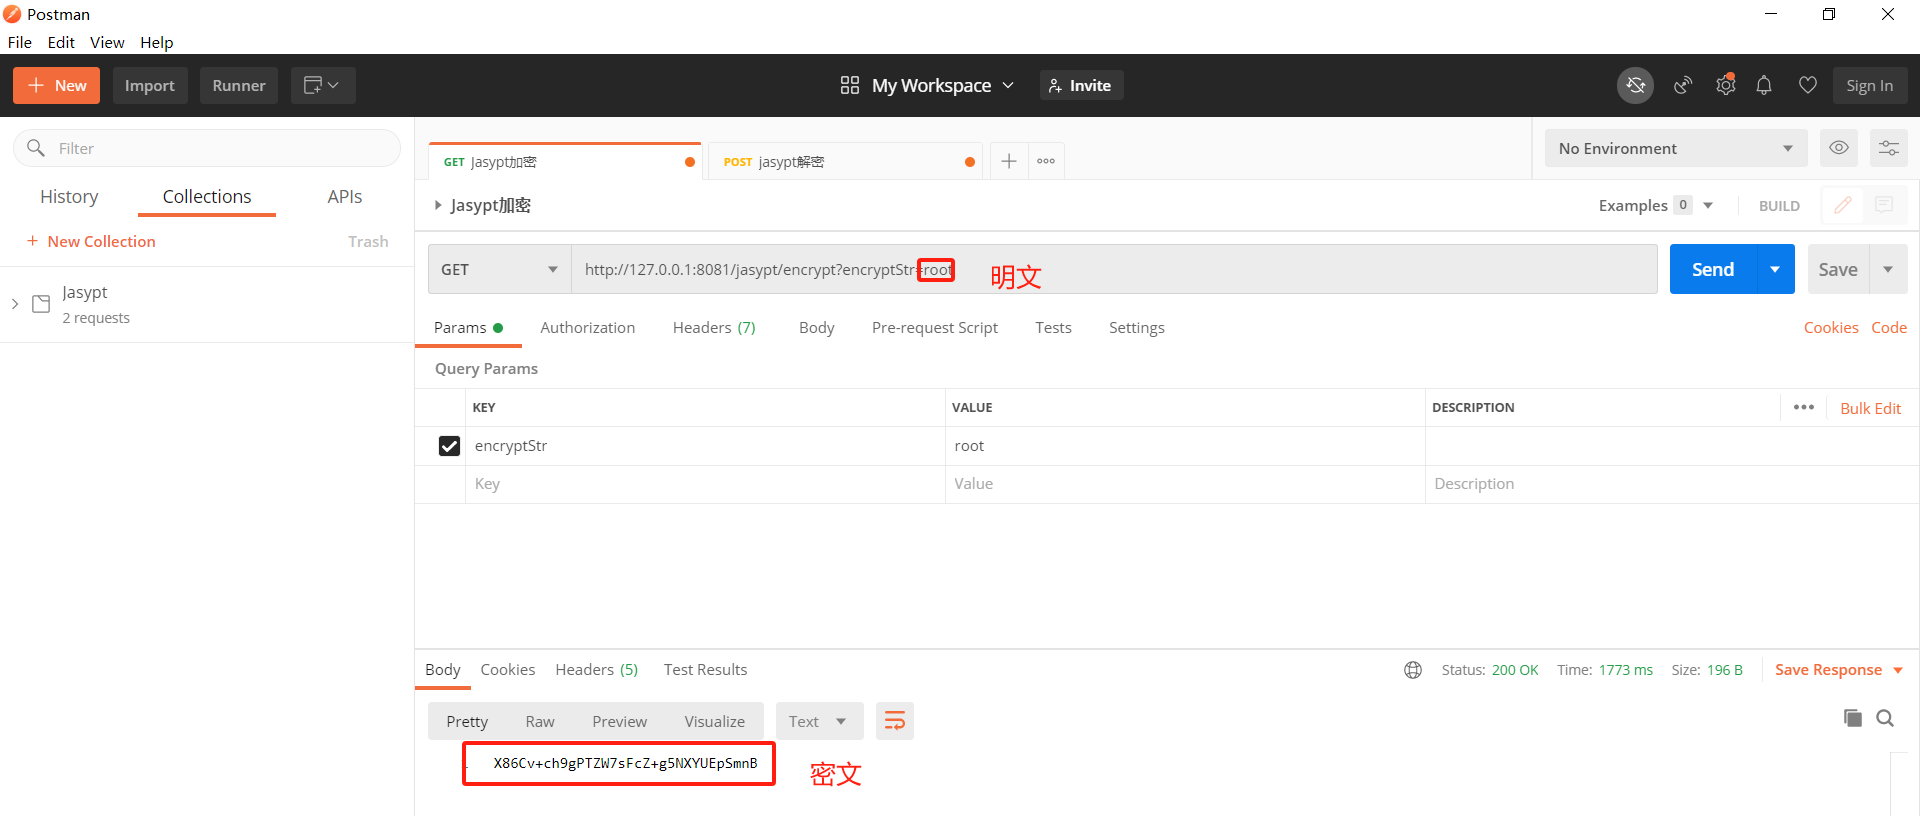
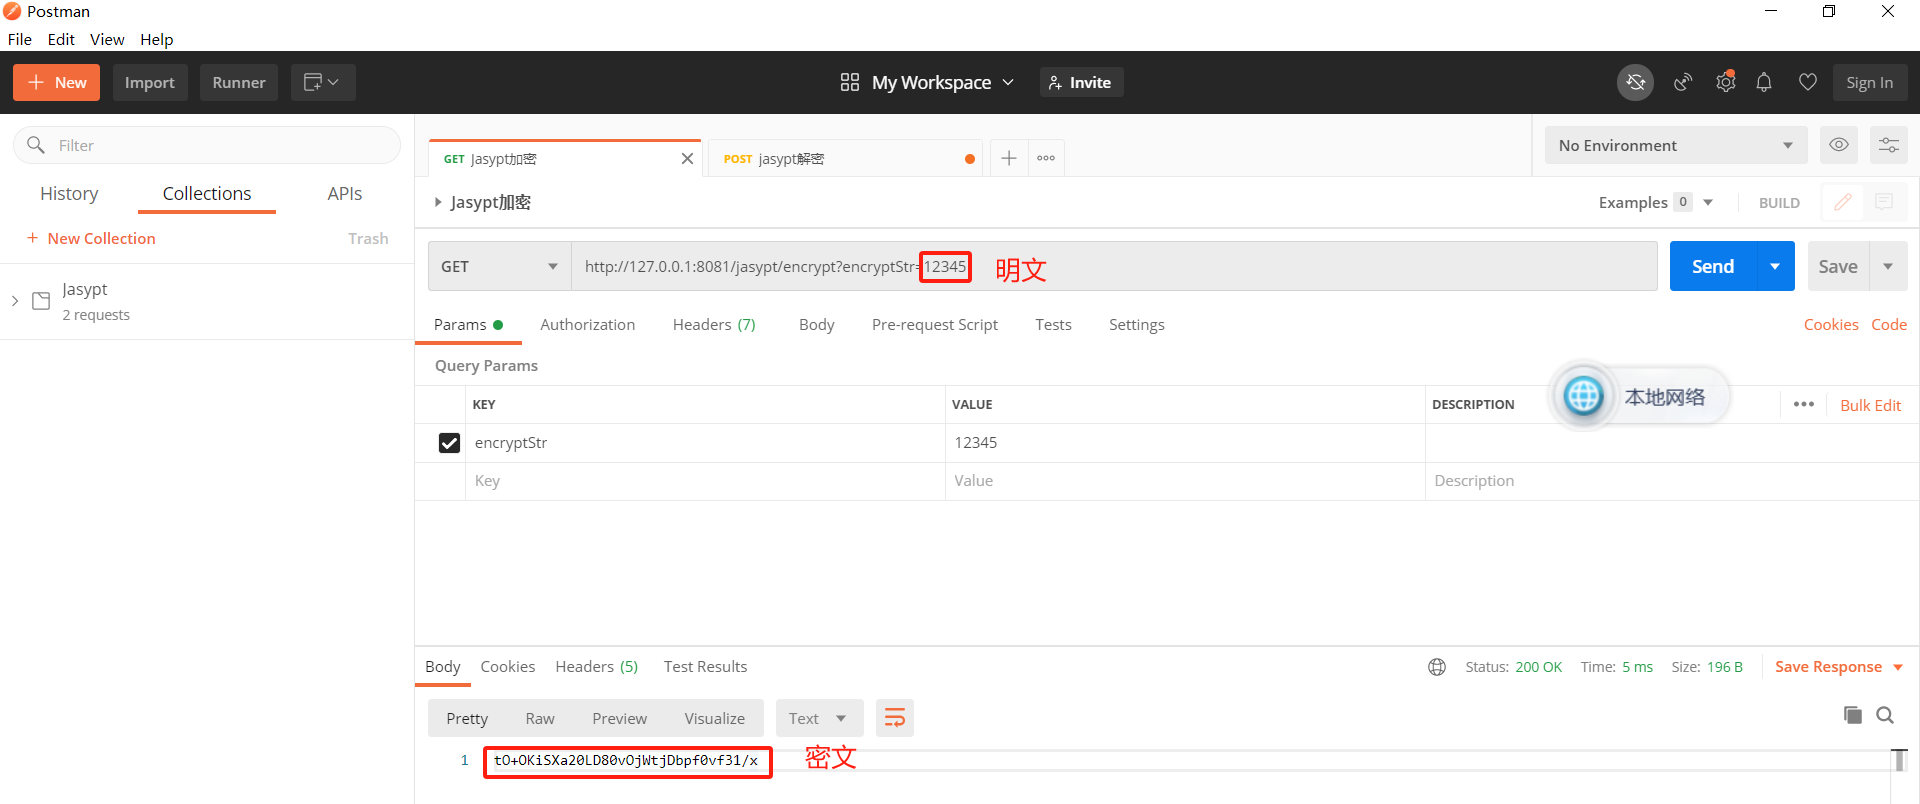
加密URL:
http://127.0.0.1:8081/jasypt/encrypt?encryptStr=root
3.1.2 解密验证
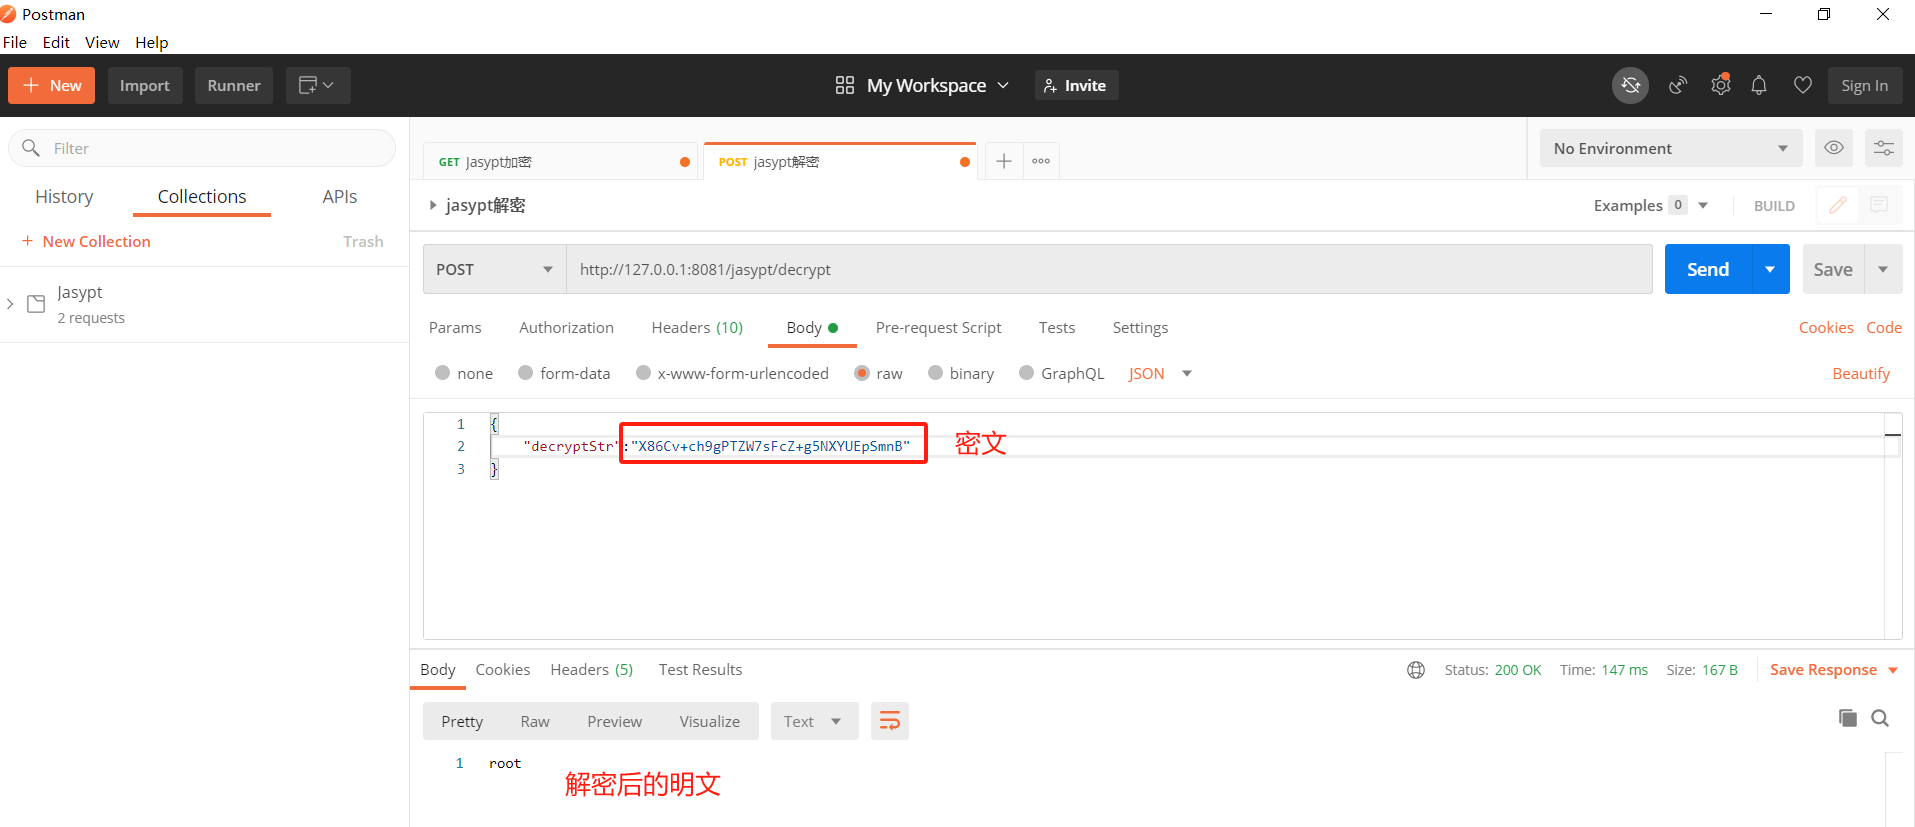
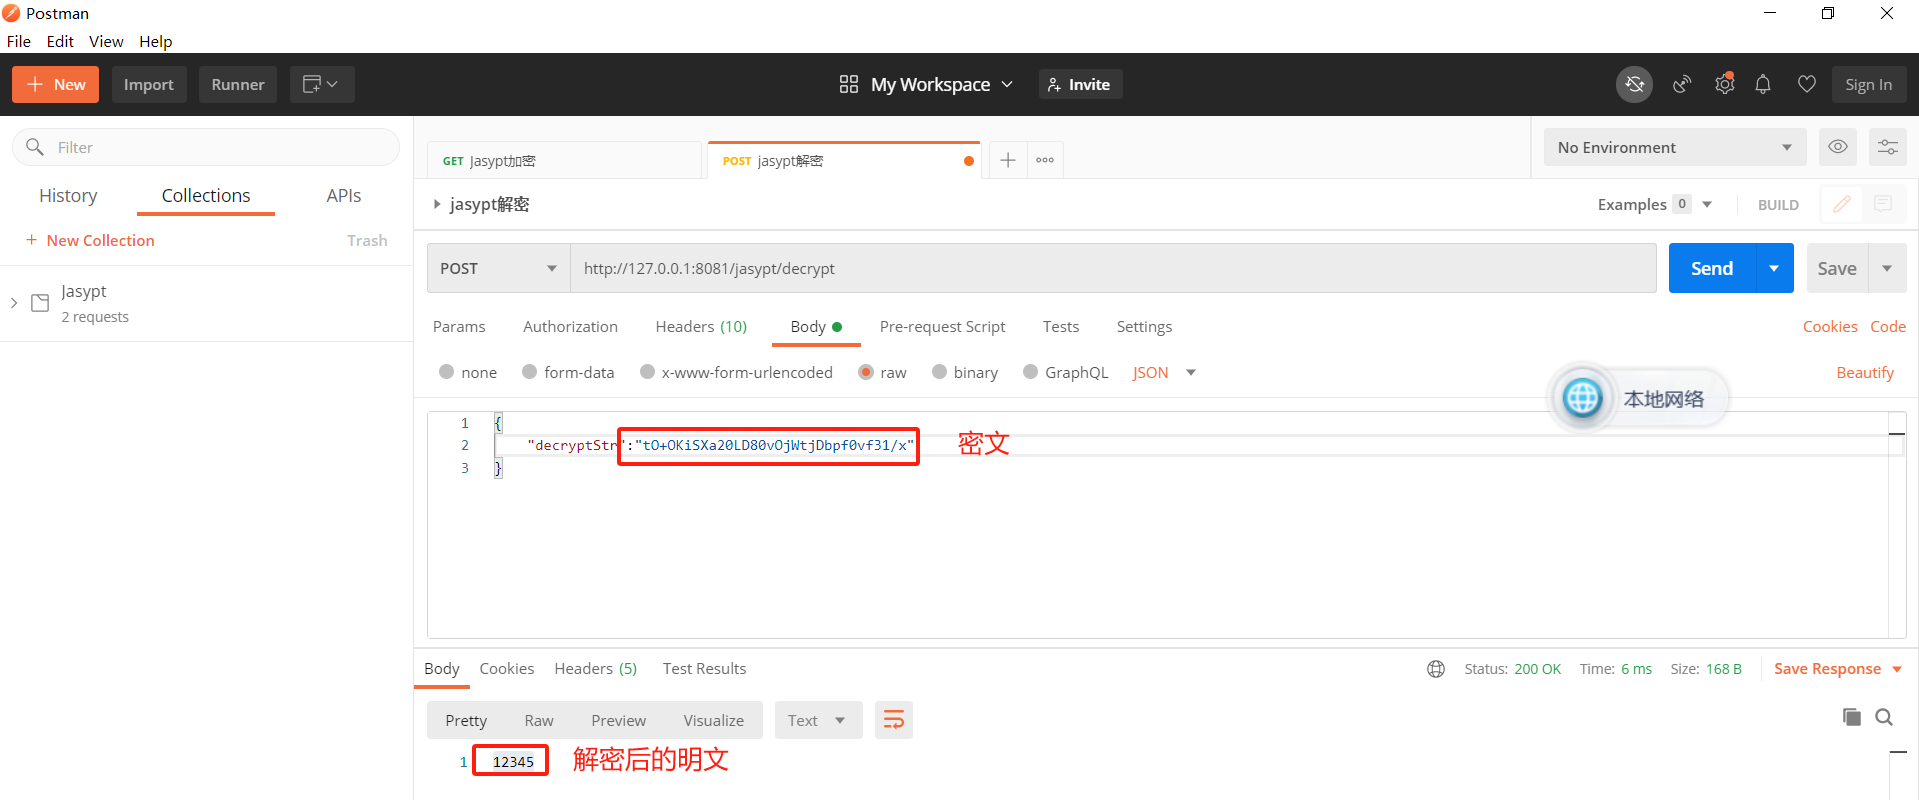
解密URL:
http://127.0.0.1:8081/jasypt/decrypt
报文:
{
"decryptStr":"X86Cv+ch9gPTZW7sFcZ+g5NXYUEpSmnB"
}
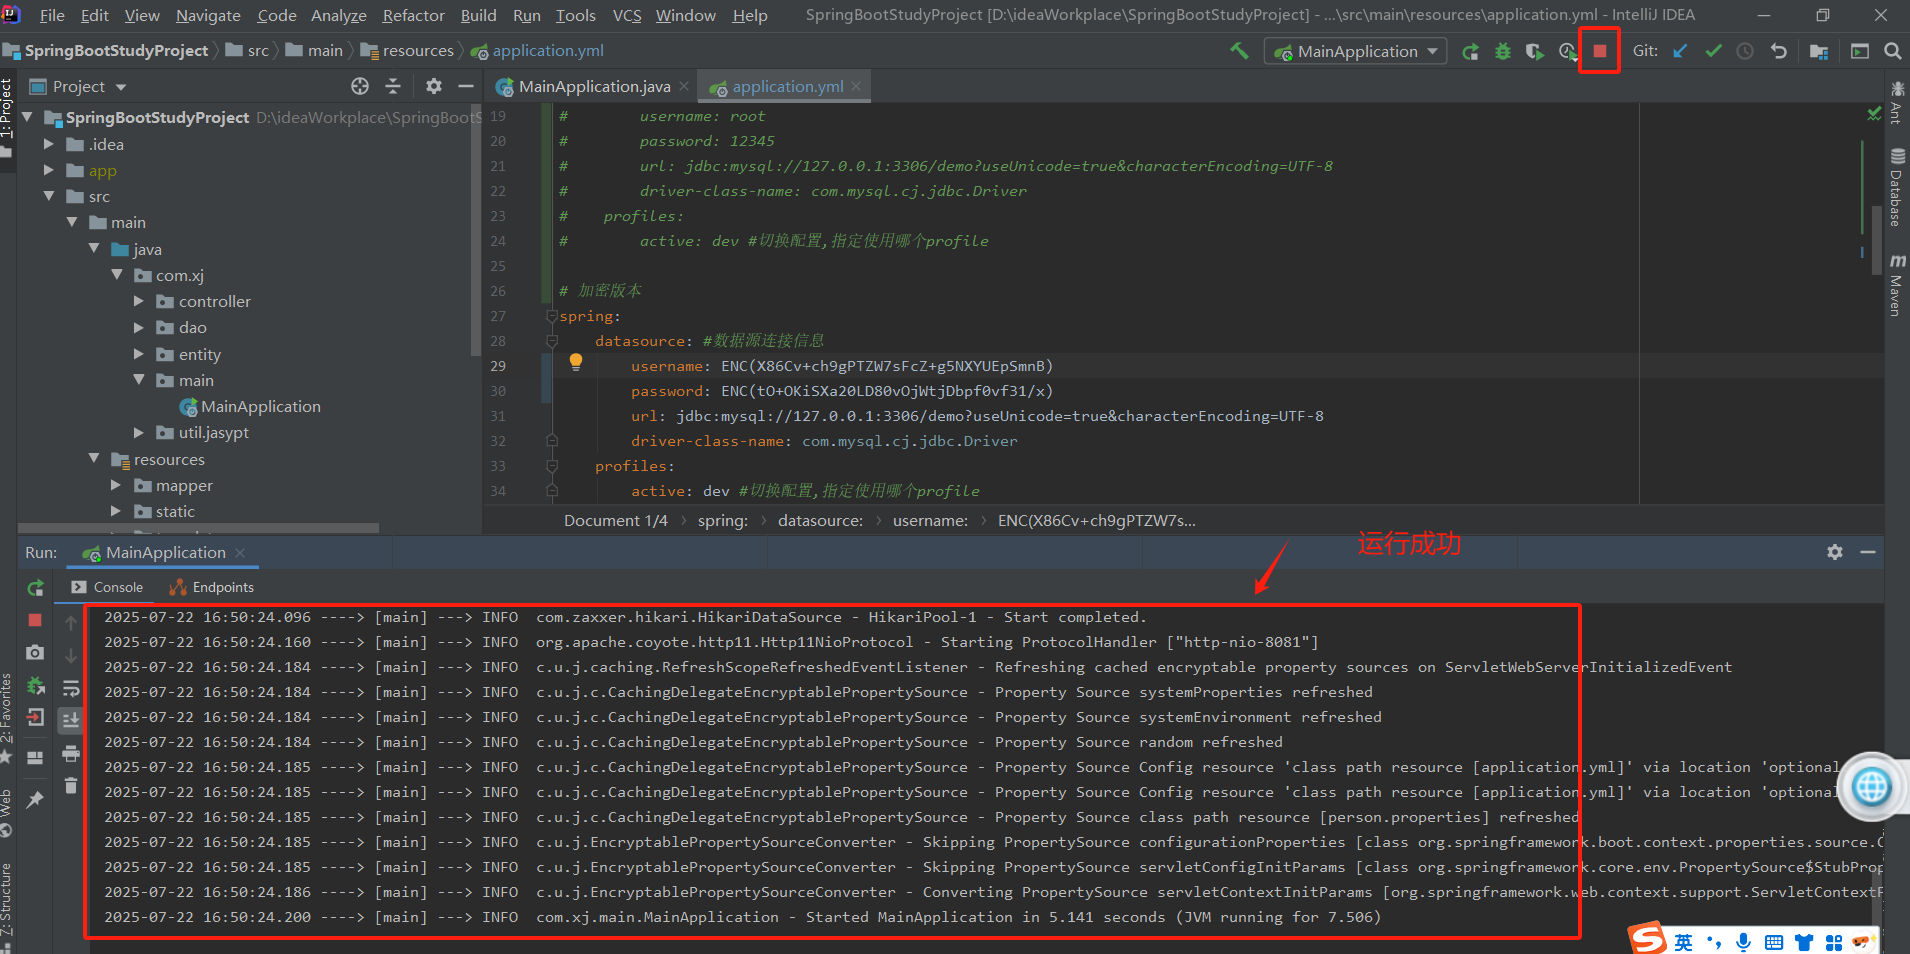
3.2 再将加密密文用ENC()包裹起来替换明文,若启动成功,即为加密成功。
替换:
启动成功:
三、重点说明
1.若解密失败,会包如下错误
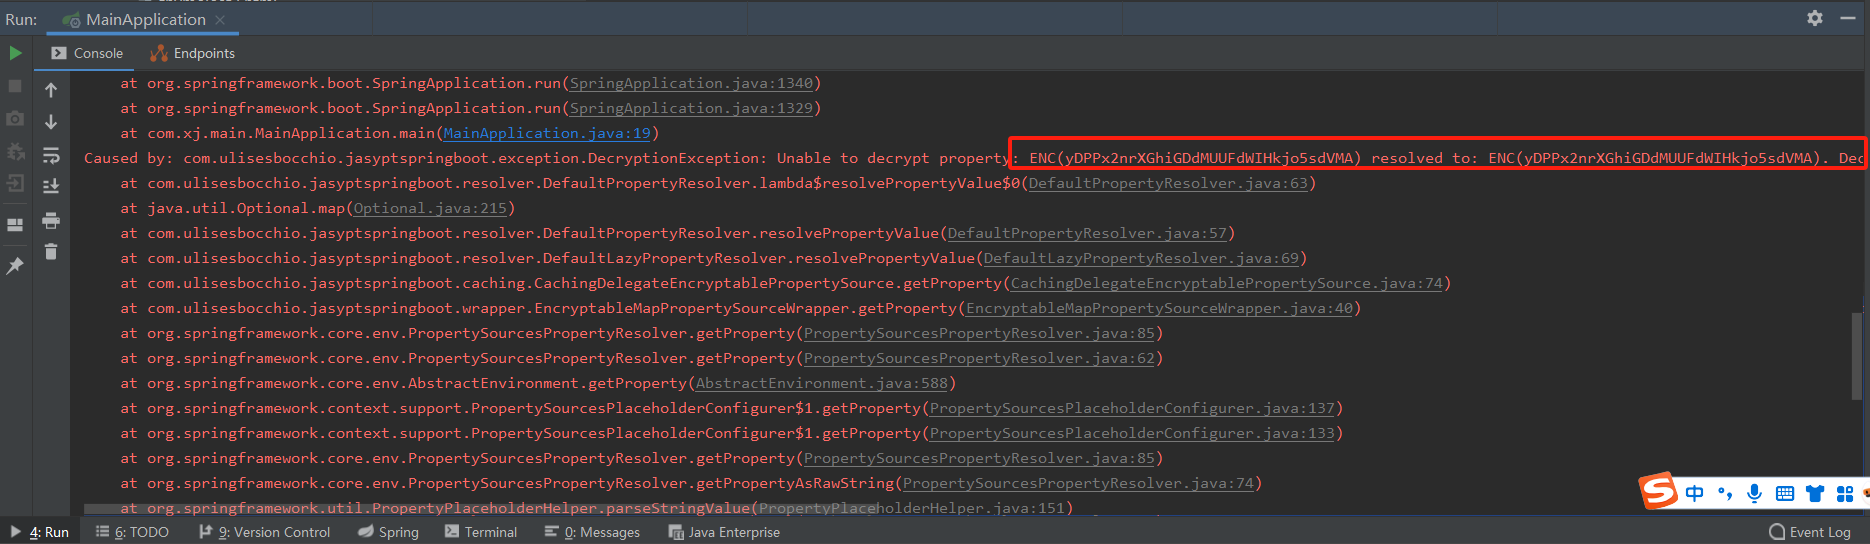
2.秘钥最好不要有特殊字符,比如“$”、"_",这样会导致解密失败,实测经验
3.解密JasyptController中的decrypt不应该用@GetMapping,因为解密中的字符春包含很多特殊字符,比如“/”,“+”等,这些都会导致解密失败。@RequestMapping + @RequestParam也不行,必须用@RequestMapping + @RequestBody。
四、感谢:
1.Jasypt概述及整合SpringBoot实现敏感数据加密_jasypt 原理-CSDN博客
2.Jasypt 开源加密库使用教程-CSDN博客
3.springboot 跨域以及jasypt加密使用(第六章)_springboot jasypt-CSDN博客


Unity3d-ROS联合仿真:turtlebot在Unity3d中仿真)

)


)


