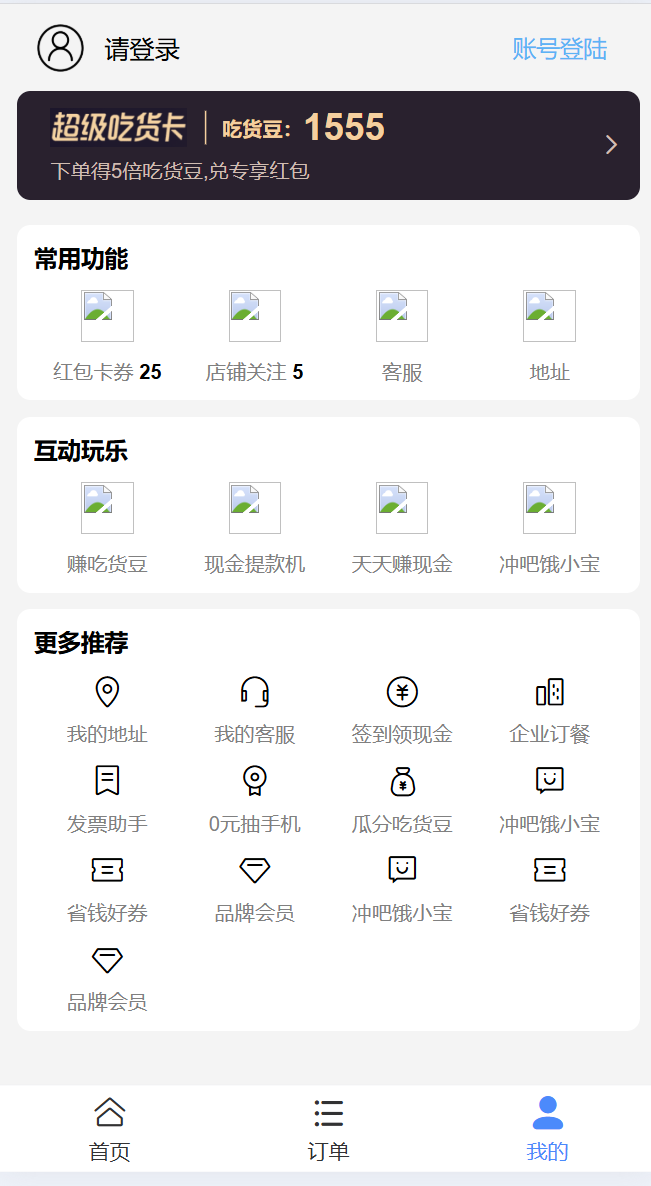
我的页面开发
后端
data\me_page.js
我的页面静态数据
module.exports = () => {return {superCard: {beanCount: 1555,tips: "下单得5倍吃货豆,兑专享红包",},cards: [{label: "常用功能",size: 30,items: [{iconUrl: "/imgs/me_page/coupang.png",label: "红包卡券",count: 25,},{iconUrl: "/imgs/me_page/like.png",label: "店铺关注",count: 5,},{iconUrl: "/imgs/me_page/serve.png",label: "客服",count: 0,},{iconUrl: "/imgs/me_page/location.png",label: "地址",count: 0,},],},{label: "互动玩乐",size: 30,items: [{iconUrl: "/imgs/me_page/bean.png",label: "赚吃货豆",count: 0,},{iconUrl: "/imgs/me_page/cash.png",label: "现金提款机",count: 0,},{iconUrl: "/imgs/me_page/redbag.png",label: "天天赚现金",count: 0,},{iconUrl: "/imgs/me_page/exiaobao.png",label: "冲吧饿小宝",count: 0,},],},{label: "更多推荐",size: 20,items: [{iconUrl: "location-o",label: "我的地址",count: 0,},{iconUrl: "service-o",label: "我的客服",count: 0,},{iconUrl: "gold-coin-o",label: "签到领现金",count: 0,},{iconUrl: "hotel-o",label: "企业订餐",count: 0,},{iconUrl: "label-o",label: "发票助手",count: 0,},{iconUrl: "award-o",label: "0元抽手机",count: 0,},{iconUrl: "balance-o",label: "瓜分吃货豆",count: 0,},{iconUrl: "smile-comment-o",label: "冲吧饿小宝",count: 0,},{iconUrl: "coupon-o",label: "省钱好券",count: 0,},{iconUrl: "diamond-o",label: "品牌会员",count: 0,},{iconUrl: "smile-comment-o",label: "冲吧饿小宝",count: 0,},{iconUrl: "coupon-o",label: "省钱好券",count: 0,},{iconUrl: "diamond-o",label: "品牌会员",count: 0,},],},],// features: [//   {//     iconUrl: '/imgs/me_page/coupang.png',//     label: '红包卡券',//     count: 25,//   },//   {//     iconUrl: '/imgs/me_page/like.png',//     label: '店铺关注',//     count: 5,//   },//   {//     iconUrl: '/imgs/me_page/serve.png',//     label: '客服',//     count: 0,//   },//   {//     iconUrl: '/imgs/me_page/location.png',//     label: '地址',//     count: 0,//   },// ],// entertainments: [//   {//     iconUrl: '/imgs/me_page/bean.png',//     label: '赚吃货豆',//     count: 0,//   },//   {//     iconUrl: '/imgs/me_page/cash.png',//     label: '现金提款机',//     count: 0,//   },//   {//     iconUrl: '/imgs/me_page/redbag.png',//     label: '天天赚现金',//     count: 0,//   },//   {//     iconUrl: '/imgs/me_page/exiaobao.png',//     label: '冲吧饿小宝',//     count: 0,//   },// ],// recommends: [//   {//     iconUrl: 'location-o',//     label: '我的地址',//     count: 0,//   },//   {//     iconUrl: 'service-o',//     label: '我的客服',//     count: 0,//   },//   {//     iconUrl: 'gold-coin-o',//     label: '签到领现金',//     count: 0,//   },//   {//     iconUrl: 'hotel-o',//     label: '企业订餐',//     count: 0,//   },//   {//     iconUrl: 'label-o',//     label: '发票助手',//     count: 0,//   },//   {//     iconUrl: 'award-o',//     label: '0元抽手机',//     count: 0,//   },//   {//     iconUrl: 'balance-o',//     label: '瓜分吃货豆',//     count: 0,//   },//   {//     iconUrl: 'smile-comment-o',//     label: '冲吧饿小宝',//     count: 0,//   },//   {//     iconUrl: 'coupon-o',//     label: '省钱好券',//     count: 0,//   },//   {//     iconUrl: 'diamond-o',//     label: '品牌会员',//     count: 0,//   },//   {//     iconUrl: 'smile-comment-o',//     label: '冲吧饿小宝',//     count: 0,//   },//   {//     iconUrl: 'coupon-o',//     label: '省钱好券',//     count: 0,//   },//   {//     iconUrl: 'diamond-o',//     label: '品牌会员',//     count: 0,//   },// ],};
};
src\db.js
配置静态路由
const test = require('../data/test')
const homePage = require('../data/home_page')
const mePage = require("../data/me_page");
function responseData(data) {return {code: 0,data,msg: "请求成功"}
}
module.exports = () => {return {test: test(),home_page: responseData(homePage()),me_page: responseData(mePage())}
}
前端
src\views\tabs\me\MeView.vue
请求我的页面api接口数据。
 <script setup lang="ts">
import type { ISuperCard } from '@/types'
import { useAsync } from '@/use/useAsync'
// import { useAuth } from '@/use/useAuth'
import { fetchMePageData } from '@/api/me'
import OpLoadingView from '@/components/OpLoadingView.vue'
import { useRouter } from 'vue-router'const router = useRouter()
// const { user, logout } = useAuth()
const { data, pending } = useAsync(fetchMePageData, {cards: [],superCard: {} as ISuperCard
})const gotoLogin = () => {router.push({name: 'login'})
}
</script><template><div class="me-page op-fullscreen"><div class="me-page__top"><!-- user.id --><template v-if="false"><img class="avatar" :src="user.avatar" /><div class="name">{{ user.nickname }}</div><div class="account op-then-border" @click="logout">退出</div></template><template v-else><img class="avatar" src="https://b.yzcdn.cn/vant/icon-demo-1126.png" /><div class="name" @click="gotoLogin">请登录</div><div class="account op-then-border" @click="gotoLogin">账号登陆</div></template></div><OpLoadingView :loading="pending" type="skeleton"><div class="me-page__super-card"><div class="super-card__left"><div class="super-card__left__top"><img class="card-img" src="@/assets/imgs/me_page/super-card.png" /><div class="divider"></div><div class="bean">吃货豆:</div><div class="bean-count">{{ data.superCard.beanCount }}</div></div><div class="super-card__left__tips">{{ data.superCard.tips }}</div></div><VanIcon name="arrow" size="14" color="rgb(212, 189, 178)"></VanIcon></div><div class="me-page__card" v-for="v in data.cards" :key="v.label"><div class="me-page__card__title">{{ v.label }}</div><div class="me-page__card__items"><div class="me-page__card__item" v-for="cv in v.items" :key="cv.iconUrl"><VanIcon :name="cv.iconUrl" :size="v.size"></VanIcon><div class="label">{{ cv.label }}<span v-if="cv.count" class="count">{{ cv.count }}</span></div></div></div></div></OpLoadingView></div>
</template>
自定义hooks-useAuth 实现登录页面逻辑
后端
实现模拟用户登录,生成鉴权token逻辑
data\user_list.js
静态用户列表。
module.exports = () => {return [{id: 1,username: "muke",password: "ilovemuke",nickname: "测试账号",avatar: "/imgs/me_page/avatar.png",},{id: 2,username: "duzhaoquan",password: "1234",nickname: "银河护卫",avatar: "/imgs/me_page/avatar.png",},];
};
src\controller\auth.js
处理 auth 路由业务逻辑
const TokenService = require("../service/token");
const userList = require("../../data/user_list");module.exports = (req, res, next) => {const { username, password } = req.body;const userListData = userList();const userInfo = userListData.find((v) => v.username === username && v.password === password);if (!userInfo) {req.fail("请输入正确的用户名和密码");return;}delete userInfo.password;const token = TokenService.create({ username });res.success({token,userInfo,});
};
src\service\token.js
用于生成鉴权 token 以及校验合法性逻辑
const jwt = require("jsonwebtoken");
const secret = "SLDLKKDS323ssdd@#@@gf";const AUTH_URL = ["/api/user_info"];/*** 创建JWT令牌* @param {Object} useInfo - 用户信息对象,将被编码到JWT令牌中* @returns {string} 返回生成的JWT令牌字符串*/
const create = (useInfo) => {return jwt.sign(useInfo, secret, { expiresIn: 5 * 60 * 60 }); // 使用jwt.sign方法生成令牌,设置过期时间为5小时(5 * 60 * 60秒)
};/*** 解析JWT令牌的函数* @param {string} token - 需要解析的JWT令牌* @returns {object|null} - 返回解析后的令牌对象,如果解析失败或令牌不存在则返回null*/
const parse = (token) => {if (token) { // 检查令牌是否存在try {return jwt.verify(token, secret); // 尝试验证并解析令牌} catch (e) { // 捕获验证过程中可能发生的错误return null; // 如果验证失败,返回null}}return null; // 如果令牌不存在,返回null
};/*** 检查给定路径是否为认证URL* @param {string} path - 需要检查的路径* @returns {boolean} - 如果路径在认证URL列表中则返回true,否则返回false*/
const isAuthURL = (path) => {return AUTH_URL.includes(path); // 使用includes方法检查路径是否存在于AUTH_URL数组中
};/*** 检查请求是否授权的函数* @param {Object} req - 请求对象,包含请求路径和请求头信息* @returns {boolean} 返回true表示授权,false表示未授权*/
const isAuthorized = (req) => {// 检查请求路径是否为认证URLif (!isAuthURL(req.path)) {return true; // 如果不是认证URL,直接返回true,表示授权通过}// 从请求头中获取tokenconst token = req.headers["x-token"];// 解析tokenconst result = parse(token);// 打印token和解析结果,用于调试console.log("==========", req.headers["x-token"], result);// 检查解析结果中是否存在usernameif (result && result.username) {return true; // 如果解析结果有效且包含username,返回true,表示授权通过}return false; // 否则返回false,表示未授权
};module.exports = {create,isAuthorized,parse,
};
src\router.js
配置 auth 路由
const test = require("./controller/test");
const home_search = require("./controller/home_search");
const shop_list = require("./controller/shop_list");
const auth = require("./controller/auth");module.exports = (app) => {app.use("/api/test", test);app.use("/api/home_search", home_search);app.use("/api/shop_list", shop_list);app.use("/api/auth", auth);
};
src\app.js
设置全局鉴权拦截器
// 鉴权
server.use((req, res, next) => {if (TokenService.isAuthorized(req)) {next();} else {res.sendStatus(401);}
});
前端
src\types\user.d.ts
定义登录接口用户信息类型
export interface ILoginInfo {username: string;password: string;
}export interface IUserInfo {id: number | stringavatar: stringnickname: string
}export interface IAuth {token: stringuseriNFO: IUserInfo
}
src\api\user.ts
定义登录接口
import type { ILoginInfo, IAuth } from '@/types'
import axios from './base'
export const auth = ({ username, password }: ILoginInfo) => {return axios.post<IAuth, IAuth>('/auth', { username, password })
}
src\use\useAuth.ts
定义登录、退出登录 hook
import { useUserStore } from '@/stores/user'
import { computed } from 'vue'
import { auth } from '@/api/user'
import type { ILoginInfo } from '@/types'export function useAuth() {const store = useUserStore()const user = computed(() => store.getUserInfo)const login = async (data: ILoginInfo) => {const { token, userInfo } = await auth(data)store.setInfo({ token, userInfo })}const logout = () => {store.removeInfo()}return { user, login, logout }
}
src\stores\user.ts
定义缓存用户信息的 store
import type { IUserInfo } from '@/types'
import { defineStore } from 'pinia'
import { computed, ref } from 'vue'
// import { useLocalStorage } from '@/use/useLocalStorage'export interface IUserState {userInfo: IUserInfotoken: string
}// 设置默认信息
const getDefaultUserInfo = (): IUserInfo => ({id: '',avatar: 'https://b.yzcdn.cn/vant/icon-demo-1126.png',nickname: '请登录'
})export const useUserStore = defineStore('user', () => {// const {//   value: $userInfo,//   setValue: $setUserInfoValue,//   removeItem: $removeUserInfoItem// } = useLocalStorage('userInfo', getDefaultUserInfo())// const { setValue: $setTokenValue, removeItem: $removeTokenItem } = useLocalStorage('token', '')const state = ref({userInfo: getDefaultUserInfo(),token: ''})// 获取信息const getUserInfo = computed(() => {// 为什么不直接读 localStorage 的值呢?// 因为读取 localStorage 是比较耗时的操作,所以这里先读 store// if (!state.value.userInfo || !state.value.userInfo.id) {//   state.value.userInfo = $userInfo.value// }return state.value.userInfo})// 登陆时设置信息const setInfo = ({ token, userInfo }: IUserState) => {state.value.userInfo = userInfostate.value.token = token// $setUserInfoValue(userInfo)// $setTokenValue(token)}// 移除信息const removeInfo = () => {state.value.userInfo = getDefaultUserInfo()state.value.token = ''// $removeUserInfoItem()// $removeTokenItem()}return {state,getUserInfo,setInfo,removeInfo}
})
创建登录页,实现登录功能
src\views\login\LoginView.vue
<script setup lang="ts">
import { ref } from 'vue'
import type { ILoginInfo } from '@/types'
import { useAuth } from '@/use/useAuth'
const username = ref('')
const password = ref('')
const onClickLeft = () => history.back() //回到上一个页面
const { login } = useAuth()const onSubmit = async (data: ILoginInfo) => {await login(data)onClickLeft()
}
</script><template><div class="login-page on-fullscreen"><VanNavBar title="请登录" left-text="返回" left-arrow @click="onClickLeft"></VanNavBar><VanForm class="login-page__form" @submit="onSubmit"><VanCellGroup inset><VanFieldv-model="username"name="username"label="用户名"placeholder="用户名":rules="[{ required: true, message: '请填写用户名' }]"/><VanFieldv-model="password"name="password"label="密码"placeholder="密码":rules="[{ required: true, message: '请填写密码' }]"/></VanCellGroup><div style="margin: 16px"><VanButton round block type="primary" native-type="submit">登陆</VanButton></div></VanForm></div>
</template><style lang="scss" scoped>
.login-page {.login-page__form {margin-top: 100px;}
}
</style>

--Java版)


)


--URL构建与模板的使用)


