梯度提升机(Gradient Boosting Machine, GBM),特别是其现代高效实现——XGBoost。这是继随机森林后自然进阶的方向,也是当前结构化数据竞赛和工业界应用中最强大、最受欢迎的算法之一。
为什么推荐XGBoost?
- 与随机森林互补:同属集成学习,但Random Forest是Bagging思想,而XGBoost是Boosting思想。学习它可以帮助你全面理解集成学习的两种主流范式。
- State-of-the-Art性能:在表格型数据上,XGBoost通常比随机森林表现更好,是Kaggle等数据科学竞赛中的"大杀器"。
- 高效且可扩展:专为速度和性能设计,支持并行处理,能处理大规模数据。
- 内置正则化:相比传统GBM,XGBoost自带正则化项,更不容易过拟合。
核心概念:Boosting vs Bagging
● Bagging(随机森林):并行构建多个独立的弱模型,然后通过投票/平均得到最终结果。
● Boosting(XGBoost):串行构建多个相关的弱模型,每个新模型都专注于纠正前一个模型的错误。
完整代码示例
下面我们使用XGBoost来解决同样的鸢尾花分类问题,并与随机森林进行对比。
# xgboost_module.py
# -*- coding: utf-8 -*-"""
XGBoost分类器示例 - 鸢尾花数据集
模块化实现,包含数据加载、模型训练、评估、可视化和高级功能
"""# 1. 导入必要的库
import numpy as np
import matplotlib.pyplot as plt
from sklearn.datasets import load_iris
from sklearn.model_selection import train_test_split, cross_val_score
from sklearn.metrics import accuracy_score, classification_report
from sklearn.ensemble import RandomForestClassifier
import xgboost as xgb
import warnings
warnings.filterwarnings('ignore')# 设置全局样式
plt.style.use('seaborn-v0_8')
np.random.seed(42)  # 设置随机种子以确保结果可重现# 2. 数据加载模块
def load_data():"""加载鸢尾花数据集"""iris = load_iris()X = iris.datay = iris.targetfeature_names = iris.feature_namestarget_names = iris.target_namesreturn X, y, feature_names, target_names# 3. 数据预处理模块
def prepare_data(X, y, test_size=0.2, random_state=42):"""准备训练和测试数据集"""X_train, X_test, y_train, y_test = train_test_split(X, y, test_size=test_size, random_state=random_state, stratify=y)print(f"训练集大小: {X_train.shape[0]}")print(f"测试集大小: {X_test.shape[0]}")return X_train, X_test, y_train, y_test# 4. 随机森林基准模型模块
def train_random_forest(X_train, y_train, **params):"""训练随机森林模型作为基准"""# 设置默认参数default_params = {'n_estimators': 100,'max_depth': 3,'random_state': 42}# 更新默认参数default_params.update(params)# 初始化并训练模型model = RandomForestClassifier(**default_params)model.fit(X_train, y_train)print("\n=== 随机森林模型训练完成 ===")print(f"使用参数: {default_params}")return model# 5. XGBoost模型训练模块
def train_xgboost(X_train, y_train, **params):"""训练XGBoost模型"""# 设置默认参数default_params = {'n_estimators': 100,'max_depth': 3,'learning_rate': 0.1,'random_state': 42,'use_label_encoder': False,'eval_metric': 'logloss'}# 更新默认参数default_params.update(params)# 初始化并训练模型model = xgb.XGBClassifier(**default_params)model.fit(X_train, y_train)print("\n=== XGBoost模型训练完成 ===")print(f"使用参数: {default_params}")return model# 6. 模型评估模块
def evaluate_model(model, X_test, y_test, model_name="模型"):"""评估模型性能"""# 预测y_pred = model.predict(X_test)# 计算准确率accuracy = accuracy_score(y_test, y_pred)print(f"\n=== {model_name}性能 ===")print(f"测试集准确率: {accuracy:.4f}")return accuracy, y_pred# 7. 交叉验证比较模块
def compare_cv_models(models, X, y, cv=5):"""使用交叉验证比较多个模型"""print("\n=== 交叉验证比较 ===")results = {}for name, model in models.items():scores = cross_val_score(model, X, y, cv=cv, scoring='accuracy')results[name] = scoresprint(f"{name} 交叉验证平均分: {scores.mean():.4f} (±{scores.std():.4f})")return results# 8. 特征重要性可视化模块
def plot_feature_importance(models, feature_names):"""可视化多个模型的特征重要性"""n_models = len(models)plt.figure(figsize=(5 * n_models, 5))for i, (name, model) in enumerate(models.items(), 1):plt.subplot(1, n_models, i)# 获取特征重要性if hasattr(model, 'feature_importances_'):importances = model.feature_importances_else:# 对于XGBoost模型importances = model.get_booster().get_score(importance_type='weight')# 转换为数组格式importances_array = np.zeros(len(feature_names))for j, feat in enumerate(feature_names):importances_array[j] = importances.get(f"f{j}", 0)importances = importances_array# 排序并绘制indices = np.argsort(importances)[::-1]plt.bar(range(len(feature_names)), importances[indices])plt.xticks(range(len(feature_names)), [feature_names[i] for i in indices], rotation=45)plt.title(f'{name} - Feature Importance')plt.tight_layout()plt.show()# 9. 高级功能:早停法训练模块
def train_xgboost_early_stopping(X_train, y_train, X_test, y_test, **params):"""使用早停法训练XGBoost模型"""# 设置默认参数default_params = {'max_depth': 3,'learning_rate': 0.1,'objective': 'multi:softmax','num_class': 3,'eval_metric': 'mlogloss'}# 更新默认参数default_params.update(params)# 转换为XGBoost的DMatrix格式dtrain = xgb.DMatrix(X_train, label=y_train)dtest = xgb.DMatrix(X_test, label=y_test)# 训练并使用早停法evals = [(dtrain, 'train'), (dtest, 'test')]model = xgb.train(default_params, dtrain, num_boost_round=1000,evals=evals,early_stopping_rounds=10,verbose_eval=False)print("\n=== 早停法训练完成 ===")print(f"在 {model.best_iteration} 轮停止")print(f"最佳验证分数: {model.best_score:.4f}")return model# 10. 预测模块
def make_predictions(model, new_samples, target_names, model_type='sklearn'):"""使用模型进行新样本预测"""if model_type == 'xgboost_early_stop':# 对于早停法训练的XGBoost模型dnew = xgb.DMatrix(new_samples)predictions = model.predict(dnew)# 早停法训练的模型不直接提供概率,需要额外处理print("注意: 早停法训练的XGBoost模型不直接提供概率输出")predictions_proba = Noneelse:# 对于标准sklearn接口的模型predictions = model.predict(new_samples)predictions_proba = model.predict_proba(new_samples)print("\n=== 新样本预测 ===")for i, sample in enumerate(new_samples):predicted_class = target_names[int(predictions[i])]print(f"样本 {i+1} {sample}:")print(f"  预测类别: {predicted_class}")if predictions_proba is not None:print(f"  类别概率: {dict(zip(target_names, predictions_proba[i].round(4)))}")return predictions, predictions_proba# 11. 主函数 - 整合所有模块
def main():"""主函数,整合所有模块"""# 加载数据X, y, feature_names, target_names = load_data()print("=== 鸢尾花数据集 ===")print(f"数据集形状: {X.shape}")print(f"特征名称: {feature_names}")print(f"类别名称: {target_names}")# 准备数据X_train, X_test, y_train, y_test = prepare_data(X, y)# 训练随机森林模型rf_model = train_random_forest(X_train, y_train)rf_accuracy, rf_pred = evaluate_model(rf_model, X_test, y_test, "随机森林")# 训练XGBoost模型xgb_model = train_xgboost(X_train, y_train)xgb_accuracy, xgb_pred = evaluate_model(xgb_model, X_test, y_test, "XGBoost")# 交叉验证比较models = {'随机森林': rf_model,'XGBoost': xgb_model}cv_results = compare_cv_models(models, X, y)# 特征重要性可视化plot_feature_importance(models, feature_names)# 详细分类报告print("\n=== XGBoost详细分类报告 ===")print(classification_report(y_test, xgb_pred, target_names=target_names))# 高级功能:早停法训练xgb_early_model = train_xgboost_early_stopping(X_train, y_train, X_test, y_test)# 进行预测new_samples = [[5.1, 3.5, 1.4, 0.2],  # 很可能为setosa[6.7, 3.0, 5.2, 2.3]   # 很可能为virginica]predictions, predictions_proba = make_predictions(xgb_model, new_samples, target_names)return {'rf_model': rf_model,'xgb_model': xgb_model,'xgb_early_model': xgb_early_model,'rf_accuracy': rf_accuracy,'xgb_accuracy': xgb_accuracy,'cv_results': cv_results,'predictions': predictions}# 12. 执行主程序
if __name__ == "__main__":results = main()
代码解析与学习要点
- 参数对比:
○ XGBoost有与随机森林相似的参数(n_estimators, max_depth)
○ 但也有特有参数如learning_rate(学习率),控制每棵树的贡献程度 - 性能比较:
○ 代码中比较了两种算法的准确率和交叉验证结果
○ 通常情况下,XGBoost会略优于随机森林 - 特征重要性:
○ 可视化对比两种算法计算的特征重要性
○ 注意:两种算法计算重要性的方法不同,结果可能有差异 - 高级功能:
○ 演示了早停法(Early Stopping),这是防止过拟合的重要技术
○ 展示了DMatrix数据格式,这是XGBoost的高效数据容器 - 预测概率:
○ XGBoost可以提供每个类别的预测概率,这对于不确定性分析很有用
代码运行结果
=== 鸢尾花数据集 ===
数据集形状: (150, 4)
特征名称: ['sepal length (cm)', 'sepal width (cm)', 'petal length (cm)', 'petal width (cm)']
类别名称: ['setosa' 'versicolor' 'virginica']
训练集大小: 120
测试集大小: 30=== 随机森林模型训练完成 ===
使用参数: {'n_estimators': 100, 'max_depth': 3, 'random_state': 42}=== 随机森林性能 ===
测试集准确率: 0.9667=== XGBoost模型训练完成 ===
使用参数: {'n_estimators': 100, 'max_depth': 3, 'learning_rate': 0.1, 'random_state': 42, 'use_label_encoder': False, 'eval_metric': 'logloss'}=== XGBoost性能 ===
测试集准确率: 0.9333=== 交叉验证比较 ===
随机森林 交叉验证平均分: 0.9667 (±0.0211)
XGBoost 交叉验证平均分: 0.9467 (±0.0267)=== XGBoost详细分类报告 ===precision    recall  f1-score   supportsetosa       1.00      1.00      1.00        10versicolor       0.90      0.90      0.90        10virginica       0.90      0.90      0.90        10accuracy                           0.93        30macro avg       0.93      0.93      0.93        30
weighted avg       0.93      0.93      0.93        30=== 早停法训练完成 ===
在 33 轮停止
最佳验证分数: 0.1948=== 新样本预测 ===
样本 1 [5.1, 3.5, 1.4, 0.2]:预测类别: setosa类别概率: {'setosa': 0.9911, 'versicolor': 0.0067, 'virginica': 0.0023}
样本 2 [6.7, 3.0, 5.2, 2.3]:预测类别: virginica类别概率: {'setosa': 0.0019, 'versicolor': 0.0025, 'virginica': 0.9956}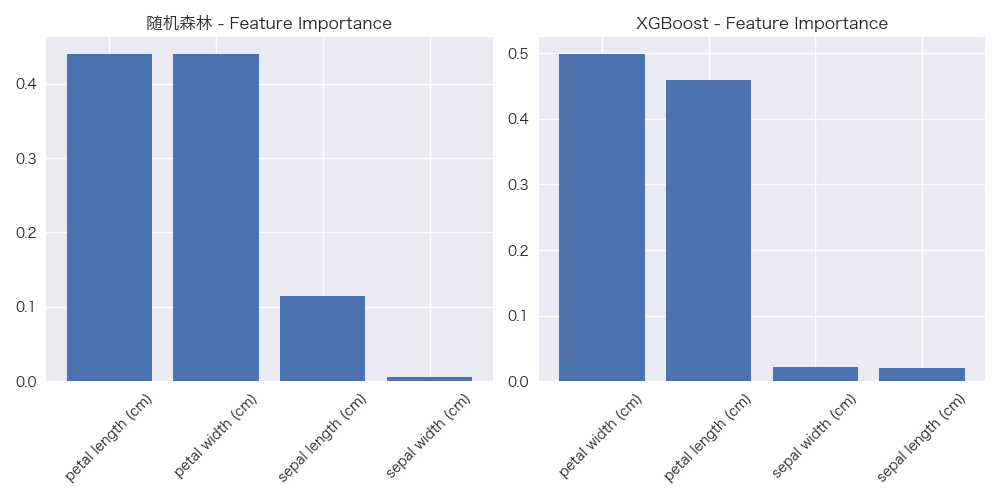


- MTK phy-mtk-hdmi.c 和 phy-mtk-hdmi-mt8173.c)


 -- 架构篇)

![[Dify 专栏] 如何通过 Prompt 在 Dify 中模拟 Persona:即便没有专属配置,也能让 AI 扮演角色](http://pic.xiahunao.cn/[Dify 专栏] 如何通过 Prompt 在 Dify 中模拟 Persona:即便没有专属配置,也能让 AI 扮演角色)


)