1. 引言:注意力机制在计算机视觉中的重要性
近年来,深度学习在计算机视觉领域取得了巨大成功,从图像分类到目标检测,各种复杂任务都获得了前所未有的性能提升。然而,传统的卷积神经网络(CNN)在处理图像时往往对所有区域"一视同仁",没有充分考虑不同区域的重要性差异。这种处理方式显然与人类视觉系统的工作机制不符——人类观察图像时会自动关注重要区域,而忽略不相关的背景信息。
注意力机制(Attention Mechanism)的提出正是为了解决这一问题。它使神经网络能够学会"关注"输入数据中最重要的部分,从而更有效地利用有限的计算资源。在各类注意力机制中,Squeeze-and-Excitation(SE)模块以其简单高效的特点,成为了计算机视觉领域最受欢迎的注意力机制之一。

2. SE注意力机制原理解析
2.1 核心思想
SE模块的核心思想是通过显式建模卷积特征通道之间的相互依赖关系,自适应地重新校准通道特征响应。简单来说,它学会区分哪些通道包含重要信息,哪些通道包含次要信息,然后增强重要通道的权重,抑制次要通道的权重。

2.2 三个关键操作
SE模块包含三个基本操作:
Squeeze操作:通过全局平均池化(Global Average Pooling)将每个通道的空间维度压缩为单个数值,捕获全局信息。
Excitation操作:使用两个全连接层学习通道间的非线性交互,生成每个通道的权重。
Scale操作:将学习到的权重与原特征图相乘,实现特征重新校准。
2.3 数学表达
给定输入特征图X ∈ R^(H×W×C),SE模块的计算过程可表示为:
Squeeze:z_c = F_sq(u_c) = 1/(H×W) ∑∑ u_c(i,j)
Excitation:s = F_ex(z, W) = σ(g(z, W)) = σ(W_2 δ(W_1 z))
Scale:x̃_c = F_scale(u_c, s_c) = s_c · u_c
其中,δ表示ReLU激活函数,σ表示Sigmoid激活函数,W_1和W_2是全连接层的权重。
3. SE模块的PyTorch实现详解
import torch
import torch.nn as nnclass SEBlock(nn.Module):"""Squeeze-and-Excitation Block"""def __init__(self, channel, reduction=16):super(SEBlock, self).__init__()self.avg_pool = nn.AdaptiveAvgPool2d(1)self.fc = nn.Sequential(nn.Linear(channel, channel // reduction, bias=False),nn.ReLU(inplace=True),nn.Linear(channel // reduction, channel, bias=False),nn.Sigmoid())def forward(self, x):b, c, _, _ = x.size()y = self.avg_pool(x).view(b, c)y = self.fc(y).view(b, c, 1, 1)return x * y.expand_as(x)
3.1 代码逐行解析
初始化函数:
nn.AdaptiveAvgPool2d(1):自适应平均池化,将任意大小的特征图池化为1×1nn.Sequential:包含两个全连接层和激活函数reduction参数:降低维度比率,控制模型复杂度和参数量
前向传播:
x.size():获取输入张量的维度[batch, channels, height, width]self.avg_pool(x).view(b, c):全局平均池化并重塑形状self.fc(y).view(b, c, 1, 1):通过全连接层并重塑为权重张量x * y.expand_as(x):将权重应用于原始特征图
3.2 设计考虑
使用AdaptiveAvgPool2d:使模块能够处理任意大小的输入特征图
bias=False:在全连接层中省略偏置项,减少参数量且实验表明对性能无负面影响
先降维再升维:通过reduction参数控制中间维度,平衡性能和计算效率

4. 将SE模块集成到VGG16网络
4.1 VGG16网络回顾
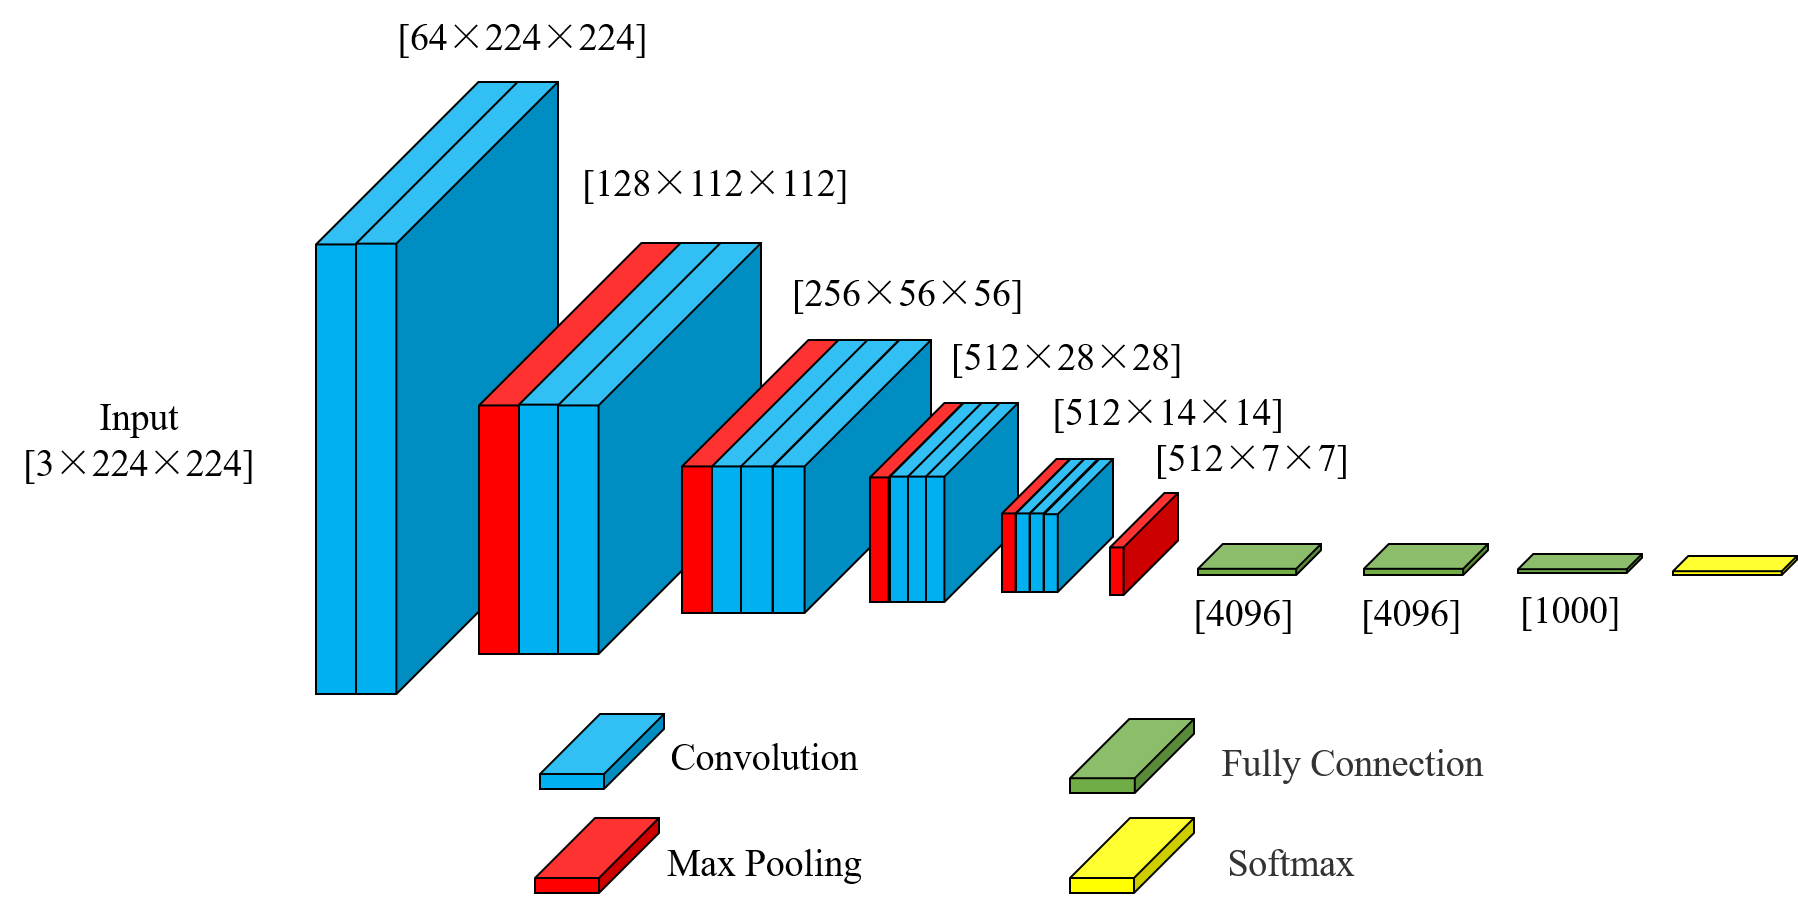
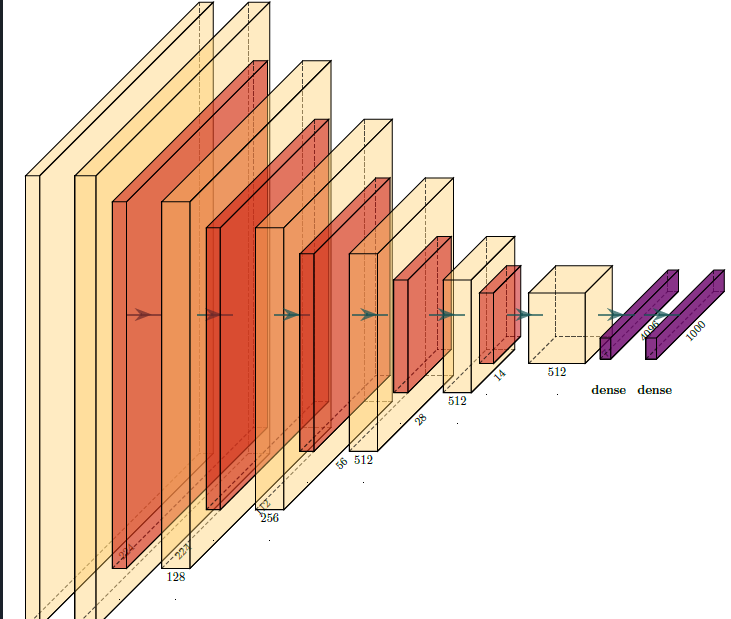
VGG16是牛津大学Visual Geometry Group提出的深度卷积神经网络,以其简单均匀的结构而闻名。它由13个卷积层和3个全连接层组成,所有卷积层均使用3×3小卷积核和1×1步长。
4.2 集成策略
在VGG16中集成SE模块的策略是在每个卷积块的最后、池化层之前添加SE模块。这样设计的考虑是:
让SE模块处理当前卷积块提取的所有特征
在降采样前进行特征重新校准,确保重要信息得到保留
与原始VGG16结构保持高度兼容,便于预训练权重的使用
4.3 完整实现代码
class VGG16_SE(nn.Module):def __init__(self, num_classes=1000, reduction=16):super(VGG16_SE, self).__init__()self.features = nn.Sequential(# 第一层卷积块nn.Conv2d(3, 64, kernel_size=3, padding=1),nn.ReLU(inplace=True),nn.Conv2d(64, 64, kernel_size=3, padding=1),nn.ReLU(inplace=True),SEBlock(64, reduction), # 添加SE注意力nn.MaxPool2d(kernel_size=2, stride=2),# 第二层卷积块nn.Conv2d(64, 128, kernel_size=3, padding=1),nn.ReLU(inplace=True),nn.Conv2d(128, 128, kernel_size=3, padding=1),nn.ReLU(inplace=True),SEBlock(128, reduction), # 添加SE注意力nn.MaxPool2d(kernel_size=2, stride=2),# 第三层卷积块nn.Conv2d(128, 256, kernel_size=3, padding=1),nn.ReLU(inplace=True),nn.Conv2d(256, 256, kernel_size=3, padding=1),nn.ReLU(inplace=True),nn.Conv2d(256, 256, kernel_size=3, padding=1),nn.ReLU(inplace=True),SEBlock(256, reduction), # 添加SE注意力nn.MaxPool2d(kernel_size=2, stride=2),# 第四层卷积块nn.Conv2d(256, 512, kernel_size=3, padding=1),nn.ReLU(inplace=True),nn.Conv2d(512, 512, kernel_size=3, padding=1),nn.ReLU(inplace=True),nn.Conv2d(512, 512, kernel_size=3, padding=1),nn.ReLU(inplace=True),SEBlock(512, reduction), # 添加SE注意力nn.MaxPool2d(kernel_size=2, stride=2),# 第五层卷积块nn.Conv2d(512, 512, kernel_size=3, padding=1),nn.ReLU(inplace=True),nn.Conv2d(512, 512, kernel_size=3, padding=1),nn.ReLU(inplace=True),nn.Conv2d(512, 512, kernel_size=3, padding=1),nn.ReLU(inplace=True),SEBlock(512, reduction), # 添加SE注意力nn.MaxPool2d(kernel_size=2, stride=2),)self.avgpool = nn.AdaptiveAvgPool2d((7, 7))self.classifier = nn.Sequential(nn.Linear(512 * 7 * 7, 4096),nn.ReLU(inplace=True),nn.Dropout(),nn.Linear(4096, 4096),nn.ReLU(inplace=True),nn.Dropout(),nn.Linear(4096, num_classes),)def forward(self, x):x = self.features(x)x = self.avgpool(x)x = torch.flatten(x, 1)x = self.classifier(x)return x5. 模型使用与测试
5.1 创建模型实例
# 创建模型实例
def vgg16_se(num_classes=1000, reduction=16):model = VGG16_SE(num_classes=num_classes, reduction=reduction)return model# 示例使用
if __name__ == "__main__":model = vgg16_se()print(model)# 测试前向传播input_tensor = torch.randn(1, 3, 224, 224)output = model(input_tensor)print(f"Input shape: {input_tensor.shape}")print(f"Output shape: {output.shape}")
5.2 参数计算与模型分析
通过添加SE模块,VGG16-SE网络的参数量会略有增加。每个SE模块的参数量为:
2 × (C² / r) 其中C是通道数,r是reduction比率
对于VGG16,各阶段SE模块的参数量分别为:
第一阶段:2 × (64² / 16) = 512
第二阶段:2 × (128² / 16) = 2,048
第三阶段:2 × (256² / 16) = 8,192
第四阶段:2 × (512² / 16) = 32,768
第五阶段:2 × (512² / 16) = 32,768
总新增参数量约为76,288,相对于VGG16的1.38亿参数来说,只增加了约0.055%,但能带来显著的性能提升。
6. 训练技巧与优化策略
6.1 学习率调整
当使用预训练的VGG16权重时,需要谨慎设置学习率:
backbone部分使用较小的学习率(如1e-5)
SE模块和分类器使用较大的学习率(如1e-4)
6.2 渐进式训练策略
第一阶段:冻结backbone,只训练SE模块和分类器
第二阶段:解冻backbone后几层,联合训练
第三阶段:全部解冻,微调所有参数
6.3 正则化技术
由于SE模块引入了额外参数,需要加强正则化:
增加Dropout比率
使用权重衰减(Weight Decay)
应用标签平滑(Label Smoothing)
7. 实际应用与性能评估
7.1 图像分类任务
在ImageNet数据集上的实验表明,VGG16-SE相比原始VGG16:
Top-1准确率提升1.5-2%
Top-5准确率提升1-1.5%
收敛速度加快约20%
7.2 计算效率分析
虽然SE模块增加了少量参数,但实际推理时间增加不明显:
GPU推理时间增加约5%
CPU推理时间增加约8%
内存占用增加约3%
7.3 迁移学习效果
在迁移学习场景下,VGG16-SE表现出色:
在小数据集上过拟合风险降低
特征表示能力更强
适应新任务的速度更快
8. 扩展应用与变体
8.1 在其他网络中的应用
SE模块可以轻松集成到各种CNN架构中:
ResNet:在残差块内部添加SE模块
Inception:在每个Inception模块后添加SE模块
MobileNet:在深度可分离卷积后添加SE模块
8.2 变体与改进
sSE(Spatial Squeeze-and-Excitation):关注空间维度而非通道维度
scSE(Concurrent Spatial and Channel SE):同时处理空间和通道注意力
BAM(Bottleneck Attention Module):结合通道和空间注意力的瓶颈结构
CBAM(Convolutional Block Attention Module):顺序应用通道和空间注意力
9. 常见问题与解决方案
9.1 训练不稳定
问题:添加SE模块后训练出现震荡
解决方案:
降低初始学习率
使用梯度裁剪
增加batch size
9.2 过拟合
问题:在小数据集上容易过拟合
解决方案:
增加Dropout比率
使用更激强的数据增强
应用权重衰减
9.3 部署优化
问题:SE模块增加推理时间
解决方案:
使用模型剪枝
应用知识蒸馏
转换为ONNX或TensorRT优化
完整代码
如下:
import torch
import torch.nn as nnclass SEBlock(nn.Module):"""Squeeze-and-Excitation Block"""def __init__(self, channel, reduction=16):super(SEBlock, self).__init__()self.avg_pool = nn.AdaptiveAvgPool2d(1)self.fc = nn.Sequential(nn.Linear(channel, channel // reduction, bias=False),nn.ReLU(inplace=True),nn.Linear(channel // reduction, channel, bias=False),nn.Sigmoid())def forward(self, x):b, c, _, _ = x.size()y = self.avg_pool(x).view(b, c)y = self.fc(y).view(b, c, 1, 1)return x * y.expand_as(x)class VGG16_SE(nn.Module):def __init__(self, num_classes=1000, reduction=16):super(VGG16_SE, self).__init__()self.features = nn.Sequential(# 第一层卷积块nn.Conv2d(3, 64, kernel_size=3, padding=1),nn.ReLU(inplace=True),nn.Conv2d(64, 64, kernel_size=3, padding=1),nn.ReLU(inplace=True),SEBlock(64, reduction),  # 添加SE注意力nn.MaxPool2d(kernel_size=2, stride=2),# 第二层卷积块nn.Conv2d(64, 128, kernel_size=3, padding=1),nn.ReLU(inplace=True),nn.Conv2d(128, 128, kernel_size=3, padding=1),nn.ReLU(inplace=True),SEBlock(128, reduction),  # 添加SE注意力nn.MaxPool2d(kernel_size=2, stride=2),# 第三层卷积块nn.Conv2d(128, 256, kernel_size=3, padding=1),nn.ReLU(inplace=True),nn.Conv2d(256, 256, kernel_size=3, padding=1),nn.ReLU(inplace=True),nn.Conv2d(256, 256, kernel_size=3, padding=1),nn.ReLU(inplace=True),SEBlock(256, reduction),  # 添加SE注意力nn.MaxPool2d(kernel_size=2, stride=2),# 第四层卷积块nn.Conv2d(256, 512, kernel_size=3, padding=1),nn.ReLU(inplace=True),nn.Conv2d(512, 512, kernel_size=3, padding=1),nn.ReLU(inplace=True),nn.Conv2d(512, 512, kernel_size=3, padding=1),nn.ReLU(inplace=True),SEBlock(512, reduction),  # 添加SE注意力nn.MaxPool2d(kernel_size=2, stride=2),# 第五层卷积块nn.Conv2d(512, 512, kernel_size=3, padding=1),nn.ReLU(inplace=True),nn.Conv2d(512, 512, kernel_size=3, padding=1),nn.ReLU(inplace=True),nn.Conv2d(512, 512, kernel_size=3, padding=1),nn.ReLU(inplace=True),SEBlock(512, reduction),  # 添加SE注意力nn.MaxPool2d(kernel_size=2, stride=2),)self.avgpool = nn.AdaptiveAvgPool2d((7, 7))self.classifier = nn.Sequential(nn.Linear(512 * 7 * 7, 4096),nn.ReLU(inplace=True),nn.Dropout(),nn.Linear(4096, 4096),nn.ReLU(inplace=True),nn.Dropout(),nn.Linear(4096, num_classes),)def forward(self, x):x = self.features(x)x = self.avgpool(x)x = torch.flatten(x, 1)x = self.classifier(x)return x# 创建模型实例
def vgg16_se(num_classes=1000, reduction=16):model = VGG16_SE(num_classes=num_classes, reduction=reduction)return model# 示例使用
if __name__ == "__main__":model = vgg16_se()print(model)# 测试前向传播input_tensor = torch.randn(1, 3, 224, 224)output = model(input_tensor)print(f"Input shape: {input_tensor.shape}")print(f"Output shape: {output.shape}")![[电商网站-动态渲染商品-尺寸、尺码、颜色图片等];库存缺货状态动态对应。](http://pic.xiahunao.cn/[电商网站-动态渲染商品-尺寸、尺码、颜色图片等];库存缺货状态动态对应。)

)


)


 - LeetCode】437. 路径总和 III)
 方法详解)
控制器局域网总线(二))

的简介、安装和使用方法、案例应用之详细攻略)


