yolo官网
https://github.com/ultralytics/ultralytics?tab=readme-ov-file
下载python和解除限制
https://www.python.org/downloads/windows/
Set-ItemProperty -Path "HKLM:\SYSTEM\CurrentControlSet\Control\FileSystem" -Name "LongPathsEnabled" -Value 1
vscode中配置python
https://code.visualstudio.com/docs/python/environments⭐⭐⭐⭐⭐
Tensorflow 理解训练过程
y = 2x + 1 的学习过程 程序一开始是不知道这个函数的
一千次充分学习 分别求y值 得出的接近这个函数的结果
import tensorflow as tf
import numpy as np# 创建简单的数据集(y = 2x + 1 加一些噪声)
x = np.array([-1.0, 0.0, 1.0, 2.0, 3.0, 4.0], dtype=float)
y = np.array([-3.0, -1.0, 1.0, 3.0, 5.0, 7.0], dtype=float)# 构建模型:单层神经网络
model = tf.keras.Sequential([tf.keras.layers.Dense(units=1, input_shape=[1])
])# 编译模型
model.compile(optimizer='sgd', loss='mean_squared_error')# 训练模型
print("\n开始训练模型...")
model.fit(x, y, epochs=1000)# 确保TensorFlow正常工作
print("TensorFlow版本:", tf.__version__)
# 使用模型进行预测
print("\n预测结果:")
print(f"当x=10时,预测y值为: {model.predict(np.array([10.0]))[0][0]}")
print(f"当x=11时,预测y值为: {model.predict(np.array([12.0]))[0][0]}")
print(f"当x=12时,预测y值为: {model.predict(np.array([13.0]))[0][0]}")
print(f"当x=13时,预测y值为: {model.predict(np.array([14.0]))[0][0]}")
结论
预测结果:
1/1 ━━━━━━━━━━━━━━━━━━━━ 0s 35ms/step
当x=10时,预测y值为: 18.9998779296875
1/1 ━━━━━━━━━━━━━━━━━━━━ 0s 22ms/step
当x=11时,预测y值为: 22.99984359741211
1/1 ━━━━━━━━━━━━━━━━━━━━ 0s 21ms/step
当x=12时,预测y值为: 24.999826431274414
1/1 ━━━━━━━━━━━━━━━━━━━━ 0s 22ms/step
当x=13时,预测y值为: 26.999807357788086
yolo quick start
https://docs.ultralytics.com/zh/quickstart/⭐⭐⭐⭐⭐
训练并导出模型
from ultralytics import YOLO# Create a new YOLO model from scratch
model = YOLO("yolo11n.yaml")# Load a pretrained YOLO model (recommended for training)
model = YOLO("yolo11n.pt")# Train the model using the 'coco8.yaml' dataset for 3 epochs
results = model.train(data="coco8.yaml", epochs=3)# Evaluate the model's performance on the validation set
results = model.val()# Perform object detection on an image using the model
results = model("https://ultralytics.com/images/bus.jpg")# Export the model to ONNX format
success = model.export(format="onnx")
验证
ownloading https://github.com/ultralytics/assets/releases/download/v8.3.0/yolo11n.pt to 'yolo11n.pt': 100%|██████
from ultralytics import YOLO
import cv2# 1. 加载.pt格式的预训练模型(或自己训练的模型)
# 可以是官方预训练模型(如yolo11n.pt),也可以是自己训练保存的模型(如runs/train/exp/weights/best.pt)
model = YOLO("yolo11n.pt") # 替换为你的.pt模型路径# 2. 对单张图片进行目标检测
image_path = "bus.jpg" # 测试图片路径
results = model(image_path) # 执行推理# 3. 解析并可视化结果
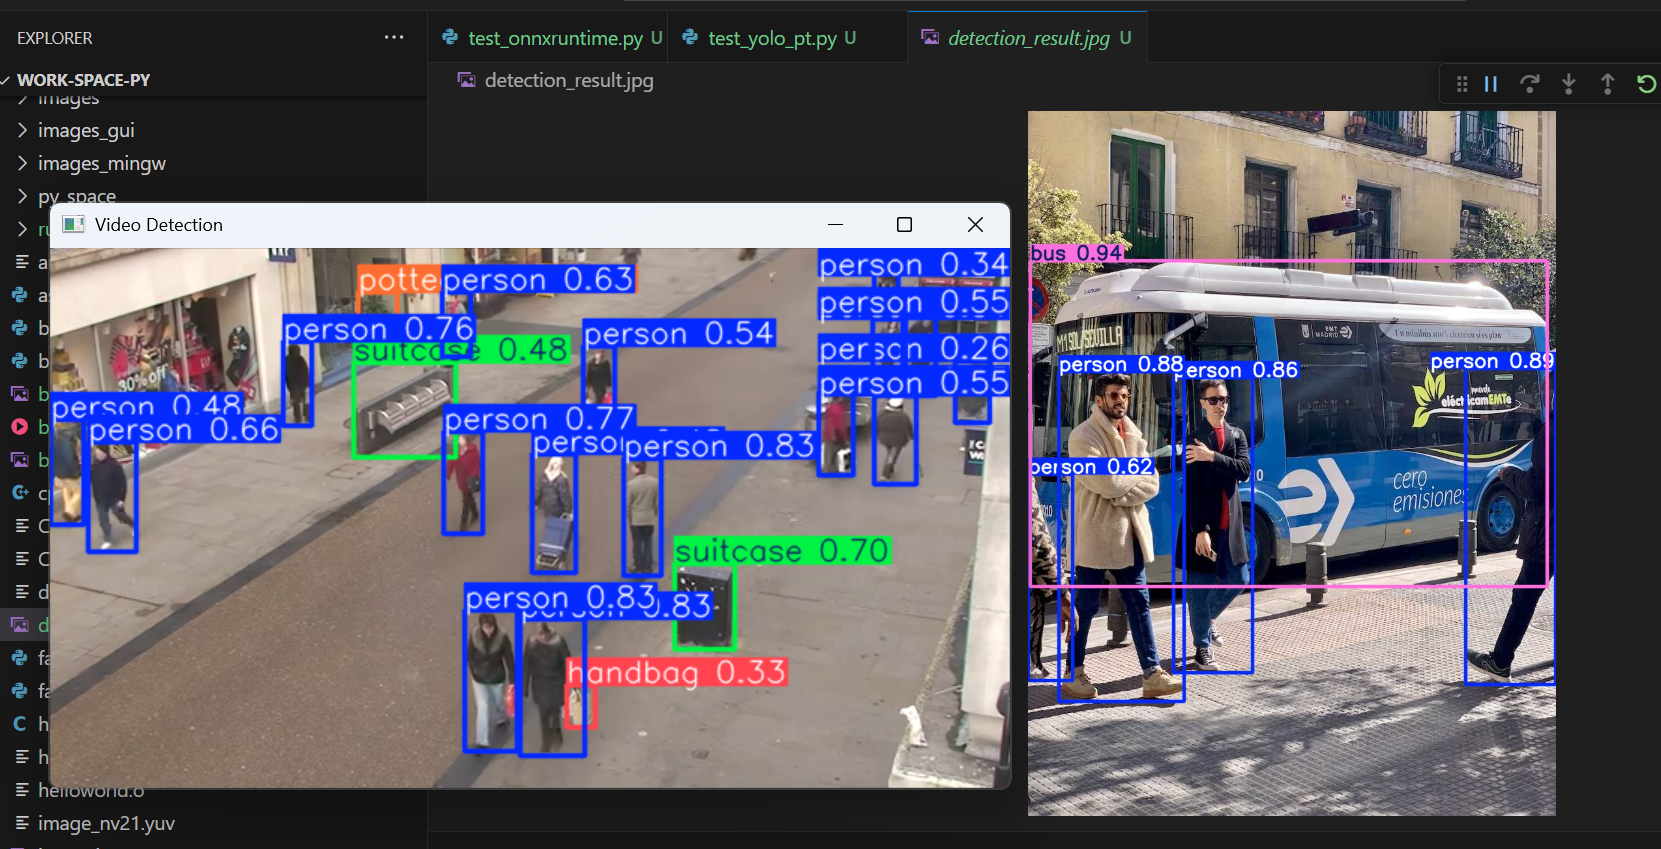
for result in results:# 直接获取处理后的图像(已绘制检测框和标签)annotated_img = result.plot() # 生成带检测框的图像# 保存结果cv2.imwrite("detection_result.jpg", annotated_img)# 显示结果(可选)cv2.imshow("YOLO Detection", annotated_img)cv2.waitKey(0) # 按任意键关闭窗口cv2.destroyAllWindows()# 4. (扩展)对视频进行检测
video_path = "bus_test.mp4" # 测试视频路径
cap = cv2.VideoCapture(video_path)while cap.isOpened():ret, frame = cap.read()if not ret:break# 对每一帧进行检测results = model(frame)annotated_frame = results[0].plot() # 绘制检测框cv2.imshow("Video Detection", annotated_frame)if cv2.waitKey(1) & 0xFF == ord('q'): # 按q退出breakcap.release()
cv2.destroyAllWindows()效果图
yolo实例

——FTP服务详解与实践操作手册)


:mysql深度分页查询优化方案)


