Nginx-2 详解处理 Http 请求
Nginx 作为当今最流行的开源 Web 服务器之一,以其高性能、高稳定性和丰富的功能而闻名。在处理 HTTP请求 的过程中,Nginx 采用了模块化的设计,将整个请求处理流程划分为若干个阶段,每个阶段都可以由特定的模块来处理。这种设计不仅使得 Nginx 具有极高的灵活性和可扩展性,而且也方便了开发者对 Nginx 进行定制和优化。
Nginx 在与客户端建立连接(三次握手)后通过事件驱动模块获取 Http 请求,解析 header 头部并进行处理,接下来的处理可以大致分为以下 11 阶段,每个阶段都会有一些模块和配置项进行处理,需要关注的是每个模块可以发挥什么作用,有哪些配置项。
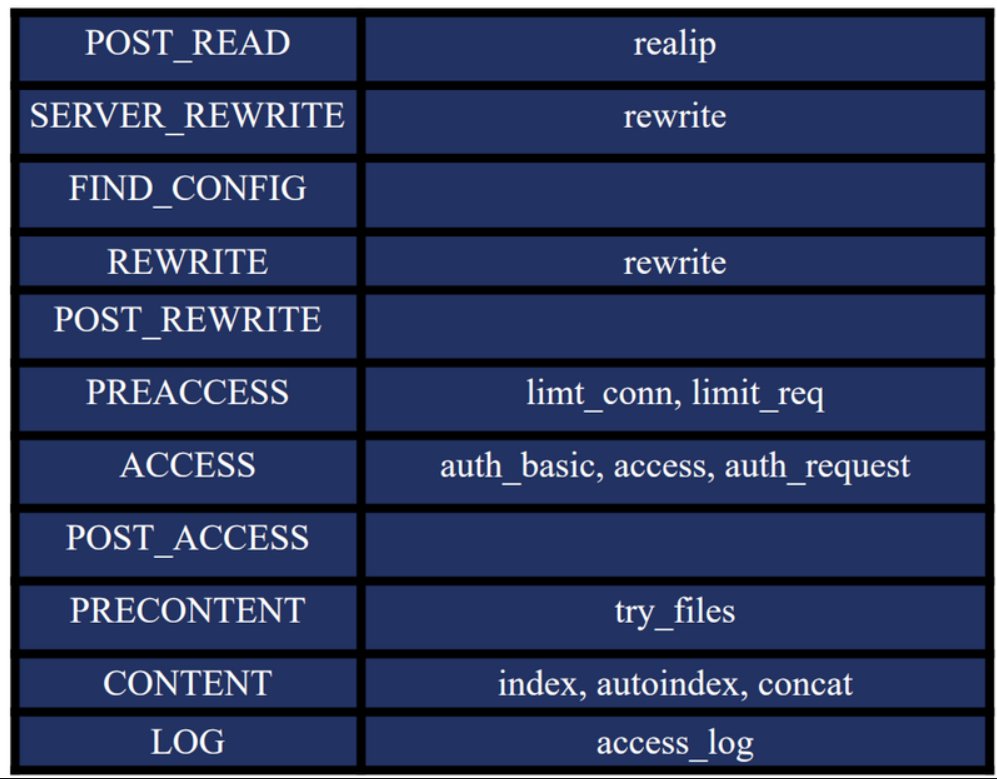
而每一个阶段中的也可能有多个模块可以对其发挥作用,这些模块之间也是有顺序的
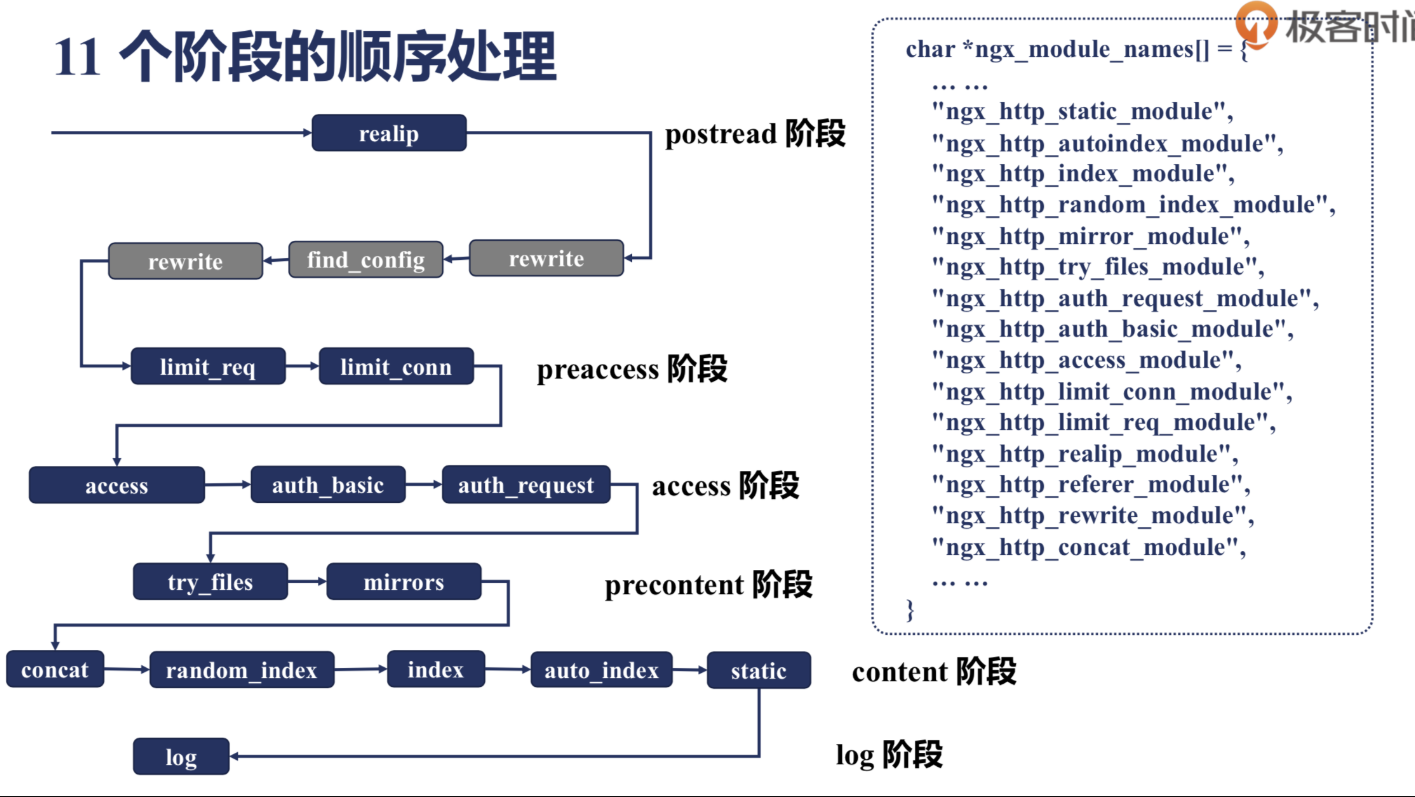
具体的处理顺序可以去 nginx-1.28.0/objs/ngx_modules.c 中查看,该文件中 ngx_module_names 字段标识了模块的处理顺序,正常为由下向上执行,某些特殊指令可以跳转到其他模块
char *ngx_module_names[] = {"ngx_core_module","ngx_errlog_module","ngx_conf_module","ngx_regex_module","ngx_events_module","ngx_event_core_module","ngx_epoll_module","ngx_http_module","ngx_http_core_module","ngx_http_log_module","ngx_http_upstream_module","ngx_http_static_module","ngx_http_autoindex_module","ngx_http_index_module","ngx_http_mirror_module","ngx_http_try_files_module","ngx_http_auth_basic_module","ngx_http_access_module","ngx_http_limit_conn_module","ngx_http_limit_req_module","ngx_http_realip_module","ngx_http_geo_module","ngx_http_map_module","ngx_http_split_clients_module","ngx_http_referer_module","ngx_http_rewrite_module","ngx_http_proxy_module","ngx_http_fastcgi_module","ngx_http_uwsgi_module",......
}
1、POST_READ
该阶段为接受到完整的 HTTP 头部后,读取请求内容阶段,nginx 读取并解析完请求头之后就立即开始执行
该阶段经常用到 realip 模块,可以获取到一些原始的值,用于做日志分析、限流等使用
我们知道一个请求从发出到 nginx 接收,中间可能经过了多台服务器,为了获取到这个原始 IP,通常会使用两个特定的HTTP头部字段:X-Forwarded-For 和 X-Real-IP
- X-Forwarded-For:用于传递客户端请求经过的所有代理服务器的 IP 地址。这个头部通常包含一个或多个 IP地址,它们按照请求经过代理的顺序排列。如果请求直接发送到服务器,则此头部可能不存在或只包含客户端的 IP 地址。
- X-Real-IP:记录客户端的真实 IP 地址,它只包含一个 IP 地址。这个头部字段由第一个代理服务器设置,并且在请求穿越后续代理时不会被更改,因此它代表了客户端的原始 IP 地址。
realip 模块
- 默认不会编译,需要编译时使用 --with-http_realip_module 加入
- 配置项
- set_real_ip_from:此指令用于定义信任的代理服务器。只有来自这些服务器的
X-Real-IP和X-Forwarded-For头部字段才会被 Nginx 接受和处理。 - real_ip_header:通过这个指令,可以指定 Nginx 应该使用
X-Real-IP还是X-Forwarded-For头部来确定客户端的真实 IP 地址。 - realip_recursive:默认关闭,指示
realip模块是否已经递归地处理了X-Forwarded-For头部字段。
- set_real_ip_from:此指令用于定义信任的代理服务器。只有来自这些服务器的
- 重要变量
- http_x_real_ip:包含
X-Real-IP头部的值,即客户端的真实IP地址。如果该头部不存在,则变量为空 - remote_addr:默认情况下,这个变量包含服务器接收到的客户端 IP 地址。当
realip模块启用并正确配置后,它会被设置为客户端的真实 IP 地址。 - http_x_forwarded_for:包含
X-Forwarded-For头部的值,这是一个 IP 地址列表,记录了客户端以及所有中间代理服务器的IP。
- http_x_real_ip:包含
实战:
server {listen 9090;location / {proxy_pass http://127.0.0.1:9091;  # 将请求转发到 server 2proxy_set_header X-Forwarded-For $proxy_add_x_forwarded_for;  # 本机 IP 加入proxy_set_header Host $host;proxy_set_header X-Real-IP $remote_addr;proxy_set_header X-Forwarded-Proto $scheme;}
}server {listen 9091;# 在 server 2 中配置 realip 模块set_real_ip_from 127.0.0.1;        # 允许来自本地的 IP 地址作为反向代理real_ip_header X-Forwarded-For;    # 使用 X-Forwarded-For 头部获取真实 IPreal_ip_recursive on;              # 如果有多个代理,递归获取真实 IPlocation / {access_log /home/nginx/nginx/logs/access_realip.log;# 测试输出真实 IPreturn 200 "\nClient real ip: $remote_addr, X-Forwarded-For: $http_x_forwarded_for\n";}
}
简单解释一下:
在本机 nginx 启动两个端口 9090 和 9091,9090 在收到请求后会模拟代理服务器转发给 9091,9091 认为本机 ip 是可信的(可以这么理解:如果这个 ip 是可信的,它给我说它收到了一个来自 ** 的请求我才相信,否则我就认为和我三次握手的那个 ip 才是真正的请求 ip )
测试:
[root@VM-16-11-centos ~]# curl -H 'X-Forwarded-For: 1.1.1.1, 2.2.2.2' 123.207.214.107:9090Client real ip: 123.207.214.107, X-Forwarded-For: 1.1.1.1, 2.2.2.2, 123.207.214.107
修改 set_real_ip_from 的值为 127.0.0.2 再测试
[root@VM-16-11-centos ~]# curl -H 'X-Forwarded-For: 1.1.1.1, 2.2.2.2' 123.207.214.107:9090Client real ip: 127.0.0.1, X-Forwarded-For: 1.1.1.1, 2.2.2.2, 123.207.214.107
原因是: 127.0.0.1 被认为不可信,所以虽然 X-Forwarded-For 中最后一个 ip 是 123.207.214.107,但 9091 发现与自己通信的其实是本机的 9090,认为真实 ip 就是 127.0.0.1
2、SERVER_REWRITE
在 uri 与 location 匹配之前修改请求的 URI(重定向),在 server 块中的请求地址重写阶段
由于该阶段在 rewrite 阶段前,所以如果这里出现 return 指令,就不会返回 location 中的 return 了
【1】测试 server 下的重写
server {listen 9092;root html/;# 测试 server 下的重写 404 但是返回 403 界面error_page 404 /403.html;}
[root@VM-16-11-centos nginx]# cat html/403.html
This is 403!
[root@VM-16-11-centos ~]# curl 123.207.214.107:9092/test.txt
This is 403!
【2】server 下的重写与 location 中的 return 相比,return 生效
server {listen 9092;root html/;# 测试 server 下的 error_page 和 location 下的 return 生效情况:location 生效error_page 404 /403.html;location / {return 404 "find nothing location!\n";}}
[root@VM-16-11-centos ~]# curl 123.207.214.107:9092/test.txt
find nothing location!
【2】server 下的 return 先于 location 中的 return 返回
server {listen 9092;root html/;# 测试 server 下的 error_page 和 location 下的 return 生效情况:location 生效error_page 404 /403.html;location / {return 404 "find nothing location!\n";}# 测试 server 下的 return 和 location 下的 return 生效: server 中生效return 404 "find nothing server!\n";}
[root@VM-16-11-centos ~]# curl 123.207.214.107:9092/test.txt
find nothing server!
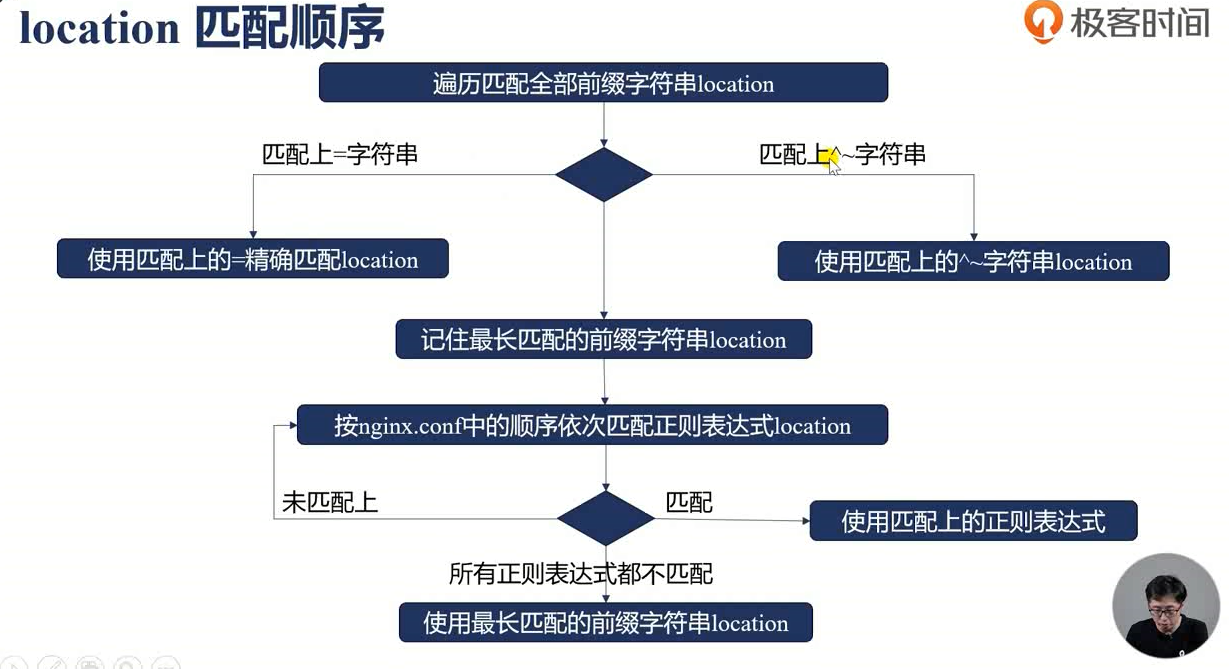
3、FIND_CONFIG
配置查找阶段,根据请求 uri 匹配 location 表达式,这个阶段不支持 nginx 模块注册处理程序,而是由ngx_http_core_module 模块来完成当前请求与 location 配置快之间的配对工作
location 的匹配规则是仅匹配 URI,忽略参数,有下面三种大的情况:
- 前缀字符串
- 常规匹配
- =:精确匹配
- ^~:匹配上后则不再进行正则表达式匹配
- 正则表达式
- ~:大小写敏感的正则匹配
- ~*:大小写不敏感
- 用户内部跳转的命名 location ,可以通过
error_page或try_files等指令进行内部跳转。- @
建议不同业务使用不同的前缀,原因是 location 支持严格匹配、正则、前缀匹配等多种匹配方式,需要考虑匹配的优先级,相比与熟知匹配优先级,各个业务使用不同前缀更加易读
4、REWRITE
location 块中的请求地址重写阶段,当 rewrite 指令用于 location 中时即运行
语法为:rewrite regex replacement [flag]
作用为将 regex 对应指定的 URL 替换成 replacement
其中 flag 字段有以下可选项:
- last:用
replacement这个 URL 进行新的 location 匹配 - break:break 指令停止当前脚本指令的执行,等价于独立的 break 指令
- redirect:返回 302 临时重定向
- permanent:返回 301 永久重定向(永久重定向会被浏览器缓存)
新建一个这样的目录结构
[root@VM-16-11-centos nginx]# tree html/test/
html/test/
|-- first
|   `-- 1.txt
|-- second
|   `-- 2.txt
|-- third`-- 3.txt
配置文件:
server {listen 9093;rewrite_log on;root html/test;location /first {rewrite /first(.*) /second$1 last;return 200 'first!\n';}location /second {rewrite /second(.*) /third$1;return 200 'second!\n';}location /third {return 200 'third!\n';}}
[root@VM-16-11-centos ~]# curl 123.207.214.107:9093/first/1.txt
second!
[root@VM-16-11-centos ~]# curl 123.207.214.107:9093/first/2.txt
second![root@VM-16-11-centos ~]# curl 123.207.214.107:9093/second/3.txt
second!
[root@VM-16-11-centos ~]# curl 123.207.214.107:9093/second/2.txt
second!
出现上述响应的原因是 flag 标志的设置,访问 /first/ 时被重写为了 /second 并按照 last 这个 flag 的规则进行了重新匹配,而 /second 虽然进行了重写,但未配置标志位,所以直接返回了 second 请求下的 200 响应
server {listen 9093;rewrite_log on;root html/test;location /first {rewrite /first(.*) /second$1 last;return 200 'first!\n';}location /second {rewrite /second(.*) /third$1 break;return 200 'second!\n';}location /third {return 200 'third!\n';}}
[root@VM-16-11-centos ~]# curl 123.207.214.107:9093/first/3.txt
3.txt
[root@VM-16-11-centos ~]# curl 123.207.214.107:9093/third/3.txt
third![root@VM-16-11-centos ~]# curl 123.207.214.107:9093/first/3
<html>
<head><title>404 Not Found</title></head>
<body>
<center><h1>404 Not Found</h1></center>
<hr><center>nginx/1.28.0</center>
</body>
</html>
[root@VM-16-11-centos ~]# curl 123.207.214.107:9093/third/3
third!
当 /second 对应的 flag 被设置为 break 后,url 重写后不再进行 location 匹配,而是真正的去找对应的 /third/3
5、POST_REWRITE
请求地址重写提交阶段,防止递归修改 uri 造成死循环,(一个请求执行10次就会被 nginx 认定为死循环)该阶段只由 ngx_http_core_module 模块实现,无外部模块
配置文件
server {listen 9094;# 开启日志,便于调试access_log logs/access_post_rewrite.log;error_log logs/post_rewrite_error.log debug; # 启用调试日志# 重写规则location /loop {rewrite ^/loop(.*)$ /loop_rewritten\$1 last;return 200 "No loop detected\n";}# 默认返回location / {return 200 "Request processed successfully\n";}}
测试
[root@localhost nginx]# curl 123.207.214.107:9094/loop/1
<html>
<head><title>500 Internal Server Error</title></head>
<body>
<center><h1>500 Internal Server Error</h1></center>
<hr><center>nginx/1.28.0</center>
</body>
</html>
查看日志:
2025/06/13 15:55:34 [notice] 32345#0: *4474 rewritten data: "/loop_rewritten\_rewritten\_rewritten\_rewritten\_rewritten\_rewritten\_rewritten\_rewritten\/1", args: "", client: 218.58.62.117, server: , request: "GET /loop/1 HTTP/1.1", host: "123.207.214.107:9094"
2025/06/13 15:55:34 [notice] 32345#0: *4474 "^/loop(.*)$" matches "/loop_rewritten\_rewritten\_rewritten\_rewritten\_rewritten\_rewritten\_rewritten\_rewritten\/1", client: 218.58.62.117, server: , request: "GET /loop/1 HTTP/1.1", host: "123.207.214.107:9094"
2025/06/13 15:55:34 [notice] 32345#0: *4474 rewritten data: "/loop_rewritten\_rewritten\_rewritten\_rewritten\_rewritten\_rewritten\_rewritten\_rewritten\_rewritten\/1", args: "", client: 218.58.62.117, server: , request: "GET /loop/1 HTTP/1.1", host: "123.207.214.107:9094"
2025/06/13 15:55:34 [notice] 32345#0: *4474 "^/loop(.*)$" matches "/loop_rewritten\_rewritten\_rewritten\_rewritten\_rewritten\_rewritten\_rewritten\_rewritten\_rewritten\/1", client: 218.58.62.117, server: , request: "GET /loop/1 HTTP/1.1", host: "123.207.214.107:9094"
2025/06/13 15:55:34 [notice] 32345#0: *4474 rewritten data: "/loop_rewritten\_rewritten\_rewritten\_rewritten\_rewritten\_rewritten\_rewritten\_rewritten\_rewritten\_rewritten\/1", args: "", client: 218.58.62.117, server: , request: "GET /loop/1 HTTP/1.1", host: "123.207.214.107:9094"
2025/06/13 15:55:34 [notice] 32345#0: *4474 "^/loop(.*)$" matches "/loop_rewritten\_rewritten\_rewritten\_rewritten\_rewritten\_rewritten\_rewritten\_rewritten\_rewritten\_rewritten\/1", client: 218.58.62.117, server: , request: "GET /loop/1 HTTP/1.1", host: "123.207.214.107:9094"
2025/06/13 15:55:34 [notice] 32345#0: *4474 rewritten data: "/loop_rewritten\_rewritten\_rewritten\_rewritten\_rewritten\_rewritten\_rewritten\_rewritten\_rewritten\_rewritten\_rewritten\/1", args: "", client: 218.58.62.117, server: , request: "GET /loop/1 HTTP/1.1", host: "123.207.214.107:9094"
2025/06/13 15:55:34 [error] 32345#0: *4474 rewrite or internal redirection cycle while processing "/loop_rewritten\_rewritten\_rewritten\_rewritten\_rewritten\_rewritten\_rewritten\_rewritten\_rewritten\_rewritten\_rewritten\/1", client: 218.58.62.117, server: , request: "GET /loop/1 HTTP/1.1", host: "123.207.214.107:9094"
最后会出现: rewrite or internal redirection cycle while processing 的错误,即一直在循环
6、PREACCESS
访问权限检查准备阶段,http 模块介入处理阶段,模块 ngx_limit_conn 和 ngx_limit_req 就运行在此阶段
ngx_limit_conn 顾名思义是限制连接个数的,而 ngx_limit_req 是限制请求数的,conn 即 tcp 连接,在一个 keepalive 周期内,所有的req 可以共用一个 conn
ngx_limit_conn
# 定义一个空间 名为 addr,存放二进制 ip 地址,大小为 10m
limit_conn_zone $binary_remote_addr zone=addr:10m;
limit_conn_zone $binary_remote_addr zone=addr:10m;
server {listen 9097;root html/;location / {limit_conn_status 500;		# 如果有多的连接返回 500 错误limit_conn_log_level  warn;limit_rate 50;				# 每秒返回 50Blimit_conn addr 1;			# 同时只能有 1 个连接}
}
开两个终端测试
[root@VM-16-11-centos zwj]# curl localhost:9097/
<!DOCTYPE html>
<html>
<head>
<title>Welcome to nginx!</title>
<style>
html { color-scheme: light dark; }
body { width: 35em; margin: 0 auto;
font-family: Tahoma, Verdana, Arial, sans-serif; }
</style>
</head>
<body>
<h1>Welcome to nginx!</h1>
<p>If you see this page, the nginx web server is successfully installed and
working. Further configuration is required.</p><p>For online documentation and support please refer to
<a href="http://nginx.org/">nginx.org</a>.<br/>
Commercial support is available at
<a href="http://nginx.com/">nginx.com</a>.</p><p><em>Thank you for using nginx.</em></p>
</body>
</html>
[root@VM-16-11-centos zwj]# curl localhost:9097/
<html>
<head><title>500 Internal Server Error</title></head>
<body>
<center><h1>500 Internal Server Error</h1></center>
<hr><center>nginx/1.28.0</center>
</body>
</html>
也可以查看 access.log
127.0.0.1 - - [15/Jun/2025:13:59:40 +0800] "GET / HTTP/1.1" 500 177 "-" "curl/7.29.0"
127.0.0.1 - - [15/Jun/2025:13:59:49 +0800] "GET / HTTP/1.1" 200 615 "-" "curl/7.29.0"
ngx_limit_req
# 定义一个空间 名为 addr_req,存放二进制 ip 地址,大小为 10m,每分钟最多处理 3 个请求
limit_req_zone $binary_remote_addr zone=addr_req:10m rate=3r/m;# limit_req 这里注意 burst 和 nodelay 选项
# burst 桶大小 缓存请求
# nodelay 超出桶大小后是否直接返回,nodelay 就是不延时,直接返回定义的错误信息
limit_req zone=addr_req burst=3 nodelay;
limit_conn_zone $binary_remote_addr zone=addr:10m;
limit_req_zone $binary_remote_addr zone=addr_req:10m rate=3r/m;server {listen 9097;root html/;location / {limit_conn_status 500;limit_conn_log_level  warn;limit_rate 50;limit_conn addr 1;#limit_req zone=one burst=3 nodelay;limit_req zone=addr_req;limit_req_status 503;}
}
也可以查看 error.log
2025/06/15 14:13:33 [error] 26915#0: *5530 limiting requests, excess: 0.882 by zone "addr_req", client: 127.0.0.1, server: , request: "GET / HTTP/1.1", host: "localhost:9097"
"logs/error.log" 175L, 21036C
7、ACCESS
访问权限检查阶段,标准模块 ngx_access,第三方模块 nginx_auth_request 以及第三方模块 ngx_lua 的 access_by_lua 指令运行在此阶段,配置指令多是执行访问控制性质的任务,比如检查用户的访问权限,检查用户的来源 IP 地址是否合法
最常用的其实是 allow deny 指令,比如在系统开发完成给远程客户使用阶段,可以指定允许访问的 IP 块
location / { deny 192.168.1.1; allow 192.168.1.0/24; allow 10.1.1.0/16; allow 2001:0db8::/32; deny all;
}
这些指令是顺序匹配,满足其中一条后就不会继续了
除此之外常用的还有 auth_basic 和 auth_request ,但这些模块需要生成密码文件来配置使用,有点麻烦这里就不再验证了~
8、POST_ACCESS
在请求通过访问控制之后,Nginx 执行这个阶段的处理。这可以用于执行一些在访问控制之后需要进行的操作。
9、TRY_FILES
如果 http 请求访问静态文件资源,try_files 配置项可以使这个请求顺序地访问多个静态文件资源,直到某个静态文件资源符合选取条件,重要部分为:try files 处理 和 mirrors
try files 允许我们在请求访问静态文件时,顺序地尝试访问多个文件,直到找到一个符合条件的文件。如果没有符合条件的文件,Nginx 会执行指定的备用操作。
目录结构:
html/
|-- 403.html
|-- 50x.html
|-- index.html
|-- file
|   |-- assets
|   |   |-- 1.css
|   |   |-- 2.css
|   |   `-- default.css
|   `-- images
|       |-- 1.txt
|       |-- 2.txt
|       `-- default.txt
配置
server {listen 9096;root html/file; # 网站根目录# 处理静态文件location / {try_files $uri $uri/ /index.html; # 依次尝试 $uri、$uri/、index.html}# 针对特定路径处理,比如 /images 目录下的静态文件location /images/ {try_files $uri $uri/ /images/default.txt; # 尝试访问图片目录下的文件,如果文件不存在,使用默认}# 其他配置location /assets/ {try_files $uri /assets/default.css; # 访问 assets 目录下的 CSS 文件,若不存在,使用默认样式}}
[root@VM-16-11-centos nginx]# curl localhost:9096/
index
[root@VM-16-11-centos nginx]# curl localhost:9096/3.html
index[root@VM-16-11-centos nginx]# curl localhost:9096/images/111.txt
default
[root@VM-16-11-centos nginx]# curl localhost:9096/images/1.txt
1111.txt1111.txt1111.txt1111.txt1111.txt1111.txt1111.txt1111.txt1111.txt1111.txt1111.txt
mirror 处理请求时,生成子请求访问其他服务,对子请求的返回值不做处理
10、CONTENT
内容产生阶段,大部分HTTP模块会介入该阶段,是所有请求处理阶段中最重要的阶段,因为这个阶段的指令通常是用来生成HTTP响应内容的
这里比较重要的部分包括:root/alias 的使用,index 和 autoindex 的使用
root 和 alias 的区别主要在于匹配到 location 后,最终的那个文件到底是加上 location 对应的前缀还是不加
[root@VM-16-11-centos nginx]# tree html/
html/
|-- 403.html
|-- 50x.html
|-- index.html
|-- root
|   `-- index.html
配置文件
server {listen 9095;location /root {root html;}location /alias {alias html;}}
[root@VM-16-11-centos nginx]# curl localhost:9095/alias/index.html
<!DOCTYPE html>
<html>
<head>
<title>Welcome to nginx!</title>
<style>
html { color-scheme: light dark; }
body { width: 35em; margin: 0 auto;
font-family: Tahoma, Verdana, Arial, sans-serif; }
</style>
</head>
<body>
<h1>Welcome to nginx!</h1>
<p>If you see this page, the nginx web server is successfully installed and
working. Further configuration is required.</p><p>For online documentation and support please refer to
<a href="http://nginx.org/">nginx.org</a>.<br/>
Commercial support is available at
<a href="http://nginx.com/">nginx.com</a>.</p><p><em>Thank you for using nginx.</em></p>
</body>
</html>[root@VM-16-11-centos nginx]# curl localhost:9095/root/index.html
root/html[root@VM-16-11-centos nginx]# curl localhost:9095/alias/root/index.html
root/html
root 会将请求 url 完整的追加在其值的后面,而 alias 则会从请求 url 中先去除 location 匹配的部分再追加
index 指定 / 结尾的目录访问时,返回 index 文件内容
配置
server {listen       9095;charset utf-8;  # 编码格式,不配置的话中文可能乱码#access_log  logs/host.access.log  main;location / {root   html;index index.html index.htm;}error_page   500 502 503 504  /50x.html;location = /50x.html {root   html;}
}
autoindex
server {listen 9095;charset utf-8; # 编码格式,不配置的话中文可能乱码#access_log logs/host.access.log main;location / {root myHtml;autoindex on; # 启用目录列表显示autoindex_exact_size on; # 可选:禁用文件大小显示(以字节为单位)autoindex_localtime on; # 可选:显示本地时间}error_page 500 502 503 504 /50x.html;location = /50x.html {root html;}}
注意:index 模块在 autoindex 之前,所以使用 autoindex 请务必关闭 index 或指定一个不存在的文件
11、LOG
日志模块处理阶段,记录日志,正常会在 logs/access.log 中记录 http 请求的日志信息
默认格式:
log_format combined '$remote_addr - $remote_user [$time_local] '
'"$request" $status $body_bytes_sent ' '"$http_referer"
"$http_user_agent"';
可以根据需要自行修改,同时也会有日志压缩和日志缓存的可配置项
日志格式
access_log path [format=name [buffer=size] [gzip[=level]] [flush=time] [if=condition]];access_log off;
path:日志文件的路径,可以包含变量。format:指定日志格式的名称。buffer:设置日志写入的缓冲区大小。gzip:启用日志文件的压缩,并可选地设置压缩级别。flush:设置日志刷新的频率。if:通过条件判断来控制是否记录日志。
日志缓存 日志缓存功能可以减少磁盘 I/O 操作,通过批量写入日志来提高性能。
写入磁盘的条件
- 待写入磁盘的日志大小超出缓存大小。
- 达到
flush指定的时间。 - worker 进程执行 reopen 命令,或者正在关闭。
我只能说学到这里我大概知道 nginx 的每个阶段可以做什么,具体的指令如果不是经常配置应该还是会忘记~


)


)

)
)


)

