记得关注一下博主,博主每天都会更新IT技术,让你有意想不到的小收获哦^_^
文章目录
- *`记得关注一下博主,博主每天都会更新IT技术,让你有意想不到的小收获哦^_^`*
- 一、MongDB集群启停止
- 1、MonogoDB分片集群服务启动顺序(三台主机都要操作,主机启动顺序 mongodb01 --- mongodb02 --- mongodb03)
- 2、MonogoDB分片集群服务停止顺序(三台主机都要操作,主机停止顺序 mongodb03 --- mongodb02 --- mongodb01)
- 二、查看并调整MonogDB分片集群
- 1、查看分片集群状态信息
- 2、查看分片数据库信息
- 3、开启balancer功能
- 4、设置balance进程activeWindows运行窗口时间(本教程暂时不设置,以免影响后面模拟操作)
- 三、MongoDB分片集群模拟非分片集合转分片集合
- 1、分片集群创建非分片集合并插入数据
- 2、查看school数据库分片情况
- 3、school数据库开启分片功能
- 4、school数据库student集合开启分片功能
- 5、调整MongoDB分片集群 Chunk大小
- 6、开启student集合balancer功能和设置autosplit属性为true
- 7、设置student集合balancer功能autosplit属性为true
- 8、查看school数据库student集合Chunk数据块在每个shard节点分配使用情况
- 9、模拟school数据库student集合插入数据
- 10、查看school数据库student集合Chunk数据块在每个shard节点分配使用情况
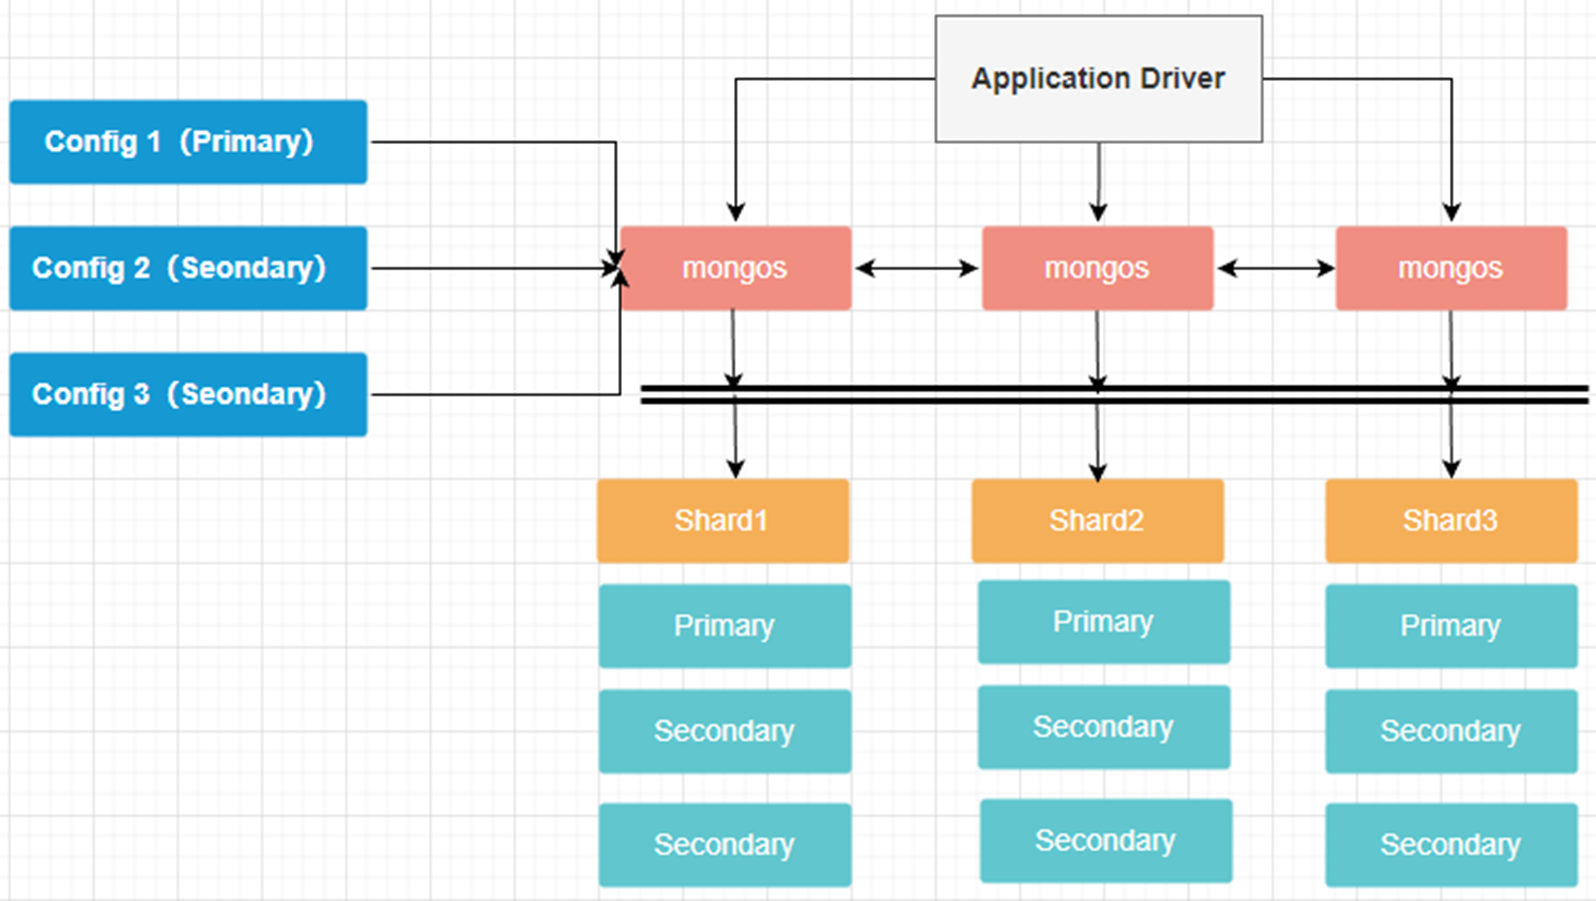
MongoDB分片集群由以下组件组成
shard 分片服务: 提供以复制集为单位横向扩展,最大支持分片节点1024个,分片之间的数据不重复,所有分片在一起才可以完整工作。
mongos 路由服务:提供客户端应用程序和分片群集之间接口,选择合适数据shard节点进行读写,不持久化数据,只缓存config配置服务器的元数据。
config 配置服务: 提供MongoDB分片集群数据存储分片shard节点的信息和分片功能的配置信息, 从MongoDB 3.4开始,配置服务器必须部署为副本集。
主机规划
| 主机名称 | 主机IP | CPU | 内存 | mongos端口 | config端口 | share1端口 | share2端口 | share3端口 | 操作系统及软件版本 |
|---|---|---|---|---|---|---|---|---|---|
| mongodb01 | 192.168.91.61 | 2*4 | 16GB | 27017 | 27019 | 27101 | 27102 | 27103 | CentOS 7.9 mongo 4.4.29 mongos 4.4.29 mongod 4.4.29 mongosh 2.2.29 |
| mongodb02 | 192.168.91.62 | 2*4 | 16GB | 27017 | 27019 | 27101 | 27102 | 27103 | CentOS 7.9 mongo 4.4.29 mongos 4.4.29 mongod 4.4.29 mongosh 2.2.29 |
| mongodb03 | 192.168.91.63 | 2*4 | 16GB | 27017 | 27019 | 27101 | 27102 | 27103 | CentOS 7.9 mongo 4.4.29 mongos 4.4.29 mongod 4.4.29 mongosh 2.2.29 |
MongoDB分片集群架构图
提示:MongoDB 分片集群安装与部署本教程不讲解,如有疑问请自行上网查阅关于MongDB分片集群安装与部署。
一、MongDB集群启停止
1、MonogoDB分片集群服务启动顺序(三台主机都要操作,主机启动顺序 mongodb01 — mongodb02 — mongodb03)
systemctl start mongod
systemctl start shard1
systemctl start shard2
systemctl start shard3
systemctl start mongossystemctl status mongod
systemctl status shard1
systemctl status shard2
systemctl start shard3
systemctl status mongos
2、MonogoDB分片集群服务停止顺序(三台主机都要操作,主机停止顺序 mongodb03 — mongodb02 — mongodb01)
systemctl stop mongos
systemctl stop shard3
systemctl stop shard2
systemctl stop shard1
systemctl stop mongodsystemctl status mongos
systemctl status shard3
systemctl status shard2
systemctl status shard1
systemctl status mongod
二、查看并调整MonogDB分片集群
1、查看分片集群状态信息
mongosh --host 192.168.91.61 --port 27017 -u root -p 123456### 显示分片集群的分片节点信息
use admin
db.runCommand({ listshards : 1})### 查看分片集群状态信息
use admin
sh.status()
### 查看更多分片集群状态信息,包括分片键和范围信息等
sh.status(true)
2、查看分片数据库信息
mongosh --host 192.168.91.61 --port 27017 -u root -p 123456### 查看已开启分片的数据库
use config
db.databases.find( { "partitioned": true } )
db.databases.find()### 查看所有分片的片键
db.collections.find()
3、开启balancer功能
提示:balancer组件是MongoDB分片集群中的一个进程,它会定期检查分片集群中的分片数量,并自动迁移分片之间数据不均衡的数据块,以此来实现数据分布均衡。
mongosh --host 192.168.91.61 --port 27017 -u root -p 123456### 检查balancer是否开启,true为开启,false为关闭,默认开启
sh.getBalancerState()### 启动balancer
sh.startBalancer()### 关闭balancer
sh.stopBalancer()
4、设置balance进程activeWindows运行窗口时间(本教程暂时不设置,以免影响后面模拟操作)
提示:如果MongDB分片集群在执行备份期间,需要确保balance处于停止状态,以免MongDB分片集群在执行备份期间还有数据块在迁移,影响备份数据的一致性。可以设置一个备份窗口时间用于自动化备份操作,在这个时间段内,balancer进程一直处于停止状态。
mongosh --host 192.168.91.61 --port 27017 -u root -p 123456### 检查balancer是否开启,true为开启,false为关闭,默认开启
use config
sh.getBalancerState()### 如果未开balancer功能可以执行以下命令开启
sh.setBalancerState( true )### 设置balancer进程activeWindows运行窗口从6点开始运行,晚上23点停止,其余的时间段可以用来备份分片集群数据库操作
db.settings.update( { _id : "balancer" }, { $set : { activeWindow : { start : "6:00", stop : "23:00" } } }, true )### 删除balancer进程activeWindows运行窗口
db.settings.update({ "_id" : "balancer" }, { $unset : { activeWindow : 1 }});
三、MongoDB分片集群模拟非分片集合转分片集合
模拟说明:暂时先不要给模拟数据库和集合启动分片功能,等创建好数据库并插入数据后,再启动分片功能。
1、分片集群创建非分片集合并插入数据
mongosh --host 192.168.91.61  --port 27017  -u root -p 123456### 创建school数据库
use school### 创建student集合并插入数据
for (var i = 1; i <= 10000; i++){db.student.insert({number:i,"001":"xiaoming"});
}### 查看school数据库student集合数据
use school
show collections;
db.student.find().limit(5)
db.student.find().count()
2、查看school数据库分片情况
提示:MongoDB分片集群school数据库student集合如果要开启分片功能,需要先开启school数据库分片功能才能接着开启student集合的分片功能。
mongosh --host 192.168.91.61  --port 27017  -u root -p 123456### 当前参数partitioned:为false说明school数据库并没有开启分片功能,student集合也没有开启分片功能,当前参数primary: 'shard1'说明school数据库只是分配在shard1节点上
[direct: mongos] config> sh.status()
…………………………………………database: {_id: 'school',primary: 'shard1',partitioned: false,version: {uuid: UUID('9e42a412-f191-40b5-9804-9f225cd5abb4'),lastMod: 1},lastMovedTimestamp: Timestamp({ t: 1718954817, i: 1 })},collections: {}}
]
3、school数据库开启分片功能
mongosh --host 192.168.91.61  --port 27017  -u root -p 123456### school数据库开启分片功能
use admin
sh.enableSharding("school")### 当前参数partitioned:为true说明school数据库开启分片功能
[direct: mongos] admin> sh.status()
…………………………………………database: {_id: 'school',primary: 'shard1',partitioned: true,version: {uuid: UUID('9e42a412-f191-40b5-9804-9f225cd5abb4'),lastMod: 1},lastMovedTimestamp: Timestamp({ t: 1718954817, i: 1 })},collections: {}}
]
4、school数据库student集合开启分片功能
mongosh --host 192.168.91.61  --port 27017  -u root -p 123456### school数据库student集合开启分片功能,提示以下错误原因在于当前school数据库student集合已经有数据在里面(属于非分片集合),并且插入的数据并没有分片索引,所以,需要进入到school数据库先创建student集合的分片索引。
[direct: mongos] admin> use admin
[direct: mongos] admin> sh.shardCollection( "school.student", { _id: "hashed" } )
MongoServerError[InvalidOptions]: Please create an index that starts with the proposed shard key before sharding the collection### 进入school数据库创建student集合分片索引(”_id”索引名称自定义)
[direct: mongos] school> use school
[direct: mongos] school> db.student.createIndex( { _id: "hashed" } )
[direct: mongos] school> db.student.getIndexes()
[{ v: 2, key: { _id: 1 }, name: '_id_' },{ v: 2, key: { _id: 'hashed' }, name: '_id_hashed' }
]### 开启school数据库student集合分片功能
use admin
sh.shardCollection( "school.student", { _id: "hashed" } )### 当前参数balancing值为true说明student集合开启了balancer功能。当前chunkMetadata参数只分配在shard1节点上,但没有分配在shard2节点和shard3节点,是否student没有开启分片功能?其实不是这样子,原因在于当前student集合并没有数据写入,而且数据也很小,分片集群的Chunk数据块默认是64MB,其实只要一个shard节点的一个Chunk数据块就够存储了。如果我们把Chunk数据块调整成1MB,然后我们在往student集合插入大量数据,那balancer进程就会检查到有数据写入到student集合就会触发自动平衡student集合Chunk数据块到shard1节点、shard2节点、shard3节点。
[direct: mongos] admin> sh.status()
…………………………………………database: {_id: 'school',primary: 'shard1',partitioned: true,version: {uuid: UUID('9e42a412-f191-40b5-9804-9f225cd5abb4'),lastMod: 1},lastMovedTimestamp: Timestamp({ t: 1718954817, i: 1 })},collections: {'school.student': {shardKey: { _id: 'hashed' },unique: false,balancing: true,chunkMetadata: [ { shard: 'shard1', nChunks: 1 } ],chunks: [{ min: { _id: MinKey() }, max: { _id: MaxKey() }, 'on shard': 'shard1', 'last modified': Timestamp({ t: 1, i: 0 }) }],tags: []}}}
]
5、调整MongoDB分片集群 Chunk大小
提示:本教程调整Chunk大小为1MB只是为了方便模拟测试,如果是生产环境推荐使用默认值或根据实际环境需求调整。
mongosh --host 192.168.91.61  --port 27017  -u root -p 123456### 调整chunk大小,默认64MB,chunk取值范围 1MB~1024MB(2的整数倍取值),"value:1"代表调整每个chunk大小为1MB
use config
db.settings.updateOne( { _id: "chunksize" },{ $set: { _id: "chunksize", value: 1 } },{ upsert: true } )### 查看chunk大小,并且要确保当前参数autosplit为true状态,才能让Chunk自动分裂,autosplit属性也是靠insert和update来触发Chunk自动分裂的
[direct: mongos] config> db.settings.find()
[{ _id: 'balancer', mode: 'full', stopped: false },{ _id: 'autosplit', enabled: true },{ _id: 'chunksize', value: 1 }
]
6、开启student集合balancer功能和设置autosplit属性为true
mongosh --host 192.168.91.61  --port 27017  -u root -p 123456### 开启student集合balancer功能
use config
sh.enableBalancing("school.student") ### 关闭student集合balancer功能
use config
sh.disableBalancing("school.student")### 查看school数据库student集合是否开启了balancer功能,如果参数balancing值为true说明开启,false说明关闭
sh.status()
7、设置student集合balancer功能autosplit属性为true
mongosh --host 192.168.91.61  --port 27017  -u root -p 123456### 设置autosplit属性为true
use config
sh.disableAutoSplit()### 设置autosplit属性为false
use config
sh.enableAutoSplit()### 查看student集合balancer功能autosplit属性值
use config
db.settings.find()
8、查看school数据库student集合Chunk数据块在每个shard节点分配使用情况
mongosh --host 192.168.91.61  --port 27017  -u root -p 123456[direct: mongos] config> use school[direct: mongos] school> db.student.getShardDistribution()
Shard shard1 at shard1/192.168.91.61:27101,192.168.91.62:27101,192.168.91.63:27101
{data: '507KiB',docs: 10000,chunks: 1,'estimated data per chunk': '507KiB','estimated docs per chunk': 10000
}
---
Totals
{data: '507KiB',docs: 10000,chunks: 1,'Shard shard1': ['100 % data','100 % docs in cluster','52B avg obj size on shard']
}
9、模拟school数据库student集合插入数据
mongosh --host 192.168.91.61  --port 27017  -u root -p 123456use school### student集合在原来1万条数据再插入多5万条数据
for (var i = 10001; i <= 60000; i++){db.student.insert({id:i,"003":"xiaoming"});
}### 查看school数据库student集合数据
use school
show collections;
db.student.find().limit(5)
db.student.find().count()
10、查看school数据库student集合Chunk数据块在每个shard节点分配使用情况
mongosh --host 192.168.91.61  --port 27017  -u root -p 123456[direct: mongos] school> use school[direct: mongos] school> db.student.getShardDistribution()
Shard shard1 at shard1/192.168.91.61:27101,192.168.91.62:27101,192.168.91.63:27101
{data: '2.16MiB',docs: 46552,chunks: 1,'estimated data per chunk': '2.16MiB','estimated docs per chunk': 46552
}
---
Shard shard2 at shard2/192.168.91.61:27102,192.168.91.62:27102,192.168.91.63:27102
{data: '1.38MiB',docs: 29859,chunks: 1,'estimated data per chunk': '1.38MiB','estimated docs per chunk': 29859
}
---
Shard shard3 at shard3/192.168.91.61:27103,192.168.91.62:27103,192.168.91.63:27103
{data: '709KiB',docs: 14929,chunks: 1,'estimated data per chunk': '709KiB','estimated docs per chunk': 14929
}
---
Totals
{data: '4.24MiB',docs: 91340,chunks: 3,'Shard shard1': ['51.06 % data','50.96 % docs in cluster','48B avg obj size on shard'],'Shard shard2': ['32.62 % data','32.68 % docs in cluster','48B avg obj size on shard'],'Shard shard3': ['16.31 % data','16.34 % docs in cluster','48B avg obj size on shard']
}


)


