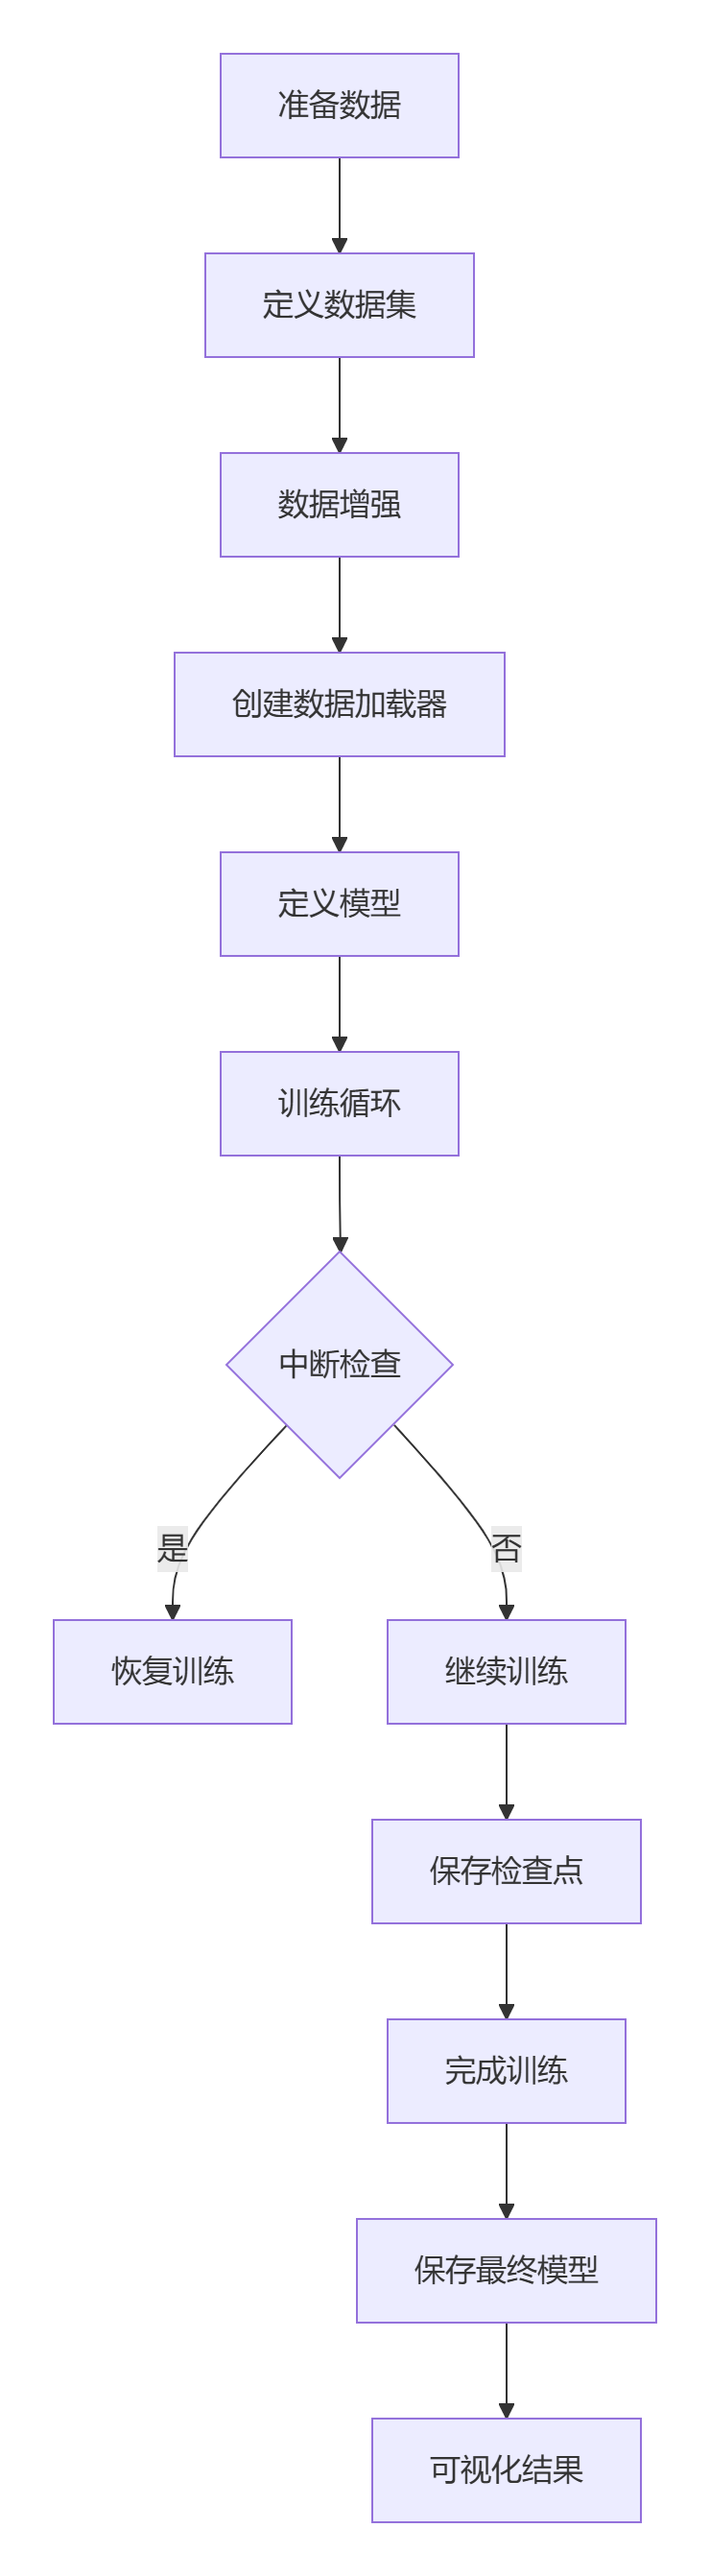
流程
- 定义自定义数据集类
- 定义训练和验证的数据增强
- 定义模型、损失函数和优化器
- 训练循环,包括验证
- 训练可视化
- 整个流程
- 模型评估
- 高级功能扩展
- 混合精度训练
- 分布式训练
 {:width=“50%” height=“50%”}
定义自定义数据集类
#======================
#1. 自定义数据集类
#======================
class CustomImageDataset(Dataset):def __init__(self, root_dir, transform=None):"""自定义数据集初始化:param root_dir: 数据集根目录:param transform: 数据增强和预处理"""self.root_dir = root_dirself.transform = transformself.classes = sorted(os.listdir(root_dir))self.class_to_idx = {cls_name: i for i, cls_name in enumerate(self.classes)}# 收集所有图像路径和标签self.image_paths = []self.labels = []for cls_name in self.classes:cls_dir = os.path.join(root_dir, cls_name)for img_name in os.listdir(cls_dir):if img_name.lower().endswith(('.jpg', '.png', '.jpeg')):self.image_paths.append(os.path.join(cls_dir, img_name))self.labels.append(self.class_to_idx[cls_name])def __len__(self):return len(self.image_paths)def __getitem__(self, idx):# 加载图像img_path = self.image_paths[idx]try:image = Image.open(img_path).convert('RGB')except Exception as e:print(f"Error loading image {img_path}: {e}")# 返回空白图像作为占位符image = Image.new('RGB', (224, 224), (0, 0, 0))# 应用数据增强和预处理if self.transform:image = self.transform(image)# 获取标签label = self.labels[idx]return image, label
定义训练和验证的数据增强
#======================
#2. 数据增强与预处理
#======================
def get_transforms():"""返回训练和验证的数据增强管道"""# 训练集增强(更丰富)train_transform = transforms.Compose([transforms.RandomResizedCrop(224),transforms.RandomHorizontalFlip(p=0.5),transforms.RandomRotation(15),transforms.ColorJitter(brightness=0.2, contrast=0.2, saturation=0.2),transforms.ToTensor(),transforms.Normalize(mean=[0.485, 0.456, 0.406], std=[0.229, 0.224, 0.225])])# 验证集预处理(无随机增强)val_transform = transforms.Compose([transforms.Resize(256),transforms.CenterCrop(224),transforms.ToTensor(),transforms.Normalize(mean=[0.485, 0.456, 0.406], std=[0.229, 0.224, 0.225])])return train_transform, val_transform
定义模型、损失函数和优化器
#======================
#3. 模型定义
#======================
def create_model(num_classes):"""创建模型(使用预训练ResNet18)"""model = resnet18(pretrained=True)num_ftrs = model.fc.in_featuresmodel.fc = nn.Linear(num_ftrs, num_classes)return model
训练循环,包括验证
#======================
#4. 训练函数
#======================
def train_model(model, dataloaders, criterion, optimizer, scheduler, device, num_epochs=25, checkpoint_path='checkpoint.pth', resume=False):"""训练模型并支持中断恢复:param resume: 是否从检查点恢复训练"""# 训练历史记录history = {'train_loss': [], 'val_loss': [],'train_acc': [], 'val_acc': [],'epoch': 0, 'best_acc': 0.0}# 从检查点恢复start_epoch = 0if resume and os.path.exists(checkpoint_path):print(f"Loading checkpoint from {checkpoint_path}")checkpoint = torch.load(checkpoint_path)model.load_state_dict(checkpoint['model_state_dict'])optimizer.load_state_dict(checkpoint['optimizer_state_dict'])scheduler.load_state_dict(checkpoint['scheduler_state_dict'])history = checkpoint['history']start_epoch = history['epoch'] + 1print(f"Resuming training from epoch {start_epoch}")# 训练循环for epoch in range(start_epoch, num_epochs):print(f'Epoch {epoch+1}/{num_epochs}')print('-' * 10)# 更新历史记录history['epoch'] = epoch# 每个epoch都有训练和验证阶段for phase in ['train', 'val']:if phase == 'train':model.train()  # 设置训练模式else:model.eval()   # 设置评估模式running_loss = 0.0running_corrects = 0# 迭代数据for inputs, labels in dataloaders[phase]:inputs = inputs.to(device)labels = labels.to(device)# 梯度清零optimizer.zero_grad()# 前向传播with torch.set_grad_enabled(phase == 'train'):outputs = model(inputs)_, preds = torch.max(outputs, 1)loss = criterion(outputs, labels)# 训练阶段反向传播和优化if phase == 'train':loss.backward()optimizer.step()# 统计running_loss += loss.item() * inputs.size(0)running_corrects += torch.sum(preds == labels.data)if phase == 'train':scheduler.step()epoch_loss = running_loss / len(dataloaders[phase].dataset)epoch_acc = running_corrects.double() / len(dataloaders[phase].dataset)# 记录历史history[f'{phase}_loss'].append(epoch_loss)history[f'{phase}_acc'].append(epoch_acc.item())print(f'{phase} Loss: {epoch_loss:.4f} Acc: {epoch_acc:.4f}')# 保存最佳模型if phase == 'val' and epoch_acc > history['best_acc']:history['best_acc'] = epoch_acc.item()torch.save(model.state_dict(), 'best_model.pth')print(f"New best model saved with accuracy: {epoch_acc:.4f}")# 保存检查点(每个epoch结束后)checkpoint = {'epoch': epoch,'model_state_dict': model.state_dict(),'optimizer_state_dict': optimizer.state_dict(),'scheduler_state_dict': scheduler.state_dict(),'history': history}torch.save(checkpoint, checkpoint_path)print(f"Checkpoint saved at epoch {epoch+1}")print()# 保存最终模型torch.save(model.state_dict(), 'final_model.pth')print('Training finished!')return model, history
训练可视化
#======================
#5. 可视化训练历史
#======================
def plot_history(history):plt.figure(figsize=(12, 4))# 损失曲线plt.subplot(1, 2, 1)plt.plot(history['train_loss'], label='Train Loss')plt.plot(history['val_loss'], label='Validation Loss')plt.xlabel('Epochs')plt.ylabel('Loss')plt.legend()plt.title('Training and Validation Loss')# 准确率曲线plt.subplot(1, 2, 2)plt.plot(history['train_acc'], label='Train Accuracy')plt.plot(history['val_acc'], label='Validation Accuracy')plt.xlabel('Epochs')plt.ylabel('Accuracy')plt.legend()plt.title('Training and Validation Accuracy')plt.tight_layout()plt.savefig('training_history.png')plt.show()
整个流程
#======================
#6. 主函数
#======================
def main():# 设置随机种子(确保可复现性)torch.manual_seed(42)np.random.seed(42)# 检查设备device = torch.device("cuda" if torch.cuda.is_available() else "cpu")print(f"Using device: {device}")# 创建数据增强管道train_transform, val_transform = get_transforms()# 创建数据集train_dataset = CustomImageDataset(root_dir='path/to/your/train_data',  # 替换为你的训练数据路径transform=train_transform)val_dataset = CustomImageDataset(root_dir='path/to/your/val_data',    # 替换为你的验证数据路径transform=val_transform)# 创建数据加载器train_loader = DataLoader(train_dataset,batch_size=32,shuffle=True,num_workers=4,pin_memory=True)val_loader = DataLoader(val_dataset,batch_size=32,shuffle=False,num_workers=4,pin_memory=True)dataloaders = {'train': train_loader, 'val': val_loader}# 创建模型num_classes = len(train_dataset.classes)model = create_model(num_classes)model = model.to(device)# 定义损失函数和优化器criterion = nn.CrossEntropyLoss()optimizer = optim.Adam(model.parameters(), lr=0.001, weight_decay=1e-4)scheduler = optim.lr_scheduler.StepLR(optimizer, step_size=7, gamma=0.1)# 检查是否要恢复训练resume_training = Falsecheckpoint_path = 'checkpoint.pth'# 检查是否存在检查点文件if os.path.exists(checkpoint_path):print("Checkpoint file found. Do you want to resume training? (y/n)")response = input().lower()if response == 'y':resume_training = True# 开始训练start_time = time.time()model, history = train_model(model=model,dataloaders=dataloaders,criterion=criterion,optimizer=optimizer,scheduler=scheduler,device=device,num_epochs=25,checkpoint_path=checkpoint_path,resume=resume_training)end_time = time.time()# 保存训练历史with open('training_history.json', 'w') as f:json.dump(history, f, indent=4)# 打印训练时间training_time = end_time - start_timeprint(f"Total training time: {training_time//3600}h {(training_time%3600)//60}m {training_time%60:.2f}s")# 可视化训练历史plot_history(history)if __name__ == "__main__":main()
模型评估
#======================
#模型评估
#======================
def evaluate_model(model, dataloader, device):model.eval()correct = 0total = 0with torch.no_grad():for inputs, labels in dataloader:inputs, labels = inputs.to(device), labels.to(device)outputs = model(inputs)_, predicted = torch.max(outputs.data, 1)total += labels.size(0)correct += (predicted == labels).sum().item()accuracy = 100 * correct / totalprint(f'Test Accuracy: {accuracy:.2f}%')return accuracy
test_dataset = CustomImageDataset('path/to/test_data', transform=val_transform)
test_loader = DataLoader(test_dataset, batch_size=32, shuffle=False)
evaluate_model(model, test_loader, device)
高级功能扩展
混合精度训练
from torch.cuda.amp import autocast, GradScaler
#在训练函数中添加
scaler = GradScaler()
#修改训练循环
with autocast():outputs = model(inputs)loss = criterion(outputs, labels)scaler.scale(loss).backward()
scaler.step(optimizer)
scaler.update()
分布式训练
import torch.distributed as dist
from torch.nn.parallel import DistributedDataParallel as DDP
#初始化分布式环境
dist.init_process_group(backend='nccl')
local_rank = int(os.environ['LOCAL_RANK'])
torch.cuda.set_device(local_rank)
#包装模型
model = DDP(model.to(local_rank), device_ids=[local_rank])
#修改数据加载器
train_sampler = torch.utils.data.distributed.DistributedSampler(train_dataset)
train_loader = DataLoader(..., sampler=train_sampler)


)


)


工程文件结构)


 - 解题思路 + Golang实现)
:数据预处理)
》)


