list&list模拟
- 1.list使用
- 2、list模拟
- 附录
1.list使用
list常见接口不做介绍,跟前面vector有相似之处,跟数据结构list基本一样。

因为list使用带头的双向循环链表实现的,不能用小标访问,只能用迭代器或范围for访问
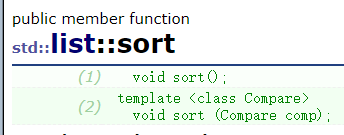
list有成员函数sort,来实现排序
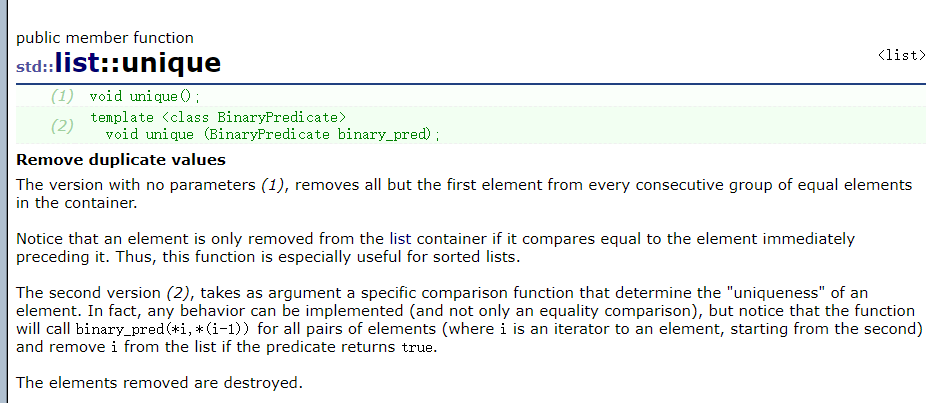
void unique(),去重,去重先先要排序
void test_list1()
{list<int> lt1 = { 10,2,3,3,4,5,6 };list<int> ::iterator it = lt1.begin();while (it != lt1.end()){cout << *it << " ";it++;}cout << endl;//list不支持sort//sort(lt1.begin(), lt1.end(), greater<int>());//list有自己的排序算法lt1.sort();it = lt1.begin();while (it != lt1.end()){cout << *it << " ";it++;}cout << endl;lt1.sort(greater<int>());it = lt1.begin();while (it != lt1.end()){cout << *it << " ";it++;}cout << endl;//unique 去重//先排序,在去重lt1.unique();for (auto e : lt1){cout << e << " ";  //10 6 5 4 3 2}cout << endl;
}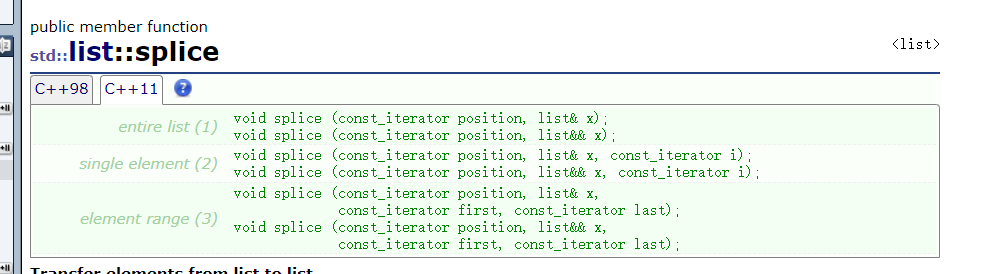
splice粘接
void splice(const _iterator position,list& x);把x粘接到pos位置。
void test_list2()
{//splice:粘接std::list<int> mylist1, mylist2;std::list<int>::iterator it;// set some initial values:for (int i = 1; i <= 4; ++i)mylist1.push_back(i);      // mylist1: 1 2 3 4for (int i = 1; i <= 3; ++i)mylist2.push_back(i * 10);   // mylist2: 10 20 30it = mylist1.begin();++it;                         // points to 2mylist1.splice(it, mylist2); // mylist1: 1 10 20 30 2 3 4// mylist2 (empty)// "it" still points to 2 (the 5th element
}
void splice(const_iterator position,list& x,const_itrator i);
把list的第i个位置的数粘接到position位置.
void test_list3()
{list<int> mylist;for (int i = 1; i <= 4; i++){mylist.push_back(i);  //mylist:   1 2 3 4} //想把3转移到头list<int>::iterator  it = find(mylist.begin(), mylist.end(), 3);//void splice (const_iterator position, list& x, const_iterator i);//把list的第i个位置的数粘接到position位置mylist.splice(mylist.begin(), mylist, it);
}
2、list模拟
先写申请一个节点的类,把节点弄成一个类,相当与搞了一个新的数据类型。
//这是第一个类 ListNode
//所谓的类就是把成员对象和成员函数封装在一起.
//这个全部弄成共有
//供后面存储数据来用
template<class T>
struct ListNode
{ListNode<T>* _next;ListNode<T>* _prev;T _data;//const T& data是接受常量//不能权限放大,会报错ListNode(const T& data = T()):_next(nullptr),_prev(nullptr),_data(data){}
};
先写list的大框架
template<class T>
class list
{typedef ListNode<T> Node;
public://无参构造函数就是默认构造list(){_head = new Node;_head->_prev = _head;_head->_next = _head;}void push_back(const T& data){//...}
private:Node* _head;
};
写push_back()先跑通框架
void push_back(const T& data)
{Node* newnode = new Node(data);Node* tail = _head->_prev;//tail newnode  _headtail->_next = newnode;newnode->_prev = tail;newnode->_next = _head;_head->_prev = newnode;
}
带头双向循环链表,非常简单,写尾插即可,通过_head->_prev找到尾巴,尾巴,新节点,头插入即可。
然后把节点封装成迭代器。把节点写成一个类,封装成迭代器所具有的属性,即可。先写·迭代器的行为,在进行封装。
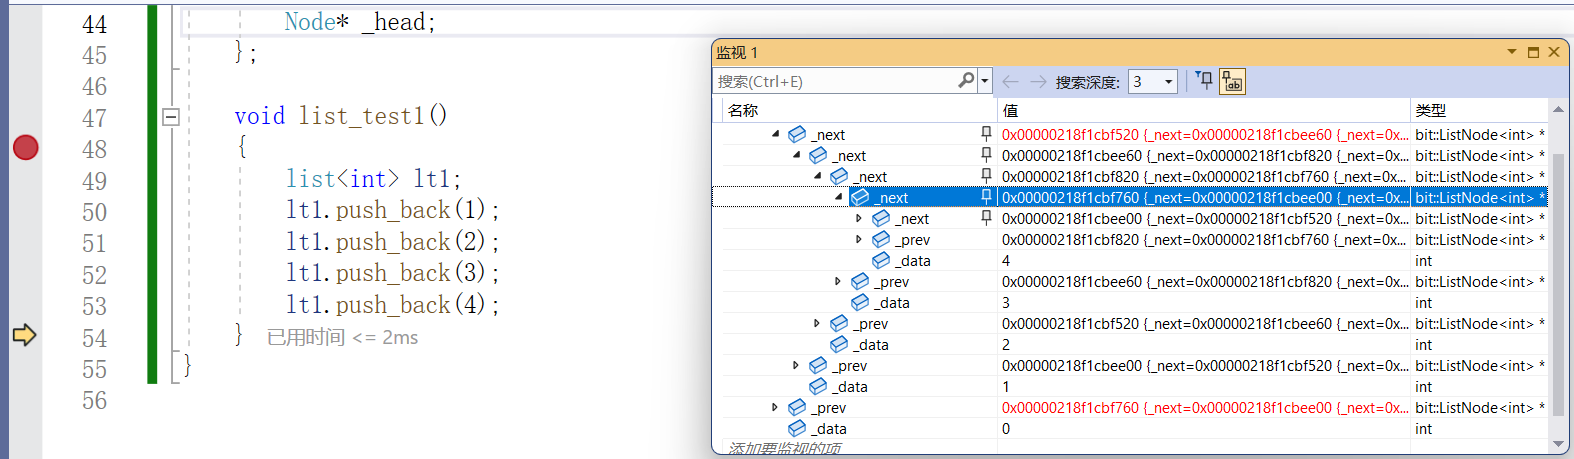
void list_test1()
{list<int> lt1;lt1.push_back(1);lt1.push_back(2);lt1.push_back(3);lt1.push_back(4);list<int>::iterator it = lt1.begin();while (it != lt1.end()){cout << (*it) << " ";++it;}
}
通过iterator it = it1.begin(),定义一个对象it,把it初始化为第一个节点的位置,然后进行以下运算符重载,!=,前置++,*就可以了。
template<class T>
class ListIterator
{typedef ListIterator<T> Self;typedef ListNode<T> Node;
public:ListIterator(Node* node = T()){_node = node;}//拷贝构造不要//赋值也不要T& operator*(){return _node->_data;}bool operator!=(const Self& it){return _node != it._node;}Self& operator++(){_node = _node->_next;return *this;}
public:Node* _node;
};
const_iterator可以通过*的运算符重载的返回值+const实现,具体在增加一个模版参数即可,不过多叙述
//Ref引用
//Ptr指针
template<class T,class Ref,class Ptr>
struct  ListIterator
{typedef ListNode<T> Node;typedef ListIterator<T,Ref,Ptr> Self;public:Node* _node;ListIterator(Node* node):_node(node){}//拷贝构造和赋值写也可以,不写也可以//这儿是浅拷贝ListIterator(const Self& it){_node = it._node;}//++itSelf& operator++(){_node = _node->_next;return *this;}Self& operator++(int){Self tmp(*this);_node = _node->_next;return tmp;}Self& operator--(){_node = _node->_prev;return *this;}Self& operator--(int){Self tmp(*this);_node = _node->_prev;return tmp;}//T* operator->()//{//	return &(_node->_data);//}Ptr operator->(){return &(_node->_data);}////这个是前置//T& operator*()//{//	return _node->_data;//}//这个是前置Ref operator*(){return _node->_data;}bool operator!=(const Self& it){return _node != it._node;}bool operator==(const Self& it){return _node == it._node;}
};
写insert,iterator insert(iterator pos,const T& x);
在pos前面插入,返回的是x所在节点的位置
//在pos前面插入
//没有迭代器失效
iterator insert(iterator pos, const T& x)
{Node* next = pos._node;Node* newnode = new Node(x);Node* prev = next->_prev;prev->_next = newnode;newnode->_prev = prev;newnode->_next = next;next->_prev = newnode;return iterator(newnode);
}
写erase,iterator erase(iterator pos),防止迭代器失效,返回的是pos的下一个位置
//erase后pos失效了,pos指向节点被释放了
iterator erase(iterator pos)
{assert(pos != end());Node* cur = pos._node;Node* next = cur->_next;Node* prev = cur->_prev;prev->_next = next;next->_prev = prev;delete cur;return iterator(next);
}
写void clear(),清空,只剩头结点
void clear()
{list<T>::iterator it = begin();while (it != end()){//防止迭代器失效it = erase(it);}
}
写~list(),先clear,在释放头节点
~list()
{//Node* cur = _head->_next;//while (cur != _head)//{//	Node* next = cur->_next;//	delete cur;//	cur = next;//}//delete _head;//_head = nullptr;clear();delete _head;_head = nullptr;
}
写voId init_empty()保证有头结点,在后面插入数据
void empty_init()
{_head = new Node;_head->_next = _head;_head->_prev = _head;
}
写拷贝构造,initializer_list< T >为参数的构造函数
//拷贝构造
//lt2(lt1)
list(const list<T>& lt)
{//引入这个是弄个头结点empty_init();for (const auto& e : lt){push_back(e);}
}list(initializer_list<T>il)
{empty_init();for (const auto& e : il){push_back(e);}
}
//lt1 = lt3
//lt所在的
list<T>& operator= (list<T>lt)
{std :: swap(_head,lt._head);return *this;
}
再说一下list& operator= (listlt),注意形参是拷贝构造的一份,和赋值_head,把头地址交换即可,lt在栈桢销毁时,就会销毁交换的那个_head.
附录
#define  _CRT_SECURE_NO_WARNINGS 1
#pragma once
#include <iostream>
#include <list>
#include <algorithm>
#include <assert.h>
using namespace std;namespace wyj
{//这是第一个类 ListNode//所谓的类就是把成员对象和成员函数封装在一起.//这个全部弄成共有//供后面存储数据来用template<class T>struct ListNode{ListNode<T>* _next;ListNode<T>* _prev;T _data;//const T& data是接受常量//不能权限放大,会报错ListNode(const T& data = T()):_next(nullptr),_prev(nullptr),_data(data){}};//Ref引用//Ptr指针template<class T,class Ref,class Ptr>struct  ListIterator{typedef ListNode<T> Node;typedef ListIterator<T,Ref,Ptr> Self;public:Node* _node;ListIterator(Node* node):_node(node){}//拷贝构造和赋值写也可以,不写也可以//这儿是浅拷贝ListIterator(const Self& it){_node = it._node;}//++itSelf& operator++(){_node = _node->_next;return *this;}Self& operator++(int){Self tmp(*this);_node = _node->_next;return tmp;}Self& operator--(){_node = _node->_prev;return *this;}Self& operator--(int){Self tmp(*this);_node = _node->_prev;return tmp;}//T* operator->()//{//	return &(_node->_data);//}Ptr operator->(){return &(_node->_data);}////这个是前置//T& operator*()//{//	return _node->_data;//}//这个是前置Ref operator*(){return _node->_data;}bool operator!=(const Self& it){return _node != it._node;}bool operator==(const Self& it){return _node == it._node;}};//template<class T>//class ListConstIterator//{//	typedef ListNode<T> Node;//	typedef ListConstIterator<T> Self;//	Node* _node;//public://	ListConstIterator(Node* node)//		:_node(node)//	{}//	//拷贝构造和赋值写也可以,不写也可以//	//这儿是浅拷贝//	ListConstIterator(const Self& it)//	{//		_node = it._node;//	}//	//++it//	Self& operator++()//	{//		_node = _node->_next;//		return *this;//	}//	Self& operator++(int)//	{//		Self tmp(*this);//		_node = _node->_next;//		return tmp;//	}//	Self& operator--()//	{//		_node = _node->_prev;//		return *this;//	}//	Self& operator--(int)//	{//		Self tmp(*this);//		_node = _node->_prev;//		return tmp;//	}//	const T* operator->()//	{//		return &(_node->_data);//	}//	//这个是前置//	const T& operator*()//	{//		return _node->_data;//	}//	bool operator!=(const Self& it)//	{//		return _node != it._node;//	}//	bool operator==(const Self& it)//	{//		return _node == it._node;//	}//};template<class T >class list{//封装成私有,只能list内部用typedef ListNode<T> Node;public://ListIterator通过传节点对节点进一步处理//typedef ListIterator<T> iterator;//typedef ListConstIterator<T> const_iterator;typedef ListIterator<T,T&,T*> iterator;typedef ListIterator<T,const T&,const T*> const_iterator;iterator begin(){//iterator it(_head->_next);//return it;//匿名对象//iterator这个类把这个节点封装了,通过传这个节点给iterator//调用iterator的构造函数,把节点给iterator中的_nodereturn iterator(_head->_next);}iterator end(){return iterator(_head);}const_iterator begin()  const{//iterator it(_head->_next);//return it;//匿名对象return const_iterator(_head->_next);}const_iterator end()  const{return const_iterator(_head);}void empty_init(){_head = new Node;_head->_next = _head;_head->_prev = _head;}list(){_head = new Node;_head->_next = _head;_head->_prev = _head;// empty_init()}//拷贝构造//lt2(lt1)list(const list<T>& lt){//引入这个是弄个头结点empty_init();for (const auto& e : lt){push_back(e);}}list(initializer_list<T>il){empty_init();for (const auto& e : il){push_back(e);}}//lt1 = lt3//lt所在的list<T>& operator= (list<T>lt){std :: swap(_head,lt._head);return *this;}~list(){//Node* cur = _head->_next;//while (cur != _head)//{//	Node* next = cur->_next;//	delete cur;//	cur = next;//}//delete _head;//_head = nullptr;clear();delete _head;_head = nullptr;}void clear(){list<T>::iterator it = begin();while (it != end()){//防止迭代器失效it = erase(it);}}void push_back(const T& x){//Node* newnode = new Node(x);//Node* tail = _head->_prev;////tail->_next = newnode;//newnode->_prev = tail;//newnode->_next = _head;//_head->_prev = newnode;insert(end(), x);}void pop_back(){erase(--end());}void push_front(const T& x){insert(begin(), x);}void pop_front(){erase(begin());}//在pos前面插入//没有迭代器失效iterator insert(iterator pos, const T& x){Node* next = pos._node;Node* newnode = new Node(x);Node* prev = next->_prev;prev->_next = newnode;newnode->_prev = prev;newnode->_next = next;next->_prev = newnode;return iterator(newnode);}//erase后pos失效了,pos指向节点被释放了iterator erase(iterator pos){assert(pos != end());Node* cur = pos._node;Node* next = cur->_next;Node* prev = cur->_prev;prev->_next = next;next->_prev = prev;delete cur;return iterator(next);}private:Node* _head;};void func(const list<int>& lt){list<int>::const_iterator it = lt.begin();while (it != lt.end()){cout << (*it) << " ";++it;}cout << endl;}void test_list1(){list<int>l1;l1.push_back(1);l1.push_back(2);l1.push_back(3);l1.push_back(4);l1.push_back(5);//调用begin,把节点给iterator,用iterator来接受list<int>::iterator it = l1.begin();while (it != l1.end()){cout << (*it) << " ";*it += 10;++it;}cout << endl;for (auto e : l1){cout << e << " ";++it;}cout << endl;}struct Pos{Pos(int row =0,int col = 0):_row(row),_col(col){}int _row;int _col; };void test_list2(){list<Pos>lt1;lt1.push_back(Pos(100, 100));lt1.push_back(Pos(200, 200));lt1.push_back(Pos(300, 400));list<Pos>::iterator it = lt1.begin();while (it != lt1.end()){//为了可读性,省略了一个箭头cout << it->_row << ":"<<it->_col<<endl;//cout << it.operator->()->_row << ":" << it.operator->()->_col << endl;++it;}}void test_list3(){list<int>l1;l1.push_back(1);l1.push_back(2);l1.push_back(3);l1.push_back(4);l1.push_back(5);func(l1);cout << endl;l1.push_front(10);l1.push_front(10);l1.push_front(10);func(l1);cout << endl;l1.pop_front();l1.pop_front();func(l1);cout << endl;l1.pop_back();l1.pop_back();func(l1);cout << endl;}void test_list4(){list<int>lt1;lt1.push_back(1);lt1.push_back(2);lt1.push_back(3);lt1.push_back(4);lt1.push_back(5);func(lt1);list<int> lt2(lt1);func(lt2);list<int> lt3;lt3 = lt1;func(lt2);}void test_list5(){list<int> lt1 = { 1,2,3,4,5,6 };func(lt1);}
}#include "list.h"
#include "list1.h"
void test_list1()
{list<int> lt1 = { 10,2,3,3,4,5,6 };list<int> ::iterator it = lt1.begin();while (it != lt1.end()){cout << *it << " ";it++;}cout << endl;//list不支持sort//sort(lt1.begin(), lt1.end(), greater<int>());//list有自己的排序算法lt1.sort();it = lt1.begin();while (it != lt1.end()){cout << *it << " ";it++;}cout << endl;lt1.sort(greater<int>());it = lt1.begin();while (it != lt1.end()){cout << *it << " ";it++;}cout << endl;//unique 去重//先排序,在去重lt1.unique();for (auto e : lt1){cout << e << " "; //10 6 5 4 3 2}cout << endl;
}void test_list2()
{//splice:粘接std::list<int> mylist1, mylist2;std::list<int>::iterator it;// set some initial values:for (int i = 1; i <= 4; ++i)mylist1.push_back(i); // mylist1: 1 2 3 4for (int i = 1; i <= 3; ++i)mylist2.push_back(i * 10); // mylist2: 10 20 30it = mylist1.begin();++it; // points to 2mylist1.splice(it, mylist2); // mylist1: 1 10 20 30 2 3 4// mylist2 (empty)// "it" still points to 2 (the 5th element
}void test_list3()
{list<int> mylist;for (int i = 1; i <= 4; i++){mylist.push_back(i); //mylist: 1 2 3 4} //想把3转移到头list<int>::iterator it = find(mylist.begin(), mylist.end(), 3);//void splice (const_iterator position, list& x, const_iterator i);//把list的第i个位置的数粘接到position位置mylist.splice(mylist.begin(), mylist, it);
}int main()
{//wyj::test_list5();//test_list1();bit::list_test1();return 0;
}
/*****************************************************/
/*****************************************************/
下来练习代码
#define  _CRT_SECURE_NO_WARNINGS 1
#pragma once
#include <iostream>
#include <assert.h>
using namespace std;//先定义一个节点类
//所谓的类就是把成员变量和成员方法封装在一起
//例如这个节点类
//成员变量是指定义节点的变量,方法是指操作这个节点的方法
//那么通过成员变量和成员方法把这个节点类封装好之后,外面该怎么用呢?
//类可以理解为就是个新定义的数据类型,那么其它类使用,则在另一个类
//中定义这个类来使用
//比如:在另一个类中使用这个节点类,则在这个类中定义即可,并且你在
//这个类中定义一个节点类,会自动初始化,销毁,这是类的一个特性namespace wyj
{template<class T>struct ListNode{//定义数据ListNode<T>*  _prev;ListNode<T>*  _next;T _data;//初始化ListNode(const T& data = T()):_prev(nullptr),_next(nullptr),_data(data){}//拷贝构造ListNode(const ListNode& node){_prev = node._prev;_next = node._next;_data = node._data;}//赋值ListNode& operator=(const ListNode& node){_prev = node._prev;_next = node._next;_data = node._data;return *this;}};//在这儿,把ListNode要封装一下,符合iterator的特性template<class T,class Ref>class ListIterator{//要封装节点,首先要把节点引进进来typedef ListNode<T> Node;typedef ListIterator<T, Ref> Self;public://ListIterator(Node* node = nullptr):_node(node){}ListIterator(const Self& iterator){_node = iterator._node;}ListIterator& operator=(const Self& iterator){_node = iterator._node;return *this;}ListIterator& operator++(){_node = _node->_next;return *this;}ListIterator operator++(int){ListIterator tmp = *this;_node = _node->_next;return tmp;}ListIterator& operator--(){_node = _node->_prev;return *this;}ListIterator operator--(int){ListIterator tmp = *this;_node = _node->_prev;return tmp;}Ref operator*()  {return _node->_data;}bool operator!=(const Self& iterator){return  _node != iterator._node;}bool operator==(const Self& iterator){return  _node == iterator._node;}//private:public:Node* _node;};template<class T>class list{private://这儿把封装好的ListNode重命名//ListNode可以理解为一种新的数据类型typedef ListNode<T> Node;public:typedef ListIterator<T,T&> iterator;typedef ListIterator<T,const T&> const_iterator;iterator begin(){return iterator(_head->_next);}iterator end(){return iterator(_head);}const_iterator begin() const{return const_iterator(_head->_next);}const_iterator end() const{return const_iterator(_head);}//写构造函数list(){//调用了Node的构造函数_head = new Node;_head->_prev = _head;_head->_next = _head;}template<class InputIterator>list(InputIterator first, InputIterator last){init_empty();while (first != last){push_back(*first);first++;}}list(initializer_list<T> il){init_empty();for (const auto& e : il){push_back(e);}}void init_empty(){_head = new Node;_head->_prev = _head;_head->_next = _head;}list(const list<T>& lt){init_empty();for (auto& e : lt){push_back(e);}}~list(){clear();delete _head;_head = nullptr;}//犯了一个错误,要加换了,还const//list& operator=(const list lt)list<T>& operator=(list<T> lt){swap(_head,lt._head);return *this;}void clear(){iterator it = begin();while (it != end()){it = erase(it);}}//插入void push_back(const T& data ){Node* newnode = new Node(data);Node* tail = _head->_prev;//  tail newnode _headtail->_next = newnode;newnode->_prev = tail;newnode->_next = _head;_head->_prev = newnode;//insert(end(), data);}void pop_back(){erase(--end());}void push_front(const T& data){insert(begin(),data);}void pop_front(){erase(begin());}//在pos前面插入void insert(iterator pos, const T& data){Node* newnode = new Node(data);Node* cur = pos._node;Node* prev = cur->_prev;//prev  newnode curprev->_next = newnode;newnode->_prev = prev;newnode->_next = cur;cur->_prev = newnode;}iterator erase(iterator pos){assert(pos != end());Node* cur = pos._node;Node* prev = cur->_prev;Node* next = cur->_next;prev->_next = next;next->_prev = prev;delete cur;return iterator(next);}private:Node* _head;};void list_test1(){list<int> lt1;lt1.push_back(1);lt1.push_back(2);lt1.push_back(3);lt1.push_back(4);list<int>::iterator it = lt1.begin();for (auto e : lt1){cout << e << " ";}cout << endl;while (it != lt1.end()){(*it) += 10;it++;}for (auto e : lt1){cout << e << " ";}}void Func(const list<int>& lt){list<int>::const_iterator it = lt.begin();while (it != lt.end()){cout << (*it) << " ";it++;}cout << endl;}void list_test2(){list<int> lt1;lt1.push_back(1);lt1.push_back(2);lt1.push_back(3);lt1.push_back(4);lt1.push_back(5);Func(lt1);lt1.push_front(10);lt1.push_front(20);lt1.push_front(30);Func(lt1);lt1.pop_front();lt1.pop_front();Func(lt1);lt1.pop_back();lt1.pop_back();Func(lt1);lt1.pop_back();lt1.pop_back();lt1.pop_back();lt1.pop_back();//lt1.pop_back();Func(lt1);}void list_test3(){//构造函数list<int> lt1 = { 1,2,3,4,5,6,7,8 };for (auto& e : lt1){cout << e << " ";}cout << endl;list<int> lt2 = lt1;for (auto& e : lt1){cout << e << " ";}cout << endl;list<int>lt3;lt3 = lt1;for (auto& e : lt1){cout << e << " ";}cout << endl;}
}

)


![[论文阅读] (41)JISA24 物联网环境下基于少样本学习的攻击流量分类](http://pic.xiahunao.cn/[论文阅读] (41)JISA24 物联网环境下基于少样本学习的攻击流量分类)
)

)
)

)


、批量标准化)


