文章目录
- 1.实现目标
- 2.实现过程
- 2.1 数据准备
- 2.2 创建项目
- 2.3 dcmtk库集成
- 2.4 流程&原理
- 2.5 材质
- 2.6 应用实现
- 3.参考资料
1.实现目标
本文在UE5中读取本地的dicom文件,解析像素值、窗宽窗位等信息,生成2D纹理,在UE场景中实现简单的
2D医学影像可视化
2.实现过程
包括数据准备,dicom三方库在UE工程中的集成,dicom文件中像素值,窗宽窗位Tag的解析,纹理的生成,显示处理的材质等,以实现最终在UE场景中显示2D医学影像
2.1 数据准备
(1)基于开源的dicom数据,链接在文章第三部分参考资料中
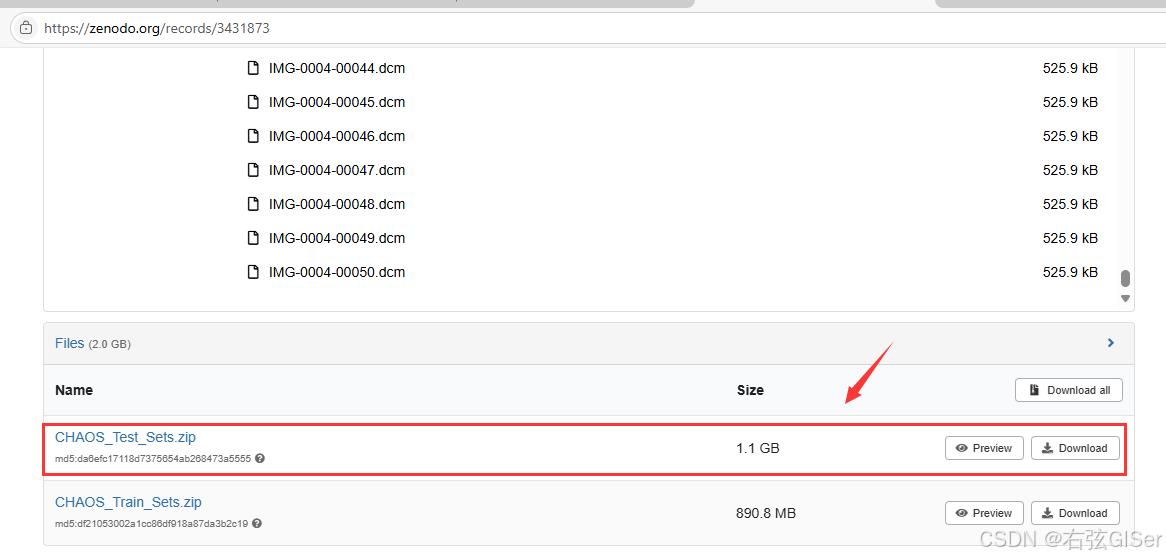
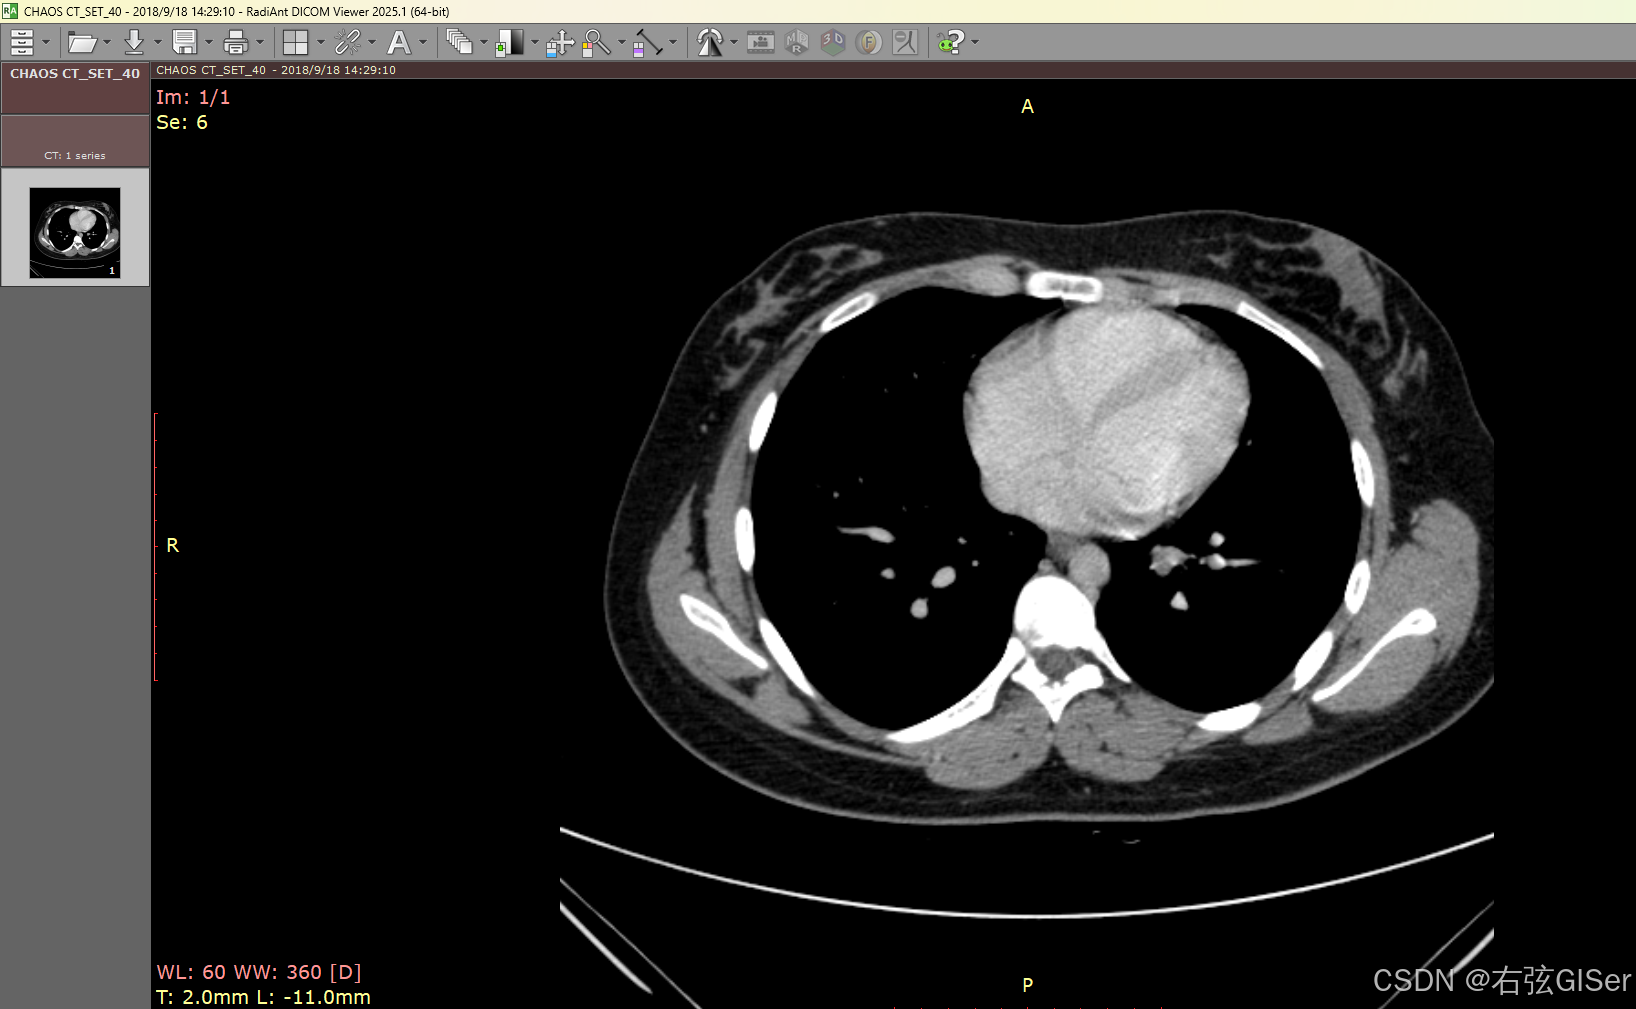
(2)在Radiant Viewer中选择一张dicom查看,如下图所示,也是此次本地使用的单张单帧dicom测试数据
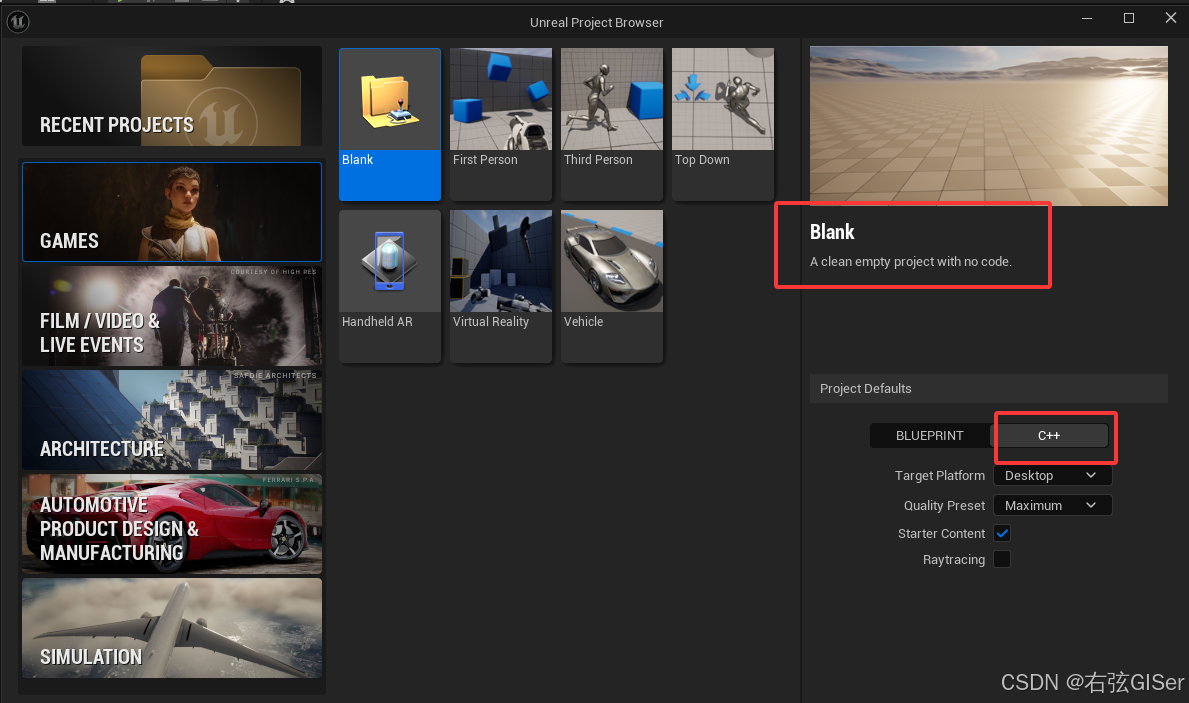
2.2 创建项目
创建引擎自带的 C++项目,这里不再赘述
2.3 dcmtk库集成
由于gdcm库在集成过程中,有较多的冲突需要解决,为了集成方便起见,所以本文这里直接对
dcmtk库进行集成。(直接使用github上编译好的库,也可以下载源码自己本地编译)
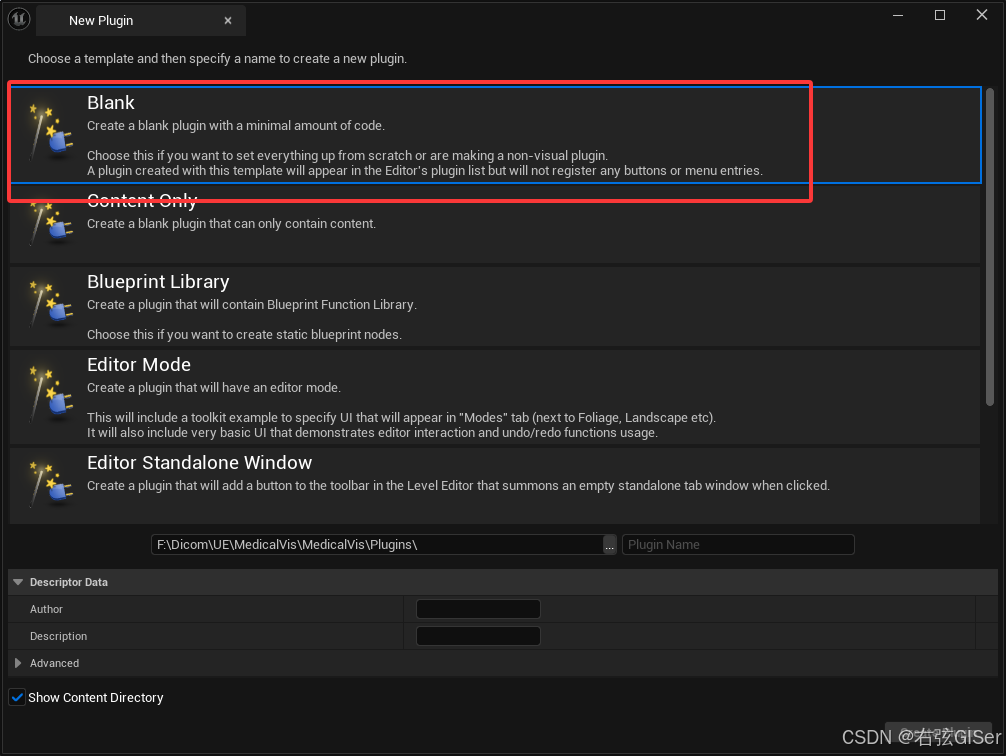
(1)以插件的形式集成三方库,这也是目前UE官方所推荐的方式。这里使用的是空白的插件模板。

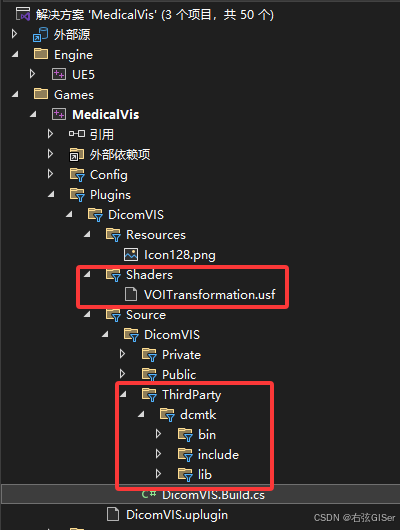
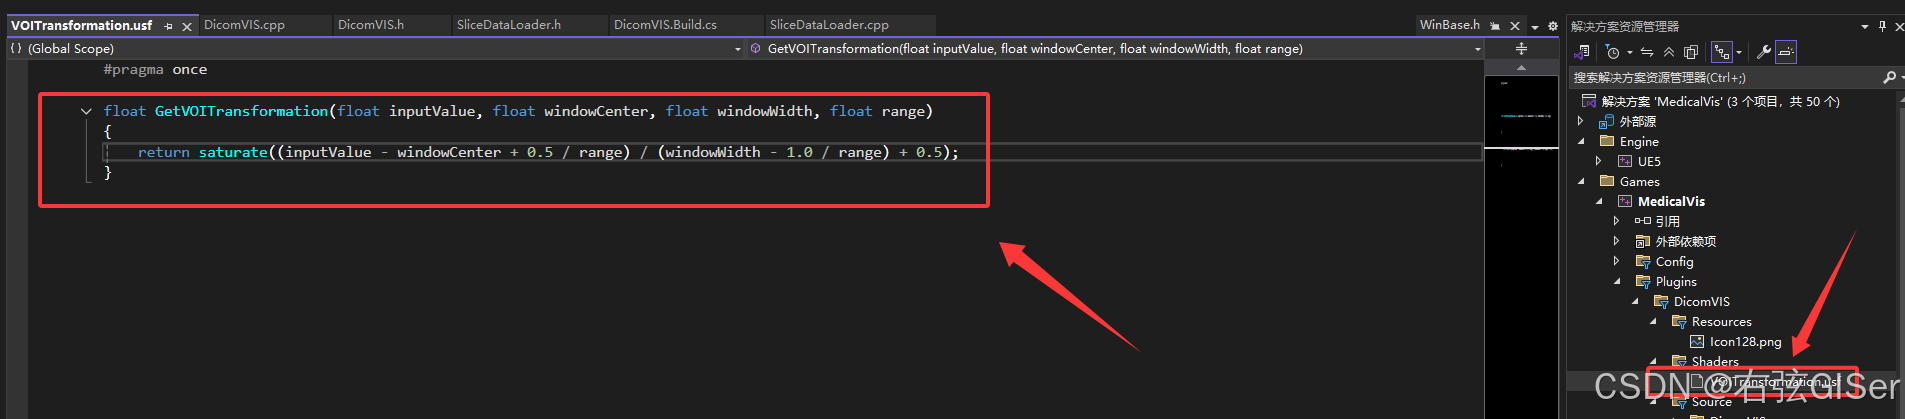
(2)插件目录,其中后续使用的usf等shader相关文件,都放在Shaders文件夹中。
第三方库dcmtk的相关内容,都放在插件source中的ThirdParty文件夹下
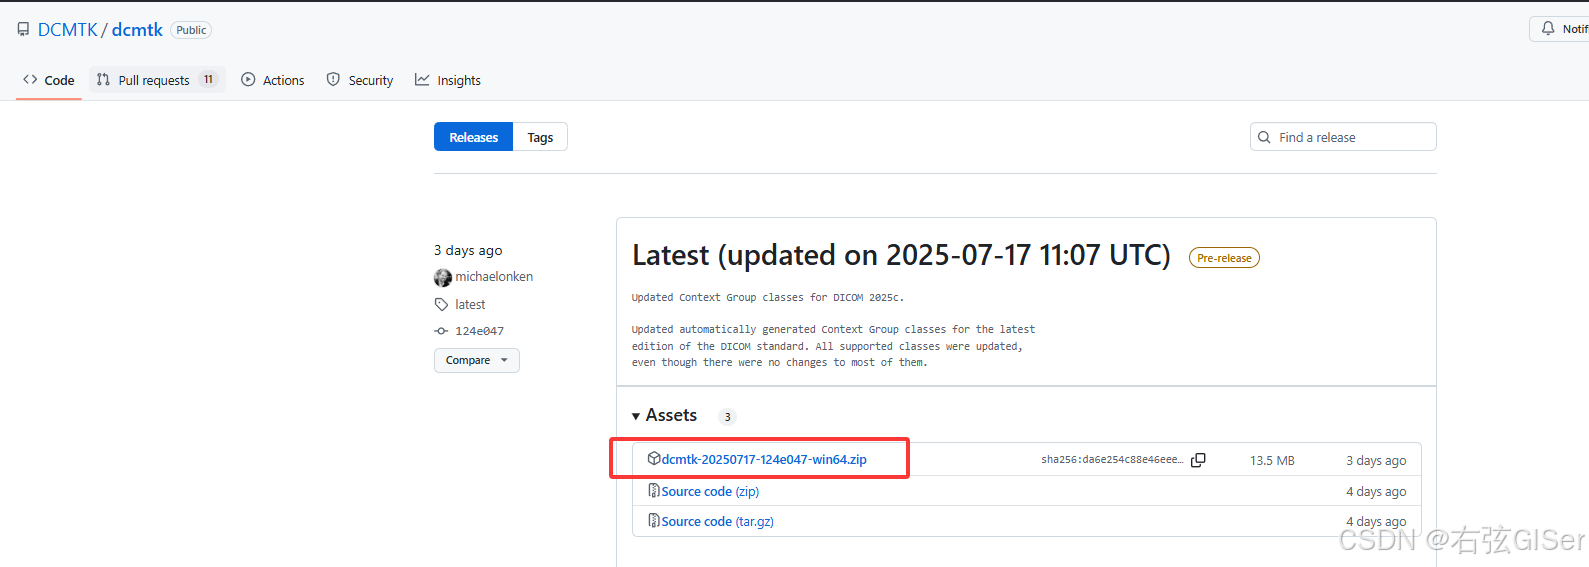
(3)下载dcmtk库,直接从github上下载dcmtk的release版本(https://github.com/DCMTK/dcmtk/releases)
其中包含了需要的头文件,以及静态库lib和动态库dll等。(也可以下载源码,自己本地编译)
(4)在插件的Build.cs中配置对三方库的引用,防止找不到头文件或者库等报错
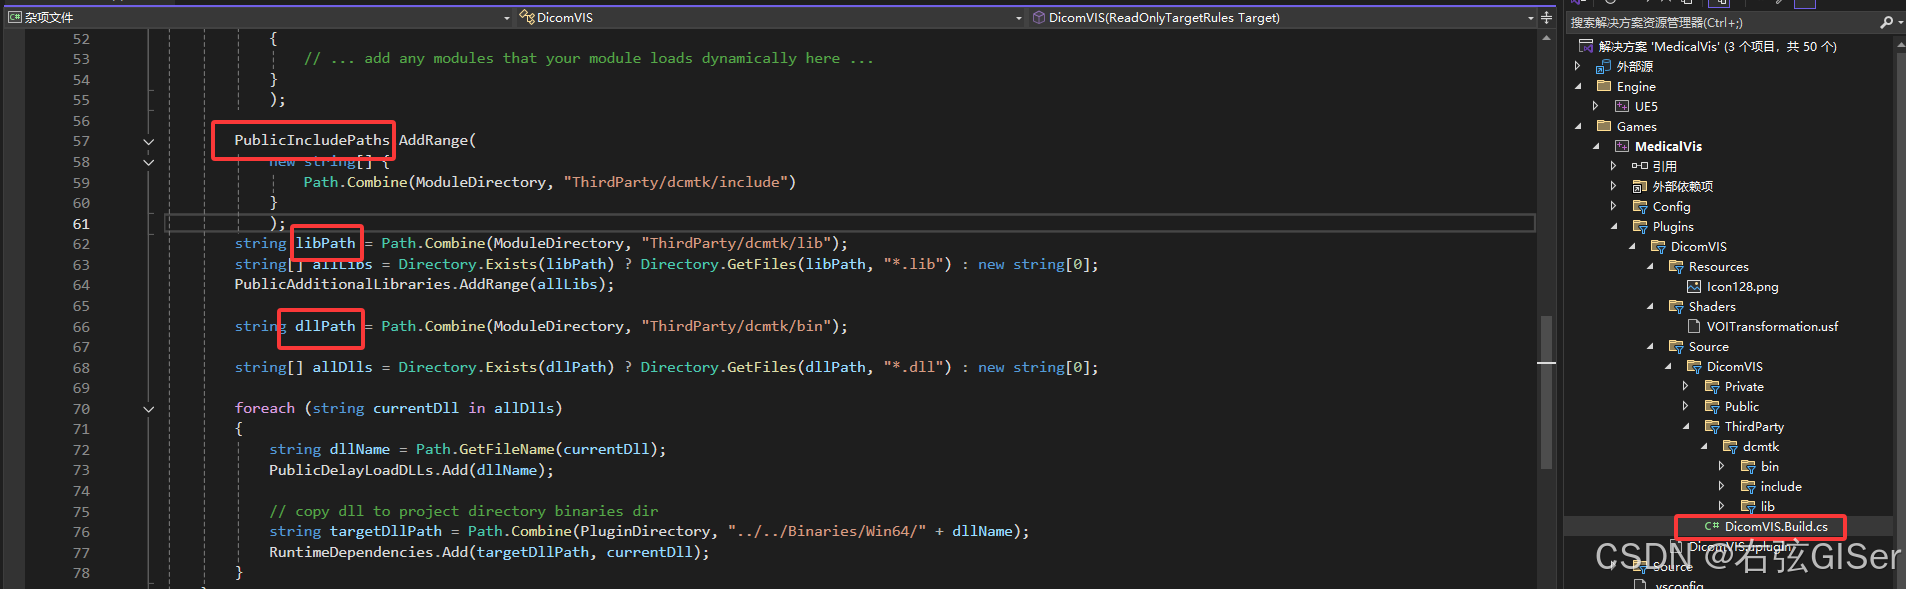
插件的build.cs完整代码如下所示:
// Copyright Epic Games, Inc. All Rights Reserved.using System.IO;
using UnrealBuildTool;public class DicomVIS : ModuleRules
{public DicomVIS(ReadOnlyTargetRules Target) : base(Target){PCHUsage = ModuleRules.PCHUsageMode.UseExplicitOrSharedPCHs;PublicIncludePaths.AddRange(new string[] {// ... add public include paths required here ...});PrivateIncludePaths.AddRange(new string[] {// ... add other private include paths required here ...});PublicDependencyModuleNames.AddRange(new string[]{"Core","ImageWrapper"// ... add other public dependencies that you statically link with here ...});PrivateDependencyModuleNames.AddRange(new string[]{"CoreUObject","Engine","Slate","SlateCore",// for custom shaders"RenderCore"});DynamicallyLoadedModuleNames.AddRange(new string[]{// ... add any modules that your module loads dynamically here ...});PublicIncludePaths.AddRange(new string[] { Path.Combine(ModuleDirectory, "ThirdParty/dcmtk/include")	});string libPath = Path.Combine(ModuleDirectory, "ThirdParty/dcmtk/lib");string[] allLibs = Directory.Exists(libPath) ? Directory.GetFiles(libPath, "*.lib") : new string[0];PublicAdditionalLibraries.AddRange(allLibs);string dllPath = Path.Combine(ModuleDirectory, "ThirdParty/dcmtk/bin");string[] allDlls = Directory.Exists(dllPath) ? Directory.GetFiles(dllPath, "*.dll") : new string[0];foreach (string currentDll in allDlls){string dllName = Path.GetFileName(currentDll);PublicDelayLoadDLLs.Add(dllName);// copy dll to project directory binaries dirstring targetDllPath = Path.Combine(PluginDirectory, "../../Binaries/Win64/" + dllName);RuntimeDependencies.Add(targetDllPath, currentDll);}}
}
(5)集成过程中可能会遇到的问题
① 引入dcmtk库相关头文件时,verify、check等宏冲突
报错如下所示:

解决方法:
// DCMTK uses their own verify and check macros.
// Also, they include some effed up windows headers which for example include min and max macros for that
// extra bit of _screw you_
#pragma push_macro("verify")
#pragma push_macro("check")
#undef verify
#undef check#include "dcmtk/dcmdata/dcdatset.h"
#include "dcmtk/dcmdata/dcdeftag.h"
#include "dcmtk/dcmdata/dcfilefo.h"
#include "dcmtk/dcmdata/dcpixel.h"
#include "dcmtk/dcmimgle/dcmimage.h"#pragma pop_macro("verify")
#pragma pop_macro("check")
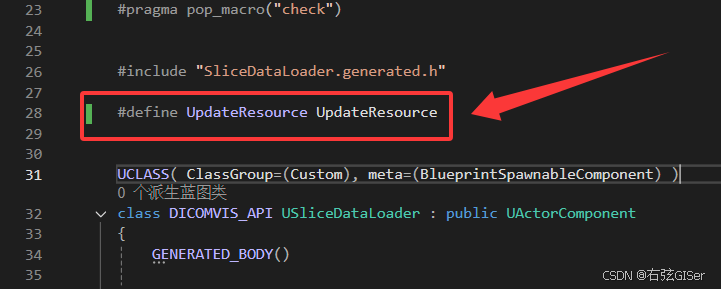
②"UpdateResourceW": 不是 "UTexture2D" 的成员,原因是dcmtk中引用了windows的相关头文件WinBase.h中已经定义了相关的宏
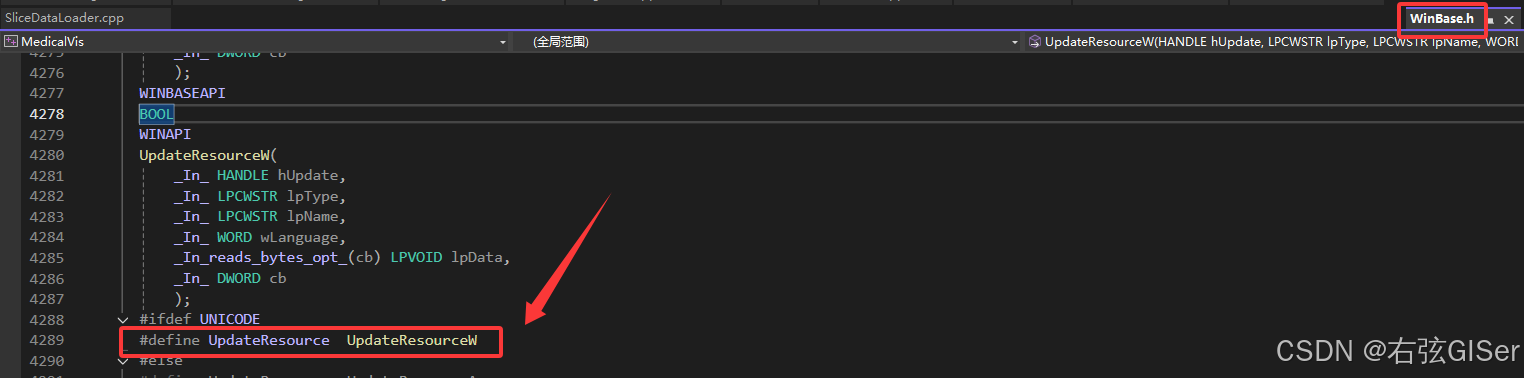
报错如下所示:

解决方法:前置声明
2.4 流程&原理
使用dcmtk库解析dicom数据中的像素数据,以及窗宽窗位等数据,再按照
dicom标准的显示处理流程处理即可。
(完整源码在本文2.6部分,此部分仅作为原理说明)
(1)使用dcmtk库解析dicom数据中的像素值,和窗宽窗位tag信息,这三个信息是显示的必要参数
直接根据相关tag解析即可,本文这里使用的无符号的16bit测试数据,其他类型暂无考虑(原理相同,参数修改下即可)
(2)窗宽窗位特殊处理
在上一篇文章中介绍了常规的dicom数据显示流程,即先根据slope和intercept进行modality变换,在根据windowCenter和windowWidth等进行VOI变换。但本文这里是直接将没有经过modality变换的原始像素值直接生成了2D纹理,后续的显示处理都在shader中处理,所以这里直接对窗宽窗位应用modality反变换,这样就在shader中节约了一次modality变换的消耗
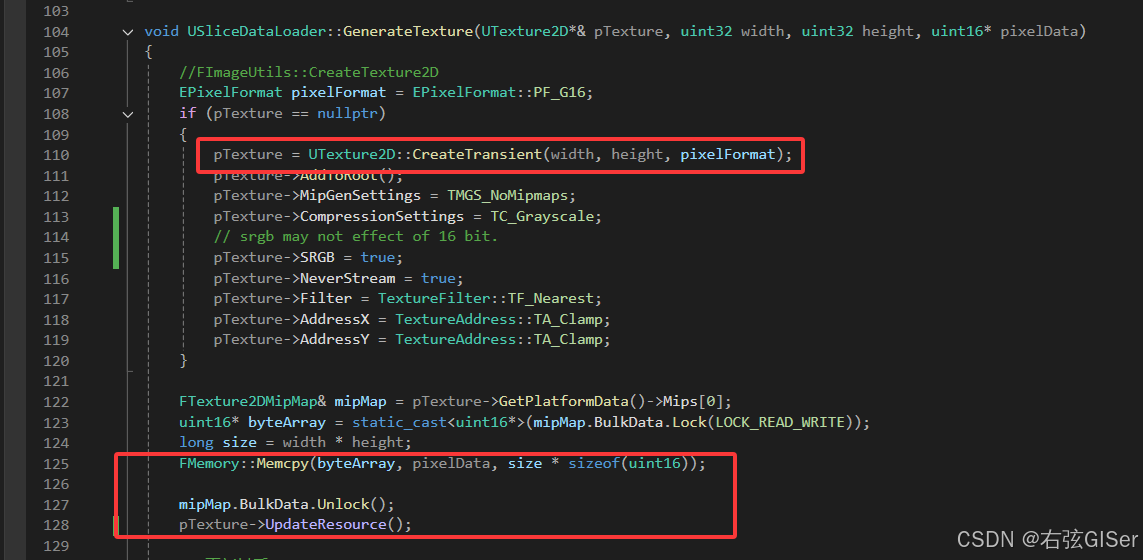
(3)创建纹理并更新像素数据
(4)最终显示:使用材质处理完成后,在Plane等StaticMesh的载体上显示即可
2.5 材质
关于dicom显示过程中的一些特殊处理,如VOI变换等,可以使用Material Function等方式,为了后续使用的方便,本文这里使用
usf的shader方式实现
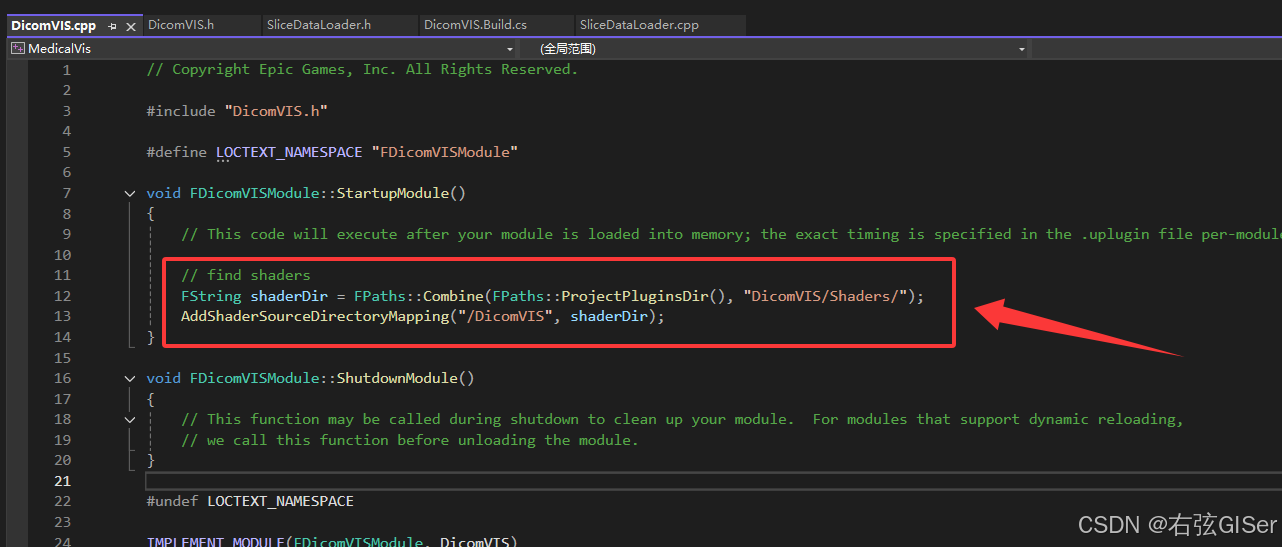
(1)在插件中添加对shader文件夹的映射,以便可以在材质编辑器中使用。
// find shaders
FString shaderDir = FPaths::Combine(FPaths::ProjectPluginsDir(), "DicomVIS/Shaders/");
AddShaderSourceDirectoryMapping("/DicomVIS", shaderDir);
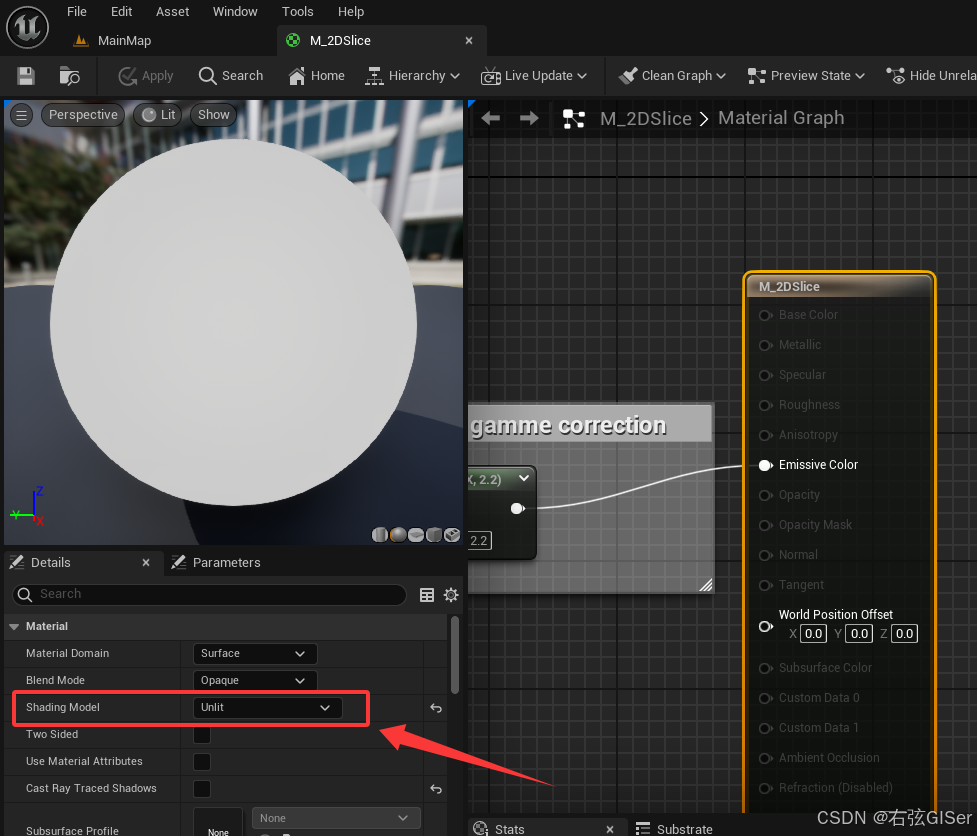
(2)在UE编辑器中创建材质,并设置为Unlit无光照模式,以避免UE中光照对dicom医学影像造成的颜色偏差等
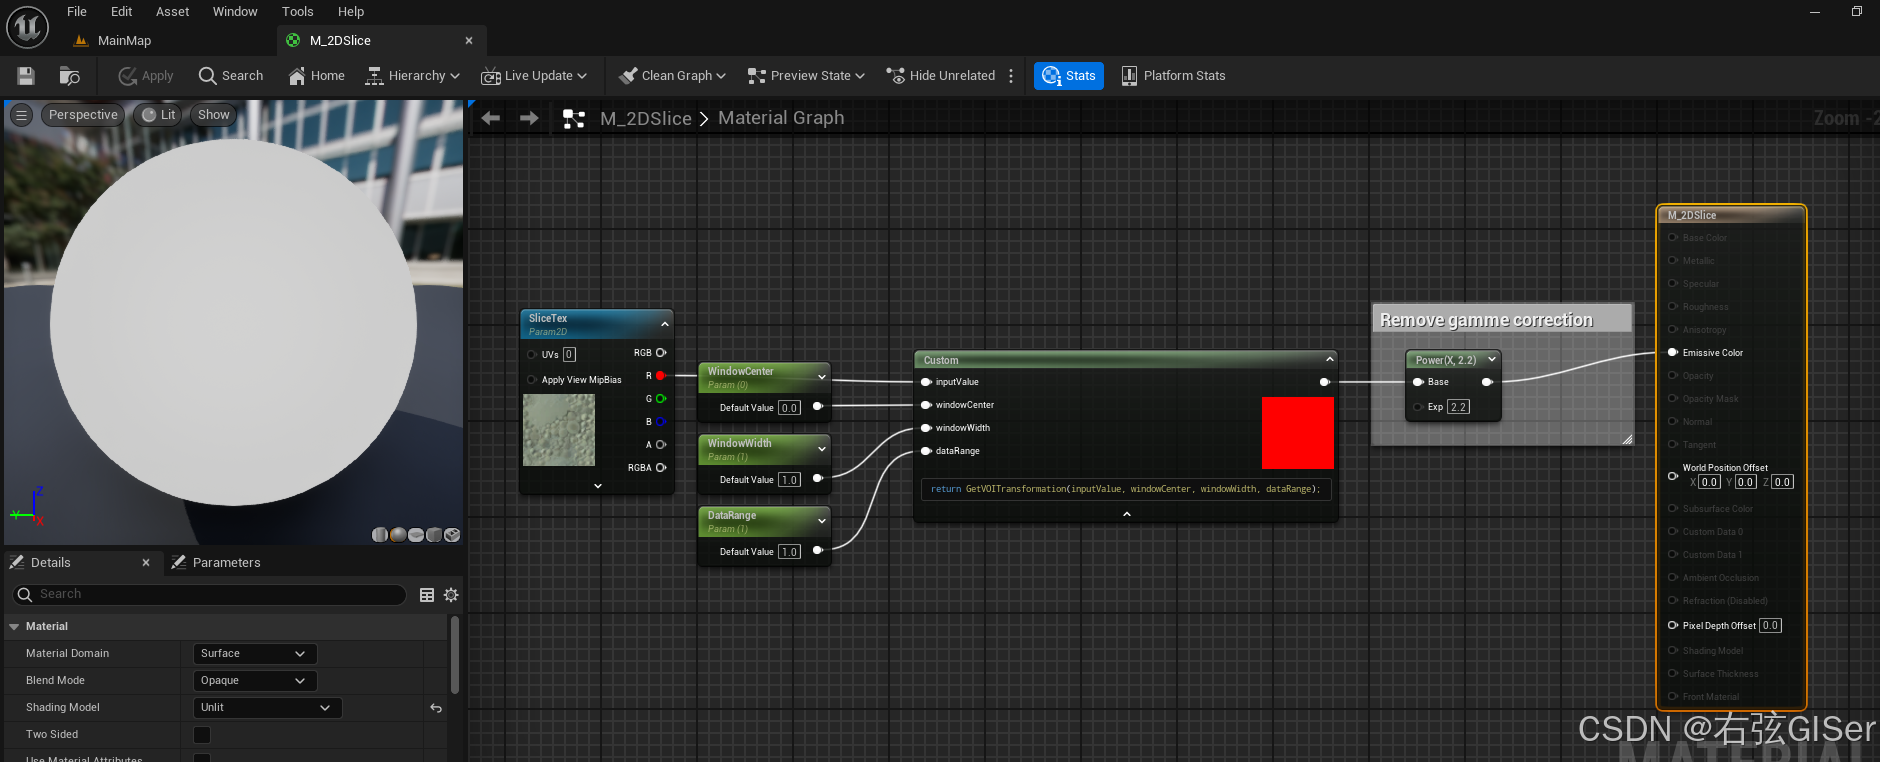
(3)该材质的主要节点如下所示。其中SliceTex参数为dicom像素值生成的2D纹理,WindowWidth和WindowCenter为窗宽窗位信息,DataRange为数据的范围,如本文使用的G16格式纹理,则该值为65535;若材质为G8格式的纹理,则该值为255
(4)新建usf,用于dicom显示过程中的VOI变换
float GetVOITransformation(float inputValue, float windowCenter, float windowWidth, float range)
{return saturate((inputValue - windowCenter + 0.5 / range) / (windowWidth - 1.0 / range) + 0.5);
}
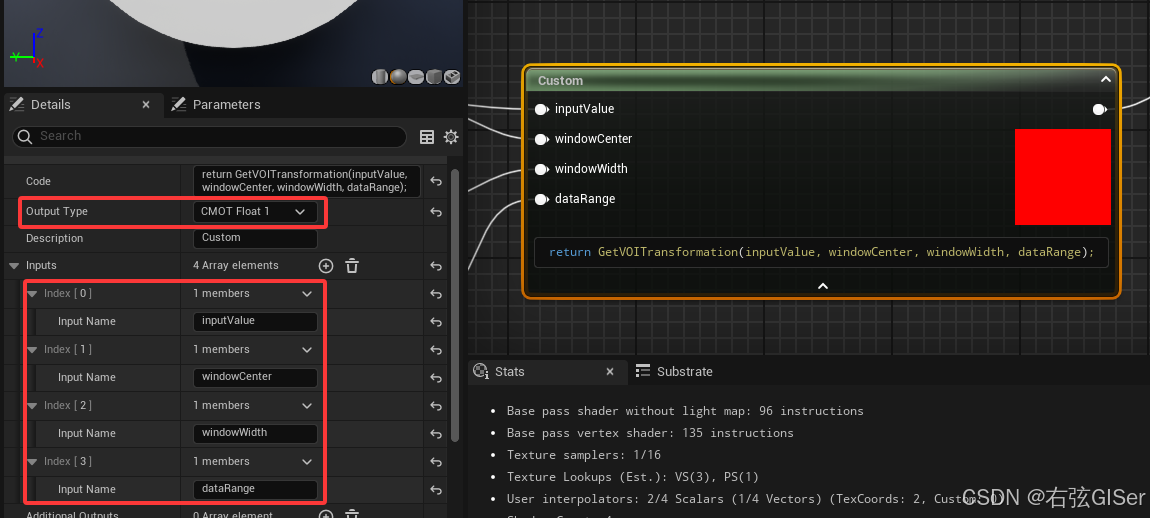
(5)新建自定义材质节点,并设置输入和输出的参数类型
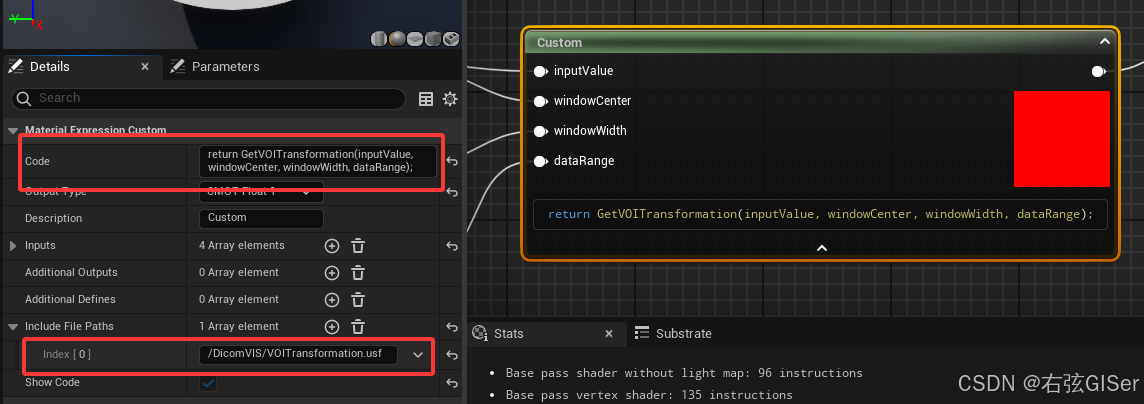
(6)设置自定义材质节点的Code和包含头文件路径,以便可以在材质中使用usf中的函数
2.6 应用实现
包括具体的实现步骤,可以在UE中Editor环境下加载Dicom数据,生成2D纹理和最终显示。
本文这里只演示了16位无符号的dicom数据处理流程,其他类型的类似,需要修改生成材质的格式等参数即可
(1)dicom解析,以及生成纹理的相关功能,本文这里基于ActorCompoent实现,具体C++代码如下所示:
SliceDataLoader.h:
// Fill out your copyright notice in the Description page of Project Settings.#pragma once#include "CoreMinimal.h"
#include "Components/ActorComponent.h"
#include "Engine/StaticMeshActor.h"
// DCMTK uses their own verify and check macros.
// Also, they include some effed up windows headers which for example include min and max macros for that
// extra bit of _screw you_
#pragma push_macro("verify")
#pragma push_macro("check")
#undef verify
#undef check#include "dcmtk/dcmdata/dcdatset.h"
#include "dcmtk/dcmdata/dcdeftag.h"
#include "dcmtk/dcmdata/dcfilefo.h"
#include "dcmtk/dcmdata/dcpixel.h"
#include "dcmtk/dcmimgle/dcmimage.h"#pragma pop_macro("verify")
#pragma pop_macro("check")#include "SliceDataLoader.generated.h"#define UpdateResource UpdateResourceUCLASS( ClassGroup=(Custom), meta=(BlueprintSpawnableComponent) )
class DICOMVIS_API USliceDataLoader : public UActorComponent
{GENERATED_BODY()public:	// Sets default values for this component's propertiesUSliceDataLoader();// The dicom data path, that is the relative path of ue game project directory.UPROPERTY(EditAnywhere, BlueprintReadWrite, Category = "Dicom")FString TargetFilePath = "Data/test.dcm";// Plane static mesh componentUPROPERTY(EditAnywhere, BlueprintReadWrite, Category = "Dicom")AStaticMeshActor* pPlaneMesh = nullptr;// 2d slice materialUPROPERTY(EditAnywhere, BlueprintReadWrite, Category = "Dicom")UMaterial* pMaterial = nullptr;// The dicom pixel data texture2DUPROPERTY(EditAnywhere, BlueprintReadWrite, Category = "Dicom")UTexture2D* pTexture2D;// Window Center of dicomUPROPERTY(EditAnywhere, BlueprintReadWrite, Category = "Dicom")float WindowCenter;// Window width of dicomUPROPERTY(EditAnywhere, BlueprintReadWrite, Category = "Dicom")float WindowWidth;// The min value of dicom dataUPROPERTY(EditAnywhere, BlueprintReadOnly, Category = "Dicom")float Min = 0;// The range of dicom data, range = max - minUPROPERTY(EditAnywhere, BlueprintReadOnly, Category = "Dicom")float Range = 1;// slope value of dicomUPROPERTY(EditAnywhere, BlueprintReadOnly, Category = "Dicom")float Slope = 0;// intercept value of dicomUPROPERTY(EditAnywhere, BlueprintReadOnly, Category = "Dicom")float Intercept = 0;// dicom image widthUPROPERTY(EditAnywhere, BlueprintReadOnly, Category = "Dicom")int Width = 0;// dicom image heightUPROPERTY(EditAnywhere, BlueprintReadOnly, Category = "Dicom")int Height = 0;// dicom image depthUPROPERTY(EditAnywhere, BlueprintReadOnly, Category = "Dicom")int Depth = 0;// Load dicom data from load file path, parse pixel data to texture2DUFUNCTION(CallInEditor, BlueprintCallable, Category = "Dicom")void LoadDicom();protected:// Called when the game startsvirtual void BeginPlay() override;// use dicom pixel data to generate texture (uint16)void GenerateTexture(UTexture2D*& pTexture, uint32 width, uint32 height, uint16* pixelData);public:	// Called every framevirtual void TickComponent(float DeltaTime, ELevelTick TickType, FActorComponentTickFunction* ThisTickFunction) override;
};
SliceDataLoader.cpp:
// Fill out your copyright notice in the Description page of Project Settings.#include "SliceDataLoader.h"
#include <Kismet/KismetSystemLibrary.h>
#include <ImageUtils.h>// Sets default values for this component's properties
USliceDataLoader::USliceDataLoader()
{// Set this component to be initialized when the game starts, and to be ticked every frame. You can turn these features// off to improve performance if you don't need them.PrimaryComponentTick.bCanEverTick = true;// ...
}void USliceDataLoader::LoadDicom()
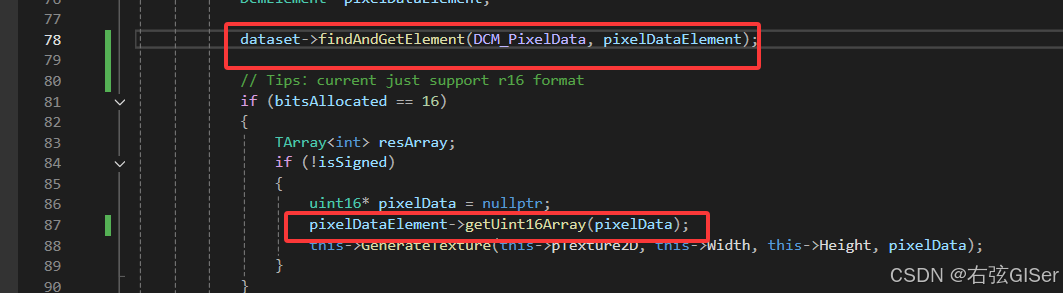
{FString dicomFilePath = UKismetSystemLibrary::GetProjectDirectory() + TargetFilePath;if (!FPaths::FileExists(dicomFilePath)){UE_LOG(LogTemp, Error, TEXT("dicom file is not exist, please check!"));return;}// ToDo: use other thread to processAsyncTask(ENamedThreads::GameThread, [=, this]() {DcmFileFormat fileFormat;if (fileFormat.loadFile(TCHAR_TO_ANSI(*dicomFilePath)).good()){UE_LOG(LogTemp, Log, TEXT("dicom file loaded successfully!"));DcmDataset* dataset = fileFormat.getDataset();dataset->chooseRepresentation(EXS_LittleEndianImplicit, nullptr);Float64 windowCenter;dataset->findAndGetFloat64(DCM_WindowCenter, windowCenter);this->WindowCenter = windowCenter;Float64 windowWidth;dataset->findAndGetFloat64(DCM_WindowWidth, windowWidth);this->WindowWidth = windowWidth;Float64 slope;dataset->findAndGetFloat64(DCM_RescaleSlope, slope);this->Slope = slope;Float64 intercept;dataset->findAndGetFloat64(DCM_RescaleIntercept, intercept);this->Intercept = intercept;Uint16 bitsAllocated;dataset->findAndGetUint16(DCM_BitsAllocated, bitsAllocated);this->Depth = bitsAllocated;Uint8 pixelRepresentation = 0;dataset->findAndGetUint8(DCM_PixelRepresentation, pixelRepresentation);bool isSigned = pixelRepresentation == 1;DicomImage* dcmImage = new DicomImage(TCHAR_TO_ANSI(*dicomFilePath));if (dcmImage->getStatus() != EIS_Normal){UE_LOG(LogTemp, Error, TEXT("dicom file image loaded failed!"));return;}const int width = dcmImage->getWidth();this->Width = width;const int height = dcmImage->getHeight();this->Height = height;DcmElement* pixelDataElement;dataset->findAndGetElement(DCM_PixelData, pixelDataElement);// Tips:current just support r16 formatif (bitsAllocated == 16){TArray<int> resArray;if (!isSigned){uint16* pixelData = nullptr;pixelDataElement->getUint16Array(pixelData);this->GenerateTexture(this->pTexture2D, this->Width, this->Height, pixelData);}}}});
}// Called when the game starts
void USliceDataLoader::BeginPlay()
{Super::BeginPlay();// ...}void USliceDataLoader::GenerateTexture(UTexture2D*& pTexture, uint32 width, uint32 height, uint16* pixelData)
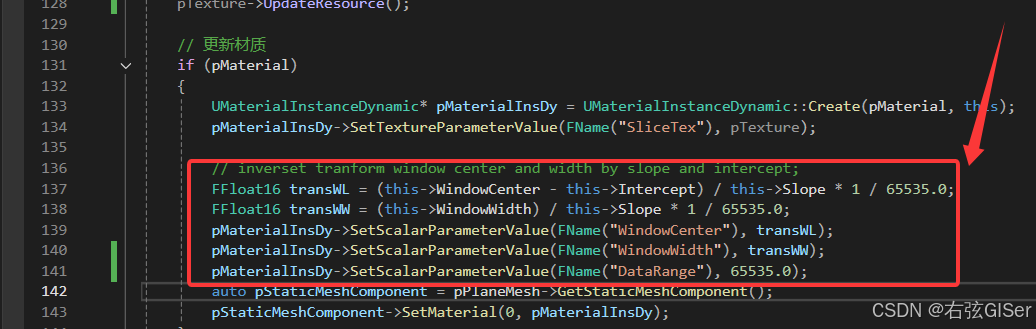
{//FImageUtils::CreateTexture2DEPixelFormat pixelFormat = EPixelFormat::PF_G16;if (pTexture == nullptr){pTexture = UTexture2D::CreateTransient(width, height, pixelFormat);pTexture->AddToRoot();pTexture->MipGenSettings = TMGS_NoMipmaps;pTexture->CompressionSettings = TC_Grayscale;// srgb may not effect of 16 bit.pTexture->SRGB = true;pTexture->NeverStream = true;pTexture->Filter = TextureFilter::TF_Nearest;pTexture->AddressX = TextureAddress::TA_Clamp;pTexture->AddressY = TextureAddress::TA_Clamp;}FTexture2DMipMap& mipMap = pTexture->GetPlatformData()->Mips[0];uint16* byteArray = static_cast<uint16*>(mipMap.BulkData.Lock(LOCK_READ_WRITE));long size = width * height;FMemory::Memcpy(byteArray, pixelData, size * sizeof(uint16));mipMap.BulkData.Unlock();pTexture->UpdateResource();// 更新材质if (pMaterial){UMaterialInstanceDynamic* pMaterialInsDy = UMaterialInstanceDynamic::Create(pMaterial, this);pMaterialInsDy->SetTextureParameterValue(FName("SliceTex"), pTexture);// inverset tranform window center and width by slope and intercept;FFloat16 transWL = (this->WindowCenter - this->Intercept) / this->Slope * 1 / 65535.0;FFloat16 transWW = (this->WindowWidth) / this->Slope * 1 / 65535.0;pMaterialInsDy->SetScalarParameterValue(FName("WindowCenter"), transWL);pMaterialInsDy->SetScalarParameterValue(FName("WindowWidth"), transWW);pMaterialInsDy->SetScalarParameterValue(FName("DataRange"), 65535.0);auto pStaticMeshComponent = pPlaneMesh->GetStaticMeshComponent();pStaticMeshComponent->SetMaterial(0, pMaterialInsDy);}
}// Called every frame
void USliceDataLoader::TickComponent(float DeltaTime, ELevelTick TickType, FActorComponentTickFunction* ThisTickFunction)
{Super::TickComponent(DeltaTime, TickType, ThisTickFunction);
}
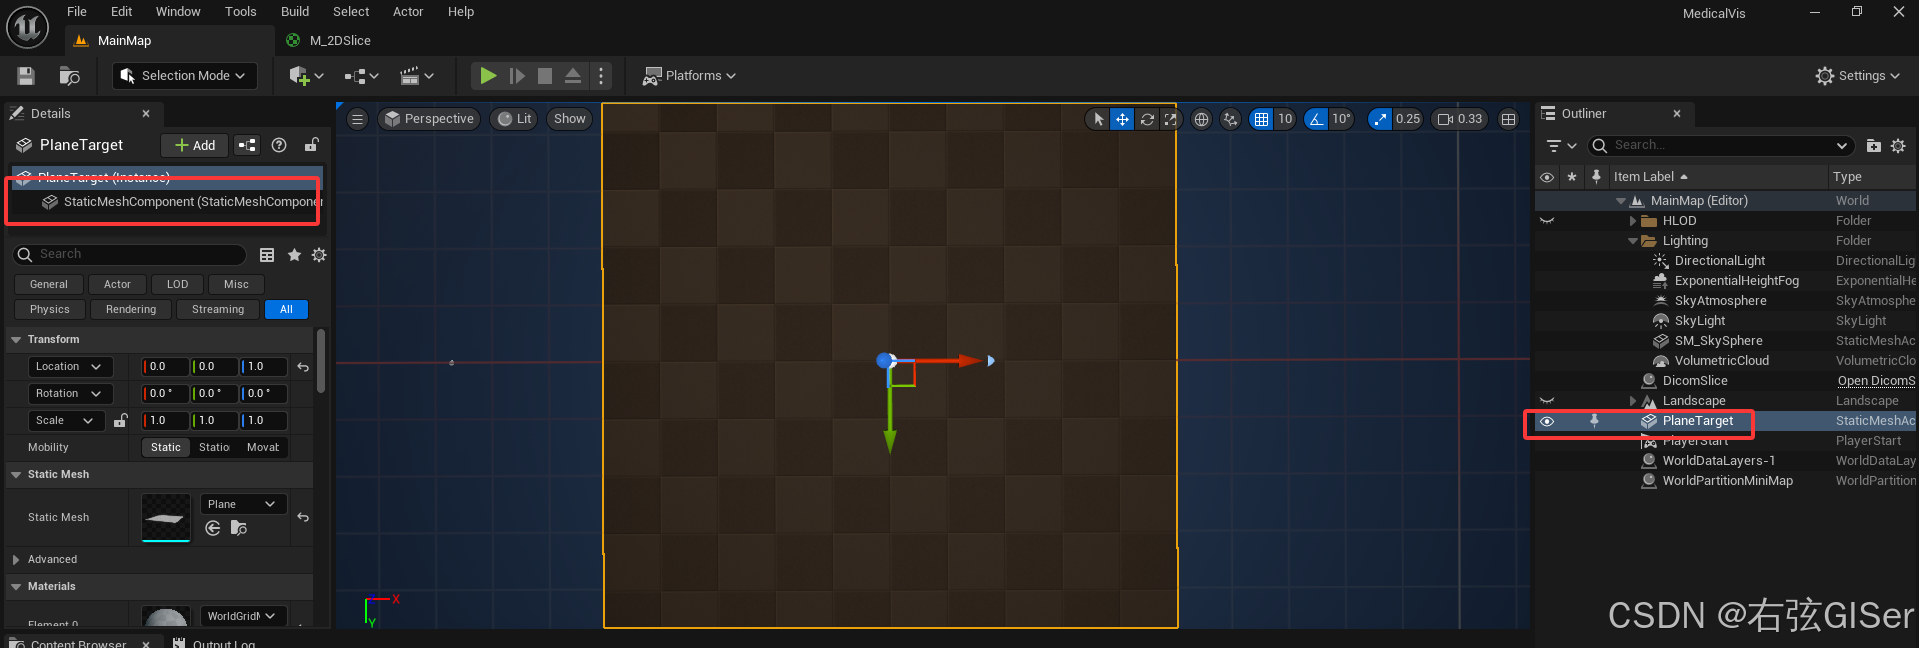
(2)在场景中添加Plane,用于影像在UE中显示的载体
(3)在UE场景中添加任意的Actor,并添加上文创建的SliceDataLoader组件
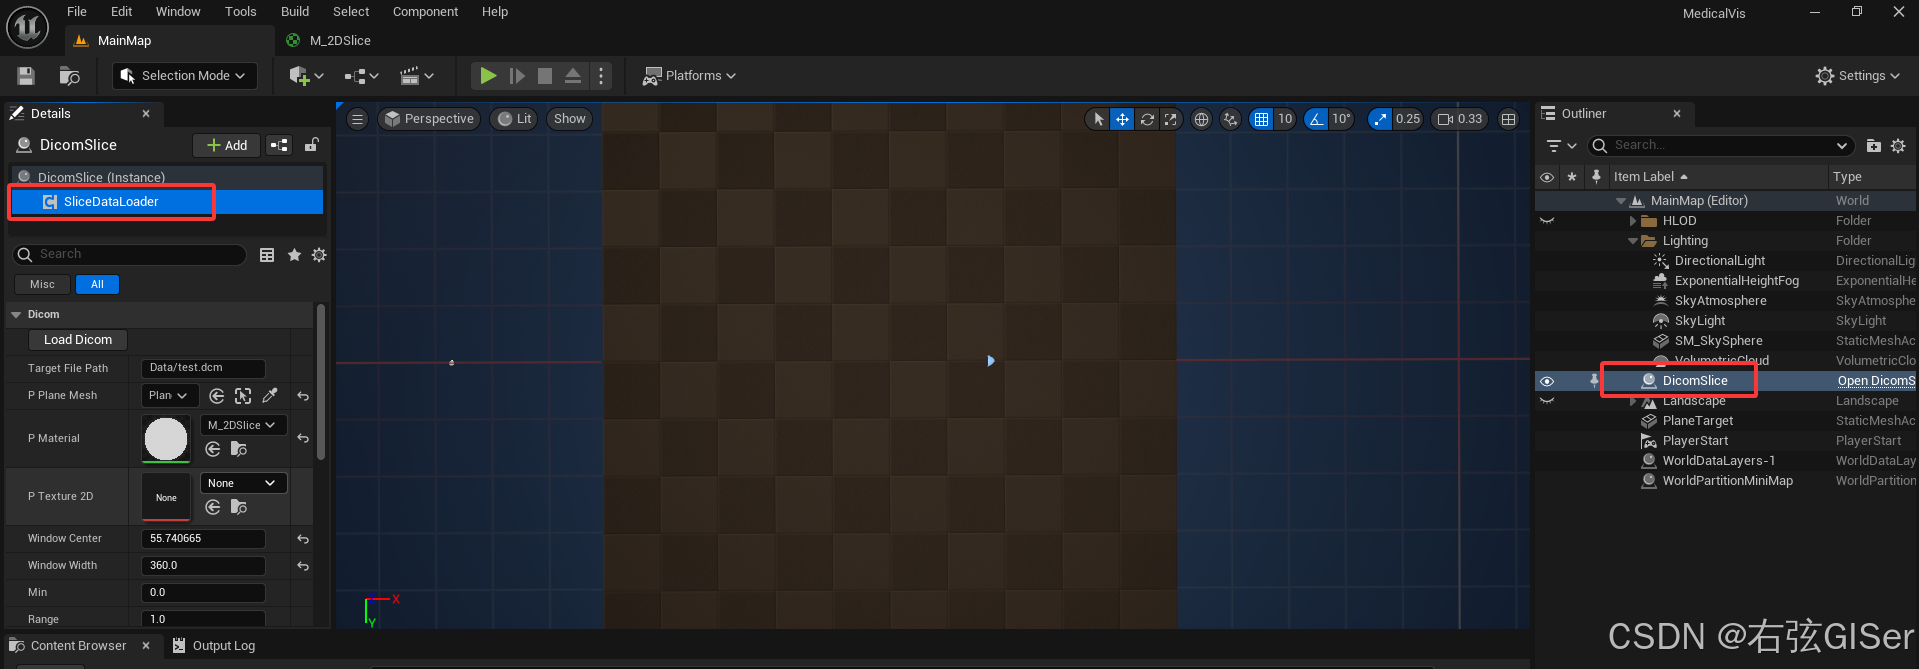
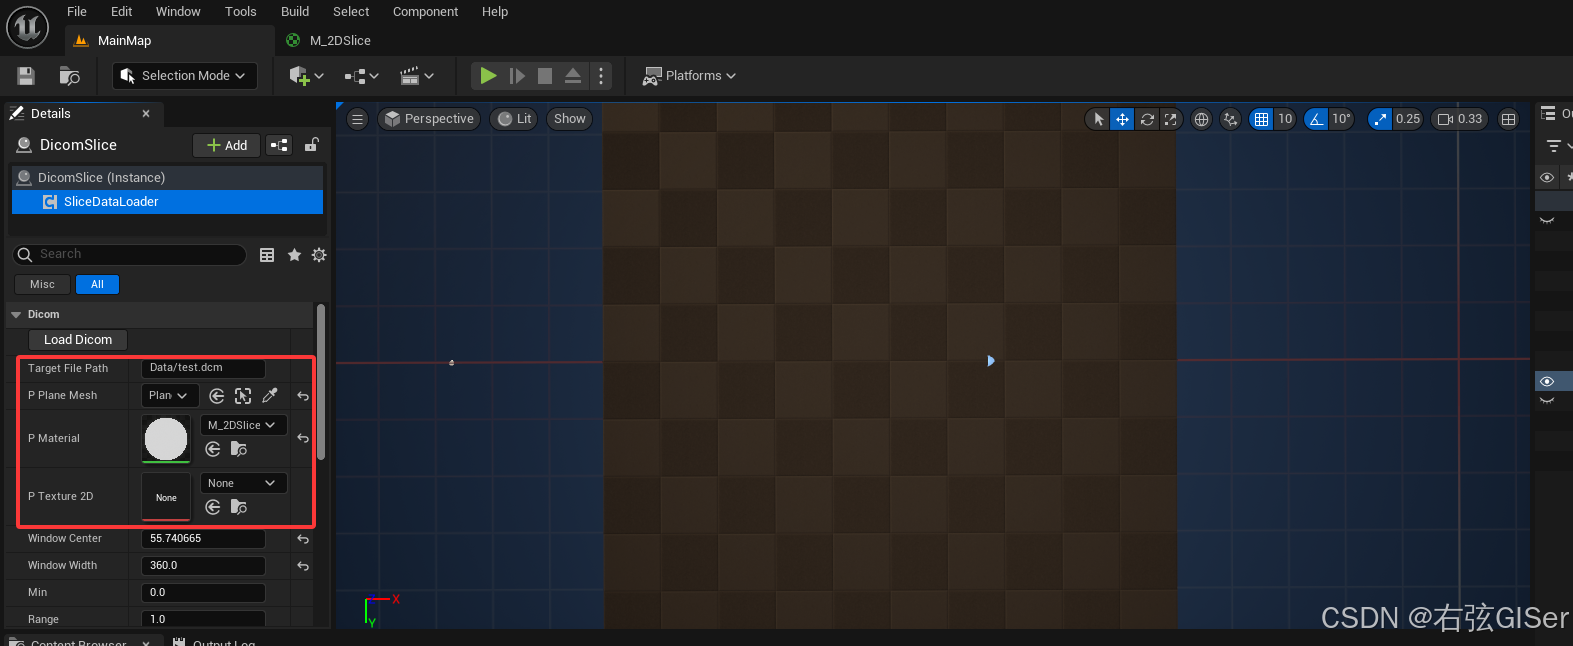
(4)在该组件的细节面板中,选择测试用的dicom文件的相对路径,以及需要应用的材质(上文创建的用于dicom显示处理的材质)等参数
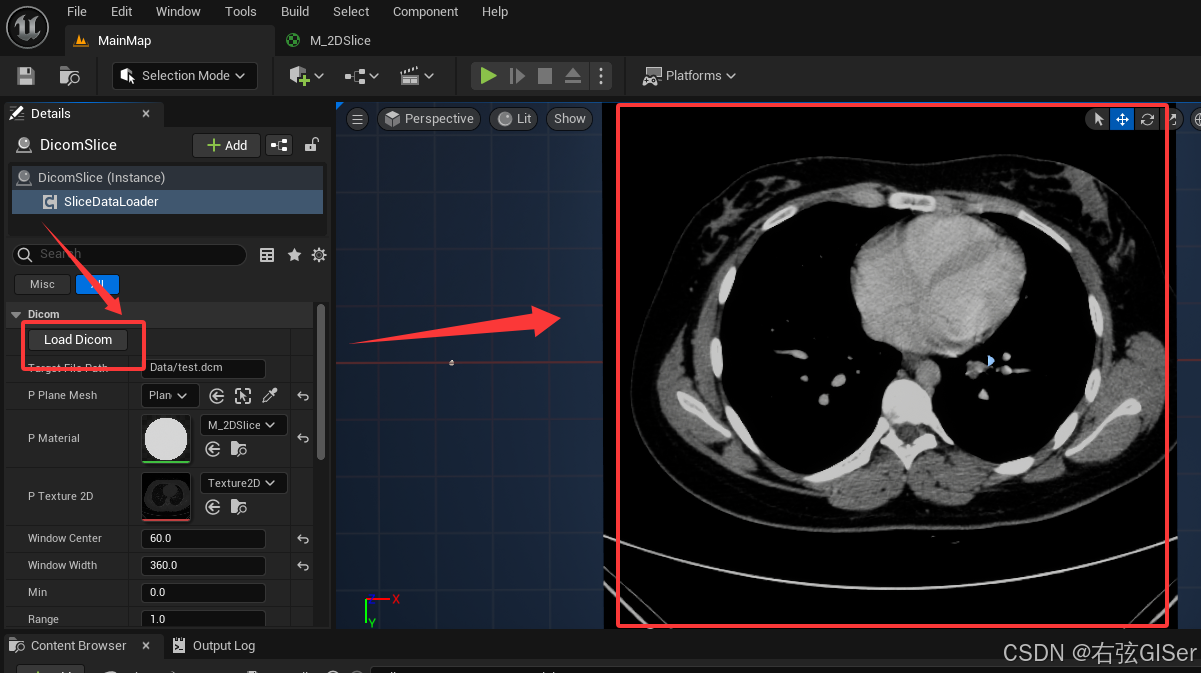
(5)Editor下点击Load Dicom按钮,即可实现对本地Dicom文件的加载解析,2D纹理的生成,以及最终在UE场景中显示正确的Dicom影像
3.参考资料
- 【UE4】使用动态库(DLL)提示找不到dll该怎么解决呢:传送门
- 医学图像数据集集锦(附下载):传送门
- Download Train and Test Data:传送门
- Volume Rendering (Raymarching) Plugin for Unreal Engine:传送门
- DCMTK:传送门
- GDCM:传送门
- UTexture::UpdateResource() overwrote by winbase.h #define:传送门
- UE4 #include <windows.h>之后UpdateResource报错:传送门
- UE4custom node引用自定义.ush .usf文件:传送门
- UE4 Gamma校正、sRGB、Linear:传送门
基础知识点记录一)


)


」2025年7月4日)


