概述
1、封装springboot全局的消息推送接口;
注:1)由于原生HTML5 EventSource 不支持添加header,所以要把连接创建接口加入身份验证白名单,并在接口内添加自己校验token2)后台需定时心跳,保证链接的存活
2、封装前端公共的消息推动存储方法:保证整个系统只有1个消息链接
组件可根据传递指定的业务类型,展示制定的消息
3、注意sse连接建立接口,需要单独指定nginx配置,防止nginx默认配置导致的推送链接中断
4、分布式系统,该后台接口改动介绍
测试效果
如下图
1 后端接口的实现
controller有3个方法
1、sse链接建立
2、给已连接的指定用户推送消息(用户在线才能收到,不在线消息丢下:可根据您的业务再做具体代码编写)
3、给所有已建立的用户广播消息
注:本文章采用:有心跳 → 用 0L 永久连接,服务器资源受控,客户端也能保持连接
也可采用:无心跳 → 建议设置 30~60 秒超时,客户端需要重连:适合连接数量非常多,或者不频繁推送的场景
1.1 推送服务Service
SseService 接口
package com.server.common.notice.service;import org.springframework.web.servlet.mvc.method.annotation.SseEmitter;public interface SseService {/*** 建立连接** @param clientId 连接id,这里是用户id* @return see 服务器事件响应*/SseEmitter connect(String clientId);/*** 给指定 连接,发送消息** @param clientId 连接id* @param type     消息类型* @param data     数据*/void sendMessage(String clientId, String type, Object data);/*** 广播消息** @param type 类型* @param data 数据*/void broadcast(String type, Object data);
}
SseService 接口实现
注意:链接建立逻辑不要做改动,若直接根据clientId 移除和关闭,可能造成竞态删除”错误对象
package com.server.common.notice.service.impl;import com.server.common.notice.service.SseService;
import org.springframework.stereotype.Service;
import org.springframework.web.servlet.mvc.method.annotation.SseEmitter;import java.util.Map;
import java.util.UUID;
import java.util.concurrent.ConcurrentHashMap;@Service
public class SseServiceImpl implements SseService {private final Map<String, SseEmitter> clients = new ConcurrentHashMap<>();@Overridepublic SseEmitter connect(String clientId) {// 1) 先移除旧连接,避免 onCompletion 把后续的新连接误删SseEmitter old = clients.remove(clientId);if (old != null) {try {old.complete();} catch (Exception ignore) {}}// 2) 建立新连接(可改成有超时,比如 15min;配合心跳更稳)SseEmitter emitter = new SseEmitter(0L);clients.put(clientId, emitter);// 3) 回调里做“条件删除”:仅当 Map 中的值就是当前这个 emitter 时才删除Runnable cleanup = () -> clients.remove(clientId, emitter);emitter.onCompletion(cleanup);emitter.onTimeout(cleanup);emitter.onError(ex -> cleanup.run());// 初始事件try {emitter.send(SseEmitter.event().name("INIT").data("connected"));} catch (Exception e) {try {emitter.completeWithError(e);} catch (Exception ignore) {}}return emitter;}@Overridepublic void sendMessage(String clientId, String type, Object data) {SseEmitter emitter = clients.get(clientId);if (emitter == null) return;try {emitter.send(SseEmitter.event().name("MESSAGE").data(Map.of("id", UUID.randomUUID().toString(),"type", type,"data", data)));} catch (Exception e) {clients.remove(clientId, emitter);try {emitter.completeWithError(e);} catch (Exception ignore) {}}}@Overridepublic void broadcast(String type, Object data) {for (String clientId : clients.keySet()) {sendMessage(clientId, type, data);}}
}
1.2 推送服务Controller
package com.server.common.notice.controller;import cn.hutool.core.util.ObjectUtil;
import com.server.common.notice.service.SseService;
import jakarta.annotation.Resource;
import lombok.extern.slf4j.Slf4j;
import org.springframework.web.bind.annotation.*;
import org.springframework.web.servlet.mvc.method.annotation.SseEmitter;import java.time.Instant;@Slf4j
@RestController
@RequestMapping("/common/stream")
public class SseController {@Resourceprivate SseService sseService;/*** 建立 SSE 连接** @param clientId 连接id* @return sse 事件*/@GetMapping("/connect/{clientId}")public SseEmitter connect(@PathVariable String clientId, @RequestParam String token) {// todo 编写自己的token校验,且不加刷新token逻辑,否则系统永不掉线return sseService.connect(clientId);}/*** 给指定用户推送(仅测试用)** @param clientId 连接id* @param type     类型* @param data     数据*/@PostMapping("/push/{clientId}")public void push(@PathVariable String clientId,@RequestParam String type,@RequestBody Object data) {sseService.sendMessage(clientId, type, data);}/*** 广播推送(仅测试用)** @param type 类型* @param data 数据*/@PostMapping("/broadcast")public void broadcast(@RequestParam String type,@RequestBody Object data) {sseService.broadcast(type, data);}
}
1.3 定时心跳,保证链接不中断
package com.server.common.notice.schedule;import com.server.common.notice.service.SseService;
import jakarta.annotation.Resource;
import org.springframework.scheduling.annotation.Scheduled;
import org.springframework.stereotype.Component;@Component
public class SseHeartbeatTask {@Resourceprivate SseService sseService;/*** 每30秒执行一次,给sse链接事件,发送一次广播*/@Scheduled(fixedRate = 30000)public void sendHeartbeat() {sseService.broadcast("HEARTBEAT", "ping");}
}
2 前端公共组件封装
核心:
1、使用公共变量存储前端唯一的:eventSource ,不重复建立连接
2、pinia 类定义了前端唯一的sse事件监听器,且存储所有消息
3、封装消息展示组件固定化流程,防止链接重复创建
包含:sseStore.js、PushMessage.vue
2.1 sseStore.js
注:其中链接地址的前缀需要你根据实际业务调整:例如:import.meta.env.VITE_BASE_API
属性 messages:存储的消息列表:格式:[{id:唯一标识,type:消息类型,data:消息内容}]
属性 connected:是够链接建立成功
方法:
1)initSse 初始化链接,传递用户id 和 用户的token
2)removeMessage:存储中删除指定消息
import {defineStore} from 'pinia';
import {ref} from 'vue';let eventSource = null; // 全局唯一 SSE 连接export const useSseStore = defineStore('sse', () => {const messages = ref([]);const connected = ref(false);function initSse(clientId, token) {if (eventSource) return; // 已存在连接eventSource = new EventSource(`/api/common/stream/connect/${clientId}?token=${token}`);eventSource.addEventListener('INIT', () => {connected.value = true;console.log('SSE connected');});eventSource.addEventListener('MESSAGE', event => {const msg = JSON.parse(event.data);messages.value.push(msg);if (messages.value.length > 500) messages.value.shift(); // 限制缓存});eventSource.addEventListener('HEARTBEAT', () => {// 可更新心跳状态});eventSource.onerror = () => {connected.value = false;console.warn('SSE error, will auto-reconnect');};}function removeMessage(id) {messages.value = messages.value.filter(msg => msg.id !== id);}return {messages, connected, initSse, removeMessage};
});
2.2 PushMessage.vue
注:onMounted的参数需要你根据实际业务传递,ui展示也需要您根据业务调整
<template><div class="push-messages"><h4>{{ title }},链接状态:{{ sseStore.connected }}</h4><ul><li v-for="msg in filteredMessages" :key="msg.id">{{ msg.data }}<button @click="remove(msg.id)">删除</button></li></ul><p v-if="!filteredMessages.length">暂无消息</p></div>
</template><script setup>
import {computed, onMounted} from 'vue';
import {useSseStore} from '@/pinia/sseStore.js';const props = defineProps({// 消息类型moduleType: {type: String, required: true},// 组件标题title: {type: String, default: '消息推送'},// 最大缓存数量maxCache: {type: Number, default: 50}
});const sseStore = useSseStore();// 过滤指定模块消息
const filteredMessages = computed(() => {return sseStore.messages.filter(msg => msg.type === props.moduleType).slice(-props.maxCache);
});function remove(id) {sseStore.removeMessage(id);
}// 组件挂载时调用 initSse
onMounted(() => {// todo 这里需要根据你的实际情况:传递用户id 和需要校验的tokensseStore.initSse()
})
</script><style scoped>
.push-messages {border: 1px solid #ddd;padding: 10px;max-height: 300px;overflow-y: auto;
}.push-messages ul {list-style: none;padding: 0;margin: 0;
}.push-messages li {display: flex;justify-content: space-between;padding: 4px 0;border-bottom: 1px dashed #eee;
}.push-messages button {background: #f5f5f5;border: 1px solid #ccc;padding: 2px 5px;cursor: pointer;
}
</style>
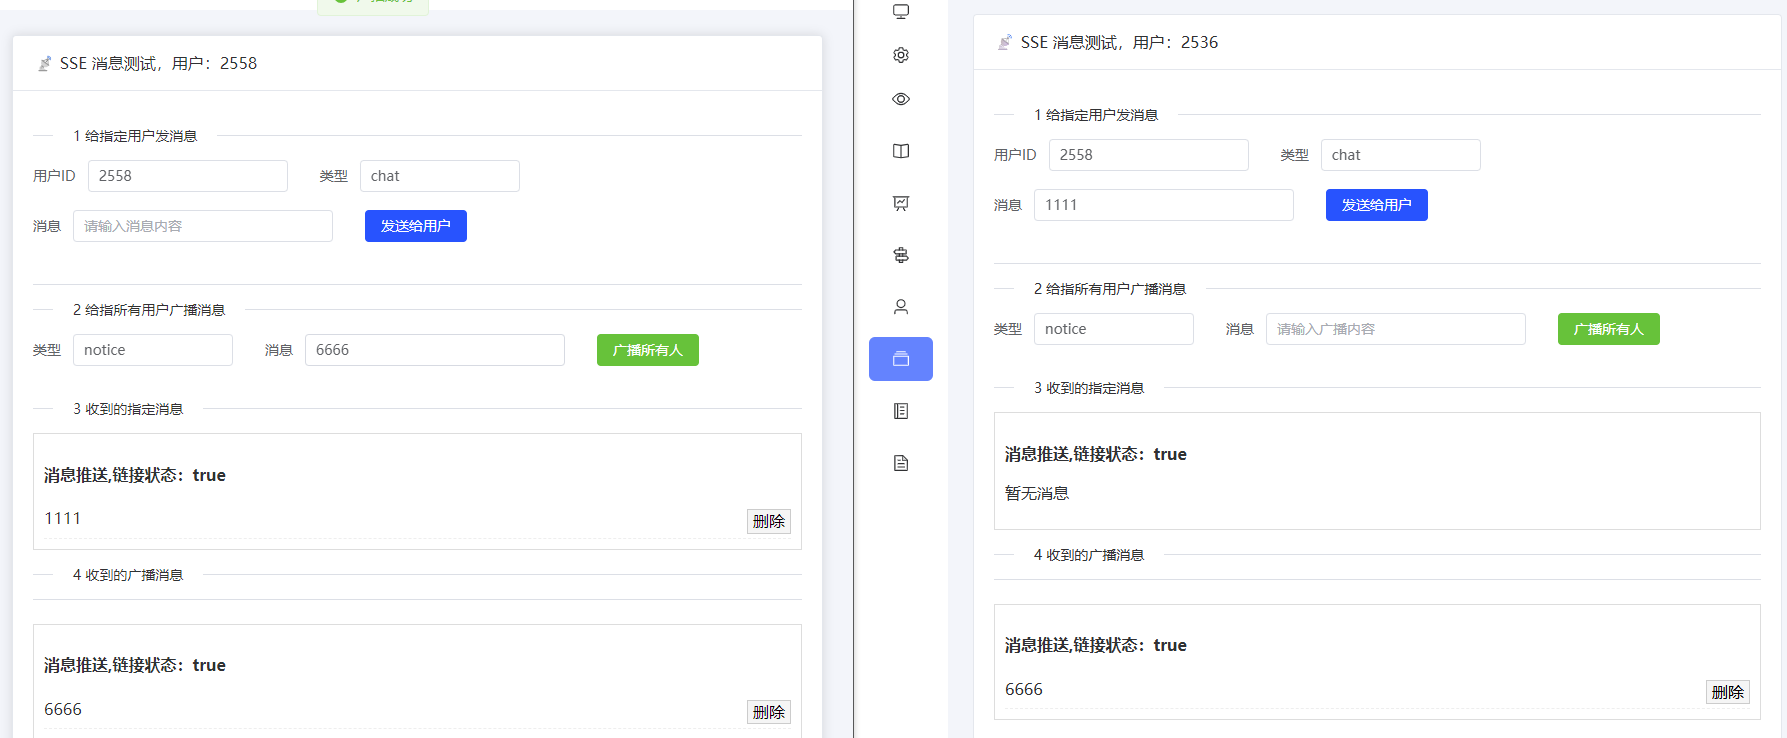
3 前端组件测试
包含:1 sseApi.js 本质就是网路请求公共提取
2 SseMessageTest.vue,测试页面
3.1 sseApi.js
这里引用的utils/request会自动添加header 头
import request from '@/utils/request'export default {// 给用发送消息sendToUser(clientId, type, data) {return request({url: `/common/stream/push/${clientId}?type=${type}`,method: 'post',data: data,headers: {'Content-Type': 'application/json',  // 根据需求设置}})},//broadcast(type, data) {return request({url: `/common/stream/broadcast?type=${type}`,method: 'post',data: data,headers: {'Content-Type': 'application/json',  // 根据需求设置}})},
}
3.1 SseMessageTest.vue
下列:common.getUserIdByToken() 为我这获取当前登陆用户id的前端方法,请根据实际业务进行替换
<template><el-card class="sse-message-test" shadow="hover"><template #header><span>📡 SSE 消息测试,用户:{{ common.getUserIdByToken() }}</span></template><el-divider content-position="left">1 给指定用户发消息</el-divider><!-- 给指定用户发消息 --><el-form :inline="true" :model="formSingle" class="form-block"><el-form-item label="用户ID"><el-input v-model="formSingle.clientId" placeholder="请输入用户ID" style="width: 200px"/></el-form-item><el-form-item label="类型"><el-input v-model="formSingle.type" placeholder="如 chat/order" style="width: 160px"/></el-form-item><el-form-item label="消息"><el-input v-model="formSingle.data" placeholder="请输入消息内容" style="width: 260px"/></el-form-item><el-form-item><el-button type="primary" @click="sendToUser">发送给用户</el-button></el-form-item></el-form><el-divider/><el-divider content-position="left">2 给指所有用户广播消息</el-divider><!-- 广播消息 --><el-form :inline="true" :model="formBroadcast" class="form-block"><el-form-item label="类型"><el-input v-model="formBroadcast.type" placeholder="如 notice/chat" style="width: 160px"/></el-form-item><el-form-item label="消息"><el-input v-model="formBroadcast.data" placeholder="请输入广播内容" style="width: 260px"/></el-form-item><el-form-item><el-button type="success" @click="broadcast">广播所有人</el-button></el-form-item></el-form><el-divider content-position="left">3 收到的指定消息</el-divider><push-message module-type="chat"/><el-divider content-position="left">4 收到的广播消息</el-divider><el-divider content="广播信息"/><push-message module-type="notice"/></el-card>
</template><script setup>
import {reactive} from 'vue'
import {ElMessage} from 'element-plus'
import sseApi from '@/api/sys/sseApi.js'
import common from "@/utils/common.js";import PushMessage from "@/components/message/PushMessage.vue";// 单用户消息
const formSingle = reactive({clientId: common.getUserIdByToken(),type: 'chat',data: ''
})// 广播消息
const formBroadcast = reactive({type: 'notice',data: ''
})// 给指定用户发消息
async function sendToUser() {if (!formSingle.clientId || !formSingle.data) {return ElMessage.warning('请填写用户ID和消息内容')}try {await sseApi.sendToUser(formSingle.clientId, formSingle.type, formSingle.data)ElMessage.success(`已向 ${formSingle.clientId} 发送消息`)} catch (e) {ElMessage.error('发送失败')}
}// 广播所有人
async function broadcast() {if (!formBroadcast.data) {return ElMessage.warning('请输入广播内容')}try {await sseApi.broadcast(formBroadcast.type, formBroadcast.data)ElMessage.success('广播成功')} catch (e) {console.log('广播失败', e)ElMessage.error('广播失败:')}
}
</script><style scoped>
.sse-message-test {margin: 20px;
}.form-block {margin-bottom: 15px;
}
</style>
3 nginx部署改动
单独添加
# SSE 专用location /api/common/stream/connect/ {proxy_set_header Host $http_host;proxy_set_header X-Real-IP $remote_addr;proxy_set_header X-Forwarded-For $proxy_add_x_forwarded_for;# SSE 专用配置proxy_http_version 1.1; # SSE 必须 HTTP/1.1proxy_set_header Connection ''; # 保持长连接chunked_transfer_encoding off; # 保证消息实时# 本机上运行的后端接口proxy_pass http://127.0.0.1:8080/common/stream/connect/;}
完整的配置nginx的配置,这边nginx安装是启用了压缩
详见:https://blog.csdn.net/qq_26408545/article/details/133685624?spm=1001.2014.3001.5502
# Nginx 进程数,一般设置为和 CPU 核数一样,可设置 auto
worker_processes  auto;#error_log  logs/error.log; # Nginx 的错误日志存放目录
#error_log  logs/error.log  notice;
#error_log  logs/error.log  info;#pid        logs/nginx.pid; # Nginx 服务启动时的 pid 存放位置events {# 根据操作系统自动选择:建议指定事件驱动模型,避免 Nginx 误判环境use epoll;# 每个进程允许最大并发数# 小规模的服务器:512或1024,中等规模的服务器:2048或4096,大规模的服务器:8192或更高# 考虑到内存占用和CPU的利用率,一般建议不要将worker_connections设置得过高worker_connections  2048;# 默认:off,高并发下建议开,让 worker 每次尽量多 accept 新连接multi_accept on;# 默认:on,避免多个 worker 同时抢占 accept,减少惊群现象accept_mutex on;
}http {include       mime.types;# 文件扩展名与类型映射表default_type  application/octet-stream;# 默认文件类型# 设置日志模式#log_format  main  '$remote_addr - $remote_user [$time_local] "$request" '#                  '$status $body_bytes_sent "$http_referer" '#                  '"$http_user_agent" "$http_x_forwarded_for"';#access_log  logs/access.log  main; # Nginx访问日志存放位置sendfile        on;# 开启高效传输模式#tcp_nopush     on;# 减少网络报文段的数量keepalive_timeout  65;# 保持连接的时间,也叫超时时间,单位秒gzip on;#表示开启压缩功能gzip_static on;#静态文件压缩开启# 设置压缩的最低文件大小(默认值是 20 字节)gzip_min_length 5k;# 设置为 1KB 或更大,避免对小文件压缩# 设置使用的压缩算法(一般是 gzip)gzip_comp_level 7;# 范围是 1-9,数字越大压缩率越高,但占用 CPU 更多# 开启对特定文件类型的压缩(不建议压缩紧凑格式:图片)gzip_types text/plain text/css application/javascript application/json application/xml text/xml application/xml+rss text/javascript application/font-woff2 application/font-woff application/font-otf;# 不压缩的 MIME 类型gzip_disable "msie6";# 禁止压缩 IE6 浏览器# 压缩缓存控制gzip_vary on;# 设置响应头 `Vary: Accept-Encoding`# 压缩后文件传输gzip_buffers 16 8k;# 设定缓冲区大小#认证后台server {listen       80; # 88 ssl 本服务监听的端口号server_name  localhost; # 主机名称client_max_body_size 600m;client_body_buffer_size 128k;proxy_connect_timeout 600;proxy_read_timeout 600;proxy_send_timeout 600;proxy_buffer_size 64k;proxy_buffers   4 32k;proxy_busy_buffers_size 64k;proxy_temp_file_write_size 64k;# 首页 index.html — 禁止缓存,强烈推荐location = /index.html {root /opt/sm-crypto/process-center-web/dist;add_header Cache-Control "no-cache, no-store, must-revalidate";add_header Pragma "no-cache";add_header Expires "0";try_files $uri =404;}# 静态资源 /assets/,缓存7天,不带immutable,允许刷新更新location /assets/ {root /opt/sm-crypto/process-center-web/dist;expires 7d;add_header Cache-Control "public";}location / {# root 规定了通过监听的端口号访问的文件目录root  /opt/sm-crypto/process-center-web/dist;# 配置资源重新跳转,防止刷新后页面丢失try_files $uri $uri/  /index.html;# index 规定了该目录下指定哪个文件index  index.html index.htm;}# SSE 专用location /api/common/stream/connect/ {proxy_set_header Host $http_host;proxy_set_header X-Real-IP $remote_addr;proxy_set_header X-Forwarded-For $proxy_add_x_forwarded_for;# proxy_http_version 1.1;        # SSE 必须 HTTP/1.1proxy_set_header Connection ''; # 保持长连接chunked_transfer_encoding off; # 保证消息实时# 本机上运行的后端接口proxy_pass http://127.0.0.1:8080/common/stream/connect/;}# 配置后端接口的跨域代理# 对于路径为 "api 的接口,帮助他跳转到指定的地址location /api/ {proxy_set_header Host $http_host;proxy_set_header X-Real-IP $remote_addr;proxy_set_header REMOTE-HOST $remote_addr;proxy_set_header X-Forwarded-For $proxy_add_x_forwarded_for;# 本机上运行的后端接口proxy_pass http://127.0.0.1:8080/; 	}location /status{stub_status on;}}}
4 分布式系统,该后台接口改动介绍
实现有多重可问AI,下面只是实现方案之一
基于 消息队列(推荐)
- 核心思路
- 每台应用实例只维护自己的 SSE 连接
- 推送消息通过 消息中间件(Redis Pub/Sub、Kafka、RabbitMQ 等)广播到所有节点
- 每台节点收到消息后,将其推送给本节点内存里的 SSE 客户端
- 流程示意
客户端(EventSource)|v节点 A --------> Redis Pub/Sub ---------> 节点 B| |v vSseEmitter SseEmitter
- 优点
- 高可用,自动扩展节点
- 节点之间解耦
- 消息顺序可控(Kafka 支持顺序)
- 实现举例(Redis Pub/Sub)
// 发布消息
redisTemplate.convertAndSend("sse:channel", msg);// 订阅消息
@EventListener
public void onMessage(Message msg) {sseService.broadcast(msg.getType(), msg.getData());
}

—— 中间件安全WPS分析WeblogicJenkinsJettyCVE)

:fixture从入门到精通)


)


)
:Service)


