一、OTA两种方式:app_update 与 esp_https_ota 区别
-
ESP32/ESP32-S2/ESP32-C3等可通过Wi-Fi或以太网下载新固件到OTA分区实现运行时升级。ESP-IDF提供两种OTA升级方法:
- 使用
app_update组件的原生API - 使用
esp_https_ota组件的简化API(支持HTTPS升级)
- 使用
-
本次主要介绍通过
app_update原生API组件进行OTA升级
二、ESP32的OTA代码
我们的目标是实现基于HTTPS协议的OTA固件升级方案,具体流程为:设备通过HTTPS请求从服务器获取最新的固件包,完成下载后将其写入指定的OTA分区,随后更新启动配置信息,最终重启系统并从新烧写的OTA分区启动更新后的应用程序。这一过程确保了固件传输的安全性和升级的可靠性,同时支持系统无缝切换到新版本。
1. 代码解析
native ota API参考链接
-
#define BUFFSIZE 1024每次从服务器读取流大小为1024个字节 -
证书嵌入:
通过 CMake 将服务器的 PEM 格式公钥证书(ca_cert.pem)嵌入到固件二进制文件中。在 CMakeLists.txt 中使用 EMBED_TXTFILES 指令将证书文件编译进程序,证书数据会被存储在设备的 NVS(非易失性存储)区域。
# Embed the server root certificate into the final binary
idf_build_get_property(project_dir PROJECT_DIR)
idf_component_register(SRCS "native_ota_example.c"INCLUDE_DIRS "."EMBED_TXTFILES ${project_dir}/server_certs/ca_cert.pem)
- 证书访问:
server_cert_pem_start指向证书数据起始地址
server_cert_pem_end指向证书数据结束地址
extern const uint8_t server_cert_pem_start[] asm("_binary_ca_cert_pem_start");
extern const uint8_t server_cert_pem_end[] asm("_binary_ca_cert_pem_end");// 初始化HTTPS客户端配置
esp_http_client_config_t config = {.url = CONFIG_EXAMPLE_FIRMWARE_UPG_URL,.cert_pem = (char *)server_cert_pem_start,.timeout_ms = CONFIG_EXAMPLE_OTA_RECV_TIMEOUT,.keep_alive_enable = true,
};
- 获取当前配置的启动分区
configured、获取当前运行分区running,获取下一个更新分区update_partition
const esp_partition_t *configured = esp_ota_get_boot_partition();const esp_partition_t *running = esp_ota_get_running_partition();update_partition = esp_ota_get_next_update_partition(NULL);
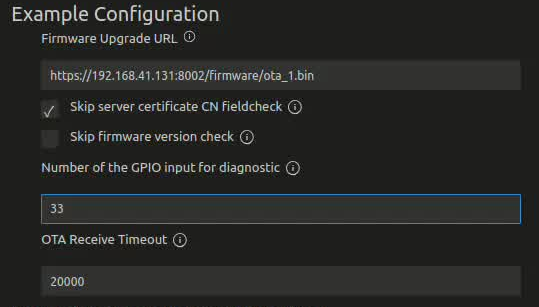
- HTTPS的Get请求配置如下,URL在menuconfig里面填写,固件名为ota_1.bin
// 初始化HTTP客户端配置esp_http_client_config_t config = {.url = CONFIG_EXAMPLE_FIRMWARE_UPG_URL,.cert_pem = (char *)server_cert_pem_start,.timeout_ms = CONFIG_EXAMPLE_OTA_RECV_TIMEOUT,.keep_alive_enable = true,};
- 从API获取流数据时,每次读取
BUFFSIZE1024个Byte
while (1){int data_read = esp_http_client_read(client, ota_write_data, BUFFSIZE);
- 首先需要检验固件头数据,擦除升级的flash区域,然后开始不断连续的写入到OTA区域。看注释
// 检查OTA头部信息,只在第一次接收数据时执行
if (image_header_was_checked == false)
{esp_app_desc_t new_app_info;  // 用于存储新固件的描述信息// 检查接收到的数据长度是否足够包含完整的头部信息// 需要包含:映像头+段头+应用描述信息if (data_read > sizeof(esp_image_header_t) + sizeof(esp_image_segment_header_t) + sizeof(esp_app_desc_t)) {// 从接收数据中提取应用描述信息,跳过映像头和段头memcpy(&new_app_info, &ota_write_data[sizeof(esp_image_header_t) + sizeof(esp_image_segment_header_t)], sizeof(esp_app_desc_t));ESP_LOGI(TAG, "检测到新固件版本: %s", new_app_info.version);// 获取当前运行固件的版本信息esp_app_desc_t running_app_info;if (esp_ota_get_partition_description(running, &running_app_info) == ESP_OK) {ESP_LOGI(TAG, "当前运行版本: %s", running_app_info.version);}// 获取最后一个无效(启动失败)分区的信息const esp_partition_t *last_invalid_app = esp_ota_get_last_invalid_partition();esp_app_desc_t invalid_app_info;if (esp_ota_get_partition_description(last_invalid_app, &invalid_app_info) == ESP_OK) {ESP_LOGI(TAG, "最后无效固件版本: %s", invalid_app_info.version);}/* 版本验证逻辑 */// 情况1:新版本与最近失败版本相同if (last_invalid_app != NULL) {if (memcmp(invalid_app_info.version, new_app_info.version, sizeof(new_app_info.version)) == 0) {ESP_LOGW(TAG, "新版本与最近失败的版本相同!");ESP_LOGW(TAG, "上次尝试启动 %s 版本固件失败", invalid_app_info.version);ESP_LOGW(TAG, "系统已回滚到之前版本");http_cleanup(client);infinite_loop();  // 阻止继续升级}}// 情况2:新版本与当前运行版本相同(可通过配置跳过此检查)
#ifndef CONFIG_EXAMPLE_SKIP_VERSION_CHECKif (memcmp(new_app_info.version, running_app_info.version, sizeof(new_app_info.version)) == 0) {ESP_LOGW(TAG, "新版本与当前运行版本相同,终止升级");http_cleanup(client);infinite_loop();}
#endifimage_header_was_checked = true;  // 标记已完成头部检查// 初始化OTA写入操作,这里会擦除目标分区,OTA_WITH_SEQUENTIAL_WRITES 数据将按顺序写入err = esp_ota_begin(update_partition, OTA_WITH_SEQUENTIAL_WRITES, &update_handle);if (err != ESP_OK) {ESP_LOGE(TAG, "esp_ota_begin 失败 (%s)", esp_err_to_name(err));http_cleanup(client);esp_ota_abort(update_handle);task_fatal_error();}ESP_LOGI(TAG, "OTA写入初始化成功");}else {// 数据长度不足错误处理int head = sizeof(esp_image_header_t) + sizeof(esp_image_segment_header_t) + sizeof(esp_app_desc_t);ESP_LOGE(TAG, "接收数据长度不足!需要%d字节,实际%d字节", head, data_read);http_cleanup(client);esp_ota_abort(update_handle);task_fatal_error();}
}// 每次循环,写入接收到的数据块到OTA分区
err = esp_ota_write(update_handle, (const void *)ota_write_data, data_read);
if (err != ESP_OK) {http_cleanup(client);esp_ota_abort(update_handle);task_fatal_error();
}// 累计已写入数据量
binary_file_length += data_read;
ESP_LOGD(TAG, "已写入数据量: %d 字节", binary_file_length);
- 结束处理
// 结束升级
err = esp_ota_end(update_handle);
// 下一次从update_partition启动
err = esp_ota_set_boot_partition(update_partition);
// 重启
esp_restart();
2. 全部代码
/* OTA exampleThis example code is in the Public Domain (or CC0 licensed, at your option.)Unless required by applicable law or agreed to in writing, thissoftware is distributed on an "AS IS" BASIS, WITHOUT WARRANTIES ORCONDITIONS OF ANY KIND, either express or implied.
*/
#include <string.h>
#include <inttypes.h>
#include "freertos/FreeRTOS.h"
#include "freertos/task.h"
#include "esp_system.h"
#include "esp_event.h"
#include "esp_log.h"
#include "esp_ota_ops.h"
#include "esp_app_format.h"
#include "esp_http_client.h"
#include "esp_flash_partitions.h"
#include "esp_partition.h"
#include "nvs.h"
#include "nvs_flash.h"
#include "driver/gpio.h"
#include "protocol_examples_common.h"
#include "errno.h"
#include "esp_netif.h"
#include <netdb.h>
#include <sys/socket.h>
#include <arpa/inet.h>#if CONFIG_EXAMPLE_CONNECT_WIFI
#include "esp_wifi.h"
#endif#define BUFFSIZE 1024
#define HASH_LEN 32 /* SHA-256 digest length */static const char *TAG = "native_ota_example";
/*an ota data write buffer ready to write to the flash*/
static char ota_write_data[BUFFSIZE + 1] = {0};
extern const uint8_t server_cert_pem_start[] asm("_binary_ca_cert_pem_start");
extern const uint8_t server_cert_pem_end[] asm("_binary_ca_cert_pem_end");#define OTA_URL_SIZE 256static void http_cleanup(esp_http_client_handle_t client)
{esp_http_client_close(client);esp_http_client_cleanup(client);
}static void __attribute__((noreturn)) task_fatal_error(void)
{ESP_LOGE(TAG, "Exiting task due to fatal error...");(void)vTaskDelete(NULL);while (1){;}
}static void print_sha256(const uint8_t *image_hash, const char *label)
{char hash_print[HASH_LEN * 2 + 1];hash_print[HASH_LEN * 2] = 0;for (int i = 0; i < HASH_LEN; ++i){sprintf(&hash_print[i * 2], "%02x", image_hash[i]);}ESP_LOGI(TAG, "%s: %s", label, hash_print);
}static void infinite_loop(void)
{int i = 0;ESP_LOGI(TAG, "When a new firmware is available on the server, press the reset button to download it");while (1){ESP_LOGI(TAG, "Waiting for a new firmware ... %d", ++i);vTaskDelay(2000 / portTICK_PERIOD_MS);}
}void network_debug_info()
{// 获取默认网络接口esp_netif_t *netif = esp_netif_get_default_netif();if (!netif){ESP_LOGE(TAG, "No active network interface");return;}// 检查网络状态if (!esp_netif_is_netif_up(netif)){ESP_LOGE(TAG, "Network interface down");return;}// 获取DNS信息esp_netif_dns_info_t dns_info;if (esp_netif_get_dns_info(netif, ESP_NETIF_DNS_MAIN, &dns_info) == ESP_OK){ESP_LOGI(TAG, "Main DNS: " IPSTR, IP2STR(&dns_info.ip.u_addr.ip4));}
}/*** @brief 检查 hostname 是否可以解析* @param hostname 要检查的域名* @return*     - ESP_OK: 解析成功*     - ESP_FAIL: 解析失败*/
esp_err_t check_hostname_resolution(const char *hostname)
{struct addrinfo hints = {.ai_family = AF_INET, // 只检查IPv4.ai_socktype = SOCK_STREAM,.ai_flags = AI_CANONNAME,};struct addrinfo *result = NULL;ESP_LOGI(TAG, "尝试解析: %s", hostname);int ret = getaddrinfo(hostname, NULL, &hints, &result);if (ret != 0){ESP_LOGE(TAG, "解析失败");if (ret == EAI_NONAME){ESP_LOGE(TAG, "错误: 域名不存在或无法解析 (EAI_NONAME)");}else if (ret == EAI_AGAIN){ESP_LOGE(TAG, "错误: 临时DNS故障 (EAI_AGAIN)");}return ESP_FAIL;}// 打印解析到的IP地址char ip_str[INET_ADDRSTRLEN];struct sockaddr_in *addr = (struct sockaddr_in *)result->ai_addr;inet_ntop(AF_INET, &addr->sin_addr, ip_str, sizeof(ip_str));ESP_LOGI(TAG, "解析成功: %s -> %s", hostname, ip_str);freeaddrinfo(result);return ESP_OK;
}static void ota_example_task(void *pvParameter)
{esp_err_t err;/* update handle : set by esp_ota_begin(), must be freed via esp_ota_end() */esp_ota_handle_t update_handle = 0;const esp_partition_t *update_partition = NULL;ESP_LOGI(TAG, "Starting OTA example task");const esp_partition_t *configured = esp_ota_get_boot_partition();const esp_partition_t *running = esp_ota_get_running_partition();// 检查配置的OTA启动分区和正在运行的分区是否相同if (configured != running){ESP_LOGW(TAG, "Configured OTA boot partition at offset 0x%08" PRIx32 ", but running from offset 0x%08" PRIx32,configured->address, running->address);ESP_LOGW(TAG, "(This can happen if either the OTA boot data or preferred boot image become corrupted somehow.)");}ESP_LOGI(TAG, "Running partition type %d subtype %d (offset 0x%08" PRIx32 ")",running->type, running->subtype, running->address);// 初始化HTTP客户端配置esp_http_client_config_t config = {.url = CONFIG_EXAMPLE_FIRMWARE_UPG_URL,.cert_pem = (char *)server_cert_pem_start,.timeout_ms = CONFIG_EXAMPLE_OTA_RECV_TIMEOUT,.keep_alive_enable = true,};// 添加网络诊断network_debug_info();#ifdef CONFIG_EXAMPLE_FIRMWARE_UPGRADE_URL_FROM_STDINchar url_buf[OTA_URL_SIZE];// 如果配置的URL为FROM_STDIN,则从标准输入读取URLif (strcmp(config.url, "FROM_STDIN") == 0){example_configure_stdin_stdout();fgets(url_buf, OTA_URL_SIZE, stdin);int len = strlen(url_buf);url_buf[len - 1] = '\0';config.url = url_buf;}else{ESP_LOGE(TAG, "Configuration mismatch: wrong firmware upgrade image url");abort();}
#endif#ifdef CONFIG_EXAMPLE_SKIP_COMMON_NAME_CHECKconfig.skip_cert_common_name_check = true;
#endif// 初始化HTTP客户端esp_http_client_handle_t client = esp_http_client_init(&config);if (client == NULL){ESP_LOGE(TAG, "Failed to initialise HTTP connection");task_fatal_error();}// 打开HTTP连接err = esp_http_client_open(client, 0);if (err != ESP_OK){ESP_LOGE(TAG, "Failed to open HTTP connection: %s", esp_err_to_name(err));esp_http_client_cleanup(client);task_fatal_error();}// 获取HTTP头部信息esp_http_client_fetch_headers(client);// 获取下一个OTA更新分区update_partition = esp_ota_get_next_update_partition(NULL);assert(update_partition != NULL);ESP_LOGI(TAG, "Writing to partition subtype %d at offset 0x%" PRIx32,update_partition->subtype, update_partition->address);int binary_file_length = 0;/*deal with all receive packet*/bool image_header_was_checked = false;// 循环读取HTTP数据while (1){int data_read = esp_http_client_read(client, ota_write_data, BUFFSIZE);if (data_read < 0){ESP_LOGE(TAG, "Error: SSL data read error %d", data_read);http_cleanup(client);task_fatal_error();}else if (data_read > 0){// 检查OTA头部信息if (image_header_was_checked == false){esp_app_desc_t new_app_info;if (data_read > sizeof(esp_image_header_t) + sizeof(esp_image_segment_header_t) + sizeof(esp_app_desc_t)){// check current version with downloadingmemcpy(&new_app_info, &ota_write_data[sizeof(esp_image_header_t) + sizeof(esp_image_segment_header_t)], sizeof(esp_app_desc_t));ESP_LOGI(TAG, "New firmware version: %s", new_app_info.version);esp_app_desc_t running_app_info;if (esp_ota_get_partition_description(running, &running_app_info) == ESP_OK){ESP_LOGI(TAG, "Running firmware version: %s", running_app_info.version);}const esp_partition_t *last_invalid_app = esp_ota_get_last_invalid_partition();esp_app_desc_t invalid_app_info;if (esp_ota_get_partition_description(last_invalid_app, &invalid_app_info) == ESP_OK){ESP_LOGI(TAG, "Last invalid firmware version: %s", invalid_app_info.version);}// check current version with last invalid partitionif (last_invalid_app != NULL){if (memcmp(invalid_app_info.version, new_app_info.version, sizeof(new_app_info.version)) == 0){ESP_LOGW(TAG, "New version is the same as invalid version.");ESP_LOGW(TAG, "Previously, there was an attempt to launch the firmware with %s version, but it failed.", invalid_app_info.version);ESP_LOGW(TAG, "The firmware has been rolled back to the previous version.");http_cleanup(client);infinite_loop();}}
#ifndef CONFIG_EXAMPLE_SKIP_VERSION_CHECKif (memcmp(new_app_info.version, running_app_info.version, sizeof(new_app_info.version)) == 0){ESP_LOGW(TAG, "Current running version is the same as a new. We will not continue the update.");http_cleanup(client);infinite_loop();}
#endifimage_header_was_checked = true;err = esp_ota_begin(update_partition, OTA_WITH_SEQUENTIAL_WRITES, &update_handle);if (err != ESP_OK){ESP_LOGE(TAG, "esp_ota_begin failed (%s)", esp_err_to_name(err));http_cleanup(client);esp_ota_abort(update_handle);task_fatal_error();}ESP_LOGI(TAG, "esp_ota_begin succeeded");}else{int head = sizeof(esp_image_header_t) + sizeof(esp_image_segment_header_t) + sizeof(esp_app_desc_t);ESP_LOGE(TAG, "received package is not fit len %d , %d", data_read, head);http_cleanup(client);esp_ota_abort(update_handle);task_fatal_error();}}err = esp_ota_write(update_handle, (const void *)ota_write_data, data_read);if (err != ESP_OK){http_cleanup(client);esp_ota_abort(update_handle);task_fatal_error();}binary_file_length += data_read;ESP_LOGI(TAG, "Written image length %d", binary_file_length);}else if (data_read == 0){/** As esp_http_client_read never returns negative error code, we rely on* `errno` to check for underlying transport connectivity closure if any*/if (errno == ECONNRESET || errno == ENOTCONN){ESP_LOGE(TAG, "Connection closed, errno = %d", errno);break;}if (esp_http_client_is_complete_data_received(client) == true){ESP_LOGI(TAG, "Connection closed");break;}}}ESP_LOGI(TAG, "Total Write binary data length: %d", binary_file_length);if (esp_http_client_is_complete_data_received(client) != true){ESP_LOGE(TAG, "Error in receiving complete file");http_cleanup(client);esp_ota_abort(update_handle);task_fatal_error();}err = esp_ota_end(update_handle);if (err != ESP_OK){if (err == ESP_ERR_OTA_VALIDATE_FAILED){ESP_LOGE(TAG, "Image validation failed, image is corrupted");}else{ESP_LOGE(TAG, "esp_ota_end failed (%s)!", esp_err_to_name(err));}http_cleanup(client);task_fatal_error();}err = esp_ota_set_boot_partition(update_partition);if (err != ESP_OK){ESP_LOGE(TAG, "esp_ota_set_boot_partition failed (%s)!", esp_err_to_name(err));http_cleanup(client);task_fatal_error();}ESP_LOGI(TAG, "Prepare to restart system!");esp_restart();return;
}static bool diagnostic(void)
{gpio_config_t io_conf;io_conf.intr_type = GPIO_INTR_DISABLE;io_conf.mode = GPIO_MODE_INPUT;io_conf.pin_bit_mask = (1ULL << CONFIG_EXAMPLE_GPIO_DIAGNOSTIC);io_conf.pull_down_en = GPIO_PULLDOWN_DISABLE;io_conf.pull_up_en = GPIO_PULLUP_ENABLE;gpio_config(&io_conf);ESP_LOGI(TAG, "Diagnostics (5 sec)...");vTaskDelay(5000 / portTICK_PERIOD_MS);bool diagnostic_is_ok = gpio_get_level(CONFIG_EXAMPLE_GPIO_DIAGNOSTIC);gpio_reset_pin(CONFIG_EXAMPLE_GPIO_DIAGNOSTIC);return diagnostic_is_ok;
}void app_main(void)
{ESP_LOGI(TAG, "OTA example app_main start");uint8_t sha_256[HASH_LEN] = {0};esp_partition_t partition;// get sha256 digest for the partition tablepartition.address = ESP_PARTITION_TABLE_OFFSET;partition.size = ESP_PARTITION_TABLE_MAX_LEN;partition.type = ESP_PARTITION_TYPE_DATA;esp_partition_get_sha256(&partition, sha_256);print_sha256(sha_256, "SHA-256 for the partition table: ");// get sha256 digest for bootloaderpartition.address = ESP_BOOTLOADER_OFFSET;partition.size = ESP_PARTITION_TABLE_OFFSET;partition.type = ESP_PARTITION_TYPE_APP;esp_partition_get_sha256(&partition, sha_256);print_sha256(sha_256, "SHA-256 for bootloader: ");// get sha256 digest for running partitionesp_partition_get_sha256(esp_ota_get_running_partition(), sha_256);print_sha256(sha_256, "SHA-256 for current firmware: ");const esp_partition_t *running = esp_ota_get_running_partition();esp_ota_img_states_t ota_state;if (esp_ota_get_state_partition(running, &ota_state) == ESP_OK){// 检查OTA状态if (ota_state == ESP_OTA_IMG_PENDING_VERIFY){// run diagnostic function ...bool diagnostic_is_ok = diagnostic();if (diagnostic_is_ok){ESP_LOGI(TAG, "Diagnostics completed successfully! Continuing execution ...");esp_ota_mark_app_valid_cancel_rollback();}else{ESP_LOGE(TAG, "Diagnostics failed! Start rollback to the previous version ...");esp_ota_mark_app_invalid_rollback_and_reboot();}}}// Initialize NVS.esp_err_t err = nvs_flash_init();if (err == ESP_ERR_NVS_NO_FREE_PAGES || err == ESP_ERR_NVS_NEW_VERSION_FOUND){// OTA app partition table has a smaller NVS partition size than the non-OTA// partition table. This size mismatch may cause NVS initialization to fail.// If this happens, we erase NVS partition and initialize NVS again.ESP_ERROR_CHECK(nvs_flash_erase());err = nvs_flash_init();}ESP_ERROR_CHECK(err);ESP_ERROR_CHECK(esp_netif_init());ESP_ERROR_CHECK(esp_event_loop_create_default());/* This helper function configures Wi-Fi or Ethernet, as selected in menuconfig.* Read "Establishing Wi-Fi or Ethernet Connection" section in* examples/protocols/README.md for more information about this function.*/ESP_ERROR_CHECK(example_connect());#if CONFIG_EXAMPLE_CONNECT_WIFI/* Ensure to disable any WiFi power save mode, this allows best throughput* and hence timings for overall OTA operation.*/ESP_LOGI(TAG, "Disable WiFi power save");esp_wifi_set_ps(WIFI_PS_NONE);
#endif // CONFIG_EXAMPLE_CONNECT_WIFIxTaskCreate(&ota_example_task, "ota_example_task", 8192, NULL, 5, NULL);
}
三、node服务器
1. 代码解析
├── ota_test├── certs│ ├── server_cert.key│ └── server_cert.pem└── ota_files├── ota_1.bin└── ota_2.bin
- 创建一个Express应用实例
function startOtaServer(config: ServerConfig): https.Server {const app = createApp(config);// 创建HTTPS服务器const server = https.createServer({// 读取SSL密钥文件key: fs.readFileSync(config.keyFile),// 读取SSL证书文件cert: fs.readFileSync(config.certFile)}, app);// 启动服务器监听指定端口server.listen(config.port, '0.0.0.0', () => {// 打印服务器启动信息,包括本地IP和端口console.log(`OTA Server running on https://${getLocalIp()}:${config.port}`);// 打印固件文件服务目录console.log(`Serving firmware from: ${config.firmwareDir}`);});// 返回创建的服务器实例return server;
}const config: ServerConfig = {port: 8002,firmwareDir: './ota_test/ota_files', // 固件的位置certFile: './ota_test/certs/server_cert.pem', // 公钥文件keyFile: './ota_test/certs/server_cert.key' // 私钥文件
};
- 固件下载的API
app.get('/firmware/:filename', (req, res) => {// 从URL参数获取请求的文件名const filename = req.params.filename;// 拼接完整的固件文件路径const filePath = path.join(PROJECT_PATH, config.firmwareDir, filename);// 检查文件是否存在if (!fs.existsSync(filePath)) {return res.status(404).send('Firmware not found');}// 获取文件信息const stat = fs.statSync(filePath);const fileSize = stat.size;// 设置响应头res.setHeader('Content-Length', fileSize); // 文件大小res.setHeader('Transfer-Encoding', 'identity'); // 关键修复:禁用分块传输res.setHeader('Content-Type', 'application/octet-stream'); // 二进制流类型// 创建文件读取流const fileStream = fs.createReadStream(filePath);// 文件流打开事件fileStream.on('open', () => {// 将文件流管道传输到响应对象fileStream.pipe(res);});// 文件流错误处理fileStream.on('error', (err) => {console.error(`文件流错误: ${err.message}`);if (!res.headersSent) {// 如果响应头还未发送,返回500错误res.status(500).send('文件流错误');} else {// 如果响应头已发送,直接销毁响应res.destroy();}});
});
2. 全部代码
import express from 'express';
import https from 'https';
import fs from 'fs';
import path from 'path';
import os from 'os';
import { PROJECT_PATH } from './config';// 配置类型
interface ServerConfig {port: number;firmwareDir: string;certFile: string;keyFile: string;
}// 获取本机IP地址
function getLocalIp(): string {const interfaces = os.networkInterfaces();for (const name of Object.keys(interfaces)) {for (const iface of interfaces[name]!) {if (iface.family === 'IPv4' && !iface.internal) {return iface.address;}}}return 'localhost';
}// 创建并配置Express应用
function createApp(config: ServerConfig): express.Application {const app = express();// 修复后的固件下载端点app.get('/firmware/:filename', (req, res) => {const filename = req.params.filename;const filePath = path.join(PROJECT_PATH, config.firmwareDir, filename);if (!fs.existsSync(filePath)) {return res.status(404).send('Firmware not found');}const stat = fs.statSync(filePath);const fileSize = stat.size;res.setHeader('Content-Length', fileSize);res.setHeader('Transfer-Encoding', 'identity'); // 关键修复res.setHeader('Content-Type', 'application/octet-stream');const fileStream = fs.createReadStream(filePath);fileStream.on('open', () => {fileStream.pipe(res);});fileStream.on('error', (err) => {console.error(`File stream error: ${err.message}`);if (!res.headersSent) {res.status(500).send('File stream error');} else {res.destroy();}});res.on('close', () => {if (!fileStream.destroyed) {fileStream.destroy();}});});// 健康检查端点app.get('/health', (req, res) => {res.status(200).json({status: 'active',firmwareDir: config.firmwareDir,port: config.port});});return app;
}// 启动HTTPS服务器
function startOtaServer(config: ServerConfig): https.Server {const app = createApp(config);const server = https.createServer({key: fs.readFileSync(config.keyFile),cert: fs.readFileSync(config.certFile)}, app);server.listen(config.port, '0.0.0.0', () => {console.log(`OTA Server running on https://${getLocalIp()}:${config.port}`);console.log(`Serving firmware from: ${config.firmwareDir}`);});return server;
}// 使用示例
const config: ServerConfig = {port: 8002,firmwareDir: './ota_test/ota_files',certFile: './ota_test/certs/server_cert.pem',keyFile: './ota_test/certs/server_cert.key'
};const server = startOtaServer(config);// 处理退出信号
process.on('SIGINT', () => {console.log('Shutting down OTA server...');server.close(() => {process.exit();});
});
四、python服务器
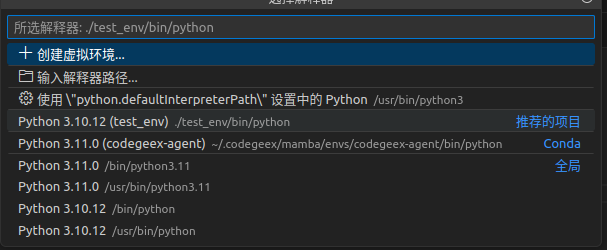
- 创建python独立环境
# 创建环境(Python 3.3+ 自带)
python -m venv test_env  # 激活环境
source test_env/bin/activate  # vscode
ctrl+shift+p 输入 python interpreter 选择test_env
- 下面是官方提供的python例子,运行方式如下:
pytest pytest_native_ota.py

import http.server
import multiprocessing
import os
import random
import socket
import ssl
import struct
import subprocess
from typing import Callable
from typing import Tupleimport pexpect
import pytest
# from common_test_methods import get_host_ip4_by_dest_ip
from pytest_embedded import Dutdef get_host_ip4_by_dest_ip(dest_ip: str) -> str:"""通过尝试连接目标IP,自动选择正确的本地IP。参数:dest_ip: 目标IP地址返回:本地主机的IPv4地址"""with socket.socket(socket.AF_INET, socket.SOCK_DGRAM) as s:s.connect((dest_ip, 80))  # 80是任意端口,无需实际通信return s.getsockname()[0]  # 获取本地绑定的IP地址# 硬编码的测试用SSL证书(PEM格式)
server_cert = '-----BEGIN CERTIFICATE-----\n' \'MIIDWDCCAkACCQCbF4+gVh/MLjANBgkqhkiG9w0BAQsFADBuMQswCQYDVQQGEwJJ\n'\# ... 证书内容省略 ...'-----END CERTIFICATE-----\n'# 硬编码的测试用SSL私钥(PEM格式)
server_key = '-----BEGIN PRIVATE KEY-----\n'\'MIIEvQIBADANBgkqhkiG9w0BAQEFAASCBKcwggSjAgEAAoIBAQDhxF/y7bygndxP\n'\# ... 私钥内容省略 ...'-----END PRIVATE KEY-----\n'def create_file(server_file: str, file_data: str) -> None:"""创建文件并写入内容参数:server_file: 文件路径file_data: 要写入的内容"""with open(server_file, 'w+') as file:file.write(file_data)def get_ca_cert(ota_image_dir: str) -> Tuple[str, str]:"""生成SSL证书和密钥文件参数:ota_image_dir: OTA镜像目录路径返回:元组(证书文件路径, 密钥文件路径)"""os.chdir(ota_image_dir)  # 切换到OTA镜像目录server_file = os.path.join(ota_image_dir, 'server_cert.pem')create_file(server_file, server_cert)  # 创建证书文件key_file = os.path.join(ota_image_dir, 'server_key.pem')create_file(key_file, server_key)  # 创建密钥文件return server_file, key_filedef https_request_handler() -> Callable[...,http.server.BaseHTTPRequestHandler]:"""创建自定义HTTP请求处理器,处理broken pipe异常返回:自定义的RequestHandler类"""class RequestHandler(http.server.SimpleHTTPRequestHandler):def finish(self) -> None:"""重写finish方法,优雅处理socket错误"""try:if not self.wfile.closed:self.wfile.flush()self.wfile.close()except socket.error:pass  # 忽略socket错误self.rfile.close()def handle(self) -> None:"""重写handle方法,捕获socket错误"""try:http.server.BaseHTTPRequestHandler.handle(self)except socket.error:pass  # 忽略socket错误return RequestHandlerdef start_https_server(ota_image_dir: str, server_ip: str, server_port: int) -> None:"""启动HTTPS服务器参数:ota_image_dir: OTA镜像目录server_ip: 服务器监听IPserver_port: 服务器监听端口"""server_file, key_file = get_ca_cert(ota_image_dir)  # 获取证书和密钥requestHandler = https_request_handler()  # 创建请求处理器# 创建HTTP服务器httpd = http.server.HTTPServer((server_ip, server_port), requestHandler)# 配置SSL上下文ssl_context = ssl.SSLContext(ssl.PROTOCOL_TLS_SERVER)ssl_context.load_cert_chain(certfile=server_file, keyfile=key_file)# 包装socket为SSL sockethttpd.socket = ssl_context.wrap_socket(httpd.socket, server_side=True)httpd.serve_forever()  # 启动服务器def start_chunked_server(ota_image_dir: str, server_port: int) -> subprocess.Popen:"""启动分块传输的HTTPS服务器(使用openssl s_server)参数:ota_image_dir: OTA镜像目录server_port: 服务器端口返回:subprocess.Popen对象"""server_file, key_file = get_ca_cert(ota_image_dir)# 使用openssl命令启动服务器chunked_server = subprocess.Popen(['openssl', 's_server', '-WWW', '-key', key_file, '-cert', server_file, '-port', str(server_port)])return chunked_server@pytest.mark.esp32
@pytest.mark.ethernet_ota
def test_examples_protocol_native_ota_example(dut: Dut) -> None:"""OTA示例测试用例 - 验证通过HTTPS多次下载完整固件测试步骤:1. 连接AP/以太网2. 通过HTTPS获取OTA镜像3. 使用新OTA镜像重启参数:dut: 被测设备对象"""server_port = 8002  # 服务器端口iterations = 3  # 测试迭代次数bin_name = 'ota_1.bin'  # 要下载的固件文件名# 启动HTTPS服务器(使用多进程)thread1 = multiprocessing.Process(target=start_https_server, args=(dut.app.binary_path, '0.0.0.0', server_port))thread1.daemon = True  # 设置为守护进程thread1.start()try:# 开始测试迭代for _ in range(iterations):# 等待设备启动完成dut.expect('Loaded app from partition at offset', timeout=30)try:# 获取设备IP地址ip_address = dut.expect(r'IPv4 address: (\d+\.\d+\.\d+\.\d+)[^\d]', timeout=30)[1].decode()print('Connected to AP/Ethernet with IP: {}'.format(ip_address))except pexpect.exceptions.TIMEOUT:raise ValueError('ENV_TEST_FAILURE: Cannot connect to AP/Ethernet')# 获取主机IPhost_ip = get_host_ip4_by_dest_ip(ip_address)# 等待OTA任务启动dut.expect('Starting OTA example task', timeout=30)# 构造OTA URL并发送给设备ota_url = 'https://' + host_ip + ':' + str(server_port) + '/firmware/' + bin_nameprint('writing to device: {}'.format(ota_url))dut.write(ota_url)# 等待设备准备重启dut.expect('Prepare to restart system!', timeout=60)finally:# 测试结束,终止服务器进程thread1.terminate()
五、升级Log
- 下面是使用node服务器远程升级成功的LOG


六、疑问
1. 网页https请求也不需要pem文件,为什么esp的OTA升级需要pem文件呢?
| 场景 | 普通浏览器/系统 | ESP设备 |
|---|---|---|
| 证书验证方式 | 内置信任的CA根证书库 | 无内置证书库(除非特别配置) |
| 证书来源 | 操作系统或浏览器预装数百个CA根证书 | 必须手动提供可信证书 |
| 自签名证书支持 | 会显示警告但可跳过 | 严格验证,无法跳过 |
-
为什么ESP需要PEM文件?
- 身份验证:防止"中间人攻击"
- PEM文件包含服务器的公钥证书(或签发它的CA证书)
- ESP用其验证服务器的HTTPS证书是否由可信机构签发
-
证书文件的作用
- server.crt / server.pem:服务器公钥证书:包含服务器身份信息和公钥
- server.key:服务器私钥:永远不共享(仅服务器持有)
- ca.pem:证书颁发机构(CA)的根证书:(验证服务器证书是否可信)
-
为什么普通用户不需要?比如:
- 访问https://google.com时:
- 浏览器检查Google证书的签发链
- 发现是由GlobalSign或Google Trust Services签发
- 系统已预装这些CA根证书,自动完成验证
| 服务器证书类型 | ESP设备处理方式 |
|---|---|
| 公共CA签发 | 启用证书包功能,无需额外PEM文件 |
| 自签名证书 | 必须提供PEM文件(如文档示例) |
| 私有CA签发 | 提供私有CA的根证书(ca.pem) |
2. ESP32 HTTPS服务器CA证书配置指南
-
关键结论:ESP需要PEM文件是因为它没有预装可信CA库,必须通过显式提供证书来建立信任关系。这是嵌入式设备安全通信的必要保障,不同于桌面系统的开箱即用特性。
-
嵌入式设备因资源限制,需手动配置CA证书建立TLS信任链。与桌面系统不同,ESP32需要显式提供证书实现安全通信。
- 启用证书包功能:
idf.py menuconfig
→ Component config → mbedTLS → Certificate Bundle → Enable
- 代码中移除cert_pem参数,改用:
.crt_bundle_attach = esp_crt_bundle_attach,
- 配置 esp_http_client_config_t 参数:
extern const uint8_t server_cert_pem_start[] asm("_binary_ca_cert_pem_start");
extern const uint8_t server_cert_pem_end[] asm("_binary_ca_cert_pem_end");// 初始化HTTPS客户端配置
esp_http_client_config_t config = {.url = CONFIG_EXAMPLE_FIRMWARE_UPG_URL,.cert_pem = (char *)server_cert_pem_start,.timeout_ms = CONFIG_EXAMPLE_OTA_RECV_TIMEOUT,.keep_alive_enable = true,
};
- cmakelist.txt 配置:
# Embed the server root certificate into the final binary
idf_build_get_property(project_dir PROJECT_DIR)
idf_component_register(SRCS "native_ota_example.c"INCLUDE_DIRS "."EMBED_TXTFILES ${project_dir}/server_certs/ca_cert.pem)
![byte[]作为接口参数传递的方法](http://pic.xiahunao.cn/byte[]作为接口参数传递的方法)


)


)
-day19)

使用心得)
![P10719 [GESP202406 五级] 黑白格](http://pic.xiahunao.cn/P10719 [GESP202406 五级] 黑白格)


