目录
一、pinia是什么
二、html的代码片段又失效?
三、Request.js
四 、状态管理库
五、main.js:19 Uncaught SyntaxError: The requested module '/src/utils/Api.js?t=1745328489985' does not provide an export named 'default' (at main.js:19:8)编辑
六、MD5值
七、Account.vue:219 Uncaught (in promise) TypeError: Cannot read properties of undefined (reading 'resetFields')
八、router-link标签
两种头像格式:跳转和不跳转
九、el-image
十、import.meta.url
为什么使用 import.meta.url?
十一、为什么传图片时图片有FileSource和FileImage两种,为什么又要转为Base64的格式
十二、刷新之后,无用户消息,需要重新登录
十三、网格布局
十四、加了监听后立马销毁
十五、组件间传递信息的方式
1.props
2.eventbus
3.Pinia(状态管理)
4.emit
5.inject与provide
6.definExpose
十六、插槽
1. 子组件 (DataLoadMoreList.vue) 的插槽定义
2. 父组件 (VideoList.vue) 的插槽使用
3. 作用域插槽的核心流程
十七、window.innerHeight、document.body.offsetHeight、window.scrollY
十八、加载数据时需要用到两个监听确定当前类别
十九、使用ArtPlayer实现视频播放(核心功能)
二十、为什么选择分P功能时会采用query而不是params呢
二十一、宽屏
1. position: static
2. position: absolute
二十二、采用轮循的方式实现在线人数
二十三、用户行为,点在,收藏,评论
二十四、评论
1 评论展示
2 点赞,踩
3 回复
4 置顶
5 删除(局部更新数组)
tips:为什么像置顶之类的就是后端做排序,删除之类的排序就在前端做
二十五、投稿中心
二十六、上传视频
二十七、draggable组件在vue中的使用
二十八、slice与splice的区别
1. slice
特点:
语法:
2. splice
特点:
二十九、vue-cropper实现图片裁剪
三十、使用EChart展示数据
三十一、VueDraggable排序
一、pinia是什么
Pinia vs Vuex:谁才是 Vue3 状态管理的最佳选择?
状态管理库
二、html的代码片段又失效?
VSCode引入HTML代码片段失败
三、display:grid
-
display: grid;:将元素的布局模式设置为网格布局(grid layout)。这意味着该元素的子元素将按照网格来排列。 -
grid-template-columns: 1fr 1fr 1fr;:定义了网格的列布局。1fr表示每一列的宽度是可用空间的 1 份(fr 是 "fraction" 的缩写,表示分数单位)。此时,网格会被划分为三列,每一列宽度相等,即三列宽度均分父容器的可用空间。
三、Request.js
import axios from 'axios'
import { ElLoading } from 'element-plus'
import Message from '../utils/Message'
import VueCookies from 'vue-cookies'import { useLoginStore } from "@/stores/loginStore"const contentTypeForm = 'application/x-www-form-urlencoded;charset=UTF-8'
const contentTypeJson = 'application/json'
const responseTypeJson = 'json'
let loading = null;
const instance = axios.create({withCredentials: true,baseURL: "/api",timeout: 10 * 1000,
});
//请求前拦截器
instance.interceptors.request.use((config) => {if (config.showLoading) {loading = ElLoading.service({lock: true,text: '加载中......',background: 'rgba(0, 0, 0, 0.7)',});}return config;},(error) => {if (error.config.showLoading && loading) {loading.close();}Message.error("请求发送失败");return Promise.reject("请求发送失败");}
);
//请求后拦截器
instance.interceptors.response.use((response) => {const { showLoading, errorCallback, showError = true, responseType } = response.config;if (showLoading && loading) {loading.close()}const responseData = response.data;if (responseType == "arraybuffer" || responseType == "blob") {return responseData;}//正常请求if (responseData.code == 200) {return responseData;} else if (responseData.code == 901) {const loginStore = useLoginStore();//登录超时loginStore.setLogin(true);//更新登录状态return Promise.reject({ showError: false });} else {//其他错误if (errorCallback) {errorCallback(responseData);}return Promise.reject({ showError: showError, msg: responseData.info });}},(error) => {if (error.config.showLoading && loading) {loading.close();}return Promise.reject({ showError: true, msg: "网络异常" })}
);const request = (config) => {const { url, params, dataType, showLoading = false, responseType = responseTypeJson, showError = true } = config;let contentType = contentTypeForm;let formData = new FormData();// 创建form对象for (let key in params) {formData.append(key, params[key] == undefined ? "" : params[key]);}if (dataType != null && dataType == 'json') {contentType = contentTypeJson;}const token = VueCookies.get('token')let headers = {'Content-Type': contentType,'X-Requested-With': 'XMLHttpRequest',"token": token}return instance.post(url, formData, {onUploadProgress: (event) => {if (config.uploadProgressCallback) {config.uploadProgressCallback(event);}},responseType: responseType,headers: headers,showLoading: showLoading,errorCallback: config.errorCallback,showError: showError,}).catch(error => {if (error.showError) {Message.error(error.msg);}return null;});
};export default request;
- 请求前拦截器:loading,防止表单重复提交
- 请求后拦截器:返回消息
- Store:状态管理
四 、状态管理库
五、main.js:19 Uncaught SyntaxError: The requested module '/src/utils/Api.js?t=1745328489985' does not provide an export named 'default' (at main.js:19:8)
Api.js
export {Api,uploadImage,doUserAction
}
在main.js中引入{}
import {Api} from './utils/Api'六、MD5值
登录时要加密传输,故用md5,且md5值不可逆
注册是需要在后端校验,所以不要用md5值
七、Account.vue:219 Uncaught (in promise) TypeError: Cannot read properties of undefined (reading 'resetFields')
修改前
const resetForm = () => {changeCheckCode();nextTick(() => {formDataRef.value.resetFields();formData.value = {};});
};
修改后:
const resetForm = () => {changeCheckCode();nextTick(() => {if (formDataRef.value) {formDataRef.value.resetFields();}formData.value = {};});
};
八、router-link标签
<div><router-link v-if="userId" :to="`${userId}`" target="_blank"><Cover></Cover></router-link><Cover v-else></Cover></div两种头像格式:跳转和不跳转
target="_blank"表示跳转至一个新页面
九、el-image
el-image
:lazy="lazy"加载:没有加载到相应的图片,就不会加载
可通过fit确定图片如何适应到容器框,同原生 object-fit
el-image-viewer图片预览
| teleported | image 自身是否插入至 body 元素上。 嵌套的父元素属性会发生修改时应该将此属性设置为 true |
十、import.meta.url
return new URL(`../assets/${image}`, import.meta.url).href;- import.meta.url 返回的是当前模块的 URL。
- new URL(...) 创建一个新的 URL 对象。这里,../assets/${image} 是一个相对路径,表示 ${image} 文件所在的文件夹。import.meta.url 是基准 URL(当前模块的路径),new URL(...) 会基于这个基准路径来解析 ../assets/${image}。
- .href 返回的是计算出的绝对 URL 字符串。
let image = "image.jpg";
let imageUrl = new URL(`../assets/${image}`, import.meta.url).href;
console.log(imageUrl);
// 假设当前模块路径是 /src/components/MyComponent.js,输出的 URL 可能是:
// "file:///your-project-path/src/assets/image.jpg"
为什么使用 import.meta.url?
-
动态路径计算:
import.meta.url可以让你动态地计算模块文件相对于其他资源(如图片、CSS 文件等)的路径,尤其在构建工具或模块化系统中很有用。 -
跨平台支持:它提供了在不同环境下(例如浏览器或 Node.js)正确处理路径的能力。
十一、为什么传图片时图片有FileSource和FileImage两种,为什么又要转为Base64的格式
为什么传图片时图片有FileSource和FileImage两种,为什么又要转为Base64的格式
十二、刷新之后,无用户消息,需要重新登录
使用localStorage的方式存储数据,刷新之后,无用户消息,需要重新登录,,localStorage 与 sessionStorage 的区别
十三、网格布局
.container {display: grid;grid-row-gap: 8px;  /* 设置行间距为 8px */grid-column-gap: 8px;  /* 设置列间距为 8px */grid-gap: 8px 16px; /* 第一值为行间距,第二值为列间距 */grid-gap: 8px; /* 行和列的间距为 8px */
}
grid-template-columns: 1fr 1fr 1fr; 表示容器会被分成三个等宽的列。每一列的宽度会根据容器的总宽度来计算,并且它们的宽度是相等的。
white-space: nowrap; 用于防止文本在元素内自动换行。它会强制文本在单行内显示,直到文本溢出元素的边界。
效果:文本不会换行,所有内容都会显示在同一行。如果内容超出了容器的宽度,则会发生 溢出,并且可能导致水平滚动条出现,或者文本被裁剪。
letter-spacing:定义文本中字符之间的间距。正值会增加字符间的距离,负值则会减少字符间的距离。单位通常是像素(px)、em、rem 等。
flex-wrap: wrap自动换行
display: -webkit-flex;使得该元素成为一个弹性容器(flex container),其子元素(flex items)将按照弹性布局规则进行排列。
-webkit-line-clamp: 2;:限制显示的行数为 2 行,超出部分会被省略
line-break: anywhere; 时,浏览器会允许文本在任意字符之间换行
text-overflow: ellipsis; 是 CSS 中的一个属性,用于在文本溢出其容器时,显示省略号(...)
十四、加了监听后立马销毁
太消耗资源 所以采用onbus
十五、组件间传递信息的方式
1.props
父->子,子组件无法修改父组件的 props 数据,子组件只能接收并使用这些数据。
2.eventbus
通过一个中央事件管理器实现跨组件通信
(所有组件)(监听窗口变化,要发射emit,绑定on,销毁off(再onUn))mitter.on() 的使用场景(订阅事件) mitter.emit() 的使用场景(发布事件) 监听
3.Pinia(状态管理)
跨级或任意层级组件通信
4.emit
子组件给父组件传值
-
emit是单向冒泡,只能冒泡到直接父组件,不能跨级冒泡到更上层的祖先组件 -
祖先组件若想知道子组件发的事件,必须经过每一级父组件的转发(中转)
5.inject与provide
祖先组件和子组件通信
- provide:祖先组件提供数据和方法:父组件通过
provide提供用来更新父组件数据的函数。 - inject:子组件接收方法:子组件通过
inject获取父组件提供的方法。 - 子组件更新父组件的数据:子组件通过调用
setXxx(数据)来更新父组件的数据。
父组件中:
const playerHeight = ref(0);// 提供给子组件一个方法,用来更新 playerHeight
provide('playerHeight', (height) => {playerHeight.value = height;  // 更新父组件中的 playerHeight
});
这里父组件使用 provide 提供了一个名为 playerHeight 的方法,这个方法接收一个 height 参数,并将其赋值给 playerHeight.value。父组件提供了一个方法来更新它自己的 playerHeight。
子组件中:
const setPlayerHeight = inject('playerHeight');  // 获取父组件提供的设置高度的方法onMounted(() => {nextTick(() => {const height = Math.round(playerRef.value.clientWidth - 8) * 0.5625;playerHeight.value = height;  // 子组件计算的高度setPlayerHeight(height);  // 调用父组件提供的方法来更新父组件的 playerHeight});
});
-
在子组件中,
inject('playerHeight')获取了父组件通过provide提供的playerHeight方法(这个方法会更新父组件的playerHeight)。 -
子组件计算了播放器的高度
height后,调用setPlayerHeight(height)更新父组件的playerHeight。
| 方式 | 适用场景 | 优势 |
|---|---|---|
props | 父子组件之间的数据传递 | 数据流单向,简单易用 |
EventBus | 非父子关系组件间的跨级或跨层通信 | 灵活性高,但需要手动管理事件监听 |
Pinia | 多个组件间共享状态,特别是跨组件和跨层级状态管理 | 集中式管理,适合大型应用 |
emit | 子组件向父组件传递数据 | 简单直观,适合父子组件通信 |
provide / inject | 祖先组件与子孙组件之间的跨层级数据传递 | 适用于多层级组件的通信,避免逐层传递数据 |
6.definExpose
defineExpose 用于暴露组件实例的属性和方法给外部访问,通常用于 setup() 函数内。
十六、插槽
1. 子组件 (DataLoadMoreList.vue) 的插槽定义
<template v-for="item in dataSource.list"><slot :data="item"></slot> <!-- 将 item 作为插槽的 data 属性暴露 -->
</template>-
作用:循环
dataSource.list,将每个item通过插槽属性:data传递给父组件。 -
逻辑:子组件负责遍历数据,但不直接渲染内容,而是通过插槽将数据交给父组件处理。
2. 父组件 (VideoList.vue) 的插槽使用
<DataLoadMoreList><template #default="{ data }"> <!-- 接收子组件传递的 data --><VideoItem :data="data"></VideoItem> <!-- 使用数据渲染具体内容 --></template>
</DataLoadMoreList>-
#default:表示默认插槽,用于接收子组件传递的数据。 -
{ data }:解构子组件插槽传递的data属性(即子组件的item)。 -
逻辑:父组件通过插槽接收到数据后,用
VideoItem组件渲染每个条目。
3. 作用域插槽的核心流程
-
子组件遍历数据,通过
<slot :data="item">将数据暴露给父组件。 -
父组件通过
<template #default="{ data }">接收数据。 -
父组件将接收到的
data传递给自己的子组件VideoItem,完成渲染。
十七、window.innerHeight、document.body.offsetHeight、window.scrollY
window.innerHeight:可见区域高度
document.body.offsetHeight:页面内容高度
window.scrollY:返回页面的垂直滚动偏移量(即页面从顶部滚动的距离)。
document.body.offsetHeight=window.scrollY+window.innerHeight
十八、加载数据时需要用到两个监听确定当前类别
-
用户首次访问页面时,路由参数可能已经存在,但分类数据尚未加载。此时需要第二个
watch在分类数据就绪后触发初始加载。 -
用户在同一页面切换分类时,路由参数变化,此时分类数据已存在,第一个
watch直接触发数据加载。
// 当用户切换路由参数(如分类栏目变化)时,触发数据重新加载。
watch(() => route.params,(newVal, oldVal) => {if (newVal) {if (!categoryInit.value) {// 如果没有加载完成,直接返回return;}// console.log(route.params);categoryStore.setCurrentPCategory(route.params.pCategoryCode);initData();}},{ immediate: true, deep: true }
);
// 处理 异步数据初始化,确保分类数据就绪后,根据当前路由加载初始数据。
watch(() => categoryStore.categoryMap,(newVal, oldVal) => {if (!newVal || Object.keys(newVal).length == 0) {return;}categoryInit.value = true;categoryStore.setCurrentPCategory(route.params.pCategoryCode);initData();},{ immediate: true, deep: true }
);
十九、使用ArtPlayer实现视频播放(核心功能)
二十、为什么选择分P功能时会采用query而不是params呢
二十一、宽屏
<divclass="video-panel":style="{ position: wideScreen ? 'absolute' : 'static' }"><!-- 如果是宽屏,则absolute,否则默认 --><Playerref="playerRef"@changeWideScreen="changeWideScreenHandler"></Player></div>1. position: static
-
这是默认的定位方式。
-
元素按照文档流正常排布,占据父元素的宽度(这里是
width: 100%,指父元素宽度的100%)。 -
宽度受限于父元素宽度。
2. position: absolute
-
脱离文档流,不占据空间。
-
宽度
100%是相对于 最近的定位祖先元素(即position不是static的祖先元素)的宽度。 -
如果父元素没有定位(
position: relative/absolute/fixed),则相对于 视口(浏览器窗口)宽度。.video-body {margin-top: 20px;position: relative;display: flex;.video-left {flex: 1;.video-panel {position: static;width: 100%;}} -
所以
.video-panel变成绝对定位后,可能宽度变成视口的宽度,也就是“宽屏”效果。
二十二、采用轮询的方式实现在线人数
轮询主要通过定时器来实现
1.获取设备id
这里需要像后端传入正在观看视频的设备Id号,区分不同的用户设备,确保每个设备在进行视频播放时能被唯一识别。通过设备ID,你可以追踪每个设备的观看状态(例如,记录每个设备的播放情况,获取每个设备是否正在观看视频等)。
使用@fingerprintjs/fingerprintjs": "^4.4.3"和cookies:获取浏览器的唯一标识,具体代码如下:
import FingerprintJS from "@fingerprintjs/fingerprintjs";
// 获取设备Id
const getDeviceId = async () => {let deviceId = VueCookies.get("deviceId");if (!deviceId) {// 通过@fingerprintjs/fingerprintjs插件获取浏览器设备const fpPromise = await FingerprintJS.load();const result = await fpPromise.get();deviceId = result.visitorId;// 过期时间,单位为天(-1 表示会话级 Cookie,浏览器关闭就删除)即永久保存VueCookies.set("deviceId", deviceId, -1);}loginStore.saveDeviceId(deviceId);
};
2.确定要轮询的事件
const onlineCount = ref(1);
const reportVideoPlayOnline = async () => {if (!fileId.value) {return;}let result = await proxy.Request({url: proxy.Api.reportVideoPlayOnline,params: {fileId: fileId.value,deviceId: loginStore.deviceId,},//  这是一个自定义配置项,// 用于控制 是否在请求出错时弹出错误提示(或进行错误处理)。showError: false,});if (!result) {return;}onlineCount.value = result.data;
};
3.使用定时器进行轮询
let timer = ref(null);
const startTimer = () => {timer.value = setInterval(() => {reportVideoPlayOnline();}, 5000);
};
4.在组件销毁之前,清空定时器
onBeforeUnmount(() => {cleanTimer()
});const cleanTimer=()=>{if(timer.value!==null){clearInterval(timer.value)timer.value=null}
}
二十四、评论
1 评论展示
通过嵌套组件展示一级二级评论 typeLevel,自己调自己
2 点赞,踩
对于点赞,收藏等投币功能,通过后端拿到用户行为表,通过foreach函数初始化用户行为,也就是获取行为列表,检查用户是否进行过点赞、收藏、投币等行为,并在页面中通过active的样式显现,点击投币,收藏,点赞等功能,触发userAtion函数,向后端发送请求,记录用户行为,并执行回调函数更新本地的点赞数量贺收藏数量
(1) 初始化用户行为(获取行为列表)
首先,代码中通过 userActionList 获取用户行为数据,并检查用户是否已经进行了点赞、收藏或投币的操作.
const userActionList = result.data.userActionList;
userActionList.forEach((element) => {if (element.actionType == ACTION_TYPE.VIDEO_LIKE.value) {videoInfo.value.likeCountActive = true;  // 如果是点赞行为,标记点赞已激活} else if (element.actionType == ACTION_TYPE.VIDEO_COLLECT.value) {videoInfo.value.collectCountActive = true;  // 如果是收藏行为,标记收藏已激活} else if (element.actionType == ACTION_TYPE.VIDEO_COIN.value) {videoInfo.value.coinCountActive = true;  // 如果是投币行为,标记投币已激活}
});-
userActionList是从服务器返回的用户行为列表,包含用户对视频进行的操作(如点赞、收藏等)。 -
通过遍历
userActionList,根据每个行为的actionType来判断用户是否已经进行过该操作。如果用户已经进行过某个行为(如点赞或收藏),就设置对应的状态为true,并改变videoInfo的状态值,例如likeCountActive、collectCountActive。
(2) 用户操作函数 userAction
userAction 函数用于处理点赞、收藏等操作。当用户点击点赞或收藏时,会触发该函数:
const userAction = (type) => {if (Object.keys(loginStore.userInfo).length == 0) {loginStore.setLogin(true);  // 如果用户未登录,则要求登录return;}doUserAction({videoId: route.params.videoId,  // 获取视频IDactionType: ACTION_TYPE[type].value,  // 获取对应的行为类型(点赞、收藏等)}, () => {// 操作成功后的回调if (type == "VIDEO_LIKE") {  // 如果是点赞操作if (videoInfo.value.likeCountActive) {videoInfo.value.likeCountActive = false;  // 取消点赞videoInfo.value.likeCount--;  // 点赞数减一} else {videoInfo.value.likeCountActive = true;  // 激活点赞videoInfo.value.likeCount++;  // 点赞数加一}} else if (type == "VIDEO_COLLECT") {  // 如果是收藏操作if (videoInfo.value.collectCountActive) {videoInfo.value.collectCountActive = false;  // 取消收藏videoInfo.value.collectCount--;  // 收藏数减一} else {videoInfo.value.collectCountActive = true;  // 激活收藏videoInfo.value.collectCount++;  // 收藏数加一}}});
};
3 回复
判断评论级别数,监听评论,如果有评论出现,复制给formData
回复功能,主要是确定回复的是视频还是其他评论设置参数sendType,是0就是回复视频,设置1就是回复其他人的评论,如那么参数中还应该包括pCommentId等等
在VideoCommentSend组件中
// 提交评论
const submitComment = async(event) => {// 防止提交表单后跳转至另外一个页面event.preventDefault();if (Object.keys(loginStore.userInfo).length == 0) {loginStore.setLogin(true);return;}// 如果不是直接回复的视频即sendType==1那么参数中还应该包括pCommentId等等const params =props.sendType == 0? { content: formData.value.content, imgPath: formData.value.imgPath }: Object.assign({}, formData.value);if(!params.content){proxy.Message.warning('请输入评论')}params.videoId=route.params.videoId;// 上传图片if(params.imgPath){const imgPath=await uploadImage(params.imgPath,true)params.imgPath=imgPath}let result = await proxy.Request({url:proxy.Api.postComment,params})if(!result){return;}// 重置表单formDataRef.value.resetFields()formData.value={}proxy.Message.success("发布成功")mitter.emit("postCommentSuccess",result.data)};
在VideoComment组件中
onMounted(() => {//监听评论mitter.on("postCommentSuccess", ( comment )=> {if(comment.pCommentId == 0){// 一级评论dataSource.value.list.unshift(comment)if (!dataSource.value.totalCount) {dataSource.value.totalCount = 1} else {dataSource.value.totalCount++}}else{// 如果是二级评论,先找到当前父评论const pComment=dataSource.value.list.find(item=>{return item.commentId==comment.pCommentId})if(!pComment){return}if(!pComment.children){pComment.children=[]}pComment.children.push(comment)}
})
}
4 置顶
-
在VideoCommentItem组件中,用户点击置顶或取消置顶时,触发事件,通知后端进行操作(置顶或取消置顶)。
-
后端根据置顶或取消置顶的请求,处理后并返回新的评论数据列。返回的数据应包含置顶后的评论列表,此时置顶的评论应该排在最前面。
-
VideoComment组件接收到置顶事件后,需要重新加载并渲染评论数据,更新显示。
在VideoCommentItem组件中,对于要置顶的评论发射”topCommentCallback“事件
// 置顶评论
const topComment = () => {proxy.Confirm({message: `确定要${props.data.topType == 1 ? "取消置顶" : "置顶"}吗?`,okfun: async () => {let result = await proxy.Request({url:props.data.topType == 1? proxy.Api.userCancelTopComment: proxy.Api.userTopComment,params: {commentId: props.data.commentId,},});if (!result) {return;}mitter.emit("topCommentCallback");},});
};
在VideoComment组件中绑定事件,重新加载数据即可
onMounted(()=>{// 是否置顶mitter.on("topCommentCallback",()=>{loadCommentList()})})
onUnmounted(()=>{mitter.off("topCommentCallback")
})
5 删除(局部更新数组)
总:评论的删除是局部删除,把所点击的评论id号传递给后端,通知后端在数据库中删除数据,并且返回数据,但是在前端并不直接接收返回的数据,而是触发回调事件,在前端上进行删除评论,首先通过pId观察他是否为以及评论,如果为一级评论,也是就是他的pid为0,就直接通过foreach函数返回新的数组,如果pid号不等于0,就是二级评论,这个时候要通过find函数找到父评论,再通过foreach函数返回新数组
-
在VideoCommentItem组件中,点击删除时,触发删除操作,通知后端删除指定评论。
-
后端返回的数据应该包含删除操作的结果,例如,返回被删除评论的父ID和评论ID。
-
VideoComment组件接收到删除事件后,需要根据返回的父评论ID找到要删除的评论并更新显示。
-
删除单条评论时,返回被删除的 ID 而非完整列表,减少数据传输量。
-
已知操作的影响范围时,无需全量更新。
在VideoCommentItem组件中,对于要置顶的评论发布”topCommentCallback“事件
// 删除评论
const delComment = () => {proxy.Confirm({message: `确定要删除评论吗?`,okfun: async () => {let result = await proxy.Request({url:proxy.Api.userDelComment,params: {commentId: props.data.commentId,},});if (!result) {return;}mitter.emit("delCommentCallback",{pCommentId:props.data.pCommentId,commentId:props.data.commentId,});},});
};在VideoComment组件中,不能简单的重新加载数据,因为评论有很多二级评论,重新加载数据会造成卡顿等显现,所以先判断是否为以及评论,是的话,对以及评论直接加载,不是的话,由返回的pCommentId找到父评论,循环父评论的孩子评论,得到新的数组,即通过本地精准更新避免全量加载
onMounted(()=>{// 删除mitter.on("delCommentCallback",({pCommentId,commentId})=>{//  pCommentId: 父评论ID(0表示顶级评论)commentId: 要删除的评论IDif(pCommentId==0){// 如果是一级评论,没有父评论,即父评论ID为0dataSource.value.list=dataSource.value.list.filter(item=>{return item.commentId!=commentId})dataSource.value.totalCount--}else{// 找到父评论const pComment=dataSource.value.list.find(item=>{return item.commentId==pCommentId})pComment.children=pComment.children.filter(item=>{return item.commentId!=commentId})}})})
onUnmounted(()=>{mitter.off("delCommentCallback")
})
tips:为什么像置顶之类的就是后端做排序,删除之类的排序就在前端做
流程图
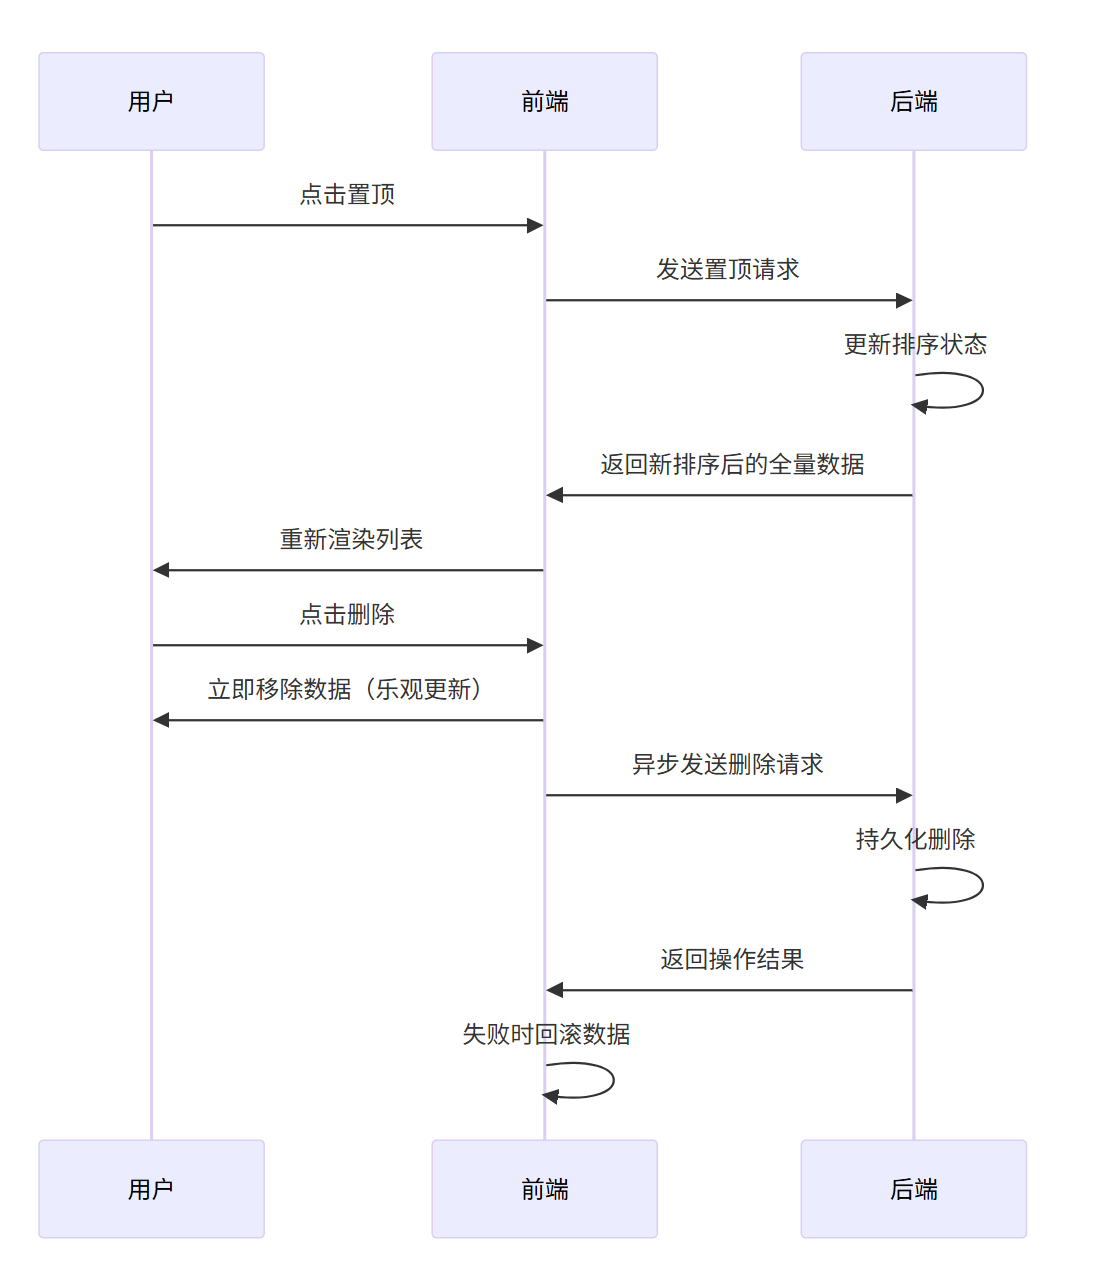
置顶操作:必须由后端排序
1. 业务特性要求
-
全局排序规则:置顶是一个 需要持久化存储的排序操作,所有用户看到的置顶评论顺序必须一致。
-
动态权重计算:置顶可能涉及复杂规则(如置顶时间、权重值、管理员权限等),需后端统一计算。
2. 技术必要性
-
前端本地排序 → 其他用户看不到变化 ❌
-
后端存储排序 → 所有客户端同步 ✅
删除操作:优先前端处理
1. 业务特性要求
-
即时反馈需求:用户期望删除后内容 立即消失,网络延迟会导致体验卡顿。
-
局部数据变更:删除操作仅影响单条数据,无需重新计算整个列表顺序。
2. 技术优势
假设列表有 1000 条评论(含嵌套)
-
前端删除 → 操作时间复杂度 O(n) ✅
-
后端重载 → 网络传输 + 解析 + 渲染全量数据 ❌
二十五、投稿中心
选择用<el-menu>组件<el-menu-item>
<div class="menu-list"><el-menu:router="true":default-active="defaultActive":default-openeds="defaultOpeneds"><!-- default-active 用于设置菜单默认高亮的菜单项 index. --><!-- default-openeds 是一个数组,指定默认展开的子菜单 index。 --><template v-for="menu in menuList"><el-menu-item :index="menu.path" v-if="!menu.children"><span :class="['iconfont', 'icon-' + menu.icon]"></span><span class="title">{{ menu.name }}</span></el-menu-item><!-- 有孩子的 --><el-sub-menu v-else :index="menu.path"><template #title><span :class="['iconfont', 'icon-' + menu.icon]"></span><span class="title">{{ menu.name }}</span></template><el-menu-item :index="sub.path" v-for="sub in menu.children"><span class="sub-menu">{{ sub.name }}</span></el-menu-item></el-sub-menu></template></el-menu></div>二十六、上传视频
上传功能的实现,点击上传按钮,判断添加的文件是否符合要求,如果符合把他放入文件列表中,并把他的状态设置为等待中,对于每个文件,把他们切分为chunksize大小的文件片段,再检查他的状态是否为uploading,并且判断他是否是第一次上传,如果是第一次上传,就从第一给分片上传,如果不是,就从之前上传的分片继续上传,同时,每上传完一个分片,uploadSize和uploadPercent就会更新,如果点击删除按钮,或者暂停上传,则中止上传
1.为每个视频文件创建新的属性,包括 uid、文件名、状态等信息,用于管理每个视频的上传任务。
2.创建一个视频数组 fileList,用来存放所有待上传的视频文件,并记录每个视频文件的状态、进度等。
3.实现文件分片上传。
const fileList = ref([]);
const addFile = (file) => {file = file.fileif (fileList.value.length > sysSettingStore.sysSetting.videoPCount) {proxy.Message.warning(`最多可以添加${sysSettingStore.sysSetting.videoPCount}个视频`);return}let fileName = file.nameconst lastPoint = fileName.lastIndexOf('.')fileName = lastPoint == -1 ? fileName : fileName.substring(0, lastPoint)const fileItem = {file: file,uid: file.uid,fileName: fileName,status: STATUS.waiting.value,uploadSize: 0,totalSize: file.size,uploadPercent: 0,pause: false,chunkIndex: 0,errMsg: null,};fileList.value.push(fileItem);if (fileItem.totalSize == 0) {fileItem.status = STATUS.emptyfile.value;return;}
//   判断文件大小if (fileItem.totalSize > sysSettingStore.sysSetting.videoSize * 1024 * 1024) {fileItem.status = STATUS.largefile.value;return;}//   正在上传的文件let uploadingFiles = fileList.value.filter((item) => {return item.status == STATUS.uploading.value;});if (uploadingFiles.length > MAX_UPLOADING) {return;}uploadFile(fileItem.uid);
};
切片上传具体为:
1.根据getFileByUid()找到当前文件
// 通过uid找到当前文件
const getFileByUid = (uid) => {const currentFile = fileList.value.find((item) => {return item.uid == uid;});return currentFile;
};
2.对当前文件的状态设置为uploading,进行切片
3.请求生成一个上传 ID,uploadId 是服务器生成的唯一标识符,用于标识一个文件的上传任务。
- 当上传被暂停或中断时,使用相同的
uploadId可以确保在恢复上传时,服务器能够继续处理文件的分片,而不是将其视为一个全新的文件上传任务。这样就避免了不同上传任务之间的混乱。 - 即使文件被分割成多个分片上传,所有分片都会与相同的
uploadId关联。 - 同一个文件的所有分片的
uploadId都是一致的。
4.进行断点处理
- 为什么设置chunkIndex = chunkIndex ? chunkIndex : 0?
- 这是为了支持断点续传, 即从上传进度的某个位置继续上传文件的剩余部分,而不是重新从头开始上传。
5.将文件的状态设置为success,进度为100%
6.开始上传下一个待上传的文件。
const uploadFile = async (uid, chunkIndex) => {// 当前文件const currentFile = getFileByUid(uid);// 文件状态设置为uploadingcurrentFile.status = STATUS.uploading.value;const file = currentFile.file;const fileSize = currentFile.totalSize;const chunks = Math.ceil(fileSize / CHUNK_SIZE);if (!currentFile.uploadId) {// 如果第一次上传的时候,请求服务端生成一个uploadIdlet resultData = await proxy.Request({url: proxy.Api.preUploadVideo,params: {fileName: currentFile.fileName,chunks,},errorCallback: (errorMsg) => {currentFile.status = STATUS.fail.value;currentFile.errMsg = errorMsg;},});if (!resultData) {return;}currentFile.uploadId = resultData.data;}
//   for(let i=chunkIndex; i<chunks; i++) 中的
//   i=chunkIndex 表示从指定的分片索引 chunkIndex 开始上传,
//   而不是从 0 开始。这是为了支持断点续传, 即从上传进度的
//   某个位置继续上传文件的剩余部分,而不是重新从头开始上传。
//   循环处理chunkIndex = chunkIndex ? chunkIndex : 0;for (let i = chunkIndex; i < chunks; i++) {if (currentFile.pause || currentFile.del) {break;}let start = i * CHUNK_SIZE;let end = start + CHUNK_SIZE >= fileSize ? fileSize : start + CHUNK_SIZE;let chunkFile = file.slice(start, end);let uploadResult = await proxy.Request({url: proxy.Api.uploadVideo,dataType: "file",params: {chunkFile: chunkFile,chunkIndex: i,uploadId: currentFile.uploadId,},showError: false,errorCallback: (errorMsg) => {currentFile.status = STATUS.fail.value;currentFile.errMsg = errorMsg;},uploadProgressCallback: (event) => {// event.loaded 表示已上传的字节数。let loaded = event.loaded;if (loaded > fileSize) {loaded = fileSize;}currentFile.uploadSize = i * CHUNK_SIZE + loaded;currentFile.uploadPercent = Math.floor((currentFile.uploadSize / fileSize) * 100);},});if (uploadResult == null) {break;}currentFile.chunkIndex = i;if (i < chunks - 1) {continue;}currentFile.status = STATUS.success.value;currentFile.uploadPercent = 100;}const nextItem = fileList.value.find((item) => {return item.status == STATUS.waiting.value;});if (nextItem) {uploadFile(nextItem.uid);}
};
最后转化为字符串提交
uploadFileList:JSON.stringify(uploadFileList)二十七、draggable组件在vue中的使用
vue-draggable-plus
二十八、slice与splice的区别
1. slice
slice 用于从数组中提取一部分元素,返回一个新的数组。
特点:
-
不修改原数组:
slice不会改变原数组,而是返回一个新的数组。 -
提取数组的部分:
slice会根据指定的开始索引和结束索引提取数组的一部分。 -
不包含结束索引:
slice的结束索引不包含在内。
语法:
arr.slice(startIndex, endIndex);
-
startIndex:开始提取的位置(包含)。 -
endIndex:结束位置(不包含)。如果省略,默认为数组的末尾。
2. splice
splice 用于改变原数组,它可以用来删除、替换或添加元素。
特点:
-
修改原数组:
splice会直接修改原数组。 -
删除、替换、添加元素:可以指定要删除的元素数目,或者指定要插入的新元素。
-
返回删除的元素:
splice会返回一个数组,包含被删除的元素。
arr.splice(startIndex, deleteCount, item1, item2, ...);
-
startIndex:开始修改的位置。 -
deleteCount:要删除的元素的数量。如果为 0,则不删除任何元素。 -
item1, item2, ...:可选的,要插入的新元素。若不提供,则只是删除元素
二十九、vue-cropper实现图片裁剪
图片切割组件
vue-cropper实现图片裁剪-CSDN博客
<template><Dialog:show="dialogConfig.show":title="dialogConfig.title":buttons="dialogConfig.buttons"width="1000px":showCancel="true"@close="dialogConfig.show = false"><div class="cut-image-panel"><VueCropperref="cropperRef"class="cropper":img="sourceImage"outputType="png":autoCrop="true":autoCropWidth="cutWidth":autoCropHeight="Math.round(cutWidth * scale)":fixed="true":fixedNumber="[1, scale]":centerBox="true":full="false"@realTime="preview"mode="100%"></VueCropper><div class="preview-panel"><div class="preview-image"><img :src="previewImage" /></div><el-upload:multiple:show-file-list="false":http-request="selectFile":accept="proxy.imageAccept"><el-button type="primary" class="select-btn">选择图片</el-button></el-upload></div></div><div class="info">建议上传至少{{ props.cutWidth }}*{{Math.round(props.cutWidth * props.scale)}}的图片</div></Dialog>
</template><script setup>
import "vue-cropper/dist/index.css";
import { VueCropper } from "vue-cropper";
import { ref, reactive, getCurrentInstance, nextTick,inject } from "vue";
import { useRoute, useRouter } from "vue-router";
const route = useRoute();
const router = useRouter();
const { proxy } = getCurrentInstance();/*** 参数说明img: '', // 裁剪图片的地址 url 地址, base64, bloboutputSize: 1, // 裁剪生成图片的质量outputType: 'jpeg', // 裁剪生成图片的格式 jpeg, png, webpinfo: true, // 裁剪框的大小信息canScale: false, // 图片是否允许滚轮缩放autoCrop: true, // 是否默认生成截图框autoCropWidth: 150, // 默认生成截图框宽度autoCropHeight: 150, // 默认生成截图框高度fixedBox: false, // 固定截图框大小 不允许改变fixed: false, // 是否开启截图框宽高固定比例,这个如果设置为true,截图框会是固定比例缩放的,如果设置为false,则截图框的狂宽高比例就不固定了fixedNumber: [1, 1], // 截图框的宽高比例 [ 宽度 , 高度 ]canMove: true, // 上传图片是否可以移动canMoveBox: true, // 截图框能否拖动original: false, // 上传图片按照原始比例渲染centerBox: true, // 截图框是否被限制在图片里面infoTrue: true, // true 为展示真实输出图片宽高 false 展示看到的截图框宽高full: true, // 是否输出原图比例的截图enlarge: '1', // 图片根据截图框输出比例倍数mode: 'contain' // 图片默认渲染方式 contain , cover, 100px, 100% auto*/const props = defineProps({cutWidth: {type: Number,default: 400,},scale: {type: Number,default: 0.5,},
});const dialogConfig = ref({show: false,title: "上传图片",buttons: [{type: "primary",text: "确定",click: (e) => {cutImage();},},],
});// 图片展示
const cropperRef = ref();
const previewImage = ref();
const preview = () => {cropperRef.value.getCropData((data) => {previewImage.value = data;});
};
const sourceImage = ref();
// 获取选择的文件
const selectFile = (file) => {file = file.file;let img = new FileReader();img.readAsDataURL(file);img.onload = ({ target }) => {sourceImage.value = target.result;};
};
// 可以通过这个方法修改祖先组件中的数据
const cutImageCallback=inject("cutImageCallback")
// 切图
const cutImage = () => {const cropW = Math.round(cropperRef.value.cropW);const cropH = Math.round(cropperRef.value.cropH);if (cropH == 0 || cropW == 0) {proxy.Message.warning("请选择图片");return;}if (cropW < props.cutWidth ||cropH < Math.round(props.cutWidth * props.scale)) {proxy.Message.warning(`建议上传至少${props.cutWidth}*${Math.round(props.cutWidth * props.scale)}的图片`);return;}cropperRef.value.getCropBlob((blob) => {// 生成一个临时的文件const file = new File([blob],"temp" + blob.type.substring(blob.type.indexOf("/") + 1),{ type: blob.type });dialogConfig.value.show=falsecutImageCallback({coverImage:file,})});
};// 组件展示
const show = () => {dialogConfig.value.show = true;
};
defineExpose({ show });
</script>:)


启动时提示Netty的某些类找不到)
- KMS drm_crtc.c)
)


)

)


(1))

软件调试---vscode配置clang-tidy静态分析(30))