一 Mybatis
1、Maven依赖
在ruoyi父项目的pom文件中有一个分页插件的依赖
<!-- pagehelper 分页插件 -->
<dependency><groupId>com.github.pagehelper</groupId><artifactId>pagehelper-spring-boot-starter</artifactId><version>${pagehelper.boot.version}</version>
</dependency>
pagehelper分页插件依赖中已经包含了Mybatis
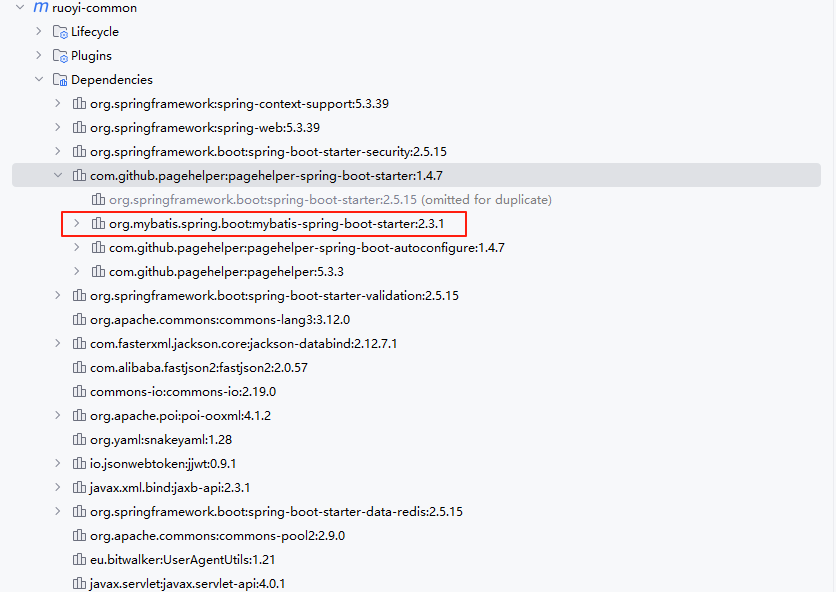
2、Mybatis配置详解
在ruoyi-admin模块的application.yml中的配置
# MyBatis配置
mybatis:# 搜索指定包别名typeAliasesPackage: com.ruoyi.**.domain# 配置mapper的扫描,找到所有的mapper.xml映射文件mapperLocations: classpath*:mapper/**/*Mapper.xml# 加载全局的配置文件configLocation: classpath:mybatis/mybatis-config.xml
Spring Boot提供了一个启动器的类MybatisAutoConfiguration,其中有一个配置MybatisProperties。从MybatisProperties中我们可以看到是从配置文件yml中读取mybatis下的配置信息以及一些内置的配置项
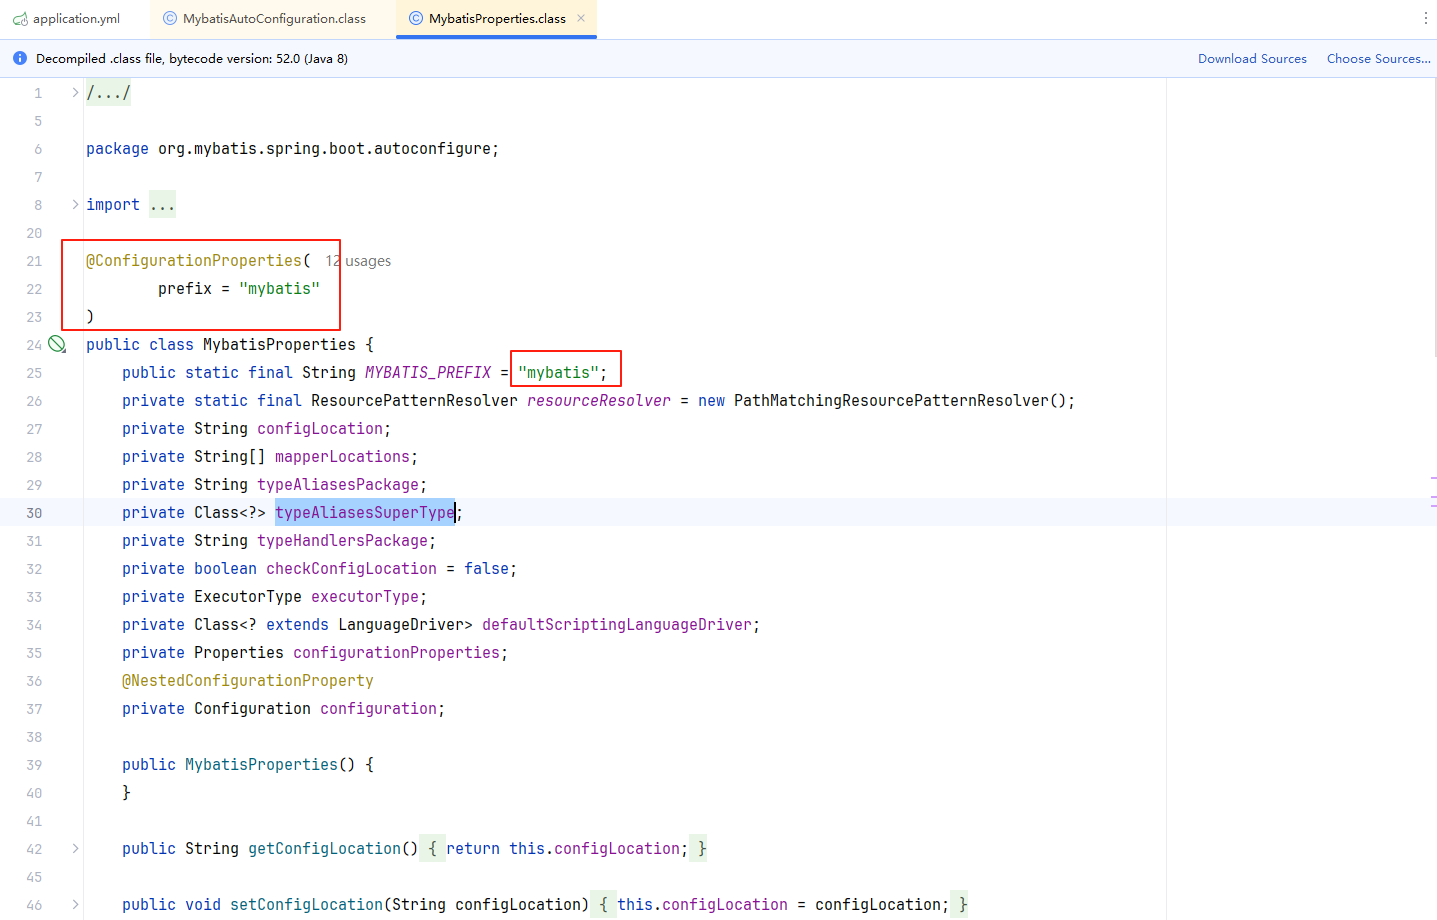
其中配置项Configuration与我们ruoyi-admin模块resources下的mybatis中的mybatis-config.xml是一样的
<?xml version="1.0" encoding="UTF-8" ?>
<!DOCTYPE configuration
PUBLIC "-//mybatis.org//DTD Config 3.0//EN"
"http://mybatis.org/dtd/mybatis-3-config.dtd">
<configuration><!-- 全局参数 --><settings><!-- 使全局的映射器启用或禁用缓存 --><setting name="cacheEnabled"             value="true"   /><!-- 允许JDBC 支持自动生成主键 --><setting name="useGeneratedKeys"         value="true"   /><!-- 配置默认的执行器.SIMPLE就是普通执行器;REUSE执行器会重用预处理语句(prepared statements);BATCH执行器将重用语句并执行批量更新 --><setting name="defaultExecutorType"      value="SIMPLE" /><!-- 指定 MyBatis 所用日志的具体实现 --><setting name="logImpl"                  value="SLF4J"  /><!-- 使用驼峰命名法转换字段 --><!-- <setting name="mapUnderscoreToCamelCase" value="true"/> --></settings></configuration>
除此之外还有一个自定义的MybatisConfig配置类,其中注册了Bean SqlSessionFactory把MybatisAutoConfiguration中的SqlSessionFactory覆盖掉了。这里主要是为了一些配置项的通配符支持,如:设置搜索指定包名的配置项typeAliasesPackage,默认的typeAliasesPackage当有多个包需要扫描时,需要配置多个包,而重写后可以通过通配符来设置。
package com.ruoyi.framework.config;import java.io.IOException;
import java.util.ArrayList;
import java.util.Arrays;
import java.util.HashSet;
import java.util.List;
import javax.sql.DataSource;
import org.apache.ibatis.io.VFS;
import org.apache.ibatis.session.SqlSessionFactory;
import org.mybatis.spring.SqlSessionFactoryBean;
import org.mybatis.spring.boot.autoconfigure.SpringBootVFS;
import org.springframework.beans.factory.annotation.Autowired;
import org.springframework.context.annotation.Bean;
import org.springframework.context.annotation.Configuration;
import org.springframework.core.env.Environment;
import org.springframework.core.io.DefaultResourceLoader;
import org.springframework.core.io.Resource;
import org.springframework.core.io.support.PathMatchingResourcePatternResolver;
import org.springframework.core.io.support.ResourcePatternResolver;
import org.springframework.core.type.classreading.CachingMetadataReaderFactory;
import org.springframework.core.type.classreading.MetadataReader;
import org.springframework.core.type.classreading.MetadataReaderFactory;
import org.springframework.util.ClassUtils;
import com.ruoyi.common.utils.StringUtils;/*** Mybatis支持*匹配扫描包* * @author ruoyi*/
@Configuration
public class MyBatisConfig
{@Autowiredprivate Environment env;static final String DEFAULT_RESOURCE_PATTERN = "**/*.class";public static String setTypeAliasesPackage(String typeAliasesPackage){ResourcePatternResolver resolver = (ResourcePatternResolver) new PathMatchingResourcePatternResolver();MetadataReaderFactory metadataReaderFactory = new CachingMetadataReaderFactory(resolver);List<String> allResult = new ArrayList<String>();try{for (String aliasesPackage : typeAliasesPackage.split(",")){List<String> result = new ArrayList<String>();aliasesPackage = ResourcePatternResolver.CLASSPATH_ALL_URL_PREFIX+ ClassUtils.convertClassNameToResourcePath(aliasesPackage.trim()) + "/" + DEFAULT_RESOURCE_PATTERN;Resource[] resources = resolver.getResources(aliasesPackage);if (resources != null && resources.length > 0){MetadataReader metadataReader = null;for (Resource resource : resources){if (resource.isReadable()){metadataReader = metadataReaderFactory.getMetadataReader(resource);try{result.add(Class.forName(metadataReader.getClassMetadata().getClassName()).getPackage().getName());}catch (ClassNotFoundException e){e.printStackTrace();}}}}if (result.size() > 0){HashSet<String> hashResult = new HashSet<String>(result);allResult.addAll(hashResult);}}if (allResult.size() > 0){typeAliasesPackage = String.join(",", (String[]) allResult.toArray(new String[0]));}else{throw new RuntimeException("mybatis typeAliasesPackage 路径扫描错误,参数typeAliasesPackage:" + typeAliasesPackage + "未找到任何包");}}catch (IOException e){e.printStackTrace();}return typeAliasesPackage;}public Resource[] resolveMapperLocations(String[] mapperLocations){ResourcePatternResolver resourceResolver = new PathMatchingResourcePatternResolver();List<Resource> resources = new ArrayList<Resource>();if (mapperLocations != null){for (String mapperLocation : mapperLocations){try{Resource[] mappers = resourceResolver.getResources(mapperLocation);resources.addAll(Arrays.asList(mappers));}catch (IOException e){// ignore}}}return resources.toArray(new Resource[resources.size()]);}@Beanpublic SqlSessionFactory sqlSessionFactory(DataSource dataSource) throws Exception{String typeAliasesPackage = env.getProperty("mybatis.typeAliasesPackage");String mapperLocations = env.getProperty("mybatis.mapperLocations");String configLocation = env.getProperty("mybatis.configLocation");typeAliasesPackage = setTypeAliasesPackage(typeAliasesPackage);VFS.addImplClass(SpringBootVFS.class);final SqlSessionFactoryBean sessionFactory = new SqlSessionFactoryBean();sessionFactory.setDataSource(dataSource);sessionFactory.setTypeAliasesPackage(typeAliasesPackage);sessionFactory.setMapperLocations(resolveMapperLocations(StringUtils.split(mapperLocations, ",")));sessionFactory.setConfigLocation(new DefaultResourceLoader().getResource(configLocation));return sessionFactory.getObject();}
}
注意: 如果后续需要加mybatis的其它配置的话不仅要在yml中进行配置还需要在MybatisConfig中进行对应新增否则不会生效。
3、Mybatis使用
在rouyi-framework模块com.ruoyi.framework.config下有一个ApplicationConfig,这里指定了要扫描的Mapper类的包的路径 @MapperScan(“com.ruoyi.**.mapper”)。否则需要在每个mapper中加上@Mapper
package com.ruoyi.framework.config;import java.util.TimeZone;
import org.mybatis.spring.annotation.MapperScan;
import org.springframework.boot.autoconfigure.jackson.Jackson2ObjectMapperBuilderCustomizer;
import org.springframework.context.annotation.Bean;
import org.springframework.context.annotation.Configuration;
import org.springframework.context.annotation.EnableAspectJAutoProxy;/*** 程序注解配置** @author ruoyi*/
@Configuration
// 表示通过aop框架暴露该代理对象,AopContext能够访问
@EnableAspectJAutoProxy(exposeProxy = true)
// 指定要扫描的Mapper类的包的路径
@MapperScan("com.ruoyi.**.mapper")
public class ApplicationConfig
{/*** 时区配置*/@Beanpublic Jackson2ObjectMapperBuilderCustomizer jacksonObjectMapperCustomization(){return jacksonObjectMapperBuilder -> jacksonObjectMapperBuilder.timeZone(TimeZone.getDefault());}
}
在xml中id名要和mapper中方法名一致
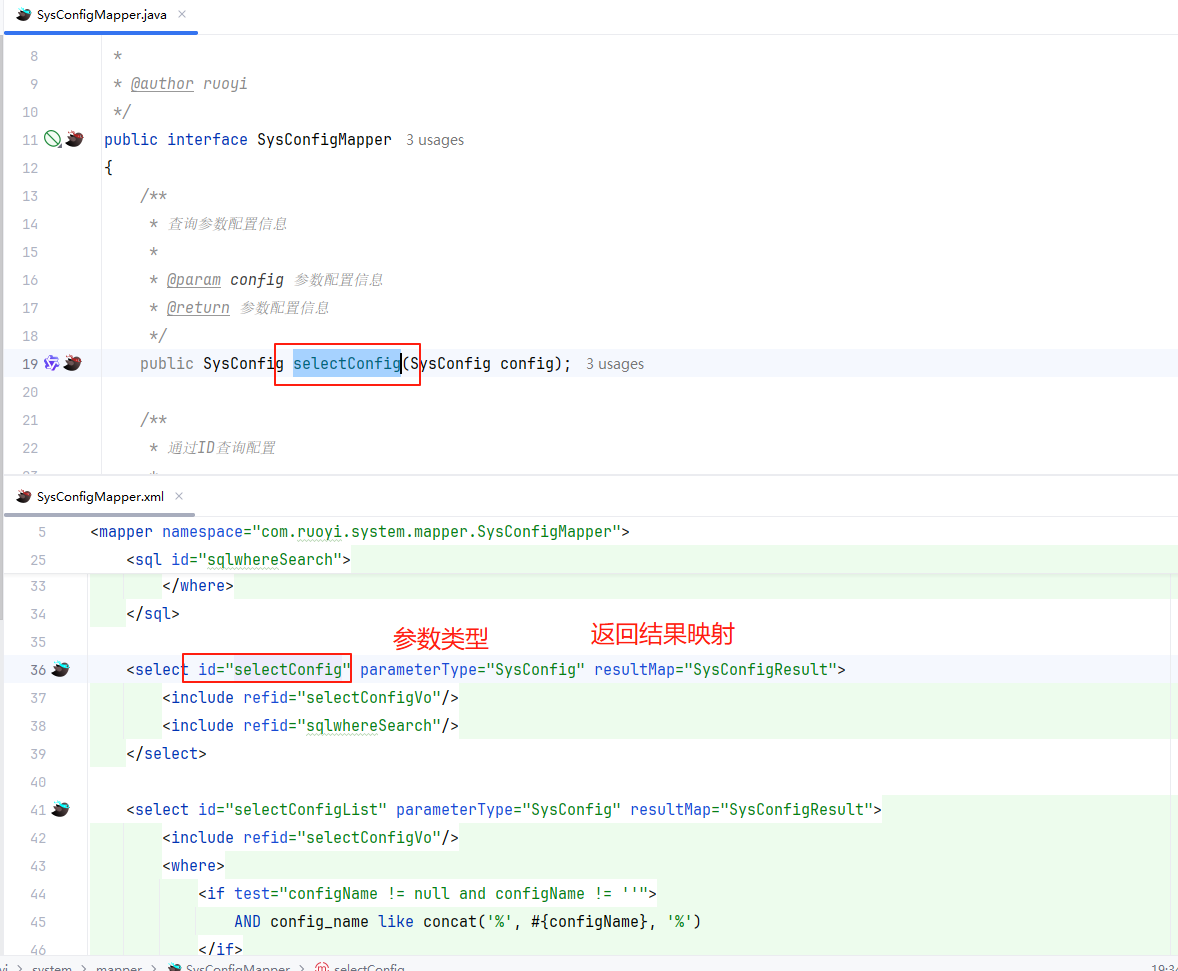
实体类属性与数据库字段映射,调用时也是用id名以及一些mybatis的基础使用
<?xml version="1.0" encoding="UTF-8" ?>
<!DOCTYPE mapper
PUBLIC "-//mybatis.org//DTD Mapper 3.0//EN"
"http://mybatis.org/dtd/mybatis-3-mapper.dtd">
<mapper namespace="com.ruoyi.system.mapper.SysConfigMapper"><resultMap type="SysConfig" id="SysConfigResult"><id property="configId" column="config_id" /><result property="configName" column="config_name" /><result property="configKey" column="config_key" /><result property="configValue" column="config_value" /><result property="configType" column="config_type" /><result property="createBy" column="create_by" /><result property="createTime" column="create_time" /><result property="updateBy" column="update_by" /><result property="updateTime" column="update_time" /></resultMap><sql id="selectConfigVo">select config_id, config_name, config_key, config_value, config_type, create_by, create_time, update_by, update_time, remark from sys_config</sql><!-- 查询条件 --><sql id="sqlwhereSearch"><where><if test="configId !=null">and config_id = #{configId}</if><if test="configKey !=null and configKey != ''">and config_key = #{configKey}</if></where></sql><select id="selectConfig" parameterType="SysConfig" resultMap="SysConfigResult"><!-- 上面定义好的查询和条件 --><include refid="selectConfigVo"/><include refid="sqlwhereSearch"/></select><select id="selectConfigList" parameterType="SysConfig" resultMap="SysConfigResult"><include refid="selectConfigVo"/><where><if test="configName != null and configName != ''">AND config_name like concat('%', #{configName}, '%')</if><if test="configType != null and configType != ''">AND config_type = #{configType}</if><if test="configKey != null and configKey != ''">AND config_key like concat('%', #{configKey}, '%')</if><if test="params.beginTime != null and params.beginTime != ''"><!-- 开始时间检索 -->and date_format(create_time,'%Y%m%d') >= date_format(#{params.beginTime},'%Y%m%d')</if><if test="params.endTime != null and params.endTime != ''"><!-- 结束时间检索 -->and date_format(create_time,'%Y%m%d') <= date_format(#{params.endTime},'%Y%m%d')</if></where></select><select id="selectConfigById" parameterType="Long" resultMap="SysConfigResult"><include refid="selectConfigVo"/>where config_id = #{configId}</select><select id="checkConfigKeyUnique" parameterType="String" resultMap="SysConfigResult"><include refid="selectConfigVo"/>where config_key = #{configKey} limit 1</select><insert id="insertConfig" parameterType="SysConfig">insert into sys_config (<if test="configName != null and configName != '' ">config_name,</if><if test="configKey != null and configKey != '' ">config_key,</if><if test="configValue != null and configValue != '' ">config_value,</if><if test="configType != null and configType != '' ">config_type,</if><if test="createBy != null and createBy != ''">create_by,</if><if test="remark != null and remark != ''">remark,</if>create_time)values(<if test="configName != null and configName != ''">#{configName},</if><if test="configKey != null and configKey != ''">#{configKey},</if><if test="configValue != null and configValue != ''">#{configValue},</if><if test="configType != null and configType != ''">#{configType},</if><if test="createBy != null and createBy != ''">#{createBy},</if><if test="remark != null and remark != ''">#{remark},</if>sysdate())</insert><update id="updateConfig" parameterType="SysConfig">update sys_config <set><if test="configName != null and configName != ''">config_name = #{configName},</if><if test="configKey != null and configKey != ''">config_key = #{configKey},</if><if test="configValue != null and configValue != ''">config_value = #{configValue},</if><if test="configType != null and configType != ''">config_type = #{configType},</if><if test="updateBy != null and updateBy != ''">update_by = #{updateBy},</if><if test="remark != null">remark = #{remark},</if>update_time = sysdate()</set>where config_id = #{configId}</update><delete id="deleteConfigById" parameterType="Long">delete from sys_config where config_id = #{configId}</delete><delete id="deleteConfigByIds" parameterType="Long">delete from sys_config where config_id in <foreach item="configId" collection="array" open="(" separator="," close=")">#{configId}</foreach></delete></mapper>
二 分页
1、分页配置
ruoyi这里使用的是pagehelper分页插件,Maven依赖如下:
<properties>
<pagehelper.boot.version>1.4.7</pagehelper.boot.version>
</properties><!-- pagehelper 分页插件 -->
<dependency><groupId>com.github.pagehelper</groupId><artifactId>pagehelper-spring-boot-starter</artifactId><version>${pagehelper.boot.version}</version>
</dependency>
yml配置
# PageHelper分页插件
pagehelper:# 设置数据库方言,这里设置为mysqlhelperDialect: mysql# 支持通过方法参数来传递分页参数supportMethodsArguments: true# params配置是用于指定分页插件的参数名,count=countSql表示使用countSql作为count查询的参数params: count=countSql
其它参数介绍见Mybatis官方文档
2、分页插件的使用及代码详解
这里使用了分页查询的第二种方法,其它方法及使用方式同见官方文档
//第二种,Mapper接口方式的调用,推荐这种使用方式。
PageHelper.startPage(1, 10);
List<User> list = userMapper.selectIf(1);
官方文档展示使用方法
在你需要进行分页的 MyBatis 查询方法前调用 PageHelper.startPage 静态方法即可,紧跟在这个方法后的第一个MyBatis 查询方法会被进行分页。
// 示例
//获取第1页,10条内容,默认查询总数count
PageHelper.startPage(1, 10);
//紧跟着的第一个select方法会被分页
List<User> list = userMapper.selectIf(1);
assertEquals(2, list.get(0).getId());
assertEquals(10, list.size());
//分页时,实际返回的结果list类型是Page<E>,如果想取出分页信息,需要强制转换为Page<E>
assertEquals(182, ((Page) list).getTotal());
ruoyi中的使用
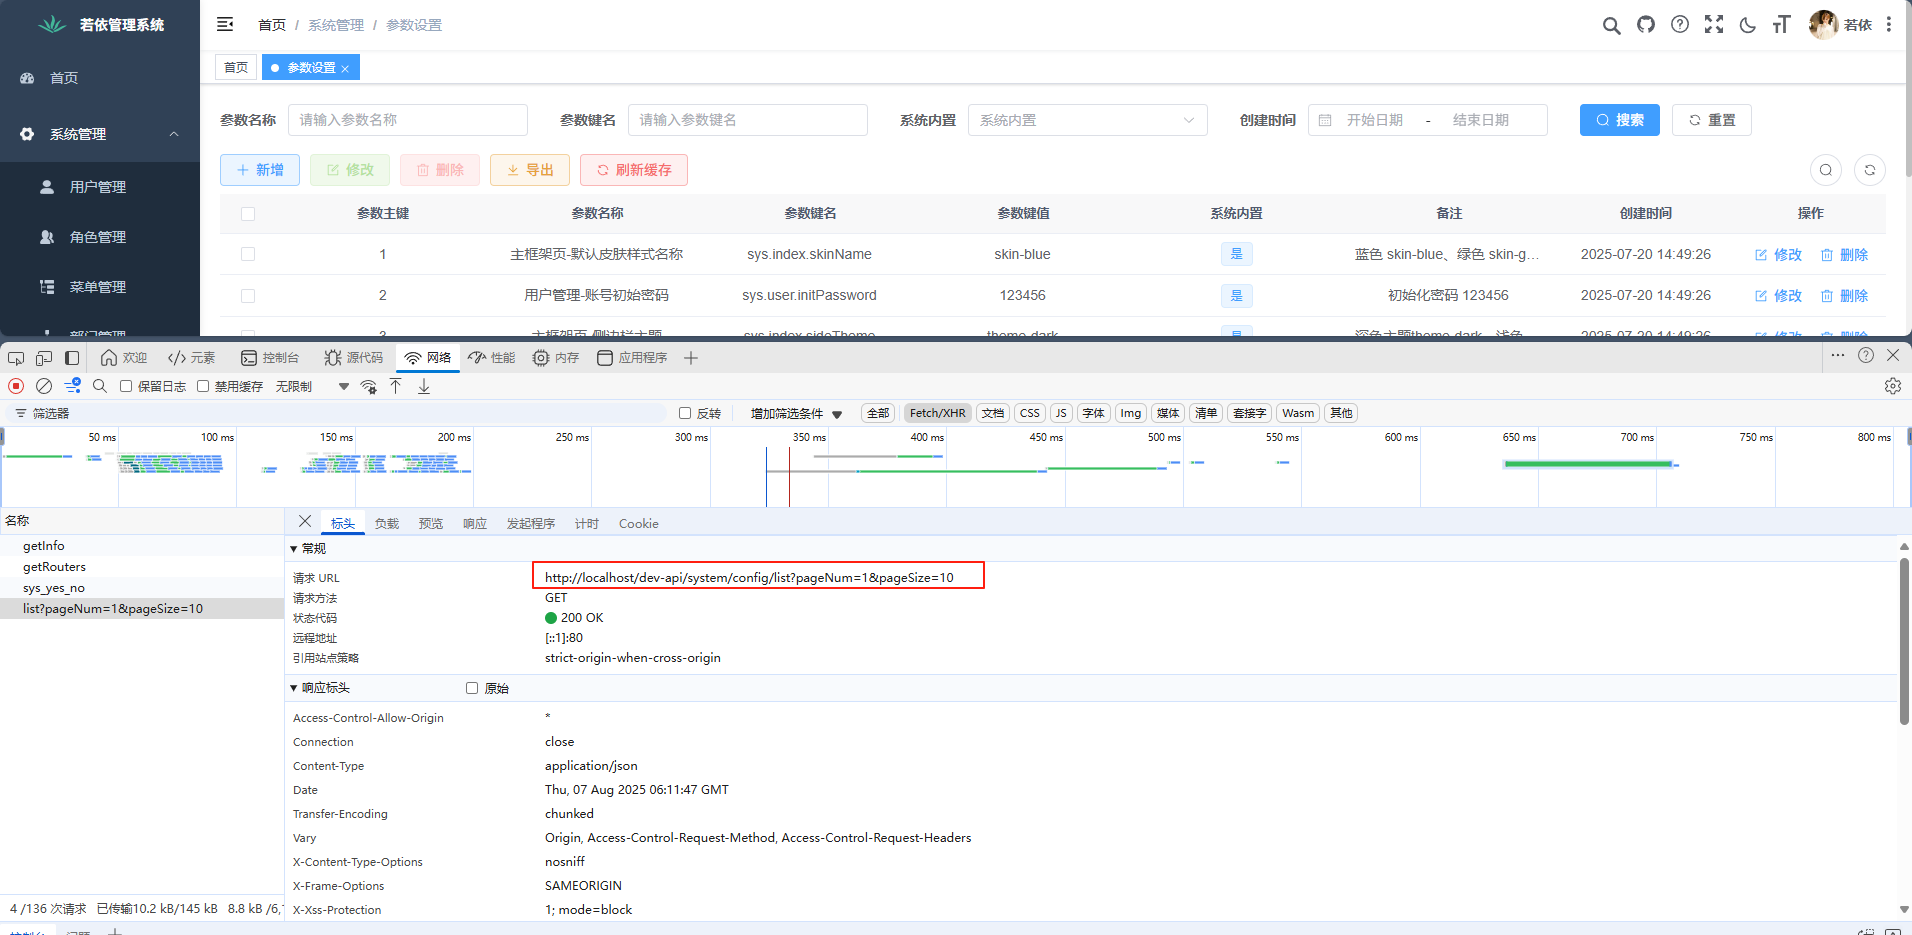
拿一个分页查询方法举例
/*** 获取参数配置列表*/
@PreAuthorize("@ss.hasPermi('system:config:list')")
@GetMapping("/list")
public TableDataInfo list(SysConfig config)
{// 在分页查询方法前调用startPage()startPage();List<SysConfig> list = configService.selectConfigList(config);return getDataTable(list);
}
前端请求时需要加上pageNum和pageSize参数
接口使用的startPage()进行了封装,点到BaseController
/*** 设置请求分页数据*/
protected void startPage()
{PageUtils.startPage();
}
再点到PageUtils中
package com.ruoyi.common.utils;import com.github.pagehelper.PageHelper;
import com.ruoyi.common.core.page.PageDomain;
import com.ruoyi.common.core.page.TableSupport;
import com.ruoyi.common.utils.sql.SqlUtil;/*** 分页工具类* * @author ruoyi*/
public class PageUtils extends PageHelper
{/*** 设置请求分页数据*/public static void startPage(){// 获取前端分页参数PageDomain pageDomain = TableSupport.buildPageRequest();Integer pageNum = pageDomain.getPageNum();Integer pageSize = pageDomain.getPageSize();// 对排序字段进行SQL注入防护转义String orderBy = SqlUtil.escapeOrderBySql(pageDomain.getOrderBy());Boolean reasonable = pageDomain.getReasonable();// 这里给PageHelper.startPage传了页数,页大小,排序方式以及是否分页参数合理化PageHelper.startPage(pageNum, pageSize, orderBy).setReasonable(reasonable);}/*** 清理分页的线程变量*/public static void clearPage(){PageHelper.clearPage();}
}
再来查看这个PageDomain
package com.ruoyi.common.core.page;import com.ruoyi.common.utils.StringUtils;/*** 分页数据* * @author ruoyi*/
public class PageDomain
{/** 当前记录起始索引 */private Integer pageNum;/** 每页显示记录数 */private Integer pageSize;/** 排序列 */private String orderByColumn;/** 排序的方向desc或者asc */private String isAsc = "asc";/** 分页参数合理化 */private Boolean reasonable = true;public String getOrderBy(){if (StringUtils.isEmpty(orderByColumn)){return "";}// 将驼峰修改为符合数据表字段的下划线格式并拼接上排序方向return StringUtils.toUnderScoreCase(orderByColumn) + " " + isAsc;}public Integer getPageNum(){return pageNum;}public void setPageNum(Integer pageNum){this.pageNum = pageNum;}public Integer getPageSize(){return pageSize;}public void setPageSize(Integer pageSize){this.pageSize = pageSize;}public String getOrderByColumn(){return orderByColumn;}public void setOrderByColumn(String orderByColumn){this.orderByColumn = orderByColumn;}public String getIsAsc(){return isAsc;}public void setIsAsc(String isAsc){if (StringUtils.isNotEmpty(isAsc)){// 兼容前端排序类型if ("ascending".equals(isAsc)){isAsc = "asc";}else if ("descending".equals(isAsc)){isAsc = "desc";}this.isAsc = isAsc;}}public Boolean getReasonable(){if (StringUtils.isNull(reasonable)){return Boolean.TRUE;}return reasonable;}public void setReasonable(Boolean reasonable){this.reasonable = reasonable;}
}
注意点(此处注意点内容来自ruoyi官方文档):
@PostMapping("/list")
@ResponseBody
public TableDataInfo list(User user)
{// 此方法配合前端完成自动分页startPage();List<User> list = userService.selectUserList(user);return getDataTable(list);
}
- 常见坑点1:selectPostById莫名其妙的分页。例如下面这段代码
startPage();
List<User> list;
if(user != null){list = userService.selectUserList(user);
} else {list = new ArrayList<User>();
}
Post post = postService.selectPostById(1L);
return getDataTable(list);
原因分析:这种情况下由于user存在null的情况,就会导致pageHelper生产了一个分页参数,但是没有被消费,这个参数就会一直保留在这个线程上。 当这个线程再次被使用时,就可能导致不该分页的方法去消费这个分页参数,这就产生了莫名其妙的分页。
上面这个代码,应该写成下面这个样子才能保证安全。
List<User> list;
if(user != null){startPage();list = userService.selectUserList(user);
} else {list = new ArrayList<User>();
}
Post post = postService.selectPostById(1L);
return getDataTable(list);
- 常见坑点2:添加了startPage方法。也没有正常分页。例如下面这段代码
startPage();
Post post = postService.selectPostById(1L);
List<User> list = userService.selectUserList(user);
return getDataTable(list);
原因分析:只对该语句以后的第一个查询(Select)语句得到的数据进行分页。
上面这个代码,应该写成下面这个样子才能正常分页。
Post post = postService.selectPostById(1L);
startPage();
List<User> list = userService.selectUserList(user);
return getDataTable(list);
提示
项目分页插件默认是Mysql语法,如果项目改为其他数据库需修改配置application.yml文件中的属性helperDialect: 你的数据库
注意
只要你可以保证在PageHelper方法调用后紧跟MyBatis查询方法,这就是安全的。因为PageHelper在finally代码段中自动清除了ThreadLocal存储的对象。 如果代码在进入Executor前发生异常,就会导致线程不可用,这属于人为的Bug(例如接口方法和XML中的不匹配,导致找不到MappedStatement时),这种情况由于线程不可用,也不会导致ThreadLocal参数被错误的使用。
最后再来看下解析前端分页参数的TableSupport,其解析前端传来的分页,排序参数并返回分页对象PageDomain
package com.ruoyi.common.core.page;import com.ruoyi.common.core.text.Convert;
import com.ruoyi.common.utils.ServletUtils;/*** 表格数据处理* * @author ruoyi*/
public class TableSupport
{/*** 当前记录起始索引*/public static final String PAGE_NUM = "pageNum";/*** 每页显示记录数*/public static final String PAGE_SIZE = "pageSize";/*** 排序列*/public static final String ORDER_BY_COLUMN = "orderByColumn";/*** 排序的方向 "desc" 或者 "asc".*/public static final String IS_ASC = "isAsc";/*** 分页参数合理化*/public static final String REASONABLE = "reasonable";/*** 封装分页对象*/public static PageDomain getPageDomain(){PageDomain pageDomain = new PageDomain();pageDomain.setPageNum(Convert.toInt(ServletUtils.getParameter(PAGE_NUM), 1));pageDomain.setPageSize(Convert.toInt(ServletUtils.getParameter(PAGE_SIZE), 10));pageDomain.setOrderByColumn(ServletUtils.getParameter(ORDER_BY_COLUMN));pageDomain.setIsAsc(ServletUtils.getParameter(IS_ASC));pageDomain.setReasonable(ServletUtils.getParameterToBool(REASONABLE));return pageDomain;}public static PageDomain buildPageRequest(){return getPageDomain();}
}
三 数据源
1、数据源配置详解
引入Maven依赖
<properties><druid.version>1.2.23</druid.version>
</properties><dependencies><!-- 阿里数据库连接池 --><dependency><groupId>com.alibaba</groupId><artifactId>druid-spring-boot-starter</artifactId><version>${druid.version}</version></dependency>
</dependencies>
我们先看配置文件application.yml
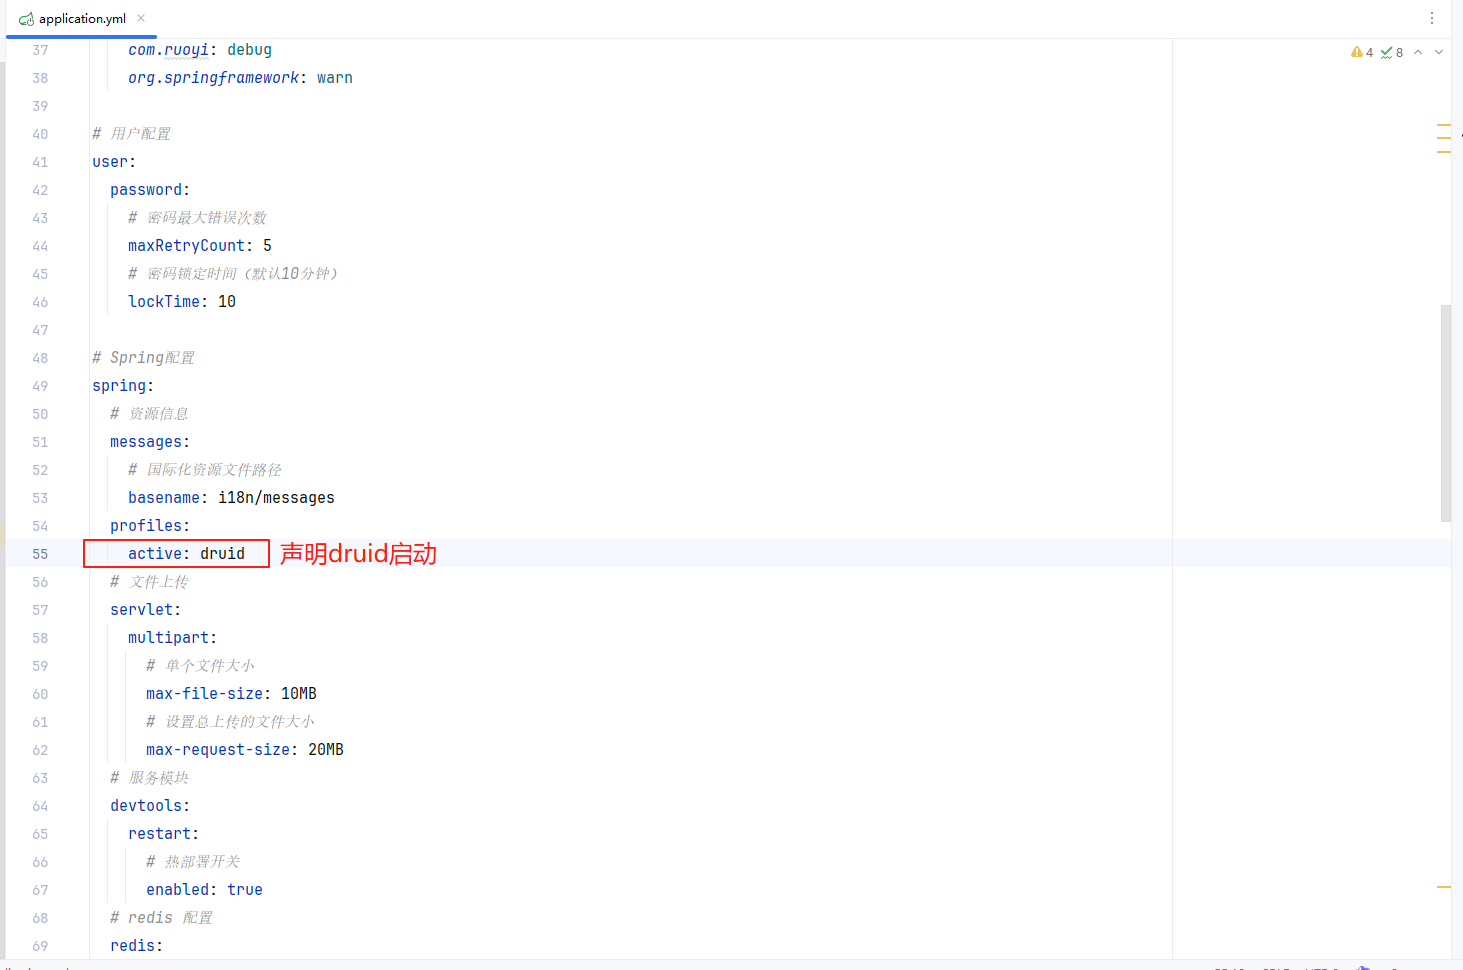
再看数据源配置文件application-druid.yml
alibb/druid官网地址
# 数据源配置
spring:datasource:# 指定连接池类型type: com.alibaba.druid.pool.DruidDataSource# 指定数据库驱动driverClassName: com.mysql.cj.jdbc.Driverdruid:# 主库数据源master:url: jdbc:mysql://localhost:3306/ry-vue?useUnicode=true&characterEncoding=utf8&zeroDateTimeBehavior=convertToNull&useSSL=true&serverTimezone=GMT%2B8username: rootpassword: password# 从库数据源slave:# 从数据源开关/默认关闭enabled: falseurl: username: password: # 初始连接数initialSize: 5# 最小连接池数量minIdle: 10# 最大连接池数量maxActive: 20# 配置获取连接等待超时的时间maxWait: 60000# 配置连接超时时间connectTimeout: 30000# 配置网络超时时间socketTimeout: 60000# 配置间隔多久才进行一次检测,检测需要关闭的空闲连接,单位是毫秒timeBetweenEvictionRunsMillis: 60000# 配置一个连接在池中最小生存的时间,单位是毫秒minEvictableIdleTimeMillis: 300000# 配置一个连接在池中最大生存的时间,单位是毫秒maxEvictableIdleTimeMillis: 900000# 配置检测连接是否有效validationQuery: SELECT 1 FROM DUAL# 申请连接的时候检测,建议配置为true,不影响性能,并且保证安全性testWhileIdle: true# 获取连接时执行检测,建议关闭,影响性能testOnBorrow: false# 归还连接时执行检测,建议关闭,影响性能testOnReturn: false# 打开监控过滤器webStatFilter:enabled: true# 开启后台管理页面statViewServlet:enabled: true# 设置白名单,不填则允许所有访问allow:url-pattern: /druid/*# 控制台管理用户名和密码login-username: ruoyilogin-password: 123456filter:stat:enabled: true# 慢SQL记录log-slow-sql: trueslow-sql-millis: 1000merge-sql: truewall:config:multi-statement-allow: true
2、数据源代码详解
我们先查看ruoyi-framework模块com.ruoyi.framework.config下的DruidConfig
package com.ruoyi.framework.config;import java.io.IOException;
import java.util.HashMap;
import java.util.Map;
import javax.servlet.Filter;
import javax.servlet.FilterChain;
import javax.servlet.ServletException;
import javax.servlet.ServletRequest;
import javax.servlet.ServletResponse;
import javax.sql.DataSource;
import org.springframework.boot.autoconfigure.condition.ConditionalOnProperty;
import org.springframework.boot.context.properties.ConfigurationProperties;
import org.springframework.boot.web.servlet.FilterRegistrationBean;
import org.springframework.context.annotation.Bean;
import org.springframework.context.annotation.Configuration;
import org.springframework.context.annotation.Primary;
import com.alibaba.druid.pool.DruidDataSource;
import com.alibaba.druid.spring.boot.autoconfigure.DruidDataSourceBuilder;
import com.alibaba.druid.spring.boot.autoconfigure.properties.DruidStatProperties;
import com.alibaba.druid.util.Utils;
import com.ruoyi.common.enums.DataSourceType;
import com.ruoyi.common.utils.spring.SpringUtils;
import com.ruoyi.framework.config.properties.DruidProperties;
import com.ruoyi.framework.datasource.DynamicDataSource;/*** druid 配置多数据源* * @author ruoyi*/
@Configuration
public class DruidConfig
{// 读取主数据源@Bean@ConfigurationProperties("spring.datasource.druid.master")public DataSource masterDataSource(DruidProperties druidProperties){// 创建数据源DruidDataSource dataSource = DruidDataSourceBuilder.create().build();// 绑定数据源配置return druidProperties.dataSource(dataSource);}// 读取从数据源 @Bean@ConfigurationProperties("spring.datasource.druid.slave")// spring.datasource.druid.slave.enabled=true时才创建该Bean@ConditionalOnProperty(prefix = "spring.datasource.druid.slave", name = "enabled", havingValue = "true")public DataSource slaveDataSource(DruidProperties druidProperties){DruidDataSource dataSource = DruidDataSourceBuilder.create().build();return druidProperties.dataSource(dataSource);}// 使用@Bean定义名为"dynamicDataSource"的Bean,@Primary注解表示这是主数据源@Bean(name = "dynamicDataSource")@Primarypublic DynamicDataSource dataSource(DataSource masterDataSource){// 创建目标数据源Map,将主数据源(masterDataSource)放入,键为"MASTER"Map<Object, Object> targetDataSources = new HashMap<>();targetDataSources.put(DataSourceType.MASTER.name(), masterDataSource);// 调用setDataSource方法尝试添加从数据源(slaveDataSource),键为"SLAVE"setDataSource(targetDataSources, DataSourceType.SLAVE.name(), "slaveDataSource");// 返回一个新的DynamicDataSource实例,包含默认数据源和所有目标数据源return new DynamicDataSource(masterDataSource, targetDataSources);}/*** 设置数据源* * @param targetDataSources 备选数据源集合* @param sourceName 数据源名称* @param beanName bean名称*/public void setDataSource(Map<Object, Object> targetDataSources, String sourceName, String beanName){try{DataSource dataSource = SpringUtils.getBean(beanName);targetDataSources.put(sourceName, dataSource);}catch (Exception e){}}/*** 去除监控页面底部的广告*/@SuppressWarnings({ "rawtypes", "unchecked" })@Bean@ConditionalOnProperty(name = "spring.datasource.druid.statViewServlet.enabled", havingValue = "true")public FilterRegistrationBean removeDruidFilterRegistrationBean(DruidStatProperties properties){// 获取web监控页面的参数DruidStatProperties.StatViewServlet config = properties.getStatViewServlet();// 提取common.js的配置路径String pattern = config.getUrlPattern() != null ? config.getUrlPattern() : "/druid/*";String commonJsPattern = pattern.replaceAll("\\*", "js/common.js");final String filePath = "support/http/resources/js/common.js";// 创建filter进行过滤Filter filter = new Filter(){@Overridepublic void init(javax.servlet.FilterConfig filterConfig) throws ServletException{}@Overridepublic void doFilter(ServletRequest request, ServletResponse response, FilterChain chain)throws IOException, ServletException{chain.doFilter(request, response);// 重置缓冲区,响应头不会被重置response.resetBuffer();// 获取common.jsString text = Utils.readFromResource(filePath);// 正则替换banner, 除去底部的广告信息text = text.replaceAll("<a.*?banner\"></a><br/>", "");text = text.replaceAll("powered.*?shrek.wang</a>", "");response.getWriter().write(text);}@Overridepublic void destroy(){}};FilterRegistrationBean registrationBean = new FilterRegistrationBean();registrationBean.setFilter(filter);registrationBean.addUrlPatterns(commonJsPattern);return registrationBean;}
}
注意:Spring Boot 2.X 版本不再支持配置继承,多数据源的话每个数据源的所有配置都需要单独配置,否则配置不会生效
里面有一个去除druid后台管理页面底层广告的方法,这里大致描述其流程
1.使用@Bean创建一个FilterRegistrationBean,当Druid监控页面启用时生效
2.定义一个匿名Filter,在请求common.js文件时进行拦截
3.在Filter中读取common.js文件内容,使用正则表达式删除广告相关的HTML代码
4.将处理后的内容写入响应,从而实现去除广告的效果
我们再看druid的配置属性,获取yml文件中druid的配置set进数据源并返回
package com.ruoyi.framework.config.properties;import org.springframework.beans.factory.annotation.Value;
import org.springframework.context.annotation.Configuration;
import com.alibaba.druid.pool.DruidDataSource;/*** druid 配置属性* * @author ruoyi*/
@Configuration
public class DruidProperties
{@Value("${spring.datasource.druid.initialSize}")private int initialSize;@Value("${spring.datasource.druid.minIdle}")private int minIdle;@Value("${spring.datasource.druid.maxActive}")private int maxActive;@Value("${spring.datasource.druid.maxWait}")private int maxWait;@Value("${spring.datasource.druid.connectTimeout}")private int connectTimeout;@Value("${spring.datasource.druid.socketTimeout}")private int socketTimeout;@Value("${spring.datasource.druid.timeBetweenEvictionRunsMillis}")private int timeBetweenEvictionRunsMillis;@Value("${spring.datasource.druid.minEvictableIdleTimeMillis}")private int minEvictableIdleTimeMillis;@Value("${spring.datasource.druid.maxEvictableIdleTimeMillis}")private int maxEvictableIdleTimeMillis;@Value("${spring.datasource.druid.validationQuery}")private String validationQuery;@Value("${spring.datasource.druid.testWhileIdle}")private boolean testWhileIdle;@Value("${spring.datasource.druid.testOnBorrow}")private boolean testOnBorrow;@Value("${spring.datasource.druid.testOnReturn}")private boolean testOnReturn;public DruidDataSource dataSource(DruidDataSource datasource){/** 配置初始化大小、最小、最大 */datasource.setInitialSize(initialSize);datasource.setMaxActive(maxActive);datasource.setMinIdle(minIdle);/** 配置获取连接等待超时的时间 */datasource.setMaxWait(maxWait);/** 配置驱动连接超时时间,检测数据库建立连接的超时时间,单位是毫秒 */datasource.setConnectTimeout(connectTimeout);/** 配置网络超时时间,等待数据库操作完成的网络超时时间,单位是毫秒 */datasource.setSocketTimeout(socketTimeout);/** 配置间隔多久才进行一次检测,检测需要关闭的空闲连接,单位是毫秒 */datasource.setTimeBetweenEvictionRunsMillis(timeBetweenEvictionRunsMillis);/** 配置一个连接在池中最小、最大生存的时间,单位是毫秒 */datasource.setMinEvictableIdleTimeMillis(minEvictableIdleTimeMillis);datasource.setMaxEvictableIdleTimeMillis(maxEvictableIdleTimeMillis);/*** 用来检测连接是否有效的sql,要求是一个查询语句,常用select 'x'。如果validationQuery为null,testOnBorrow、testOnReturn、testWhileIdle都不会起作用。*/datasource.setValidationQuery(validationQuery);/** 建议配置为true,不影响性能,并且保证安全性。申请连接的时候检测,如果空闲时间大于timeBetweenEvictionRunsMillis,执行validationQuery检测连接是否有效。 */datasource.setTestWhileIdle(testWhileIdle);/** 申请连接时执行validationQuery检测连接是否有效,做了这个配置会降低性能。 */datasource.setTestOnBorrow(testOnBorrow);/** 归还连接时执行validationQuery检测连接是否有效,做了这个配置会降低性能。 */datasource.setTestOnReturn(testOnReturn);return datasource;}
}
3、从库数据源使用
首先在application-druid.yml中进行配置,配置从库数据源slave,将enabled设置为true并配置数据源链接
# 数据源配置
spring:datasource:type: com.alibaba.druid.pool.DruidDataSourcedriverClassName: com.mysql.cj.jdbc.Driverdruid:# 主库数据源master:url: jdbc:mysql://localhost:3306/ry-vue?useUnicode=true&characterEncoding=utf8&zeroDateTimeBehavior=convertToNull&useSSL=true&serverTimezone=GMT%2B8username: rootpassword: password# 从库数据源slave:# 从数据源开关/默认关闭enabled: trueurl: jdbc:mysql://localhost:3306/ry-vue1useUnicode=true&characterEncoding=utf8&zeroDateTimeBehavior=convertToNull&useSSL=true&serverTimezone=GMT%2B8username: rootpassword: password# 初始连接数initialSize: 5# 最小连接池数量minIdle: 10# 最大连接池数量maxActive: 20# 配置获取连接等待超时的时间maxWait: 60000# 配置连接超时时间connectTimeout: 30000# 配置网络超时时间socketTimeout: 60000# 配置间隔多久才进行一次检测,检测需要关闭的空闲连接,单位是毫秒timeBetweenEvictionRunsMillis: 60000# 配置一个连接在池中最小生存的时间,单位是毫秒minEvictableIdleTimeMillis: 300000# 配置一个连接在池中最大生存的时间,单位是毫秒maxEvictableIdleTimeMillis: 900000# 配置检测连接是否有效validationQuery: SELECT 1 FROM DUALtestWhileIdle: truetestOnBorrow: falsetestOnReturn: falsewebStatFilter:enabled: truestatViewServlet:enabled: true# 设置白名单,不填则允许所有访问allow:url-pattern: /druid/*# 控制台管理用户名和密码login-username: ruoyilogin-password: 123456filter:stat:enabled: true# 慢SQL记录log-slow-sql: trueslow-sql-millis: 1000merge-sql: truewall:config:multi-statement-allow: true
在需要被切换数据源的Service或Mapper方法上添加@DataSource注解,使用方法如下:
@DataSource(value = DataSourceType.MASTER)
public List<...> select(...)
{return mapper.select(...);
}
其中value用来表示数据源名称,除MASTER和SLAVE其他均需要进行配置。
4、多数据源
4.1 新增相同数据源
在application-druid.yml中新增slave2
# 从库数据源slave2:# 从数据源开关/默认关闭enabled: trueurl: jdbc:mysql://localhost:3306/ry-vue2useUnicode=true&characterEncoding=utf8&zeroDateTimeBehavior=convertToNull&useSSL=true&serverTimezone=GMT%2B8username: rootpassword: password
在枚举类DataSouceType中新增数据库类型
package com.ruoyi.common.enums;/*** 数据源* * @author ruoyi*/
public enum DataSourceType
{/*** 主库*/MASTER,/*** 从库*/SLAVE,/*** 从库2*/SLAVE2
}
在类DruidConfig中新增
@Bean
@ConfigurationProperties("spring.datasource.druid.slave2")
@ConditionalOnProperty(prefix = "spring.datasource.druid.slave2", name = "enabled", havingValue = "true")
public DataSource slaveDataSource2(DruidProperties druidProperties)
{DruidDataSource dataSource = DruidDataSourceBuilder.create().build();return druidProperties.dataSource(dataSource);
}@Bean(name = "dynamicDataSource")
@Primary
public DynamicDataSource dataSource(DataSource masterDataSource)
{Map<Object, Object> targetDataSources = new HashMap<>();targetDataSources.put(DataSourceType.MASTER.name(), masterDataSource);setDataSource(targetDataSources, DataSourceType.SLAVE.name(), "slaveDataSource");setDataSource(targetDataSources, DataSourceType.SLAVE2.name(), "slaveDataSource2");return new DynamicDataSource(masterDataSource, targetDataSources);
}
4.2 新增不同数据源
如新增Oracle数据库(此部分摘自ruoyi官方文档)
新增Maven依赖
<!--oracle驱动-->
<dependency><groupId>com.oracle</groupId><artifactId>ojdbc6</artifactId><version>11.2.0.3</version>
</dependency>
数据源配置
# 数据源配置
spring:datasource:type: com.alibaba.druid.pool.DruidDataSourcedruid:# 主库数据源master:url: jdbc:mysql://127.0.0.1:3306/ry?useUnicode=true&characterEncoding=utf8&zeroDateTimeBehavior=convertToNull&useSSL=true&serverTimezone=GMT%2B8username: rootpassword: passwordvalidationQuery: select 1# 从库数据源slave:# 从数据源开关/默认关闭enabled: trueurl: jdbc:oracle:thin:@127.0.0.1:1521:oracleusername: rootpassword: passwordvalidationQuery: select 1 from dual
注意
对于不同数据源造成的驱动问题,可以删除driverClassName,默认会自动识别驱动
如需要对不同数据源分页需要操作application.yml中的pagehelper配置中删除helperDialect: mysql会自动识别数据源,新增autoRuntimeDialect=true表示运行时获取数据源
4.3 多数据源代码原理
首先看ruoyi-framework模块com.ruoyi.framework.aspectj下的DataSourceAspect类,处理多数据源切换的切面
package com.ruoyi.framework.aspectj;import java.util.Objects;
import org.aspectj.lang.ProceedingJoinPoint;
import org.aspectj.lang.annotation.Around;
import org.aspectj.lang.annotation.Aspect;
import org.aspectj.lang.annotation.Pointcut;
import org.aspectj.lang.reflect.MethodSignature;
import org.slf4j.Logger;
import org.slf4j.LoggerFactory;
import org.springframework.core.annotation.AnnotationUtils;
import org.springframework.core.annotation.Order;
import org.springframework.stereotype.Component;
import com.ruoyi.common.annotation.DataSource;
import com.ruoyi.common.utils.StringUtils;
import com.ruoyi.framework.datasource.DynamicDataSourceContextHolder;/*** 多数据源处理* * @author ruoyi*/
@Aspect
// 确保在所有切面中第一个执行
@Order(1)
@Component
public class DataSourceAspect
{protected Logger logger = LoggerFactory.getLogger(getClass());// 如果在方法或类上有@DataSource注解@Pointcut("@annotation(com.ruoyi.common.annotation.DataSource)"+ "|| @within(com.ruoyi.common.annotation.DataSource)")public void dsPointCut(){}// 定义环绕通知 目标方法执行前后都可以执行自定义逻辑@Around("dsPointCut()")public Object around(ProceedingJoinPoint point) throws Throwable{// 获取数据源DataSource dataSource = getDataSource(point);if (StringUtils.isNotNull(dataSource)){   // 将获取的数据源set进多数据源上下文中DynamicDataSourceContextHolder.setDataSourceType(dataSource.value().name());}try{    // 执行目标方法return point.proceed();}finally{// 销毁数据源 在执行方法之后DynamicDataSourceContextHolder.clearDataSourceType();}}/*** 获取需要切换的数据源*/public DataSource getDataSource(ProceedingJoinPoint point){MethodSignature signature = (MethodSignature) point.getSignature();DataSource dataSource = AnnotationUtils.findAnnotation(signature.getMethod(), DataSource.class);if (Objects.nonNull(dataSource)){return dataSource;}return AnnotationUtils.findAnnotation(signature.getDeclaringType(), DataSource.class);}
}
其中 DynamicDataSourceContextHolder.setDataSourceType(dataSource.value().name()); 只是将获取的数据源set进上下文中,而具体设置数据源是由DynamicDataSource来实现的
package com.ruoyi.framework.datasource;import java.util.Map;
import javax.sql.DataSource;
import org.springframework.jdbc.datasource.lookup.AbstractRoutingDataSource;/*** 动态数据源* * @author ruoyi*/
public class DynamicDataSource extends AbstractRoutingDataSource
{public DynamicDataSource(DataSource defaultTargetDataSource, Map<Object, Object> targetDataSources){super.setDefaultTargetDataSource(defaultTargetDataSource);super.setTargetDataSources(targetDataSources);super.afterPropertiesSet();}@Overrideprotected Object determineCurrentLookupKey(){return DynamicDataSourceContextHolder.getDataSourceType();}
}
DynamicDataSource在DruidConfig中被注册到容器中,去切换数据源
@Bean(name = "dynamicDataSource")@Primarypublic DynamicDataSource dataSource(DataSource masterDataSource){// 创建目标数据源Map,将主数据源(masterDataSource)放入,键为"MASTER"Map<Object, Object> targetDataSources = new HashMap<>();targetDataSources.put(DataSourceType.MASTER.name(), masterDataSource);// 调用setDataSource方法尝试添加从数据源(slaveDataSource),键为"SLAVE"setDataSource(targetDataSources, DataSourceType.SLAVE.name(), "slaveDataSource");// 返回一个新的DynamicDataSource实例,包含默认数据源和所有目标数据源return new DynamicDataSource(masterDataSource, targetDataSources);}


内容)


)
----配置RTC时钟及显示时间)


)


