传统缓存方案问题
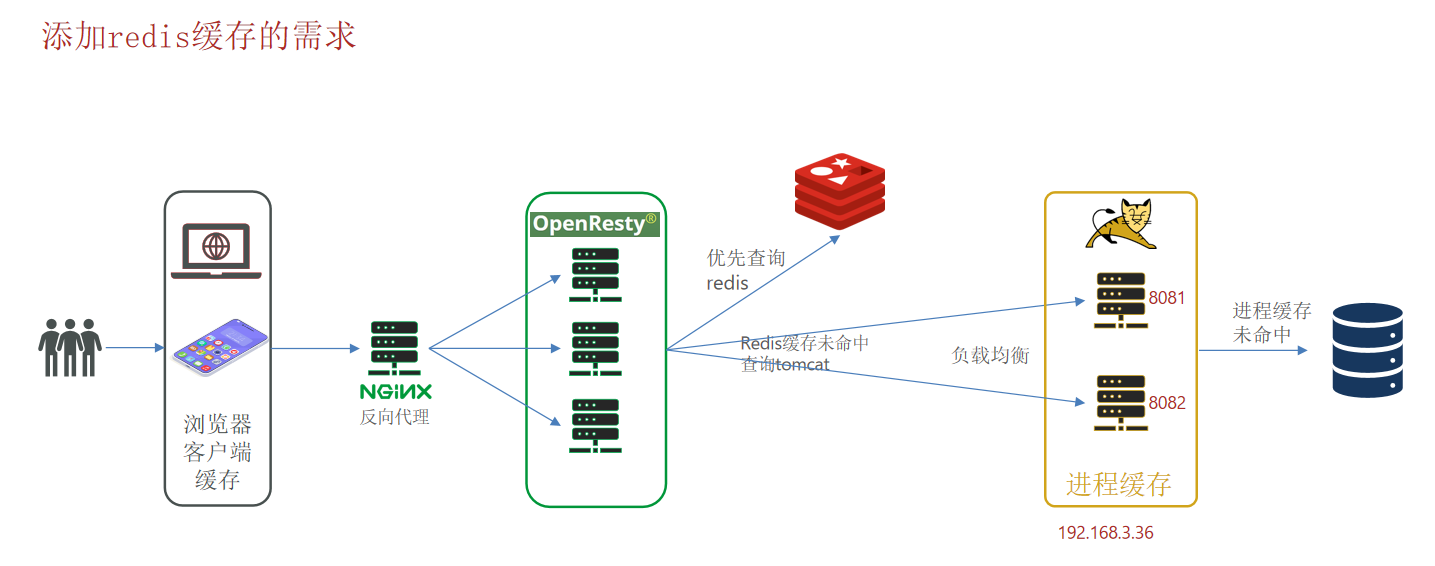
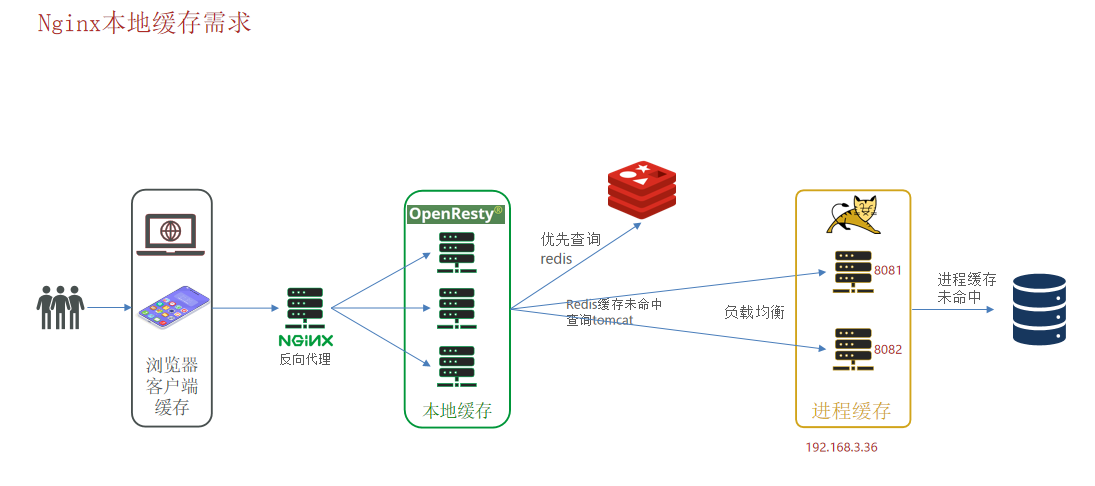
多级缓存方案
流程
1.客户端浏览器缓存页面静态资源;
2. 客户端请求到Nginx反向代理;[一级缓存_浏览器缓存]
3.Nginx反向代理将请求分发到Nginx集群(OpenResty);
4.先重Nginx集群OpenResty中获取Nginx本地缓存数据;[二级缓存_Nginx本地缓存]
5.若Nginx本地缓存未命中则在Nginx集群节点上编写Lua脚本连接操作Redis(重Redis中
拿取缓存数据);[三级缓存_Redis缓存]
6.如果Nginx集群未重Redis中拿取到数据则Nginx集群将请求分发到Tomcat服务器。在
Tomcat服务器中做进程缓存,用户请求先尝试重进程缓存中拿取数据,若进程缓存中
未获取到数据则查询数据库重数据库中获取数据;[四级缓存_JVM进程缓存]
7.当数据库中数据变更时采用canal进行数据库与缓存中数据同步;
准备工作
1.安装Mysql
2.导入SQL数据
3.导入提供的工程
4.访问提供的Nginx
5.学习进程缓存
分布式缓存与本地进程缓存区别
分布式缓存,例如Redis:
优点:
存储容量更大、可靠性更好、可以在集群间共享 缺点:访问缓存有网络开销
场景:
缓存数据量较大、可靠性要求较高、需要在集群间共享;
进程本地缓存,例如HashMap、GuavaCache:
优点:读取本地内存,没有网络开销,速度更快 缺点:存储容量有限、可靠性较低、
无法共享
场景:性能要求较高,缓存数据量较小;
Caffeine
Caffeine是一个基于Java8开发的,提供了近乎最佳命中率的高性能的本地缓存库。目前Spring内部的缓存使用的就是Caffeine。
1.导入依赖
<dependency><groupId>com.github.ben-manes.caffeine</groupId><artifactId>caffeine</artifactId>
</dependency>
2.Caffeine简单使用
@Testvoid testBasicOps() {// 创建缓存对象Cache<String, String> cache = Caffeine.newBuilder().build();// 存数据cache.put("gf", "迪丽热巴");// 取数据方式一,若key不存在则返回nullString gf = cache.getIfPresent("gf");System.out.println("gf = " + gf);// 取数据方式二,若key不存在则执行自定义的function(可在function中实现查询数据库数据)String defaultGF = cache.get("defaultGF", key -> {// 这里可以去数据库根据 key查询valuereturn "柳岩";});System.out.println("defaultGF = " + defaultGF);}2.Caffeine驱逐策略
设置进程缓存驱逐策略的目的在于避免过多缓存数据占用Java进程内存;
Caffeine提供了三种缓存驱逐策略:
2.1.基于容量:
设置缓存的数量上限(即允许当前缓存对象存入多少个"键值对")
// 创建缓存对象
Cache<String, String> cache = Caffeine.newBuilder() .maximumSize(1) // 设置缓存大小上限为 1
.build();
2.2.基于时间:
设置缓存的有效时间
// 创建缓存对象(设置缓存有效期为10秒,从最后一次写入开始计时)
Cache<String, String> cache = Caffeine.newBuilder() .expireAfterWrite(Duration.ofSeconds(10))
.build();
2.3.基于引用:
设置缓存为软引用或弱引用,利用GC来回收缓存数据。性能较差,不建议使用
3.实现商品查询本地进程缓存
利用Caffeine实现下列需求:
1.给根据id查询商品的业务添加缓存,缓存未命中时查询数据库;
2.给根据id查询商品库存的业务添加缓存,缓存未命中时查询数据库;
3.缓存初始大小为100 缓存上限为10000;
3.1.构建商品及库存Caffeine配置类
import com.github.benmanes.caffeine.cache.Cache;
import com.github.benmanes.caffeine.cache.Caffeine;
import com.heima.item.pojo.Item;
import com.heima.item.pojo.ItemStock;
import org.springframework.context.annotation.Bean;
import org.springframework.context.annotation.Configuration;
/*** 配置类*/
@Configuration
public class CaffeineConfig {/** 构建“商品”查询缓存Caffeine对象 */@Beanpublic Cache<Long, Item> itemCache(){return Caffeine.newBuilder().initialCapacity(100) // 初始化100.maximumSize(10_000) // 最大10000.build();}/** 构建“商品库存”查询缓存Caffeine对象 */@Beanpublic Cache<Long, ItemStock> stockCache(){return Caffeine.newBuilder().initialCapacity(100) // 初始化100.maximumSize(10_000) // 最大10000.build();}
}
2.使用Caffine工具类实现商品及库存查询访问进程缓存
import com.github.benmanes.caffeine.cache.Cache;
import com.heima.item.pojo.Item;
import com.heima.item.pojo.ItemStock;
import com.heima.item.service.IItemService;
import com.heima.item.service.IItemStockService;
import org.springframework.beans.factory.annotation.Autowired;
import org.springframework.web.bind.annotation.GetMapping;
import org.springframework.web.bind.annotation.PathVariable;
import org.springframework.web.bind.annotation.RequestMapping;
import org.springframework.web.bind.annotation.RestController;
@RestController
@RequestMapping("item")
public class ItemController2 {@Autowiredprivate IItemService itemService;@Autowiredprivate IItemStockService stockService;@Autowiredprivate Cache<Long,Item> itemCache;@Autowiredprivate Cache<Long,ItemStock> stockCache;@GetMapping("/{id}")public Item findById(@PathVariable("id") Long id){return itemCache.get(id,key ->itemService.query().ne("status", 3).eq("id", key).one());}@GetMapping("/stock/{id}")public ItemStock findStockById(@PathVariable("id") Long id){return stockCache.get(id,key ->stockService.getById(key));}
}
6.学习Lua
Lua 是一种轻量小巧的脚本语言,用标准C语言编写并以源代码形式开放, 其设计目的是为了嵌入应用程序中,从而为应用程序提供灵活的扩展和定制功能;
# 官网:
https://www.lua.org/# windows下载地址
https://github.com/rjpcomputing/luaforwindows/releases
6.1.安装Lua
# ubuntu安装Lua
https://www.henghost.com/news/article/159738/?jsmc=5470689cd4&jsme=1751873106
# windows安装流程
https://blog.csdn.net/weixin_41924879/article/details/126041670# 测试Lua
6.2.Lua声明变量和循环数组或Map
| 数据类型 | 描述 |
| nil | 这个最简单,只有值nil属于该类,表示一个无效值(在条件表达式中相当于false)。 |
| boolean | 包含两个值:false和true |
| number | 表示双精度类型的实浮点数 |
| string | 字符串由一对双引号或单引号来表示 |
| function | 由 C 或 Lua 编写的函数 |
| table | Lua 中的表(table)其实是一个"关联数组"(associative arrays),数组的索引可以是数字、 字符串或表类型。在 Lua 里,table 的创建是通过"构造表达式"来完成,最简单构造表达式是{}, 用来创建一个空表。(Lua中没有数组和Map但可以使用table类型来表示数组或Map) |
Lua声明变量
Lua声明变量时不需要指定数据类型,local代表声明的变量是局部变量;
-- 声明字符串
local mystr = 'hellow world'
print(mystr)-- 拼接字符串使用 ..
print("A".."B".."C")-- 声明boolean
local myboolean = true
print(myboolean)-- 声明数值类型
local mydecimal = 12.6
local mydecimal2 = 180
print(mydecimal)
print(mydecimal2)-- 声明数组 Key为索引的table(特别说明:访问数组元素时索引重1开始)
local myarr = {'my','name','is','jack'}
-- 声明Map Key为指定索引名的table
local mymap = {name = 'zs',age = 18}-- 访问数组
print(myarr[1])-- 访问Map
-- Map访问方式一
print(mymap['name'])
-- Map访问方式二
print(mymap.name)
Lua循环数组和Map
遍历数组使用ipairs、遍历Map使用pairs
-- 循环数组 index 和 value 为自定义变量名称(可变更)index 代表索引  value 代表对应索引值
for index,value in ipairs(myarr)doprint(index,value)end-- 循环Map key 和 value 为自定义变量名称(可变更)key 代表Map的key value 代表对应key的值
for key,value in pairs(mymap)doprint(key,value)end
6.3.Lua条件控制和函数
Lua定义函数语法
function 函数名(args1,agrs2,agrs3)
-- 函数体..
return 返回值
end
定义一个打印数组的函数
-- 定义数组对象
local arr = {100,200,300}-- 定义打印数组函数
function printArr(arr)for index,value in ipairs(arr)doprint(value)end
end-- 调用打印数据函数方法
printArr(arr)
6.4.Lua条件控制
类似Java的 if - else写法;
if(布尔表达式)
then
--[ 布尔表达式为 true 时执行该语句块 --]
else
--[ 布尔表达式为 false 时执行该语句块 --]
end
与Java不同Lua“布尔表达式”中的逻辑运算符是基于英文单词
| 操作符 | 描述 | 实例 |
| and | 逻辑与操作符。 若 A 为 false,则返回 A,否则返回 B。 | (A and B) 为 false。 |
| or | 逻辑或操作符。 若 A 为 true,则返回 A,否则返回 B。 | (A or B) 为 true。 |
| not | 逻辑非操作符。与逻辑运算结果相反,如果条件为 true,逻辑非为 false。 | not(A and B) 为 true。 |
定义打印数组函数当参数为nil时打印错误信息
-- 定义打印数组函数当参数为nil时打印错误信息
function printArr(arr)if(not arr) -- 判断数组是否为nilthenprint('添加条件判断、数组不能为空!')return nilendfor index,value in ipairs(arr)doprint(value)end
end
7.学习OpenResty
官方网站: https://openresty.org/cn/
OpenResty 是一个基于 Nginx的高性能 Web 平台,用于方便地搭建能够处理超高并发、扩展性极高的动态 Web 应用、Web 服务和动态网关。
具备下列特点:
1.具备Nginx的完整功能
2.基于Lua语言进行扩展,集成了大量精良的 Lua 库、第三方模块
3.允许使用Lua自定义业务逻辑、自定义库
7.1. 安装OpenResty
Ubuntu18.04.6安装OpenResty
# 1.切换为root
sudo su root# 2.安装PCRE
sudo apt -y install libpcre3-dev# 3.安装OpenSSL:
sudo apt -y install openssl
sudo apt-get -y install libssl-dev# 4.安装zlib:
sudo apt-get -y install ruby
sudo apt-get -y install zlib1g
sudo apt-get -y install zlib1g.dev# 5.下载openResty包
wget https://openresty.org/download/openresty-1.25.3.2.tar.gz# 6.解压
tar -zxvf openresty-1.25.3.2.tar.gz# 7.进入openresty目录
cd openresty-1.25.3.2# 8.创建Nginx用户、组
sudo groupadd nginx
sudo useradd -r -g nginx -s /sbin/nologin -c "Nginx web server" nginx# 9.指定Nginx组、用户、安装目录(注意:执行此命令时需确认nginx组及nginx用户必须已存在)
./configure --user=nginx --group=nginx --prefix=/usr/local/openresty# 10.编译
make# 11.编译安装
make install# 12.配置环境变量并刷新配置
vim /etc/profile# 追加环境变量值
export NGINX_HOME=/usr/local/openresty/nginx
export PATH=${NGINX_HOME}/sbin:$PATH# 刷新配置文件
source /etc/profile# 13.安装好后可去/usr/local/openresty目录下查看安装的openResty
7.1.1.调整nginx.conf
Nginx安装后nginx.conf文件有很多注释内容,使用如下内容替换原配置将剔除掉注释内容;
文件位置:/usr/local/openresty/nginx/conf/nginx.conf
#user nobody;
worker_processes 1;
error_log logs/error.log;events {
worker_connections 1024;
}http {
include mime.types;
default_type application/octet-stream;
sendfile on;
keepalive_timeout 65;server {
listen 8081;
server_name localhost;
location / {
root html;
index index.html index.htm;
}
error_page 500 502 503 504 /50x.html;
location = /50x.html {
root html;
}
}
}
7.1.2.启动Nginx并访问
# 启动Nginx(已配置环境变量直接使用nginx)
nginx
访问地址: http://yourIP:8081/
7.2.OpenResty初体验
使用OpenResty实现商品详情页查询,在OpenResty中接收这个请求,并返回一段商品假数据;
1.修改OpenResty的nginx.conf文件,在http下面添加对OpenResty的Lua模块的加载
# 加载lua 模块
lua_package_path "/usr/local/openresty/lualib/?.lua;;";
# 加载c模块
lua_package_cpath "/usr/local/openresty/lualib/?.so;;";
2.在nginx.conf的server下面,添加对/api/item这个路径的监听
location /api/item {
# 响应类型,这里返回 json
default_type application/json;
# 响应数据由 lua/item.lua这个文件来决定(lua/item.lua默认在nginx目录中查找) content_by_lua_file lua/item.lua;
}
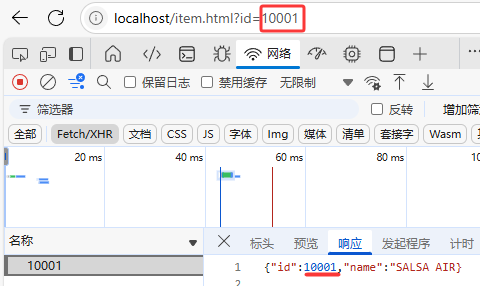
3.在/usr/local/openresty/nginx/lua/item.lua编写模拟数据返回给前端调用处
ngx.say('{"id":10001,"name":"SALSA AIR}')
如图:
4.重启nginx
nginx -s reload
5.重启nginx前此路径不存在响应404
6.重启nginx后(该值为我们在opneResty中定义的lua脚本信息返回)


修改后的nginx.conf供参考
#user nobody;
worker_processes 1;
error_log logs/error.log;events {
worker_connections 1024;
}http {
include mime.types;
default_type application/octet-stream;
sendfile on;
keepalive_timeout 65;
# 加载lua 模块
lua_package_path "/usr/local/openresty/lualib/?.lua;;";
# 加载c模块
lua_package_cpath "/usr/local/openresty/lualib/?.so;;";server {
listen 8081;
server_name localhost;
location / {
root html;
index index.html index.htm;
}
location /api/item {
# 响应类型,这里返回json
default_type application/json;
# 响应数据由 lua/item.lua这个文件来决定(lua/item.lua默认在nginx目录下查找)
content_by_lua_file lua/item.lua;
}
error_page 500 502 503 504 /50x.html;
location = /50x.html {
root html;
}
}
}
7.3.OpenResty获取请求参数
如上入门案例使用openResty读取自定义item.lua脚本向调用处返回了我们自定义的数据。后续生产中往往是需要读取用户请求的参数针对不同参数返回不同的数据结果;
OpenResty提供了各种API用来获取不同类型的请求参数:
| 参数格式 | 参数示例 | 参数解析代码示例 | 获取参数方式 |
| 路径占位符 | /item/1001 | # 1.正则表达式匹配: location ~ /item/(\d+) { content_by_lua_file lua/item.lua; } | 匹配到的参数会存入ngx.var数组中,可以用角标获取 local id = ngx.var[1] |
| 请求头 | id:1001 | -- 获取请求头,返回值是table类型 local headers = ngx.req.get_headers() | 使用lua语法读取table类型数据(详见节点6.2) |
| Get请求参数 | ?id=1001 | -- 获取GET请求参数,返回值是table类型 local getParams = ngx.req.get_uri_args() | 使用lua语法读取table类型数据 (详见节点6.2) |
| Post表单参数 | id=1001 | -- 读取请求体 ngx.req.read_body() -- 获取POST表单参数,返回值是table类型 local postParams = ngx.req.get_post_args() | 使用lua语法读取table类型数据 (详见节点6.2) |
| JSON参数 | {"id": 1001} | -- 读取请求体 ngx.req.read_body() -- 获取body中的json参数,返回值是string类型 local jsonBody = ngx.req.get_body_data() | 使用lua语法读取table类型数据 (详见节点6.2) |
7.3.1.获取参数并动态返回初体验
使用“路径占位符”方式获取查询参数并动态返回;
1.修改nginx.conf
#user nobody;
worker_processes 1;
error_log logs/error.log;
events {
worker_connections 1024;
}
http {
include mime.types;
default_type application/octet-stream;
sendfile on;
keepalive_timeout 65;
# 加载lua 模块
lua_package_path "/usr/local/openresty/lualib/?.lua;;";
# 加载c模块
lua_package_cpath "/usr/local/openresty/lualib/?.so;;";
server {
listen 8081;
server_name localhost;
location / {
root html;
index index.html index.htm;
}
# 使用正则匹配/api/item/...的参数值(注意location后面的~前后有空格)
location ~ /api/item/(\d+) {
# 响应类型,这里返回json
default_type application/json;
# 响应数据由 lua/item.lua这个文件来决定(lua/item.lua默认在nginx目录下查找)
content_by_lua_file lua/item.lua;
}
error_page 500 502 503 504 /50x.html;
location = /50x.html {
root html;
}
}
}
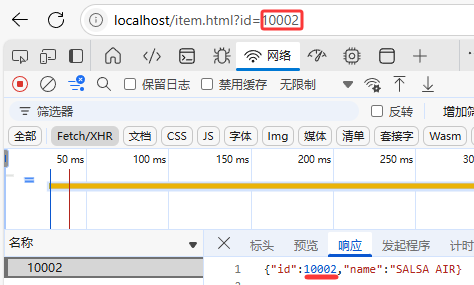
2.修改item.lua脚本
-- 获取正则匹配到的第一个参数值
local id = ngx.var[1]
-- 动态拼接id(Lua语法“..”代表拼接)
ngx.say('{"id":'..id..',"name":"SALSA AIR}')
3.重启nginx
nginx -s reload
4.实现效果
7.4.OpenResty查询Tomcat服务器数据
多级缓存方案流程一台Nginx将请求反向代理到Nginx业务集群(OpenResty),OpenResty先查询Redis中是否有数据,Redis未命中则发送http请求访问Tomcat服务器中的业务数据(此处先实现使用OpenResty向Tomcat发送请求获取数据。后面再实现使用OpenResty向Redis获取数据);
案例:
获取请求路径中的商品id信息,根据id向Tomcat查询商品信息;
实现步骤:
这里要修改item.lua,满足下面的需求:
1.获取请求参数中的id;
2.根据id向Tomcat服务发送请求,查询商品信息;
3.根据id向Tomcat服务发送请求,查询库存信息;
4.组装商品信息、库存信息,序列化为JSON格式并返回;
Nginx内部发送Http请求
nginx提供了内部API用以发送http请求:
GET请求格式:
local resp = ngx.location.capture("/item",{
method = ngx.HTTP_GET, -- 请求方式
args = {a=1,b=2}, -- get方式传参数
})
POST请求格式:
local resp = ngx.location.capture("/item",{
method = ngx.HTTP_POST, -- 请求方式
body = "c=3&d=4", -- post方式传参数
})
返回的响应内容包括:
resp.status:响应状态码;
resp.header:响应头,是一个table;
resp.body:响应体,就是响应数据;
特别注意:
这里的/item是路径,并不包含IP和端口(所以Nginx也不知道把这个请求发往哪里)这个请求会被nginx内部的server监听。我们希望监听到/item请求时将这个请求发送到Tomcat服务器所以需要编写一个server用来监听/item。当监听到/item有请求时通过反向代理将请求代理到Tomcat服务器。

7.4.1.编写server监听/item路径
# 监听/item路径,Nginx发送Http请求通过此路径时将请求代理到Tomcat服务器
location /item {
# 这里是windows电脑的ip和Java服务端口,需要确保windows防火墙处于关闭状态
proxy_pass http://192.168.3.36:8081;
}
7.4.2.封装Http查询的函数
我们可以把http查询的请求封装为一个函数,放到OpenResty函数库中,方便后期使用。
1.在/usr/local/openresty/lualib目录下创建common.lua文件
vim /usr/local/openresty/lualib/common.lua
2.在common.lua中封装http查询的函数(这里只封装GET请求)
-- 封装函数,发送http请求,并解析响应
local function read_http(path, params) -- 定义函数名为read_http 参数为 path、paramslocal resp = ngx.location.capture(path,{ -- 发送Http请求method = ngx.HTTP_GET, -- 请求方式GETargs = params, -- 参数})if not resp then -- 判断请求响应是否为空(resp为nil 或 false)-- 为空 记录nginx日志,返回404ngx.log(ngx.ERR, "http not found, path: ", path , ", args: ", args)ngx.exit(404) -- 状态码404endreturn resp.body -- 返回错误信息
end-- 将方法导出
local _M = { read_http = read_http
}
return _M
3.修改item.lua文件使用上面封装好的Http函数查询数据
编辑/usr/local/openresty/nginx/lua/item.lua脚本让其通过Http向Tomcat发送请求查询数据;
-- 引入上面自定义工具模块,不用写工具模块后缀(因为common.lua是放在/usr/local/openresty/lualib目录下的所以该工具模块不用写全路径,默认在lualib目录中找)
local common = require("common")-- 获取自定义的Http工具类中的read_http函数
local read_http = common.read_http-- 获取路径参数
local id = ngx.var[1] -- 形如:http://localhost:8081/item/10001 的请求路径 获取到的参数为10001-- lua脚本中字符串拼接使用"..",当id为10001时 如下"/item/".. id 拼接出来的路径为/item/10001。因为参数在uri中,所以read_http函数第二个参数无需传值,传nil用于占位。根据id查询库存亦是如此-- 根据id查询商品
local itemJSON = read_http("/item/".. id, nil)-- 根据id查询商品库存
local itemStockJSON = read_http("/item/stock/".. id, nil)
4.学习OpenResty的cjson模块用于序列反序列化JSON数据
OpenResty的cjson模块序列化反序列化Demo
-- 1.引入cjson模块
local cjson = require "cjson"-- 数据准备(Lua table类型)
local obj = {name = 'jack',age = 21
}
-- 2.将Lua table类型序列化为JSON
local json = cjson.encode(obj)-- 数据准备(Lua JSON字符串)
local json = '{"name": "jack", "age": 21}'
-- 3.将Lua JSON字符串反序列化table类型
local obj = cjson.decode(json);
print(obj.name)
5.引入OpenResty的cjson模块用于序列反序列化JSON数据
如上查询到的商品、库存是JSON数据我们需要将两部分数据组装,在Lua中我们无法直接对JSON数据进行操作设值,需要用到OpenResty的JSON处理函数库cjson;
修改item.lua脚本将查询到的商品和库存信息拼接在一起
-- 引入上面自定义工具模块,不用写工具模块后缀(因为common.lua是放在/usr/local/openresty/lualib目录下的所以该工具模块不用写全路径,默认在lualib目录中>找)
local common = require("common")-- 引入cjson模块(OpenResty自带模块,直接引入即可)
local cjson = require("cjson")-- 获取自定义的Http工具类中的read_http函数
local read_http = common.read_http-- 获取路径参数
local id = ngx.var[1] -- 形如:http://localhost:8081/item/10001 的请求路径 获取到的参数为10001-- lua脚本中字符串拼接使用"..",当id为10001时 如下"/item/".. id 拼接出来的路径为/item/10001。因为参数在uri中,所以read_http函数第二个参数无需传值,传nil用于占位。根据id查询库存亦是如此-- 根据id查询商品
local itemJSON = read_http("/item/".. id, nil)-- 根据id查询商品库存
local itemStockJSON = read_http("/item/stock/".. id, nil)-- 反序列化商品数据(将商品itemJSON数据反序列化为Lua table类型)
local item = cjson.decode(itemJSON)-- 反序列化库存数据(将库存itemStockJSON数据反序列化为Lua table类型)
local stock = cjson.decode(itemStockJSON)-- 将查询到的库存数据设置到item商品数据中
item.stock = stock.stock
item.sold = stock.sold-- 将Lua table类型item商品序列化为JSON对象 并返回
ngx.say(cjson.encode(item))
6.重启Nginx
nginx -s relaod
7.5.本章配置供参考(已跑通)
1./usr/local/openresty/lualib/common.lua
-- 封装函数,发送http请求,并解析响应
local function read_http(path, params) -- 定义函数名为read_http 参数为 path、paramslocal resp = ngx.location.capture(path,{ -- 发送Http请求method = ngx.HTTP_GET, -- 请求方式GETargs = params, -- 参数})if not resp then -- 判断请求响应是否为空(resp为nil 或 false)-- 为空 记录nginx日志,返回404ngx.log(ngx.ERR, "http not found, path: ", path , ", args: ", args)ngx.exit(404) -- 状态码404endreturn resp.body -- 返回错误信息
end-- 将方法导出
local _M = {read_http = read_http
}
return _M
2./usr/local/openresty/nginx/conf/nginx.conf
#user  nobody;
worker_processes  1;
error_log  logs/error.log;events {worker_connections  1024;
}http {include       mime.types;default_type  application/octet-stream;sendfile        on;keepalive_timeout  65;# 加载lua 模块lua_package_path "/usr/local/openresty/lualib/?.lua;;";# 加载c模块lua_package_cpath "/usr/local/openresty/lualib/?.so;;";server {listen       8081;server_name  localhost;location / {root   html;index  index.html index.htm;}# 使用正则匹配/api/item/...的参数值(注意location后面的~前后有空格)location ~ /api/item/(\d+) {# 响应类型,这里返回jsondefault_type application/json;# 响应数据由 lua/item.lua这个文件来决定(lua/item.lua默认在nginx目录下查找)content_by_lua_file lua/item.lua;}# 监听/item路径,Nginx发送Http请求通过此路径时将请求代理到Tomcat服务器location /item {# 这里是windows电脑的ip和Java服务端口,需要确保windows防火墙处于关闭状态proxy_pass http://192.168.3.36:8081; }error_page   500 502 503 504  /50x.html;location = /50x.html {root   html;}}
}
3./usr/local/openresty/nginx/lua/item.lua
-- 引入上面自定义工具模块,不用写工具模块后缀(因为common.lua是放在/usr/local/openresty/lualib目录下的所以该工具模块不用写全路径,默认在lualib目录中找)
local common = require("common")-- 引入cjson模块(OpenResty自带模块,直接引入即可)
local cjson = require("cjson")-- 获取自定义的Http工具类中的read_http函数
local read_http = common.read_http-- 获取路径参数
local id = ngx.var[1] -- 形如:http://localhost:8081/item/10001 的请求路径 获取到的参数为10001-- lua脚本中字符串拼接使用"..",当id为10001时 如下"/item/".. id 拼接出来的路径为/item/10001。因为参数在uri中,所以read_http函数第二个参数无需传值,传nil用于占位。根据id查询库存亦是如此-- 根据id查询商品
local itemJSON = read_http("/item/".. id, nil)-- 根据id查询商品库存
local itemStockJSON = read_http("/item/stock/".. id, nil)-- 反序列化商品数据(将商品itemJSON数据反序列化为Lua table类型)
local item = cjson.decode(itemJSON)-- 反序列化库存数据(将库存itemStockJSON数据反序列化为Lua table类型)
local stock = cjson.decode(itemStockJSON)-- 将查询到的库存数据设置到item商品数据中
item.stock = stock.stock
item.sold = stock.sold-- 将Lua table类型item商品序列化为JSON对象 并返回
ngx.say(cjson.encode(item))
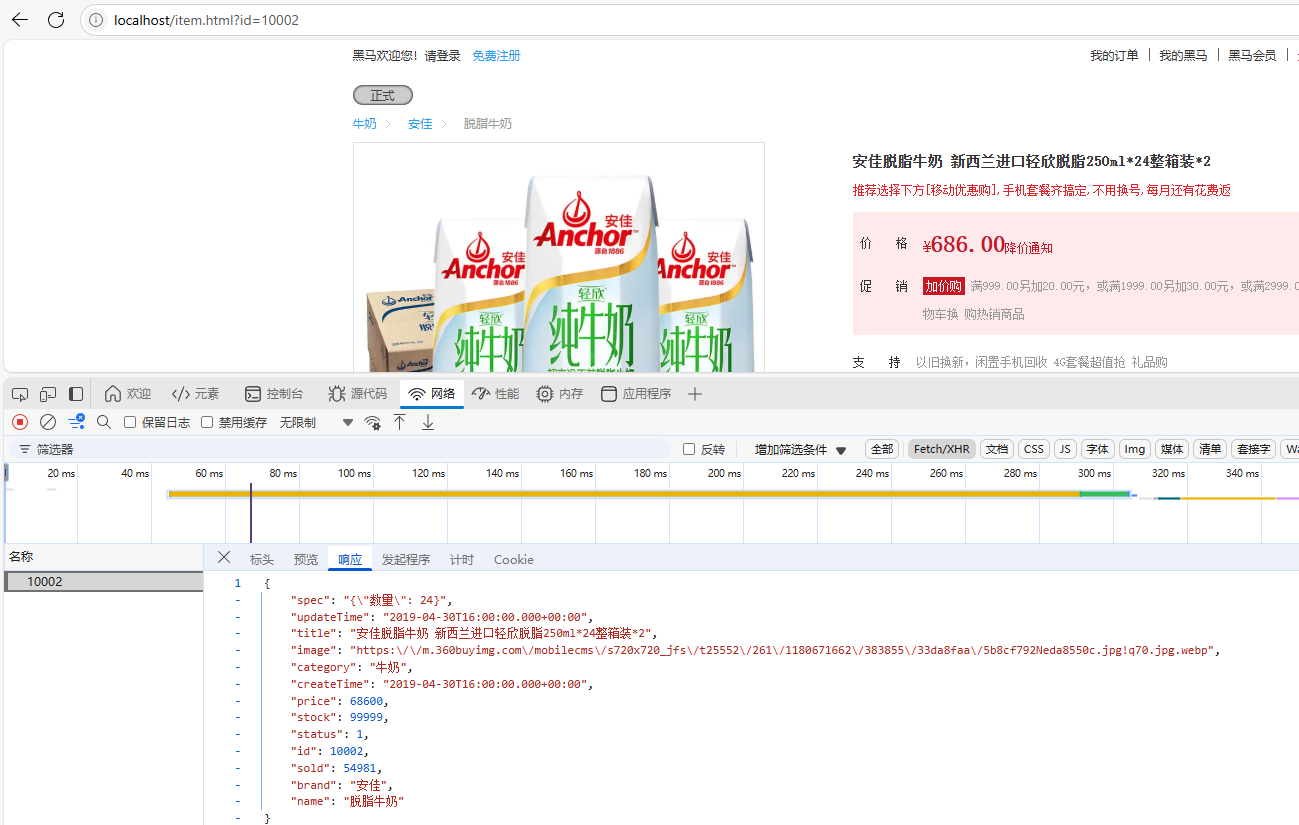
7.6.测试截止目前为止已实现效果
1.访问不同的商品ID,OpenResty发送http请求到Tomcat拿取不同的商品数据。
2.第一次访问商品ID时会重数据库中查询商品信息返回给调用处。第二次携带相同商品ID访问会重Java进程中获取缓存数据不会重数据库中查询数据。
3.通过OpenResty发送http请求到Tomcat,OpenResty的item.lua脚本自动将商品和库存信息组装在一起。
1.启动工程Java工程端口8081
2.启动反向代理Nginx
3.启动OpenResty下的Nginx
4.访问商品
4.1.第一次访问商品ID为10001数据
4.2.清空Java后台第二次访问商品ID为10001数据
4.3.换个商品第一次访问商品ID为10002数据
4.4.清空Java后台第二次访问商品ID为10002数据


8.OpenResty中Nginx根据商品ID对Tomcat业务集群实现负载均衡
为什么要负载均衡?
生产环境中为了业务本身的健壮性,吞吐量需要对Tomcat业务实现集群进行负载均衡;
为什么需要根据商品ID对Tomcat业务集群实现负载均衡?
在前面我们已经实现了对商品、库存数据进行JVM进程缓存。此时会有一些问题。多台Tomcat服务器间的进程缓存没有办法共享,假如Tomcat业务集群数量有100台默认采取轮询的方式进行负载均衡,当第1次访问id为10001的商品时访问的是第1台Tomcat服务器并在上面建立JVM进程缓存,第2次访问id为10001的商品时访问的是第2台Tomcat服务器并在上面建立JVM进程缓存。当第100次访问id为10001的商品时,前面100台Tomcat服务器都会建立相同的JVM缓存.这样缓存非常冗余和没有必要的,浪费内存空间。我们希望当访问id为10001时Nginx把请求分发到第1台Tomcat服务器上去并建立进程缓存,后面访问N次id为10001的商品Nginx仍然把请求分发到第1台Tomcat服务器上去访问第1台Tomcat服务器上的进程缓存,这样可以不用重复对不同的服务器建立相同的缓存。
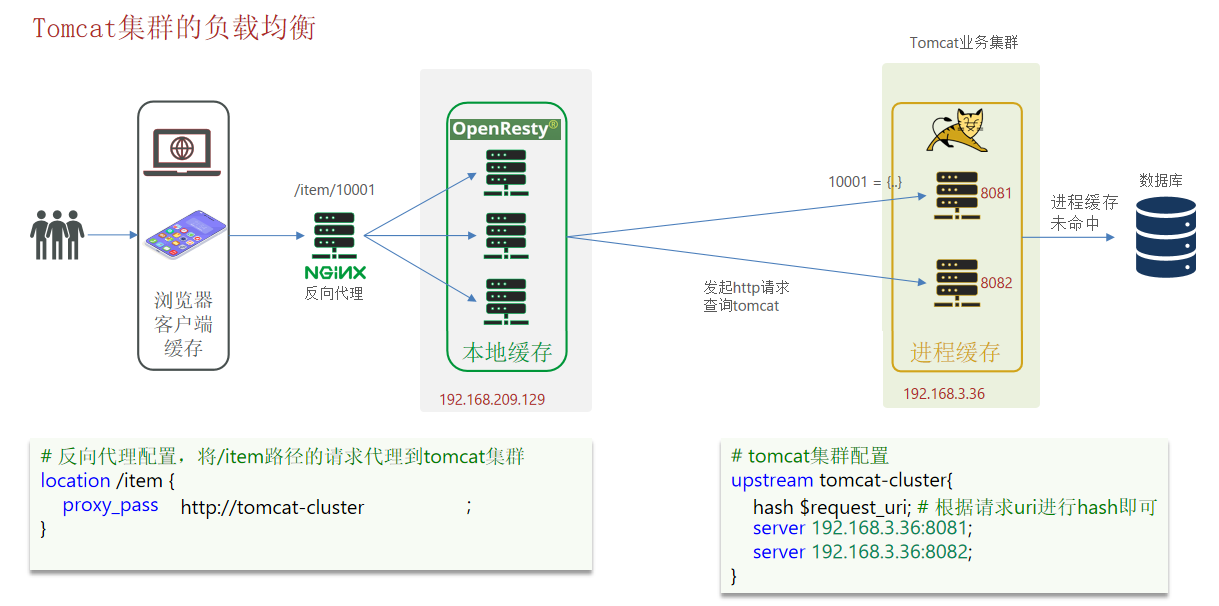
8.1.实现流程
1.修改OpenResty下Nginx配置文件
#user nobody;
worker_processes 1;
error_log logs/error.log;
events {
worker_connections 1024;
}
http {
include mime.types;
default_type application/octet-stream;
sendfile on;
keepalive_timeout 65;
# 加载lua 模块
lua_package_path "/usr/local/openresty/lualib/?.lua;;";
# 加载c模块
lua_package_cpath "/usr/local/openresty/lualib/?.so;;";
# 添加Tomcat业务集群,采用hash算法对uri进行负载均衡
upstream tomcat-cluster{
hash $request_uri;
server 192.168.3.36:8081;
server 192.168.3.36:8082;
}
server {
listen 8081;
server_name localhost;
location / {
root html;
index index.html index.htm;
}
# 使用正则匹配/api/item/...的参数值(注意location后面的~前后有空格)
location ~ /api/item/(\d+) {
# 响应类型,这里返回json
default_type application/json;
# 响应数据由 lua/item.lua这个文件来决定(lua/item.lua默认在nginx目录下查找)
content_by_lua_file lua/item.lua;
}
# 监听/item路径,Nginx发送Http请求通过此路径时将请求代理到Tomcat服务器
location /item {
# 这里是windows电脑的ip和Java服务端口,需要确保windows防火墙处于关闭状态
proxy_pass http://tomcat-cluster;
}
error_page 500 502 503 504 /50x.html;
location = /50x.html {
root html;
}
}
}
2.重启Nginx
nginx -s reload
3.开启8081 8082两个端口的业务工程
相同工程开启多个端口
https://blog.csdn.net/qq_64734490/article/details/144052589
4.启动8081 8082两个工程


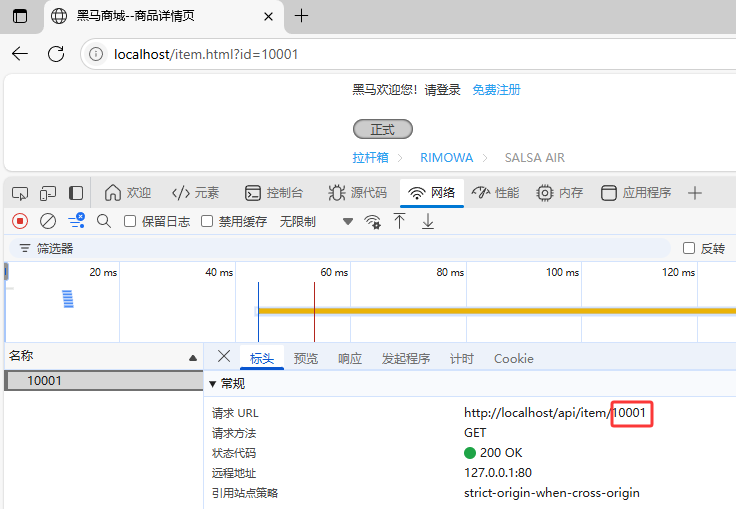
8.2.测试根据商品ID实现对Tomcat业务集群负载均衡
1.1.访问id为10001的商品
1.2.清空8082服务器上日志再次访问
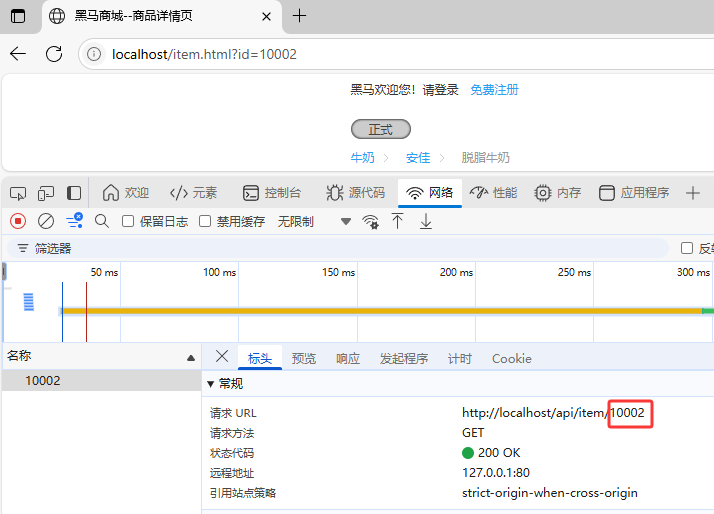
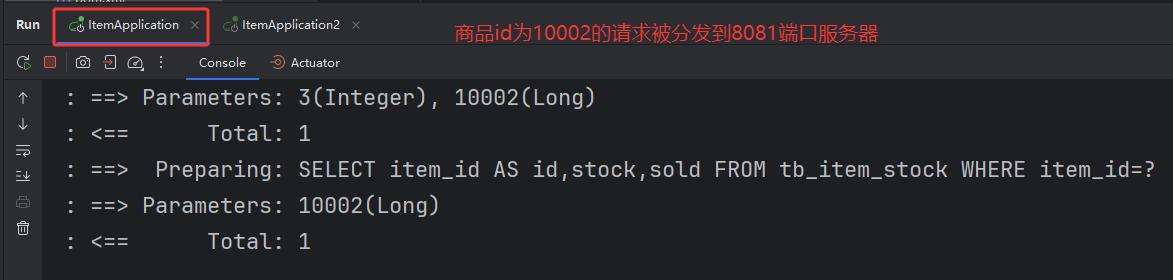
2.1.访问id为10002的商品
2.2.清空8081服务器上日志再次访问


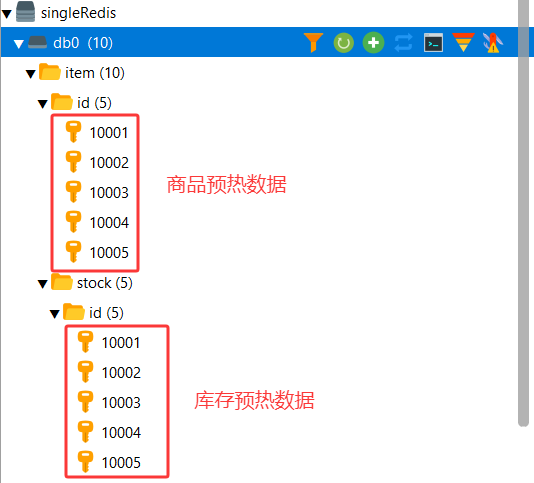
9.Redis缓存预热
冷启动与缓存预热
冷启动:
服务刚刚启动时,Redis中并没有缓存,如果所有商品数据都在第一次查询时添加缓存,可能会给数据库带来较大压力。
缓存预热:
在实际开发中,我们可以利用大数据统计用户访问的热点数据,在项目启动时将这些热点数据提前查询并保存到Redis中。
在学习阶段我们数据较少,在启动时将所有数据放入Redis中。
实现流程
1.导入依赖
<!-- Redis依赖 -->
<dependency><groupId>org.springframework.boot</groupId><artifactId>spring-boot-starter-data-redis</artifactId>
</dependency><!-- Hutool依赖 -->
<dependency><groupId>cn.hutool</groupId><artifactId>hutool-all</artifactId><version>5.8.26</version>
</dependency>
2.修改application.yml文件
spring:redis:host: 192.168.209.129port: 6379password: 123456database: 03.业务工程添加缓存预热代码
由于学习阶段数据较少,我们将所有商品和库存数据都放在Redis中。
import cn.hutool.json.JSONUtil;
import com.heima.item.pojo.Item;
import com.heima.item.pojo.ItemStock;
import com.heima.item.service.IItemStockService;
import com.heima.item.service.impl.ItemService;
import org.springframework.beans.factory.annotation.Autowired;
import org.springframework.data.redis.core.StringRedisTemplate;
import org.springframework.stereotype.Component;
import javax.annotation.PostConstruct;
import java.util.List;
/*** 缓存预热*/
@Component
public class RedisInitData {@Autowiredprivate ItemService itemService;@Autowiredprivate IItemStockService itemStockService;@Autowiredprivate StringRedisTemplate redisTemplate;/*** 初始化 商品、库存数据到缓存*/@PostConstructpublic void initItemAndStock(){// 查询所有商品数据List<Item> itemList = itemService.list();// 查询所有库存数据List<ItemStock> itemStockList = itemStockService.list();// 商品数据预热写入Redisfor (Item item : itemList) {redisTemplate.opsForValue().set("item:id:" + item.getId(), JSONUtil.toJsonPrettyStr(item));}// 库存数据预热写入Redisfor (ItemStock stock : itemStockList) {redisTemplate.opsForValue().set("item:stock:id:" + stock.getId(), JSONUtil.toJsonPrettyStr(stock));}}
}
4.启动业务工程 商品 库存数据均已写入到Redis
10.OpenResty实现先查询缓存若未命中则查询Tomcat服务器数据
10.1.OpenResty连接操作Redis
OpenResty提供了操作Redis的模块,我们只要引入该模块就能操作Redis;
调整自定义的公共common.lua脚本在其中封装如下功能
1.导入Redis模块添加连接Redis代码
-- 引入Redis模块(resty是指在openresty安装目录下的lualib目录下的resty目录。redis是指在resty目录下的redis.lua文件)
local redis = require("resty.redis")
-- 初始化Redis对象
local red = redis:new()
-- 设置Redis超时时间(形参分别为:建立连接超时时间	发送请求超时时间	响应结果超时时间) 单位都为毫秒
red:set_timeouts(1000, 1000, 1000)
2.释放Redis连接
-- 关闭redis连接的工具方法,其实是放入连接池(封装Redis操作完成后将Redis连接放入连接池方法)
local function close_redis(red)local pool_max_idle_time = 10000 -- 连接的空闲时间,单位是毫秒  local pool_size = 100 --连接池大小  local ok, err = red:set_keepalive(pool_max_idle_time, pool_size)if not ok thenngx.log(ngx.ERR, "放入Redis连接池失败: ",err)end
end
3.向Redis发送请求查询Redis数据代码
-- 查询redis的方法 ip和port是redis地址,key是查询的key(该函数只封装仅支持Redis Value为字符串类型的数据)
local function read_redis(ip, port,password, key)-- 获取一个连接(返回两个参数ok,err;ok代表Redis连接是否建立成功,err表示错误信息)local ok, err = red:connect(ip, port) if not ok then -- ok 返回为nil(Lua语法中nil代表false) 建立连接失败ngx.log(ngx.ERR, "连接redis失败 : ", err)return nilend-- 指定Redis密码local res, err = red:auth(password)if not res thenngx.log(ngx.ERR, "连接redis失败 密码错误!: ", err)return nilend-- 查询redis(该函数只封装仅支持Redis Value为字符串类型的数据)local resp, err = red:get(key) -- 指定key获取查询数据-- 查询失败处理if not resp then -- 响应nil(记录日志)ngx.log(ngx.ERR, "查询Redis失败: ", err, ", key = " , key)end--得到的数据为空处理(即通过Key未查询到缓存中数据[缓存数据不存在])if resp == ngx.null thenresp = nilngx.log(ngx.ERR,"查询Redis数据为空, key = ",key)endclose_redis(red) -- 将Redis连接放入连接池中return resp -- 返回结果
end
4.对外暴露封装好的查询缓存数据方法read_redis
-- 将方法导出
local _M = { read_http = read_http, -- 对外暴露发送http请求方法read_redis = read_redis -- 对外暴露连接Redis查询数据方法
}
return _M
完整common.lua脚本内容(供参考)
-- 引入Redis模块(resty是指在openresty安装目录下的lualib目录下的resty目录。redis是指在resty目录下的redis.lua文件)
local redis = require("resty.redis")
-- 初始化Redis对象
local red = redis:new()
-- 设置Redis超时时间(形参分别为:建立连接超时时间	发送请求超时时间	响应结果超时时间) 单位都为毫秒
red:set_timeouts(1000, 1000, 1000)-- 关闭redis连接的工具方法,其实是放入连接池(封装Redis操作完成后将Redis连接放入连接池方法)
local function close_redis(red)local pool_max_idle_time = 10000 -- 连接的空闲时间,单位是毫秒  local pool_size = 100 --连接池大小  local ok, err = red:set_keepalive(pool_max_idle_time, pool_size)if not ok thenngx.log(ngx.ERR, "放入Redis连接池失败: ",err)end
end-- 查询redis的方法 ip和port是redis地址,key是查询的key(该函数只封装仅支持Redis Value为字符串类型的数据)
local function read_redis(ip, port,password, key)-- 获取一个连接(返回两个参数ok,err;ok代表Redis连接是否建立成功,err表示错误信息)local ok, err = red:connect(ip, port) if not ok then -- ok 返回为nil(Lua语法中nil代表false) 建立连接失败ngx.log(ngx.ERR, "连接redis失败 : ", err)return nilend-- 指定Redis密码local res, err = red:auth(password)if not res thenngx.log(ngx.ERR, "连接redis失败 密码错误!: ", err)return nilend-- 查询redis(该函数只封装仅支持Redis Value为字符串类型的数据)local resp, err = red:get(key) -- 指定key获取查询数据-- 查询失败处理if not resp then -- 响应nil(记录日志)ngx.log(ngx.ERR, "查询Redis失败: ", err, ", key = " , key)end--得到的数据为空处理(即通过Key未查询到缓存中数据[缓存数据不存在])if resp == ngx.null thenresp = nilngx.log(ngx.ERR,"查询Redis数据为空, key = ",key)endclose_redis(red) -- 将Redis连接放入连接池中return resp -- 返回结果
end-- 封装函数,发送http请求,并解析响应
local function read_http(path, params) -- 定义函数名为read_http 参数为 path、paramslocal resp = ngx.location.capture(path,{ -- 发送Http请求method = ngx.HTTP_GET, -- 请求方式GETargs = params, -- 参数})if not resp then -- 判断请求响应是否为空(resp为nil 或 false)-- 为空 记录nginx日志,返回404ngx.log(ngx.ERR, "http not found, path: ", path , ", args: ", args)ngx.exit(404) -- 状态码404endreturn resp.body -- 返回错误信息
end-- 将方法导出
local _M = { read_http = read_http, -- 对外暴露发送http请求方法read_redis = read_redis -- 对外暴露连接Redis查询数据方法
}
return _M
10.2.修改item.lua
1.修改item.lua封装一个read_data函数实现先查询Redis,如果未命中再查询tomcat
-- 获取封装好的Redis工具类中的read_redis函数(item文件中前面已经引入了common.lua模块故此直接使用common对象获取read_redis方法)
local read_redis = common.read_redis-- 封装一个read_data函数实现先查询Redis,如果未命中再查询tomcat
local function read_data(key,path,params)-- 查询Redislocal resp = read_redis("192.168.209.129",6379,"123456",key)if not resp then  -- 判断Redis是否命中ngx.log(ngx.ERR,"Redis查询失败或未查询到数据,尝试发送http查询Tomcat数据,Key:",key)-- Redis查询失败或未查询到数据,发送Http查询Tomcat服务器数据resp = read_http(path,params)end    return resp
end
2.查询商品和库存时都调用read_data这个函数
-- 根据id查询商品
local itemJSON = read_data("item:id:".. id ,"/item/".. id, nil)-- 根据id查询商品库存
local itemStockJSON = read_data("item:stock:id:".. id,"/item/stock/".. id, nil)
完整item.lua脚本内容(供参考)
-- 引入上面自定义工具模块,不用写工具模块后缀(因为common.lua是放在/usr/local/openresty/lualib目录下的所以该工具模块不用写全路径,默认在lualib目录中找)
local common = require("common")
-- 引入cjson模块(OpenResty自带模块,直接引入即可)
local cjson = require("cjson")-- 获取自定义的Http工具类中的read_http函数
local read_http = common.read_http
-- 获取封装好的Redis工具类中的read_redis函数
local read_redis = common.read_redis-- 封装一个read_data函数实现先查询Redis,如果未命中再查询tomcat
local function read_data(key,path,params)-- 查询Redislocal resp = read_redis("192.168.209.129",6379,"123456",key)if not resp then  -- 判断Redis是否命中ngx.log(ngx.ERR,"Redis查询失败或未查询到数据,尝试发送http查询Tomcat数据,Key:",key)-- Redis查询失败或未查询到数据,发送Http查询Tomcat服务器数据resp = read_http(path,params)end    return resp
end-- 获取路径参数
local id = ngx.var[1] -- 形如:http://localhost:8081/item/10001 的请求路径 获取到的参数为10001-- lua脚本中字符串拼接使用"..",当id为10001时 如下"/item/".. id 拼接出来的路径为/item/10001。因为参数在uri中,所以read_http函数第二个参数无需传值,传nil用于占位。根据id查询库存亦是如此
-- 根据id查询商品
local itemJSON = read_data("item:id:".. id ,"/item/".. id, nil)-- 根据id查询商品库存
local itemStockJSON = read_data("item:stock:id:".. id,"/item/stock/".. id, nil)-- 反序列化商品数据(将商品itemJSON数据反序列化为Lua table类型)
local item = cjson.decode(itemJSON)-- 反序列化库存数据(将库存itemStockJSON数据反序列化为Lua table类型)
local stock = cjson.decode(itemStockJSON)-- 将查询到的库存数据设置到item商品数据中
item.stock = stock.stock
item.sold = stock.sold-- 将Lua table类型item商品序列化为JSON对象 并返回
ngx.say(cjson.encode(item))
10.3.测试OpenResty先查Redis缓存再查Tomcat服务器
1.前面学习缓存数据预热时已将所有的商品和库存数据写入到了缓存中
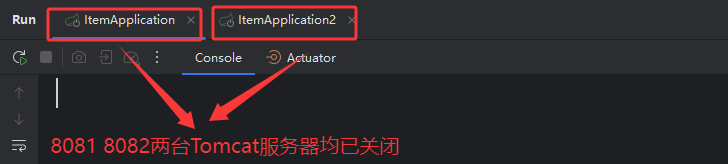
2.关闭8081 8082两台Tomcat服务器
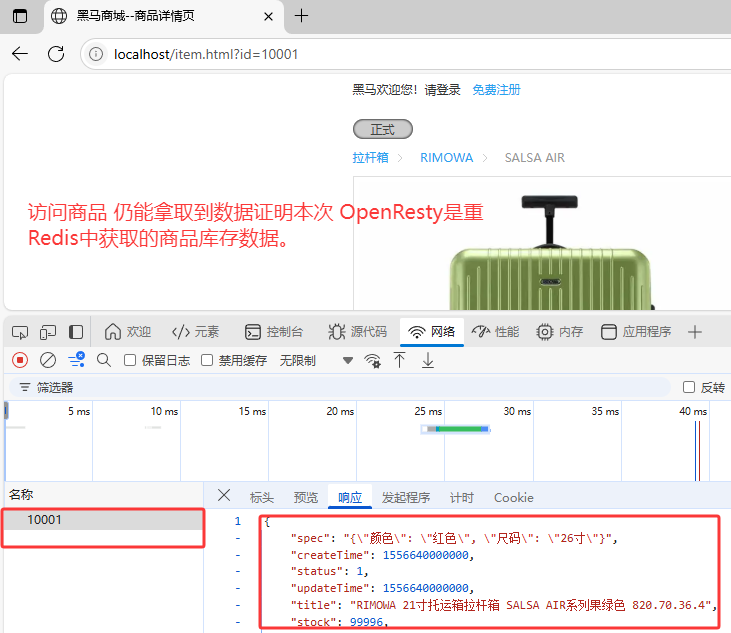
3.访问商品界面
本次是重Redis中获取的商品库存数据。
4.启动Tomcat服务器访问一个不存在的商品ID看本次是否重Tomcat服务器中查询
由前面可知Redis中存放的商品ID是重10001 ~ 10005。此时我们访问一个缓存中不存在的Key。此时这个请求会被转发到Tomcat服务器中先去进程缓存中查找再去数据库中查找。
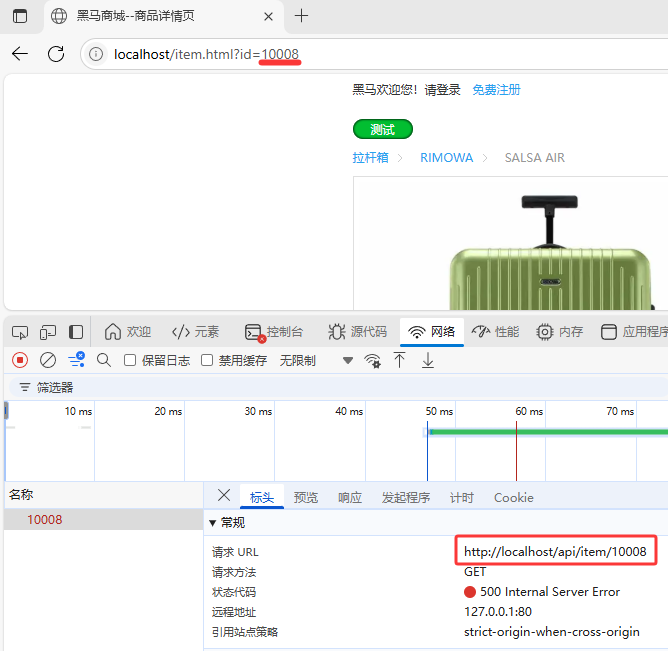
4.1.访问ID为10008的商品(该商品在Redis和数据库中都不存在)
本次请求之所以会响应500是因为在后台服务器中将查询为空的null值直接返回;并没有返回一个JSON格式的数据;
4.2.该请求被分发到Tomcat端口为8082服务器中去数据库中查询数据


11.Nginx本地缓存
1.Nginx本地缓存更适用于处理那些对时效性要求不高的数据。比如用做热点数据续期(如微博热搜);
2.Nginx本地缓存只会在同一个进程中的多个worker间共享(多个Nginx集群节点间不共享数据)若Nginx是集群为避免在集群节点上缓存相同的数据,在Nginx反向代理路由到Nginx集群时考虑根据uri进行路由。
多级缓存流程:
1.客户端访问浏览器缓存;(一级缓存_浏览器缓存)
2.客户端请求被Nginx反向代理到OpenResty集群。请求先去Nginx本地缓存中查找数据;
(二级缓存_Nginx本地缓存)
3.Nginx本地缓存未查找到数据 访问Redis去Redis中获取数据;(三级缓存_Redis)
4.Redis未命中数据则发送Http到Tomcat服务器;
5.Tomcat服务器先重JVM进程缓存中查找数据;(四级缓存_JVM进程缓存)
6.JVM进程缓存未命中数据,则重数据库中查询数据并返回;
11.1.Nginx本地缓存初体验
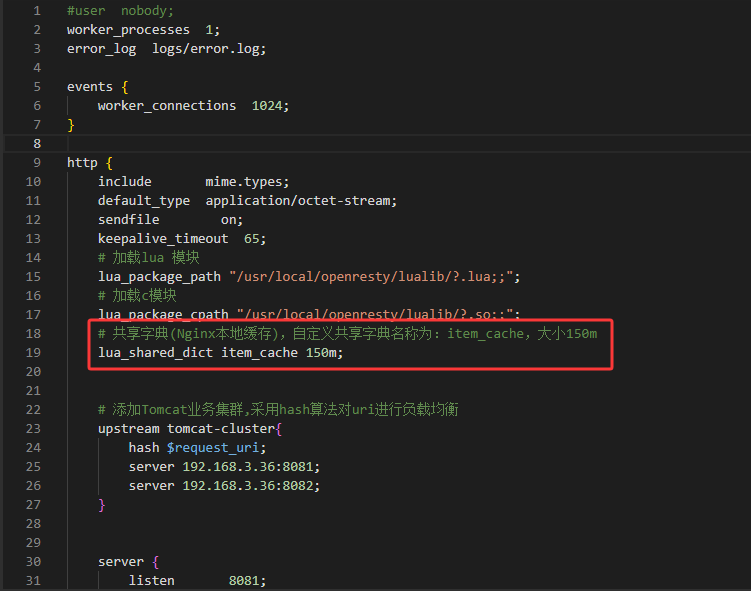
OpenResty为Nginx提供了shard dict的功能,可以在nginx的多个worker之间共享数据,实现缓存功能。
1.开启共享字典,在nginx.conf下的http中添加
# 共享字典,也就是本地缓存,自定义名称为:item_cache,大小150mlua_shared_dict item_cache 150m;2.操作共享字典
-- 获取Nginx本地缓存对象
local item_cache = ngx.shared.item_cache
-- 存储, 指定key、value、过期时间(到期自动删除Nginx本地缓存),单位s,默认为0代表永不过期
item_cache:set('key', 'value', 1000)
-- 读取
local val = item_cache:get('key')
11.2.修改item.lua中查询商品库存逻辑
由原先查询Redis未命中再查询Tomcat服务器。变更为 先查询Nginx本地缓存,Nginx本地缓存未命中则查询Redis,Redis未命中则查询Tomcat服务器;
实现需求
1.修改item.lua中的read_data函数,优先查询Nginx本地缓存,未命中时再查询Redis、Tomcat;
2.查询Redis或Tomcat成功后,将数据写入本地缓存,并设置有效期;
3.商品基本信息,有效期30分钟;
4.库存信息,有效期5秒;
特别说明:
在实际生产开发中,如遇“商品秒杀”功能对于库存数据的缓存可重这几个方面考虑;
1.对于库存数据及一些变动很快的数据 不建议对这部分数据添加Nginx本地缓存;
2.对于这部分数据若添加本地缓存,可考虑将Nginx本地缓存有效期缩短比如设置库存有
效期为5秒。比如出现如下场景,数据库中商品库存已为0,但是Nginx本地缓存未及
时同步,这时用户仍然可以通过浏览器去下单。当这个下单请求到达Tomcat服务器
时,从后台拿取出数据库中的库存 判断此次下单是否有效。若无效返回客户端"活动
火爆,请稍后再试!",此时Nginx本地缓存中的库存因为键过期重新去构建Nginx本
地缓存数据,此时库存数据已被更新为0;
演示对商品及库存添加Nginx本地缓存
1.在nginx.conf下的http中添加开启“共享字典”
# 共享字典(Nginx本地缓存),自定义共享字典名称为:item_cache,大小150mlua_shared_dict item_cache 150m;
2.修改item.lua中read_data函数实现优先查询Nginx本地缓存,未命中时再查询Redis、Tomcat;
-- 导入共享词典(Nginx本地缓存)
local item_cache = ngx.shared.item_cache-- 封装一个read_data函数实现先查询Redis,如果未命中再查询tomcat
local function read_data(key,expire,path,params)-- 读取Nginx本地缓存(item_cache为在nginx.conf中定义的"共享字典"名称)local val = item_cache:get(key)-- Nginx本地缓存未命中 查询if not val then ngx.log(ngx.ERR,'Nginx本地缓存未命中 Key:',key,",尝试Redis查询..") -- 查询Nginx本地缓存记录日志val = read_redis("192.168.209.129",6379,"123456",key)if not val then ngx.log(ngx.ERR,'Redis缓存未命中 Key:',key,",尝试Http查询..")val = read_http(path,params) -- 未处理 http查询不到的情况end    end-- 刷新Nginx本地缓存(内容 或 过期时间)item_cache:set(key,val,expire)return val
end-- 获取路径参数
local id = ngx.var[1]-- 根据id查询商品(设置Nginx本地缓存过期时间为1800秒)
local itemJSON = read_data("item:id:".. id,1800 ,"/item/".. id, nil)
-- 根据id查询商品库存(设置Nginx本地缓存过期时间为5秒)
local itemStockJSON = read_data("item:stock:id:".. id,5,"/item/stock/".. id, nil)
修改后nginx.conf文件(供参考)
#user nobody;
worker_processes 1;
error_log logs/error.log;events {
worker_connections 1024;
}http {
include mime.types;
default_type application/octet-stream;
sendfile on;
keepalive_timeout 65;
# 加载lua 模块
lua_package_path "/usr/local/openresty/lualib/?.lua;;";
# 加载c模块
lua_package_cpath "/usr/local/openresty/lualib/?.so;;";
# 共享字典(Nginx本地缓存),自定义共享字典名称为:item_cache,大小150m
lua_shared_dict item_cache 150m;
# 添加Tomcat业务集群,采用hash算法对uri进行负载均衡
upstream tomcat-cluster{
hash $request_uri;
server 192.168.3.36:8081;
server 192.168.3.36:8082;
}
server {
listen 8081;
server_name localhost;
location / {
root html;
index index.html index.htm;
}# 使用正则匹配/api/item/...的参数值(注意location后面的~前后有空格)
location ~ /api/item/(\d+) {
# 响应类型,这里返回json
default_type application/json;
# 响应数据由 lua/item.lua这个文件来决定(lua/item.lua默认在nginx目录下查找)
content_by_lua_file lua/item.lua;
}# 监听/item路径,Nginx发送Http请求通过此路径时将请求代理到Tomcat服务器
location /item {
# 这里是windows电脑的ip和Java服务端口,需要确保windows防火墙处于关闭状态
proxy_pass http://tomcat-cluster;
}
error_page 500 502 503 504 /50x.html;
location = /50x.html {
root html;
}
}
}
修改后的item.lua脚本内容(供参考)
-- 引入上面自定义工具模块,不用写工具模块后缀(因为common.lua是放在/usr/local/openresty/lualib目录下的所以该工具模块不用写全路径,默认在lualib目录中找)
local common = require("common")
-- 引入cjson模块(OpenResty自带模块,直接引入即可)
local cjson = require("cjson")
-- 获取自定义的Http工具类中的read_http函数
local read_http = common.read_http
-- 获取封装好的Redis工具类中的read_redis函数
local read_redis = common.read_redis
-- 导入共享词典(Nginx本地缓存)
local item_cache = ngx.shared.item_cache
-- 封装一个read_data函数实现先查询Redis,如果未命中再查询tomcat
local function read_data(key,expire,path,params)
-- 读取Nginx本地缓存(item_cache为在nginx.conf中定义的"共享字典"名称)
local val = item_cache:get(key)
-- Nginx本地缓存未命中 查询
if not val then
ngx.log(ngx.ERR,'Nginx本地缓存未命中 Key:',key,",尝试Redis查询..") -- 查询Nginx本地缓存记录日志
val = read_redis("192.168.209.129",6379,"123456",key)
if not val then
ngx.log(ngx.ERR,'Redis缓存未命中 Key:',key,",尝试Http查询..")
val = read_http(path,params) -- 未处理 http查询不到的情况
end
end
-- 刷新Nginx本地缓存(内容 或 过期时间)
item_cache:set(key,val,expire)
return val
end
-- 获取路径参数
local id = ngx.var[1] -- 形如:http://localhost:8081/item/10001 的请求路径 获取到的参数为10001
-- lua脚本中字符串拼接使用"..",当id为10001时 如下"/item/".. id 拼接出来的路径为/item/10001。因为参数在uri中,所以read_http函数第二个参数无需传值,传nil用于占位。根据id查询库存亦是如此
-- 根据id查询商品(设置Nginx本地缓存过期时间为1800秒)
local itemJSON = read_data("item:id:".. id,1800 ,"/item/".. id, nil)
-- 根据id查询商品库存(设置Nginx本地缓存过期时间为5秒)
local itemStockJSON = read_data("item:stock:id:".. id,5,"/item/stock/".. id, nil)
-- 反序列化商品数据(将商品itemJSON数据反序列化为Lua table类型)
local item = cjson.decode(itemJSON)
-- 反序列化库存数据(将库存itemStockJSON数据反序列化为Lua table类型)
local stock = cjson.decode(itemStockJSON)
-- 将查询到的库存数据设置到item商品数据中
item.stock = stock.stock
item.sold = stock.sold
-- 将Lua table类型item商品序列化为JSON对象 并返回
ngx.say(cjson.encode(item))
11.3.测试访问Nginx本地缓存
1.重启Nginx
nginx -s reload
2.进入nginx下的logs目录查看error.log日志输出
tail -f error.log
3.访问商品界面
由前可知Nginx的本地缓存会在第一次访问商品时建立,例如第一次访问ID为10001的商品,会重Redis中加载数据到Nginx本地缓存。当第二次访问ID为10001的商品时会重Nginx本地缓存中加载数据。
3.1.第一次访问ID为10001商品
3.2.第二次访问ID为10001商品
第二次访问,因为商品数据设置的Nginx本地缓存过期时间为30分钟,库存数据设置的Nginx本地缓存过期时间为5秒。所以在第二次访问时库存数据是重Redis中重新获取的,而商品数据是重Nginx本地缓存中获取的。


12.缓存同步
前面已实现对商品库存的多级缓存。现衍生出另外一个需要解决的问题,如何保证数据库中数据与Redis缓存中数据的一致性。比如数据库中商品库存数据变更时我希望有一个中间件能自动将数据库中变更后的数据自动同步到Redis缓存中去。
常见的缓存同步策略:
1.设置有效期:给缓存设置有效期,到期后自动删除。再次查询时更新
优势:简单、方便;
缺点:时效性差,缓存过期之前可能不一致;
场景:更新频率较低,时效性要求低的业务;
2.同步双写:在修改数据库的同时,直接修改缓存
优势:时效性强,缓存与数据库强一致;
缺点:有代码侵入,耦合度高;
场景:对一致性、时效性要求较高的缓存数据;
3.异步通知:修改数据库时发送事件通知,相关服务监听到通知后修改缓存数据
优势:低耦合,可以同时通知多个缓存服务;
缺点:时效性一般,可能存在中间不一致状态;
场景:时效性要求一般,有多个服务需要同步;
异步通知方案一:
基于MQ
异步通知方案二:
基于Canal
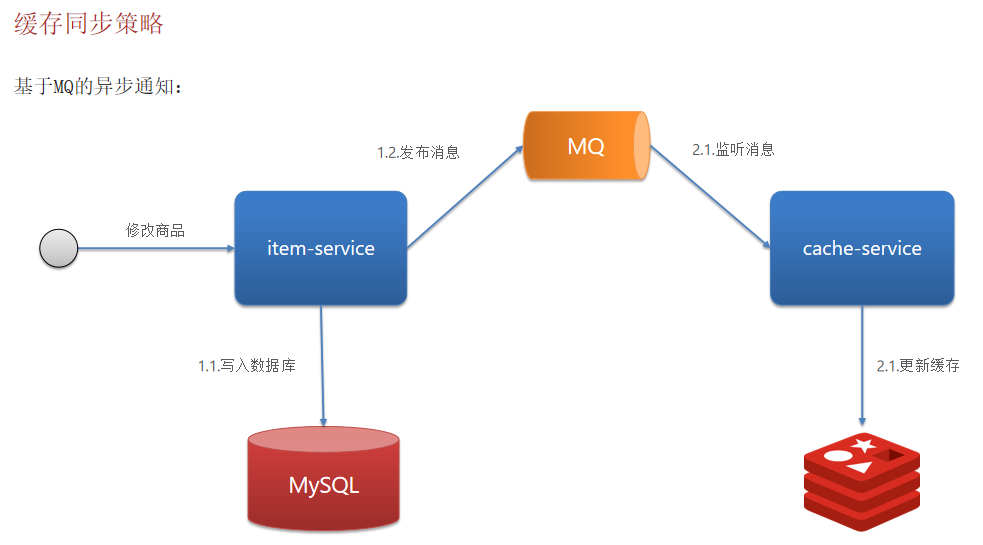
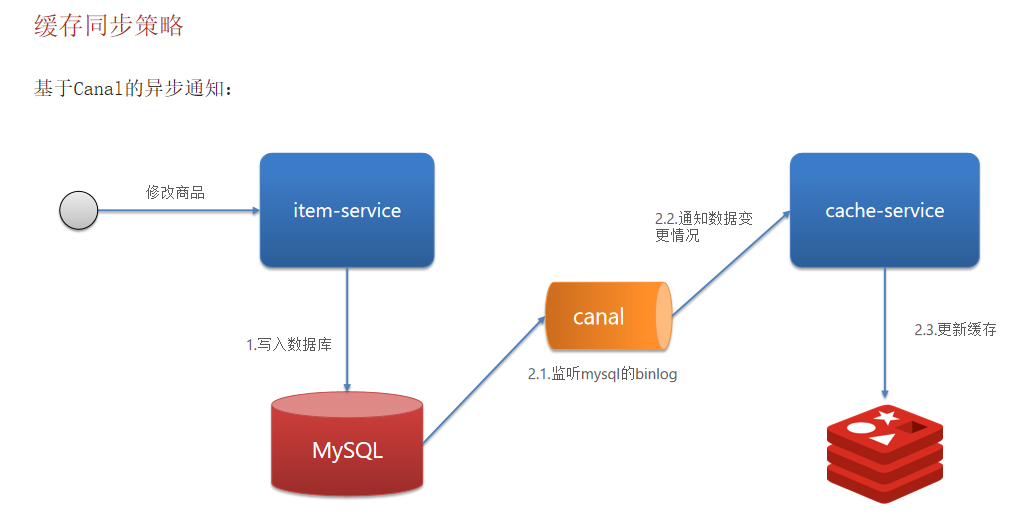
12.1.基于Canal完成数据库与缓存数据的一致性
Canal译意为水道/管道/沟渠,canal是阿里巴巴旗下的一款开源项目,基于Java开发。基于数据库增量日志解析,提供增量数据订阅&消费。Canal是基于mysql的主从同步来实现的,MySQL主从同步的原理如下:
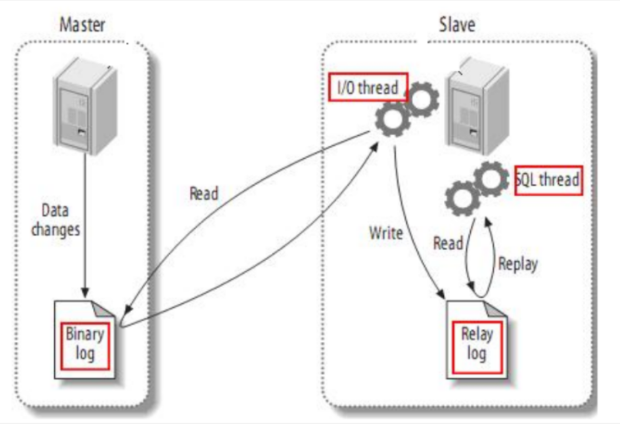
主从复制步骤:
1.将Master的binary-log日志文件打开,mysql会把所有的DDL,DML,TCL写入BinaryLog日志文件中;
2.Master会生成一个 log dump 线程,用来给从库的 i/o线程传binlog;
3.从库的i/o线程去请求主库的binlog,并将得到的binlog日志写到中继日志(relaylog)中;
4.从库的sql线程,会读取relaylog文件中的日志,并解析成具体操作,通过主从的操作一致,而达到最终数据一致而Canal的原理就是伪装成Slave从Binlog中复制SQL语句或者数据;
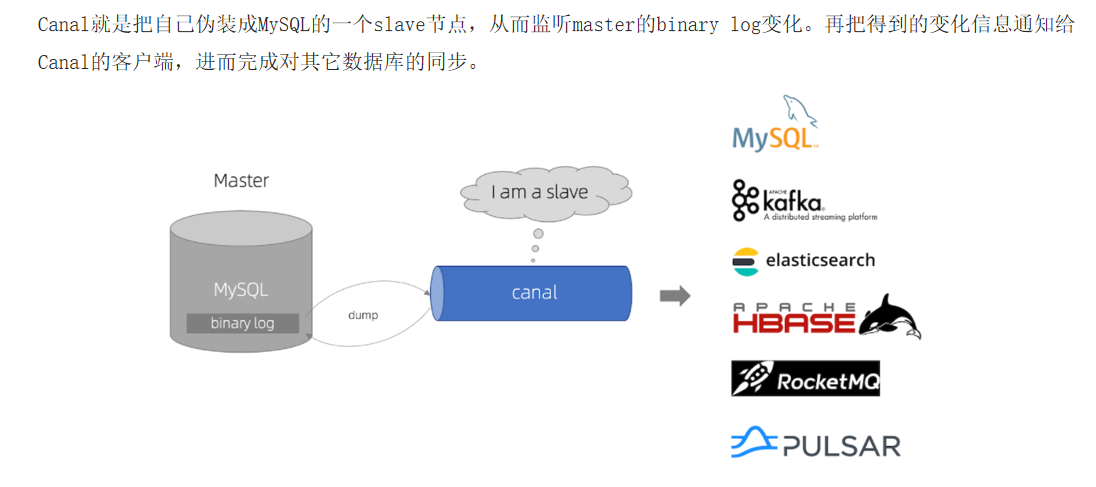
12.2.Canal实现Mysql Redis数据同步流程
Canal版本与Mysql版本有对照关系。如果使用高版本Mysql如8.0.28,Canal使用1.1.5则在Canal的日志里会出现如下警告。此时换个Canal的版本如1.1.8,Mysql仍使用8.0.28则会解决此问题;
[MultiStageCoprocessor-other-example-0] WARN com.taobao.tddl.dbsync.binlog.LogDecoder - Skipping unrecognized binlog event Unknown from: canal-mysql-bin.000001:2663
Canal下载地址
Canal下载地址![]() https://github.com/alibaba/canal/releases
https://github.com/alibaba/canal/releases
Mysql部分
1.开启Mysql主从
因为Canal是通过伪装成slave去获取Mysql主节点数据,所以第一步开启Mysql主从;
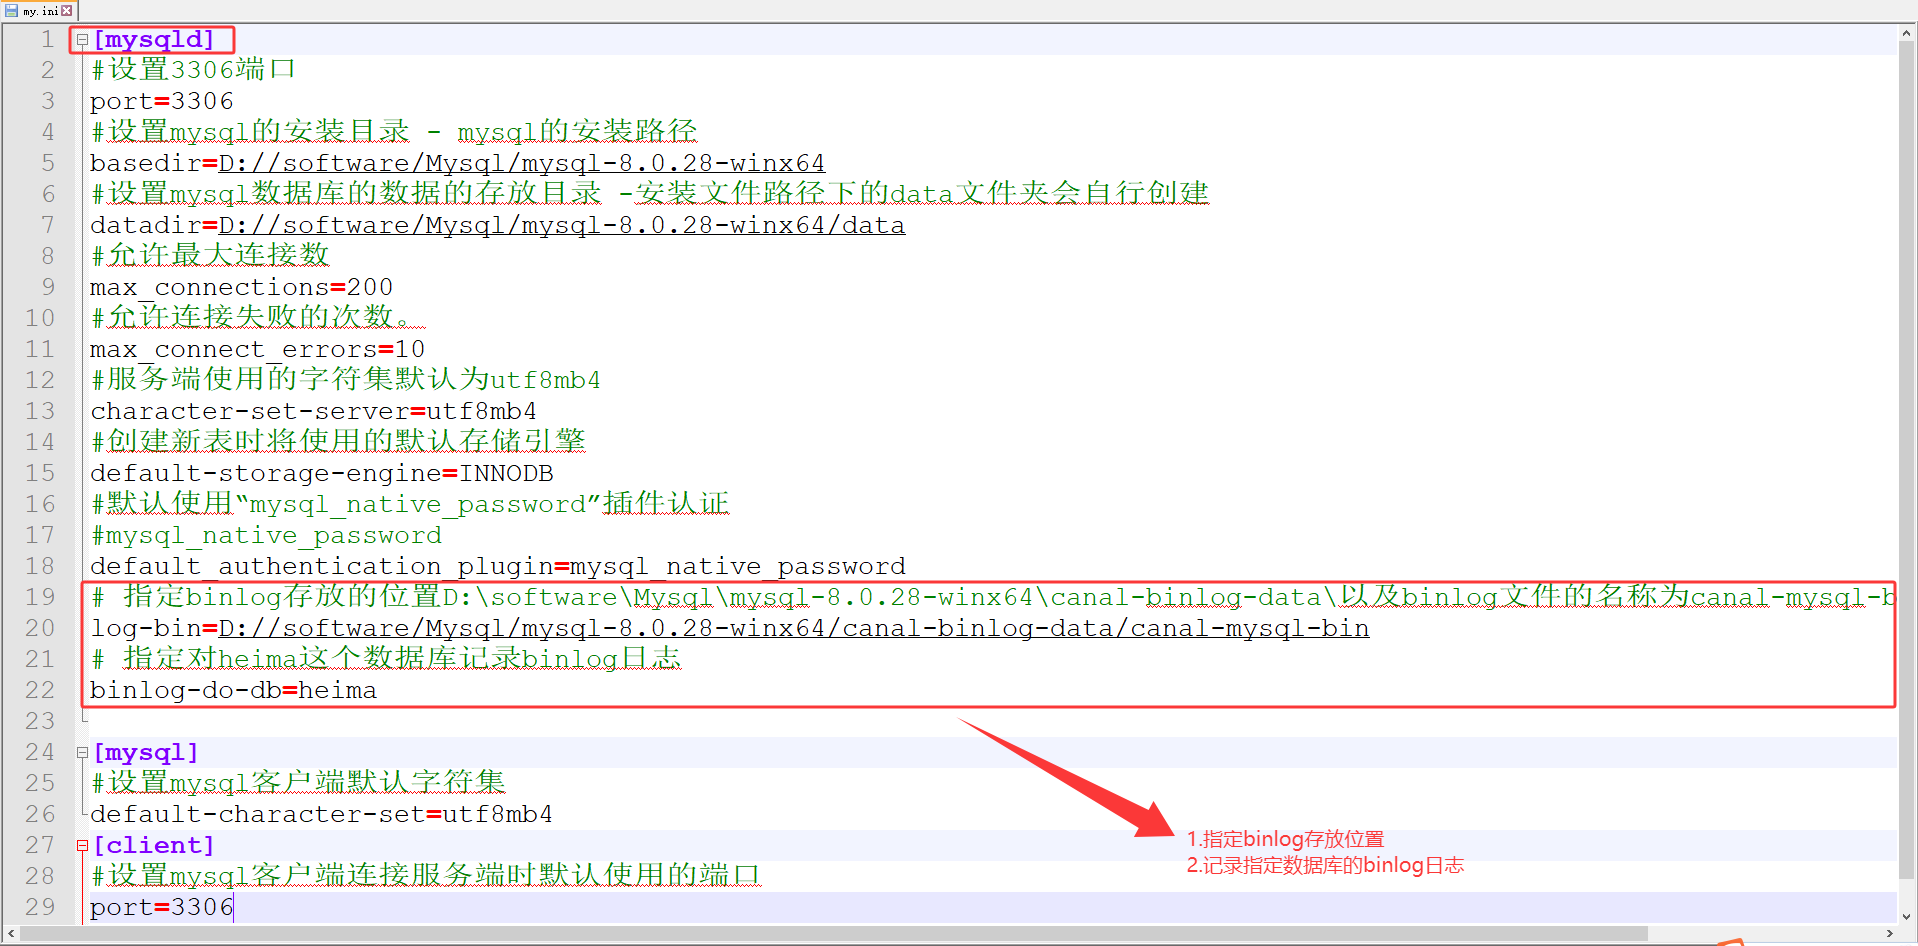
1.1.修改Mysql的conf目录下的my.cnf文件
在[mysqld]层级下添加如下两行代码
# 指定binlog存放的位置D:\software\Mysql\mysql-8.0.28-winx64\canal-binlog-data\以及binlog文件的名称为canal-mysql-bin(自定义文件名)
log-bin=D://software/Mysql/mysql-8.0.28-winx64/canal-binlog-data/canal-mysql-bin
# 指定对heima这个数据库记录binlog日志
binlog-do-db=heima
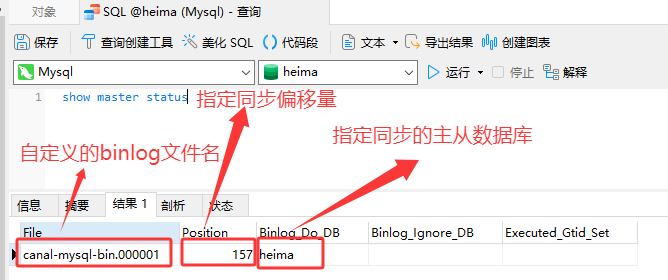
1.2.重启Mysql后使用show master status命令查看开启Mysql主从状态
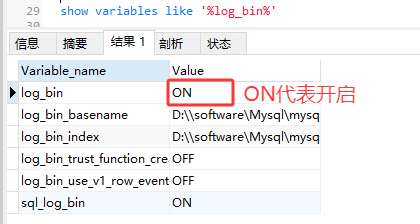
使用show variables like '%log_bin%'命令检查Mysql是否开启主从同步
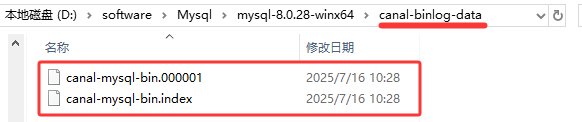
进入canal-binlog-data目录中可以看到binlog日志存放在此目录中
1.3.出于安全考虑我们创建一个名为canal的Mysql用户专门用于数据同步(不使用root用户)
#创建用户cannal 密码 canal
CREATE USER canal IDENTIFIED BY 'canal';
#把所有权限赋予canal,密码也是canal
GRANT SELECT, REPLICATION SLAVE, REPLICATION CLIENT,SUPER ON *.* TO 'canal'@'%';
#刷新权限
flush privileges;
Canal部分
1.安装Canal
安装Canal前先安装JDK Canal需要使用JDK;
1.1.修改Canal安装目录下conf/example目录中的instance.properties文件修改内容如下
############### instance.properties完整配置文件内容(标红部分为需要确认信息)
#################################################
## mysql serverId , v1.0.26+ will autoGen
# canal.instance.mysql.slaveId=0# enable gtid use true/false
canal.instance.gtidon=false# rds oss binlog
canal.instance.rds.accesskey=
canal.instance.rds.secretkey=
canal.instance.rds.instanceId=
# position info(Mysql主节点信息)
canal.instance.master.address=192.168.3.36:3306
canal.instance.master.journal.name=
canal.instance.master.position=
canal.instance.master.timestamp=
canal.instance.master.gtid=# multi stream for polardbx
canal.instance.multi.stream.on=false# ssl
#canal.instance.master.sslMode=DISABLED
#canal.instance.master.tlsVersions=
#canal.instance.master.trustCertificateKeyStoreType=
#canal.instance.master.trustCertificateKeyStoreUrl=
#canal.instance.master.trustCertificateKeyStorePassword=
#canal.instance.master.clientCertificateKeyStoreType=
#canal.instance.master.clientCertificateKeyStoreUrl=
#canal.instance.master.clientCertificateKeyStorePassword=# table meta tsdb info
canal.instance.tsdb.enable=true
#canal.instance.tsdb.url=jdbc:mysql://127.0.0.1:3306/canal_tsdb
#canal.instance.tsdb.dbUsername=canal
#canal.instance.tsdb.dbPassword=canal#canal.instance.standby.address =
#canal.instance.standby.journal.name =
#canal.instance.standby.position =
#canal.instance.standby.timestamp =
#canal.instance.standby.gtid=# username/password(数据库账密)
canal.instance.dbUsername=canal
canal.instance.dbPassword=canal
canal.instance.connectionCharset = UTF-8
# enable druid Decrypt database password
canal.instance.enableDruid=false
#canal.instance.pwdPublicKey=MFwwDQYJKoZIhvcNAQEBBQADSwAwSAJBALK4BUxdDltRRE5/zXpVEVPUgunvscYFtEip3pmLlhrWpacX7y7GCMo2/JM6LeHmiiNdH1FWgGCpUfircSwlWKUCAwEAAQ== table regex
# 指定读取heima数据库中的所有表
canal.instance.filter.regex=heima\\..*
# table black regex
canal.instance.filter.black.regex=mysql\\.slave_.*
# table field filter(format: schema1.tableName1:field1/field2,schema2.tableName2:field1/field2)
#canal.instance.filter.field=test1.t_product:id/subject/keywords,test2.t_company:id/name/contact/ch
# table field black filter(format: schema1.tableName1:field1/field2,schema2.tableName2:field1/field2)
#canal.instance.filter.black.field=test1.t_product:subject/product_image,test2.t_company:id/name/contact/ch
# mq config
canal.mq.topic=example
# dynamic topic route by schema or table regex
#canal.mq.dynamicTopic=mytest1.user,topic2:mytest2\\..*,.*\\..*
canal.mq.partition=0
# hash partition config
#canal.mq.enableDynamicQueuePartition=false
#canal.mq.partitionsNum=3
#canal.mq.dynamicTopicPartitionNum=test.*:4,mycanal:6
#canal.mq.partitionHash=test.table:id^name,.*\\..*
#################################################
2.启动Canal
1.进入Canal的bin目录启动Canal
./startup.sh
2.jps命令查看Canal
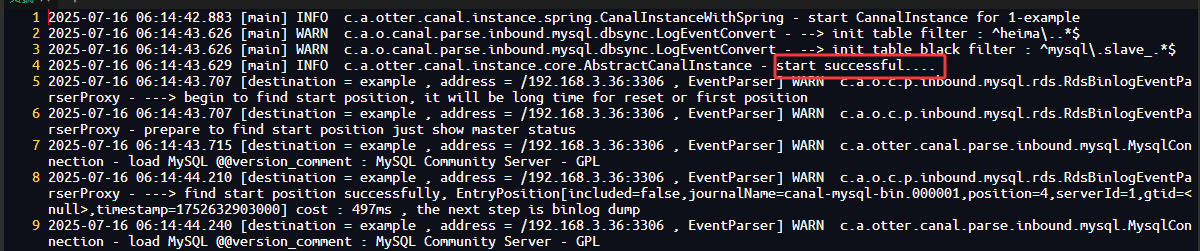
3.进入Canal日志目录查看canal和example两个目录中的日志可知Canal已启动成功
logs/canal/canal.log
logs/example/example.log


Tomcat服务器部分
由上可知Canal与Mysql已成功建立连接,接下来只需要我们在Tomcat服务器中编码,重Canal中拿取到数据表内容变更再相应的对Redis中数据进行更新即可完成数据库、缓存数据同步;
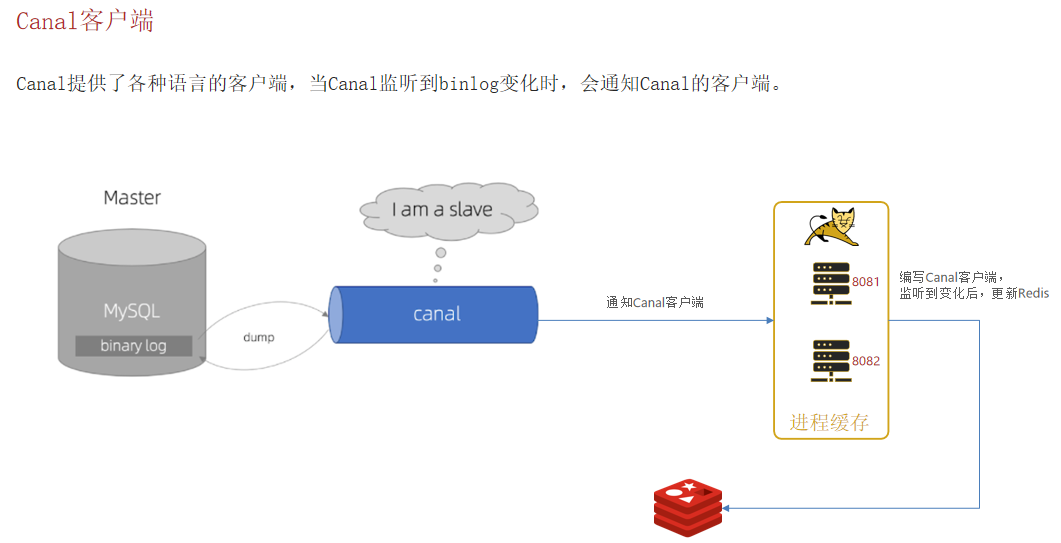
Canal提供了各种语言的客户端,当Canal监听到binlog变化时,会通知Canal的客户端。这里我们会使用GitHub上的第三方开源的canal-starter。
地址:https://github.com/NormanGyllenhaal/canal-client
1.导入Maven依赖
<!-- Canal依赖 -->
<dependency><groupId>top.javatool</groupId><artifactId>canal-spring-boot-starter</artifactId><version>1.2.1-RELEASE</version>
</dependency>
2.修改application.yml配置
# Canal配置
canal:destination: example # canal 默认实例名称为example,该实例名称可以在canal.properties中修改server: 192.168.209.129:11111 # Canal Server默认端口为11111
3.添加Redis序列化配置文件(避免缓存key乱码)
import org.springframework.context.annotation.Bean;
import org.springframework.context.annotation.Configuration;
import org.springframework.data.redis.connection.RedisConnectionFactory;
import org.springframework.data.redis.core.RedisTemplate;
import org.springframework.data.redis.serializer.GenericJackson2JsonRedisSerializer;
import org.springframework.data.redis.serializer.RedisSerializer;
import org.springframework.data.redis.serializer.StringRedisSerializer;
/*** 序列化工具*/
@Configuration
public class RedisConfig {@Beanpublic RedisTemplate<String,Object> redisTemplate(RedisConnectionFactory connectionFactory){// 创建RedisTemplate对象RedisTemplate<String,Object> template = new RedisTemplate();// 设置连接工厂template.setConnectionFactory(connectionFactory);// 创建Json序列化工具GenericJackson2JsonRedisSerializer jsonRedisSerializer = new GenericJackson2JsonRedisSerializer();StringRedisSerializer stringRedisSerializer = new StringRedisSerializer();// 设置Key的序列化template.setKeySerializer(RedisSerializer.string());template.setHashKeySerializer(RedisSerializer.string());// 设置Value的序列化template.setValueSerializer(jsonRedisSerializer);// 设置Hash采用String的方式序列化Valuetemplate.setHashValueSerializer(stringRedisSerializer);return template;}
}
4.表实体字段映射
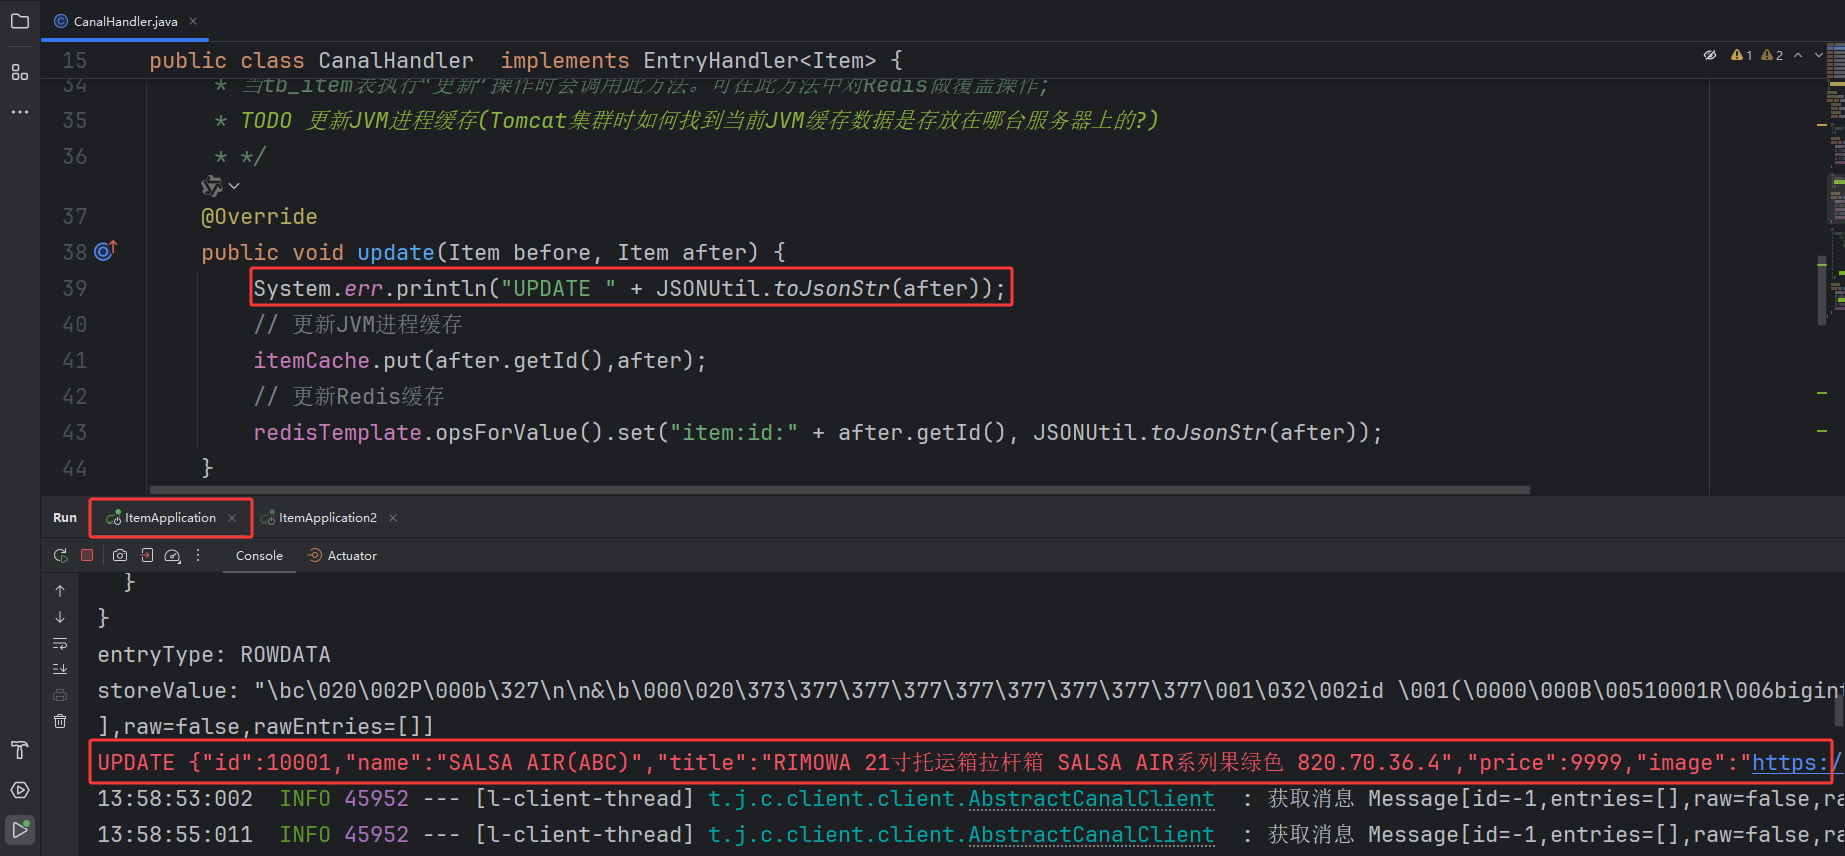
import com.baomidou.mybatisplus.annotation.IdType;
import com.baomidou.mybatisplus.annotation.TableField;
import com.baomidou.mybatisplus.annotation.TableId;
import com.baomidou.mybatisplus.annotation.TableName;
import lombok.Data;
import org.springframework.data.annotation.Id;
import org.springframework.data.annotation.Transient;
import java.util.Date;
/*** 特别说明:*      Canal不依赖Mybatis,所以不能使用Mybatis相关的注解 来指定“主键”、“字段值不存在”;*          如下:*              1.指定主键使用 @Id注解;*              2.不存在的数据库字段使用 @Transient注解;*              3.当数据库字段名与实体属性名不一致时使用 @Column(name = "Xxx")注解映射;*/
@Data
@TableName("tb_item")
public class Item {@TableId(type = IdType.AUTO)@Id /** 标记表中的主键字段(Canal需要) */private Long id;//商品idprivate String name;//商品名称private String title;//商品标题private Long price;//价格(分)private String image;//商品图片private String category;//分类名称private String brand;//品牌名称private String spec;//规格private Integer status;//商品状态 1-正常,2-下架private Date createTime;//创建时间(数据库中字段为 create_time实体转换时自动驼峰)private Date updateTime;//更新时间(数据库中字段为 update_time实体转换时自动驼峰)@TableField(exist = false)@Transient /** (Canal需要数据库中不存在此字段使用@Transient注解) */private Integer stock;@TableField(exist = false)@Transient /** (Canal需要数据库中不存在此字段使用@Transient注解) */private Integer sold;
}
5.编写Canal监听类用于数据库数据变动时同步缓存
import cn.hutool.json.JSONUtil;
import com.github.benmanes.caffeine.cache.Cache;
import com.heima.item.pojo.Item;
import org.springframework.beans.factory.annotation.Autowired;
import org.springframework.data.redis.core.StringRedisTemplate;
import org.springframework.stereotype.Component;
import top.javatool.canal.client.annotation.CanalTable;
import top.javatool.canal.client.handler.EntryHandler;
/*** @description: 编写Canal监听类 用于做数据同步*/
@Component
@CanalTable(value = "tb_item") // 编写Canal监听的表名
public class CanalHandler  implements EntryHandler<Item> {@Autowiredprivate StringRedisTemplate redisTemplate;@Autowiredprivate Cache<Long,Item> itemCache;/*** 当tb_item表执行“新增”操作时会调用此方法。可在此方法中对Redis做新增操作;* */@Overridepublic void insert(Item item) {System.err.println("INSERT " + JSONUtil.toJsonStr(item));// 写数据到JVM进程缓存itemCache.put(item.getId(),item);// 新增数据到RedisredisTemplate.opsForValue().set("item:id:" + item.getId(), JSONUtil.toJsonStr(item));}/*** 当tb_item表执行“更新”操作时会调用此方法。可在此方法中对Redis做覆盖操作;* TODO 更新JVM进程缓存(Tomcat集群时如何找到当前JVM缓存数据是存放在哪台服务器上的?)* */@Overridepublic void update(Item before, Item after) {System.err.println("UPDATE " + JSONUtil.toJsonStr(after));// 更新JVM进程缓存itemCache.put(after.getId(),after);// 更新Redis缓存redisTemplate.opsForValue().set("item:id:" + after.getId(), JSONUtil.toJsonStr(after));}/*** 当tb_item表执行“删除”操作时会调用此方法。可在此方法中对Redis做删除操作;*      问题描述:*          后端有 Nginx本地缓存、Redis缓存、JVM进程缓存。各缓存间是如何更新刷新的?*          Canal监听到Mysql数据被删除时*              1.Nginx本地缓存通过设置合理的过期时间控制缓存的刷新(会存在缓存不一致的情况,可在网上自行寻找解决方案),暂不考虑通过代码的方式去同步更新Nginx本地缓存;*              2.JVM进程缓存通过设置合理的过期时间控制缓存的刷新(会存在缓存不一致的情况,可在网上自行寻找解决方案),且由前面可知在业务Nginx中查询商品接口/item/{id}根据*                uri做负载均衡(相同商品ID的请求路由到同一台Tomcat服务器做JVM进程缓存)避免多台Tomcat服务器缓存相同的JVM进程数据。*                这样存在一个其它问题在删除或更新数据库时如何找到更新的商品ID存放在哪台服务器中?需要在对应的Tomcat服务器中删除或更新*                JVM进程缓存;*              3.Redis缓存通过Canal直接完成数据库与Redis缓存的同步;*      TODO 删除JVM进程缓存(Tomcat集群时如何找到当前JVM缓存数据是存放在哪台服务器上的?)* */@Overridepublic void delete(Item item) {System.err.println("DELETE " + JSONUtil.toJsonStr(item));// 删除JVM进程缓存// TODO itemCache.invalidate(item.getId());// 删除Redis缓存redisTemplate.delete("item:id:" + item.getId());}
}
6.测试手动更新数据库查看Redis缓存中的数据是否同步更新
1.修改ID为10001商品的名称
2.Tomcat服务器
8081服务器执行变更Redis缓存数据请求;
3.查看Redis数据


补充说明
多台Canal客户端(Tomcat服务器集成Canal),当数据库数据变更时Canal会把变更的数据推送给多台Canal客户端中的一台。不会所有的Canal客户端都推送,这样避免了多台Canal服务器都去更新Redis缓存;


![[特殊字符] Java反射从入门到飞升:手撕类结构,动态解析一切![特殊字符]](http://pic.xiahunao.cn/[特殊字符] Java反射从入门到飞升:手撕类结构,动态解析一切![特殊字符])
命令使用说明)


 添加快捷键 Ctrl+D(功能等于Ctrl+C + Ctrl+V),一步到位)


如何处理重复数据问题?)
)