应用Spring Security
前面介绍了在项目开发时为什么选择Spring Security,还介绍了它的原理。本节开始动手实践Spring Security的相关技术。
实战:Spring Security入门
现在开始搭建一个新项目,实践一个Spring Security的入门程序。
(1)新建一个spring-security-demo模块,添加项目依赖,在pom.xml中添加如下依赖:
<properties>
<java.version>11</java.version>
</properties>
<dependencies>
<dependency>
<groupId>org.springframework.boot</groupId>
<artifactId>spring-boot-starter-security</artifactId>
</dependency>
<dependency>
<groupId>org.springframework.boot</groupId>
<artifactId>spring-boot-starter-thymeleaf</artifactId>
</dependency>
<!--thymeleaf对security5的支持依赖-->
<dependency>
<groupId>org.thymeleaf.extras</groupId>
<artifactId>thymeleaf-extras-springsecurity5</artifactId>
<!--<version>3.0.4.RELEASE</version>-->
</dependency>
<dependency>
<groupId>org.springframework.boot</groupId>
<artifactId>spring-boot-starter-web</artifactId>
</dependency>
<dependency>
groupId>org.projectlombok</groupId>
<artifactId>lombok</artifactId>
<optional>true</optional>
</dependency>
<dependency>
<groupId>javax.servlet</groupId>
<artifactId>javax.servlet-api</artifactId>
<version>4.0.1</version>
</dependency>
</dependencies>
<build>
<plugins>
<plugin>
<groupId>org.springframework.boot</groupId>
<artifactId>spring-boot-maven-plugin</artifactId>
</plugin>
</plugins>
</build>
(2)在application.properties中添加Spring Security配置,配置当前登录的用户名和密码,配置内容如下:
#登录的用户名
spring.security.user.name=admin
#登录的密码
spring.security.user.password=123456
(3)在resources文件夹下创建页面add.html,表示添加页面,代码如下:
<!DOCTYPE html>
<html xmlns:th="https://www.thymeleaf.org">
<head>
title></title>
</head>
<body>
add 页面
</body>
</html>
(4)添加主页home.html,代码如下:
<!DOCTYPE html>
<html xmlns:th="https://www.thymeleaf.org">
<head>
<title>主页</title>
</head>
<body>
你已经登录成功!
<form th:action="@{/logout}" action="/login" method="post">
<input type="submit" value="退出系统"/>
</form>
</body>
</html>
(5)添加login.html登录页,用于用户的登录,代码如下:
<!DOCTYPE html>
<html xmlns:th="https://www.thymeleaf.org">
<head>
<title>请登录</title>
</head>
<body>
<div>
<form th:action="@{/login}" method="post" action="/login">
<p>
<span>请输入用户名:</span>
<input type="text" id="username" name="username">
</p>
<p>
<span>请输入密码:</span>
<input type="password" id="password"
name="password">
</p>
<input type="submit" value="登录"/>
</form>
</div>
</body>
</html>
(6)在resources文件夹下创建一个css文件夹,新建一个my.css文件,内容如下:
my css file
(7)新建一个Controller包,再新建如下3个Controller。
AddController类,用于返回add页面,代码如下:
package com.example.springsecuritydemo.controller;
import org.springframework.stereotype.Controller;
import org.springframework.web.bind.annotation.GetMapping;
@Controller
public class AddController {
@GetMapping("/add")
public String ad(){
return "add";
}
}
omeController类用于访问home页面,代码如下:
package com.example.springsecuritydemo.controller;
import org.springframework.stereotype.Controller;
import org.springframework.web.bind.annotation.GetMapping;
@Controller
public class HomeController {
@GetMapping("/home")
public String home(){
return "home";
}
}
LoginController类用于用户登录,代码如下:
package com.example.springsecuritydemo.controller;
import org.springframework.stereotype.Controller;
import org.springframework.web.bind.annotation.GetMapping;
@Controller
public class LoginController {
@GetMapping("/login")
public String login(){
return "login";
}
}
(8)新建一个config包,添加Spring Security配置文件
WebSecurityConfig:
package com.example.springsecuritydemo.config;
import com.example.springsecuritydemo.service.LoginSuccessHandler;
import org.springframework.context.annotation.Configuration;
import
org.springframework.security.config.annotation.web.builders.HttpSecuri
ty;
import
org.springframework.security.config.annotation.web.configuration.WebSe
curityConfigurerAdapter;
@Configuration
public class WebSecurityConfig extends WebSecurityConfigurerAdapter {
@Override
protected void configure(HttpSecurity http) throws Exception {
// 关闭csrf校验
http.csrf().disable();
// 配置登录页面,用户名和密码已在配置文件中
http.formLogin().loginPage("/login").permitAll();
// 配置登录成功后的操作
http.formLogin().successHandler(new LoginSuccessHandler());
// 登录授权
http.logout().permitAll();
// 授权配置
http.authorizeRequests()
/* 所有的静态文件可以访问 */
.antMatchers("/js/**","/css/**","/images/**").permitAll()
/* 所有的以/add 开头的 add页面可以访问 */
.antMatchers("/add/**").permitAll()
.anyRequest().fullyAuthenticated();
}
}
9)新建一个登录成功后的业务处理服务类LoginSuccessHandler,代码如下:
package com.example.springsecuritydemo.service;
import org.springframework.security.core.Authentication;
import org.springframework.security.web.authentication.Authentication
SuccessHandler;
import javax.servlet.http.HttpServletRequest;
import javax.servlet.http.HttpServletResponse;
import java.io.IOException;
/**
* 登录成功后的业务处理类
*/
public class LoginSuccessHandler implements
AuthenticationSuccessHandler {
@Override
public void onAuthenticationSuccess(HttpServletRequest request,
HttpServletResponse response,
Authentication authentication)
throws
IOException {
System.out.println("登录成功");
//重定向到home.html页面
response.sendRedirect("/home");
}
}
(10)添加当前项目的启动类
SpringSecurityDemoApplication,使用注解@EnableWeb- Security启动Spring Security功能:
package com.example.springsecuritydemo;
import org.springframework.boot.SpringApplication;import org.springframework.boot.autoconfigure.SpringBootApplication;
@EnableWebSecurity
@SpringBootApplication
public class SpringSecurityDemoApplication {
public static void main(String[] args) {
SpringApplication.run(SpringSecurityDemoApplication.class,
args);
}
}
(11)执行
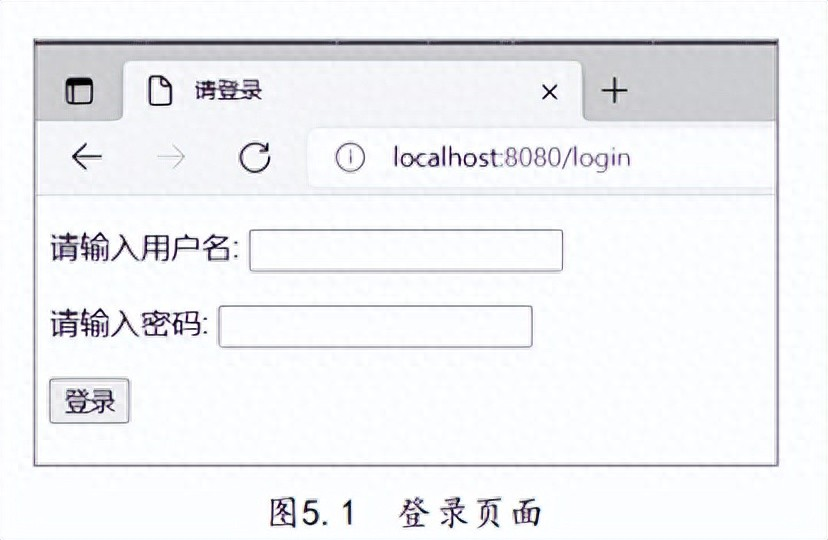
SpringSecurityDemoApplication启动当前项目,访问localhost:8080,因为没有登录,所以跳转到登录页,如图5.1所示。再访问localhost:8080/home,还是会自动跳转到登录页面,因为没有登录。前两次访问Spring Security时会自动判断用户还未登录,直接跳转到登录页面,提示用户登录。
再访问localhost:8080/add,可以看到add页面,如图5.2所示。之所以能够在没有登录的情况下看到add页面,是因为Spring Security配置了未登录时可以访问/add这个链接。配置在WebSecurityConfig.java的代码如下:
.antMatchers("/add/**").permitAll()
这个代码的含义是所有以/add开头的链接都允许访问,因此可以看到add页面。
同理,访问localhost:8080/css/my.css会返回项目的静态文件my.css,因为在WebSecurity-Config中配置了静态文件的访问权限。
/* 所有的静态文件可以访问 */
.antMatchers("/js/**","/css/**","/images/**").permitAll()
所以,js、css和images文件夹下的所有文件可以直接获取,不会有任何校验,访问结果如图5.3所示。
现在输入用户名admin和密码123456登录系统,登录成功后的页面如图5.4所示,因为在LoginSuccessHandler中配置了登录成功后的跳转页面代码,即response.sendRedirect ("/home"),所以登录成功后直接跳转到了home页面。
Spring Security适配器
Spring大量使用适配器模式,适配器的好处是当选择性地修改一部分配置时不用覆盖其他不相关的配置,Spring Security常用的适配器有
WebSecurityConfigurerAdapter。在开发中,可以选择覆盖部分自定义的配置,从而快速完成开发。
设计模式中适配器模式的结构如图5.5所示。
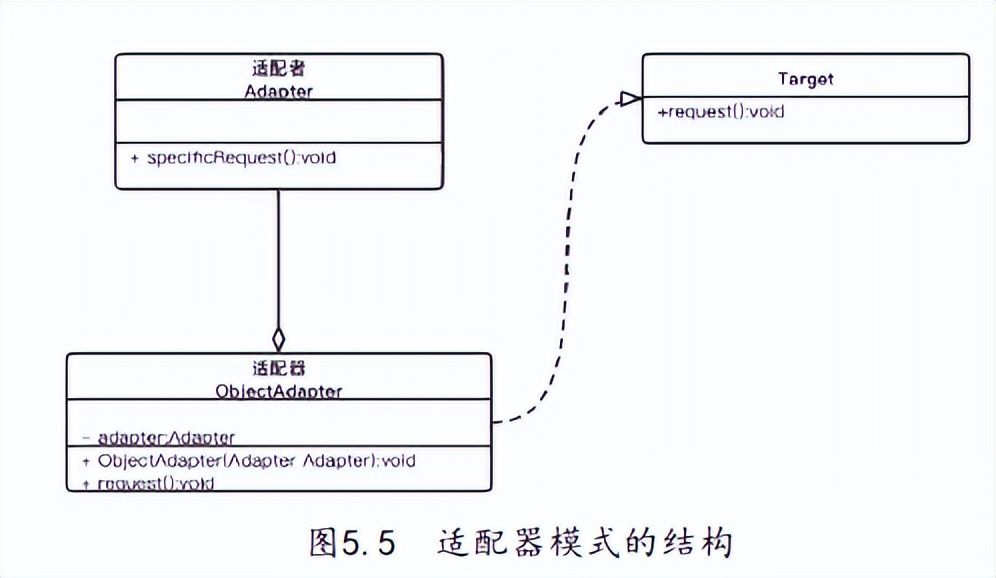
适配器模式有3个类,分别是Adapter适配者类、Target目标类和ObjectAdapter适配器,可以通过这3个类实现适配器的相关功能。
在Spring Security框架中,
WebSecurityConfigurerAdapter类图如图5.6所示。
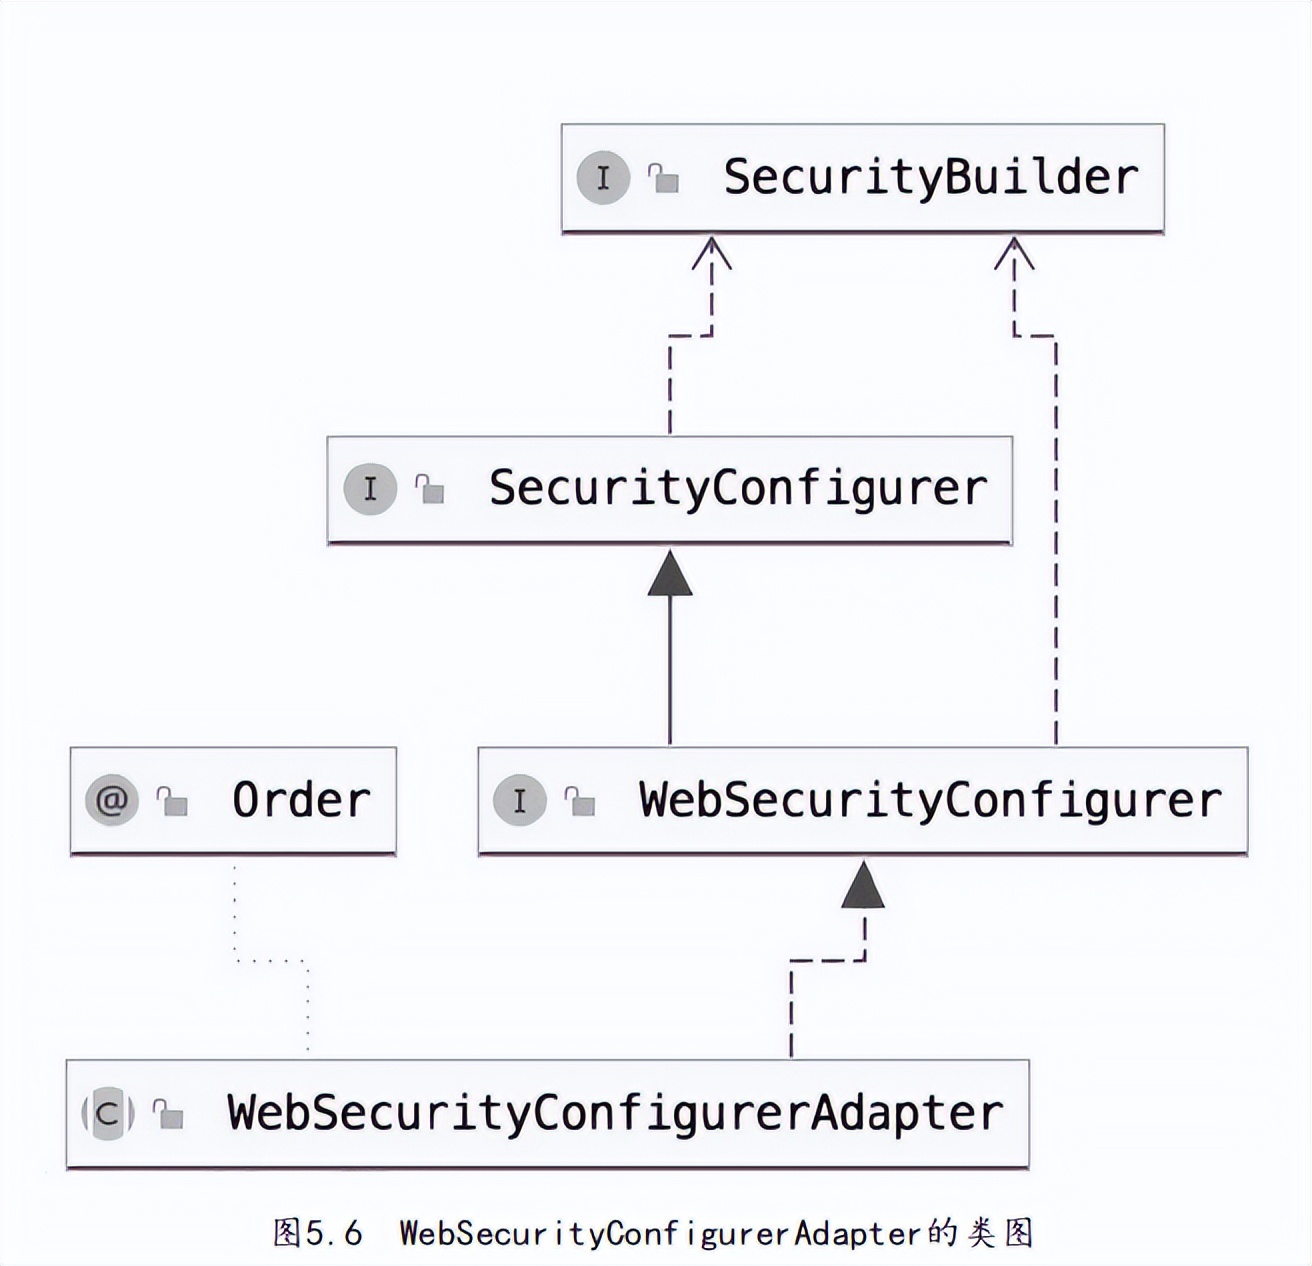
在图5.6中,SecurityBuilder、SecurityConfigurer和SecurityBuilder这3个类非常重要,它们是用来构建过滤器链的,在用HttpSecurity实现SecurityBuilder时,传入的泛型是
DefaultSecurityFilterChain,因此SecurityBuilder.build()用来构建过滤器链,而WebSecurity- Configurer用来配置WebSecurity。
在
WebSecurityConfigurerAdapter中有两个方法非常重要,下面分别介绍。
(1)第一个是init()方法,其部分源码如下:
public void init(final WebSecurity web) throws Exception {
final HttpSecurity http = getHttp();
web.addSecurityFilterChainBuilder(http).postBuildAction(() -> {
FilterSecurityInterceptor securityInterceptor = http .getSharedObject(FilterSecurityInterceptor.class);
web.securityInterceptor(securityInterceptor);
});
}
首先init()方法调用了getHttp()方法,其作用是进行HttpSecurity的初始化,其部分源码如下:
@SuppressWarnings({ "rawtypes", "unchecked" })
protected final HttpSecurity getHttp() throws Exception {
if (http != null) {
return http;
}
AuthenticationEventPublisher eventPublisher =
getAuthenticationEventPublisher();
localConfigureAuthenticationBldr.authenticationEventPublisher(eventPub
lisher);
AuthenticationManager authenticationManager =
authenticationManager();
authenticationBuilder.parentAuthenticationManager(authenticationManage
r);
Map<Class<?>, Object> sharedObjects = createSharedObjects();
http = new HttpSecurity(objectPostProcessor, authenticationBuilder,
sharedObjects);
if (!disableDefaults) {
// @formatter:off
http
.csrf().and()
.addFilter(new WebAsyncManagerIntegrationFilter())
.exceptionHandling().and()
.headers().and()
.sessionManagement().and() .securityContext().and()
.requestCache().and()
.anonymous().and()
.servletApi().and()
.apply(new DefaultLoginPageConfigurer<>()).and()
.logout();
// @formatter:on
ClassLoader classLoader = this.context.getClassLoader();
List<AbstractHttpConfigurer> defaultHttpConfigurers =
SpringFactoriesLoader.loadFactories(AbstractHttpConfigurer.class,
classLoader);
for (AbstractHttpConfigurer configurer : defaultHttpConfigurers)
{
http.apply(configurer);
}
}
configure(http);
return http;
}
在初始化完成后,init()方法调用了configure()方法配置默认的拦截器,当完成HttpSecurity初始化后,将HttpSecurity放入WebSecurity中,最终保存在WebSecurity的
securityFilterChainBuilders集合中。configure()方法的部分源码如下:
/**
* 覆盖此方法以配置{@link HttpSecurity}。
通常子类不建议通过调用super来调用此方法,因为它可能会覆盖它们的配置。默认配置如下:
*
* <pre>
*
http.authorizeRequests().anyRequest().authenticated().and().formLogin(
).and().httpBasic();
* </pre> *
* 任何需要防御常见漏洞的端点都可以在这里指定,包括公共的端点
* See {@link HttpSecurity#authorizeRequests} and the
`permitAll()`authorization rule
* 更多关于公共端点的详细信息
*
* @param http the {@link HttpSecurity} to modify
* @throws Exception if an error occurs
*/
// @formatter:off
protected void configure(HttpSecurity http) throws Exception {
http.authorizeRequests().anyRequest().authenticated().and()
.formLogin().and().httpBasic();
}
(2)另外一个非常重要的方法是前面提到的configure()方法。可以看到,抽象类
WebSecurityConfigurerAdapter中的configure是个protect()方法,开发者可以新建类或继承此类后实现该方法,从而实现业务逻辑。
在当前项目中,自定义的WebSecurityConfig类继承了
WebSecurityConfigurerAdapter()方法,实现了空的configure()方法,并配置了当前项目的登录和拦截信息。当前方法的入参是HttpSecurity,可以使用HttpSecurity的builder构建方式来灵活制定访问策略。Http- Security的常用方法参见表5.1。

表5.1 HttpSecurity的常用方法
实战:用户授权
在Spring Security中可以设置不同的用户拥有不同的角色,同时不同的角色有不同的权限。下面举例说明。
修改HomeController.java文件,增加一个/home2方法,增加的代码如下:
@GetMapping("/home2")
public String home2(){ return "home2";
}
修改WebSecurityConfig.java文件,增加配置属性:
/**
* 授权,赋予用户角色,基于内存授权
*/
@Override
protected UserDetailsService userDetailsService() {
InMemoryUserDetailsManager manager = new
InMemoryUserDetailsManager();
manager.createUser(User.withUsername("admin").password("123456").
roles("admin").build());
return manager;
}
修改WebSecurityConfig.java中的configure()方法,增加/home2连接的
角色权限配置:
// 授权配置
http.authorizeRequests()
//可以访问所有静态文件
.antMatchers("/js/**","/css/**","/images/**").permitAll()
//可以访问所有以/add开头的add页面
.antMatchers("/add/**").permitAll()
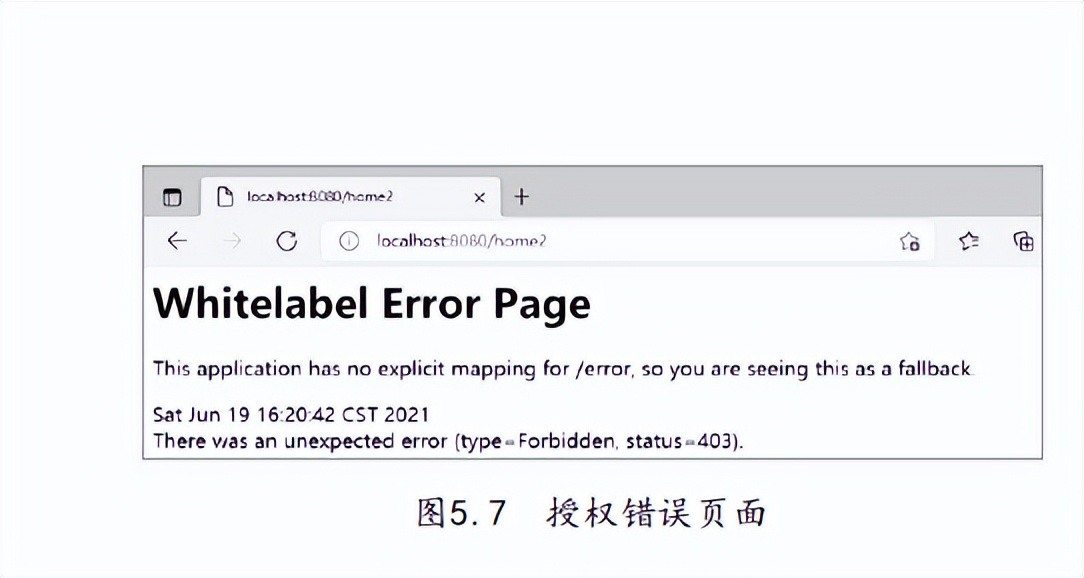
.antMatchers("/home2").hasRole("user")
.anyRequest().fullyAuthenticated();
重启项目,登录之后访问localhost:8080/home2,结果如图5.7所示。因为当前用户没有权限,所以访问报错。
Spring Security核心类
Spring Security框架中最核心的接口类是AuthenticationManager,其部分源码如下:
Authentication authenticate(Authentication authentication)
throws AuthenticationException;
AuthenticationManager是用来处理认证(Authentication)请求的基本接口。这个接口定义了方法authenticate(),此方法只接收一个代表认证请求的Authentication对象作为参数,如果认证成功,则会返回一个封装了当前用户权限等信息的Authentication对象,否则认证无法通过。
AuthenticationManager接口有两个重要的实现。
AuthenticationManagerDelegator是一个委托类,由SecurityBuilder接口的子类来配置生成一个身份管理器;另外一个实现类是ProviderManager,此类的部分源码如下:
public class ProviderManager implements AuthenticationManager, Message
SourceAware,
InitializingBean {
private List<AuthenticationProvider> providers =
Collections.emptyList();
private AuthenticationManager parent;public ProviderManager(AuthenticationProvider... providers) {
this(Arrays.asList(providers), null);
}
/**
* 使用给定的{@link AuthenticationProvider}构造一个{@link
ProviderManager}
*
* @param providers the {@link AuthenticationProvider}s to use
*/
public ProviderManager(List<AuthenticationProvider> providers) {
this(providers, null);
}
/**
* 使用给定的参考构造一个{@link ProviderManager}
*
* @param providers the {@link AuthenticationProvider}s to use
* @param parent a parent {@link AuthenticationManager} to fall back
to
*/
public ProviderManager(List<AuthenticationProvider> providers,
AuthenticationManager parent) {
Assert.notNull(providers, "providers list cannot be null");
this.providers = providers;
this.parent = parent;
checkState();
}
}
在此类中,构造函数有List<AuthenticationProvider> providers,它的作用是真正地完成认证工作。Spring Security有多种认证方式,如邮箱登录、手机号登录和第三方登录等,只要一个认证成功了,就表示认证成功。
Spring Security的验证机制
核心类AuthenticationManager调用其他的实现类进行认证。在SpringSecurity中提供认证功能的接口是
org.springframework.security.authentication.AuthenticationProvider。
该接口有两个方法:authenticate()方法用来认证处理,返回一个authentication的实现类,代表认证成功;supports()方法表示当前身份提供者支持认证什么类型的身份信息,如果支持返回true,才会执行authenticate()方法进行身份认证。该接口的部分源码如下:
public interface AuthenticationProvider {
Authentication authenticate(Authentication authentication)
throws AuthenticationException;
boolean supports(Class<?> authentication);
}
AuthenticationProvider接口有几个常用的实现类,用来实现认证类型的具体方式,包括
AbstractUserDetailsAuthenticationProvider、DaoAuthenticationProvider和RememberMe- AuthenticationProvider。
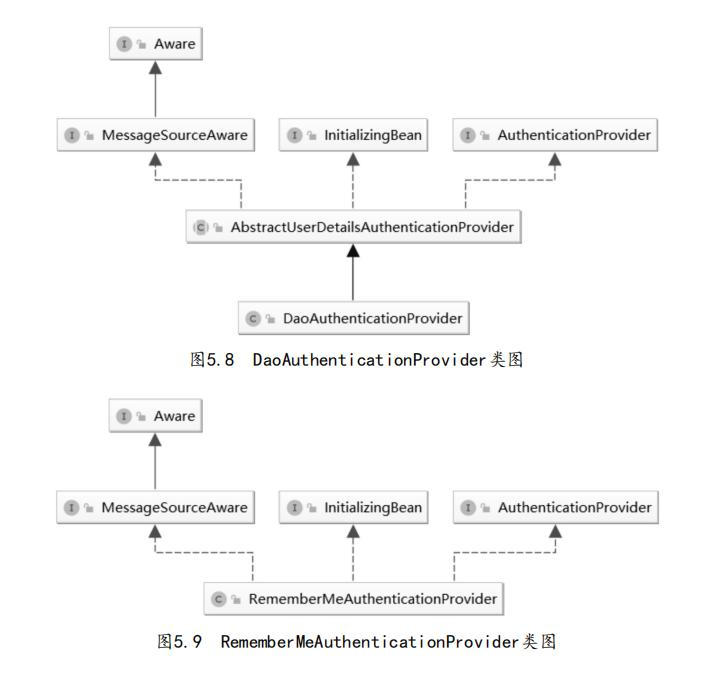
DaoAuthenticationProvider的作用是从数据源中加载身份信息,其类图如图5.8所示。
RememberMeAuthenticationFilter的作用是当用户没有登录而直接访问资源时,首先从cookie中查找用户信息,如果Spring Security能够识别出用户提供的remember me cookie,则不用再输入用户名和密码,表示用户已经认证成功。如图5.9所示为RememberMeAuthenticationProvider类图。
Spring Security的认证流程如下:
(1)从
WebSecurityConfigurerAdapter认证配置的configure(HttpSecurity http)方法进入,并添加拦截器addFilterBefore。
(2)进入
AbstractAuthenticationProcessingFilter拦截器的attemptAuthentication方法,指定认证对象AbstractAuthenticationToken。
(3)执行AuthenticationProvider认证逻辑,根据supports的判断对认证的目标对象选择一个拦截器进行认证,进入具体的认证逻辑方法authenticate()。
(4)如果认证成功,则进入拦截器的successfulAuthentication()方法;如果认证失败,则进入拦截器的
unsuccessfulAuthentication方法()。
(5)对认证结果进行处理。
认证成功的逻辑:进入
SimpleUrlAuthenticationSuccessHandler的onAuthentication-Success()方法。
认证失败的逻辑:进入
SimpleUrlAuthenticationFailureHandler的onAuthentication-Failure()方法。
(6)将数据封装在ObjectMapper对象中后即可返回结果。


