目录
一、什么是Service
二、启停 Service
三、绑定 Service
四、前台服务
五、远程服务扩展
六、服务保活
七、服务启动方法混用
你可以把Service想象成一个“后台默默打工的工人”。它没有UI界面,默默地在后台干活,比如播放音乐、下载文件、处理网络请求等。即使你退出了App,Service也可以继续运行。
一、什么是Service
Service是Android应用的核心后台组件。
1. 无界面后台任务
- Service 是 Android 系统中无可视化界面、运行于后台的长生命周期组件。
- 核心功能:执行与用户界面无关的持续性任务,如后台播放音乐、文件下载等。
- Service 不依赖用户交互界面,生命周期独立于Activity。
- 典型应用场景:网络请求、传感器数据采集、跨进程通信(AIDL)。
2. 生命周期管理
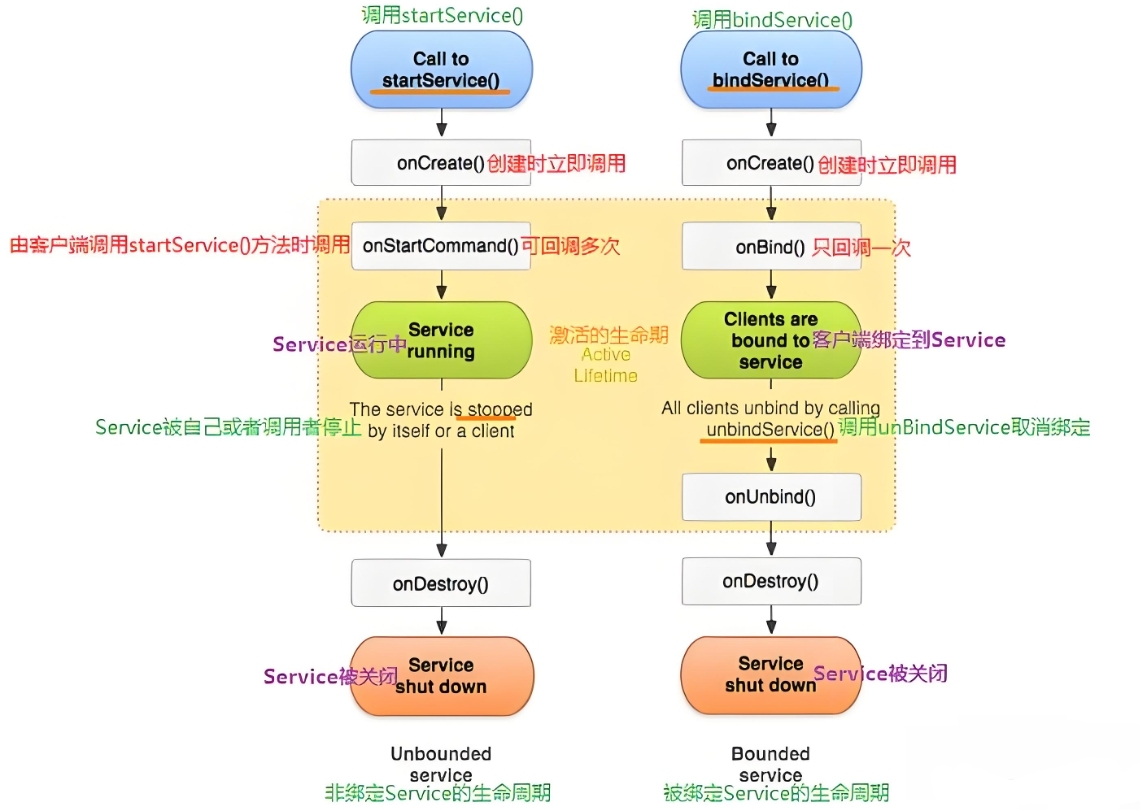
Service有两种主要类型:
| 特性 | Started Service(启动式) | Bound Service(绑定式) |
|---|---|---|
| 启动方式 | 通过 startService(Intent) 启动 | 通过 bindService(Intent, ServiceConnection, flags) 启动 |
| 生命周期 | onCreate() → onStartCommand() → onDestroy() | onCreate() → onBind() → onUnbind() → onDestroy() |
| 通信机制 | 无法直接与组件交互,需通过广播或 Intent 传递数据 | 通过 Binder 接口直接通信(支持方法调用) |
| 销毁条件 | 需手动调用 stopSelf() 或 stopService() | 所有绑定组件解绑后自动销毁 |
| 多组件绑定 | 不支持,每次启动独立运行 | 支持多个组件同时绑定(如多个 Activity 共享同一服务实例) |
| 适用场景 | 一次性后台任务(如下载、音乐播放) | 长期交互服务(如数据同步、实时计算) |
| 优先级与系统回收 | 后台服务可能被系统回收,可通过 startForeground() 提升为前台服务 | 优先级较低,绑定组件退出后可能更快被回收 |
| 共存场景 | 可与 Bound Service 共存,需同时调用 stopSelf() 和解绑操作才能销毁 | 与 Started Service 共存时,需先解绑所有组件再手动停止服务 |
涉及的生命周期方法:
| 生命周期方法 | 触发场景 |
|---|---|
onCreate() | Service 首次创建时调用(仅一次) |
onStartCommand() | 每次通过 startService() 启动时调用 |
onBind() | 通过 bindService() 绑定时调用 |
onUnbind() | 所有客户端解绑时调用 |
onDestroy() | Service 被销毁前调用(需手动停止或系统回收) |
Service 默认运行在主线程,耗时操作需自行创建子线程或使用
IntentService
二、启停 Service
1. 定义 Service 类
继承 Service 类并实现核心方法:
public class MyService extends Service {private static final String TAG = "MyService";@Overridepublic IBinder onBind(Intent intent) {return null; // 非绑定模式时返回 null}@Overridepublic int onStartCommand(Intent intent, int flags, int startId) {Log.d(TAG, "Service 启动"); // 执行后台任务return START_STICKY; // 服务终止后自动重启}@Overridepublic void onDestroy() {Log.d(TAG, "Service 销毁");super.onDestroy();}
}
2. 注册 Service
在 AndroidManifest.xml 中添加声明:
<application><service android:name=".MyService" />
</application>
3. 通过 startService() 启动
在 Activity 或其他组件中调用:
Intent serviceIntent = new Intent(this, MyService.class);
startService(serviceIntent); // 启动服务:ml-citation{ref="6,8" data="citationList"}
4. 通过 stopService() 或 stopSelf() 停止
stopService(new Intent(this, MyService.class)); // 外部停止
// 或在 Service 内部调用 stopSelf();:ml-citation{ref="6,8" data="citationList"}三、绑定 Service
1. 定义 Bound Service
- 通过
LocalBinder返回 Service 实例,实现组件间交互 onBind()返回IBinder对象,供客户端绑定
// MyBoundService.java
public class MyBoundService extends Service {  private final IBinder binder = new LocalBinder();  private static final String TAG = "MyBoundService";  public class LocalBinder extends Binder {  MyBoundService getService() {  return MyBoundService.this;  }  }  @Override  public IBinder onBind(Intent intent) {  Log.d(TAG, "Service 已绑定");  return binder;  }  @Override  public boolean onUnbind(Intent intent) {  Log.d(TAG, "所有客户端已解绑");  return super.onUnbind(intent);  }  // 自定义服务方法(供Activity调用)  public void performTask(String data) {  Log.d(TAG, "执行任务:" + data);  }
}
2. 注册 Service
在 AndroidManifest.xml 中添加声明:
<application>  <service android:name=".MyBoundService" />
</application>
3. Activity 绑定与通信
- 通过
bindService()建立绑定 ServiceConnection处理绑定成功/断开事件- 绑定后通过
myService实例直接调用服务方法 - 必须调用
unbindService()释放资源,避免内存泄漏 - 多个组件可绑定同一服务,全部解绑后服务销毁
// MainActivity.java
public class MainActivity extends AppCompatActivity {  private MyBoundService myService;  private boolean isBound = false;  private ServiceConnection connection = new ServiceConnection() {  @Override  public void onServiceConnected(ComponentName name, IBinder service) {  MyBoundService.LocalBinder binder= (MyBoundService.LocalBinder) service;  myService = binder.getService();  isBound = true;  myService.performTask("Hello from Activity!"); // 调用服务方法  }  @Override  public void onServiceDisconnected(ComponentName name) {  isBound = false;  }  };  @Override  protected void onCreate(Bundle savedInstanceState) {  super.onCreate(savedInstanceState);  setContentView(R.layout.activity_main);  // 绑定服务  Intent intent = new Intent(this, MyBoundService.class);  bindService(intent, connection, Context.BIND_AUTO_CREATE);  }  @Override  protected void onDestroy() {  super.onDestroy();  if (isBound) {  unbindService(connection); // 必须解绑避免泄漏  isBound = false;  }  }
}
Activity 创建时: bindService() → Service: onCreate() → onBind()
Activity 销毁时: unbindService() → Service: onUnbind() → onDestroy()
四、前台服务
1. 服务端实现
- Android 8.0+ 必须创建
NotificationChannel,否则通知无法显示 - 通过
IMPORTANCE_LOW设置低优先级(无提示音) startForeground()必须在onCreate()或onStartCommand()中调用,调用后服务优先级提升,避免被系统轻易回收stopForeground(true)确保通知栏通知被移除
// ForegroundService.java
public class ForegroundService extends Service {private static final int NOTIFICATION_ID = 1001;private static final String CHANNEL_ID = "foreground_service_channel";@Overridepublic void onCreate() {super.onCreate();createNotificationChannel();startForegroundWithNotification("服务初始化中...");}@Overridepublic int onStartCommand(Intent intent, int flags, int startId) {// 获取 Activity 传递的数据(可选)String inputData = intent != null? intent.getStringExtra("input_data") : null;updateNotification("正在运行: " + inputData);// 模拟耗时任务new Thread(() -> {for (int i = 0; i < 10; i++) {try {Thread.sleep(1000);updateNotification("进度: " + (i + 1) * 10 + "%");} catch (InterruptedException e) {e.printStackTrace();}}stopSelf(); // 任务完成后自动停止服务}).start();return START_STICKY; // 服务被系统杀死后自动重启}private void createNotificationChannel() {if (Build.VERSION.SDK_INT >= Build.VERSION_CODES.O) {NotificationChannel channel = new NotificationChannel(CHANNEL_ID,"前台服务示例",NotificationManager.IMPORTANCE_LOW);channel.setDescription("用于展示前台服务的持续运行状态");NotificationManager manager= getSystemService(NotificationManager.class);manager.createNotificationChannel(channel);}}private void startForegroundWithNotification(String text) {Intent notificationIntent = new Intent(this, MainActivity.class);PendingIntent pendingIntent = PendingIntent.getActivity(this,0,notificationIntent,PendingIntent.FLAG_IMMUTABLE);Notification notification = new NotificationCompat.Builder(this, CHANNEL_ID).setContentTitle("前台服务示例").setContentText(text).setSmallIcon(R.drawable.ic_notification).setContentIntent(pendingIntent).setOnlyAlertOnce(true) // 避免重复提示音.build();startForeground(NOTIFICATION_ID, notification);}private void updateNotification(String text) {Notification notification = new NotificationCompat.Builder(this, CHANNEL_ID).setContentTitle("前台服务示例").setContentText(text).setSmallIcon(R.drawable.ic_notification).setOnlyAlertOnce(true).build();NotificationManager manager= getSystemService(NotificationManager.class);manager.notify(NOTIFICATION_ID, notification);}@Overridepublic IBinder onBind(Intent intent) {return null; // 无需绑定功能}@Overridepublic void onDestroy() {super.onDestroy();stopForeground(true); // 停止时移除通知}
}
2. 配置清单文件注册服务
<!-- 服务端 AndroidManifest.xml -->
<manifest xmlns:android="http://schemas.android.com/apk/res/android"><!-- 必须的权限声明,否则startForeground方法不可用 --><uses-permission android:name="android.permission.FOREGROUND_SERVICE"/><application><!-- 服务定义 --><serviceandroid:name=".ForegroundService"android:enabled="true"android:exported="false"android:foregroundServiceType="mediaPlayback"/>  <!-- 按需配置类型 --></application>
</manifest>
3. 客户端调用(Activity)
- 通过
stopSelf()或stopService()停止服务
// MainActivity.java
public class MainActivity extends AppCompatActivity {@Overrideprotected void onCreate(Bundle savedInstanceState) {super.onCreate(savedInstanceState);setContentView(R.layout.activity_main);// 启动前台服务按钮findViewById(R.id.btn_start).setOnClickListener(v -> {Intent serviceIntent = new Intent(this, ForegroundService.class);serviceIntent.putExtra("input_data", "用户启动任务");if (Build.VERSION.SDK_INT >= Build.VERSION_CODES.O) {startForegroundService(serviceIntent); // Android 8.0+ 专用方法} else {startService(serviceIntent);}});// 停止服务按钮findViewById(R.id.btn_stop).setOnClickListener(v -> {Intent serviceIntent = new Intent(this, ForegroundService.class);stopService(serviceIntent);});}
}
4. 客户端配置权限
<!-- 客户端 AndroidManifest.xml -->
<manifest>  <!-- 添加权限 -->  <uses-permission android:name="android.permission.FOREGROUND_SERVICE"/>  <!-- 跨进程调用时添加(可选) -->  <queries>  <package android:name="com.example.service"/>  </queries>  <application>  <!-- 无需声明服务组件 -->  </application>
</manifest>
五、远程服务扩展
1. 自定义 Parcelable 对象
// CustomData.java
package com.example.model;  import android.os.Parcel;
import android.os.Parcelable;  public class CustomData implements Parcelable {  private String content;  // 构造函数  public CustomData(String content) {  this.content = content;  }  // Parcelable 反序列化构造函数  protected CustomData(Parcel in) {  content = in.readString();  }  // Parcelable CREATOR  public static final Creator<CustomData> CREATOR = new Creator<CustomData>() {  @Override  public CustomData createFromParcel(Parcel in) {  return new CustomData(in);  }  @Override  public CustomData[] newArray(int size) {  return new CustomData[size];  }  };  @Override  public int describeContents() {  return 0;  }  @Override  public void writeToParcel(Parcel dest, int flags) {  dest.writeString(content);  }  // Getter  public String getContent() {  return content;  }
}
2. 定义 AIDL 接口
- AIDL 文件定义跨进程通信的接口方法
- 支持基本类型、
String、List、Parcelable等数据类型 - 需在 AIDL 中显式导入
parcelable类型
// IRemoteService.aidl
package com.example.service;  parcelable CustomData;
interface IRemoteService {  int add(int a, int b);  String getData(String input); void sendData(in CustomData data); void registerCallback(IRemoteCallback callback);void unregisterCallback(IRemoteCallback callback);
}  // 回调接口(IRemoteCallback.aidl)
interface IRemoteCallback {void onResult(int result);
}
3. 服务端实现 AIDL 接口
- 继承
IRemoteService.Stub实现接口方法 - 通过
onBind()返回IBinder对象 - 直接使用
CustomData对象(已自动反序列化) - 服务端通过
RemoteCallbackList自动清理无效回调,无需手动处理。 RemoteCallbackList.register()会自动去重,多次注册同一回调不会重复触发
public class RemoteService extends Service {  private final IBinder binder = new RemoteBinder();// 使用 RemoteCallbackList 管理跨进程回调(线程安全)private final RemoteCallbackList<IRemoteCallback> callbackList= new RemoteCallbackList<>();private class RemoteBinder extends IRemoteService.Stub {  @Override  public int add(int a, int b) {  int result = a + b;notifyResult(result); // 触发回调通知return result;}  @Override  public String getData(String input) {  return "Processed: " + input;  }  @Override  public void sendData(CustomData data) throws RemoteException {  Log.d(TAG, "收到数据: " + data.getContent());  // 处理数据逻辑  } @Overridepublic void registerCallback(IRemoteCallback callback) {if (callback != null) {callbackList.register(callback);}}@Overridepublic void unregisterCallback(IRemoteCallback callback) {if (callback != null) {callbackList.unregister(callback);}}// 通知所有客户端计算结果private void notifyResult(int result) {int count = callbackList.beginBroadcast();try {for (int i = 0; i < count; i++) {IRemoteCallback callback = callbackList.getBroadcastItem(i);callback.onResult(result); // 跨进程回调}} catch (RemoteException e) {e.printStackTrace(); // 客户端已断开,自动从列表中移除} finally {callbackList.finishBroadcast();}}}  @Override  public IBinder onBind(Intent intent) {  return binder;  }  @Overridepublic void onDestroy() {super.onDestroy();callbackList.kill(); // 清理回调列表}
}
注意:必须使用 Android 提供的
RemoteCallbackList管理跨进程回调(自动处理客户端进程死亡情况),普通集合(如ArrayList)无法正确识别跨进程的IBinder对象。
4. 注册 Service(AndroidManifest.xml)
android:exported="true"允许跨进程访问- 定义唯一
action供客户端绑定 - android:process=":remote" 强制指定独立进程,所有跨进程绑定均指向此进程,复用同一实例
<!-- 服务端AndroidManifest.xml-->
<manifest xmlns:android="http://schemas.android.com/apk/res/android"><!-- 声明自定义权限(可选,用于安全控制) --><permissionandroid:name="com.example.permission.REMOTE_SERVICE"android:protectionLevel="signature"/> <!-- 仅允许同签名应用访问 --><!-- 添加前台服务权限(若涉及前台服务) --><uses-permission android:name="android.permission.FOREGROUND_SERVICE"/><application><!-- RemoteService 定义 --><serviceandroid:name=".RemoteService"android:enabled="true"android:exported="true" <!-- 允许跨进程访问 -->android:permission="com.example.permission.REMOTE_SERVICE" <!-- 绑定权限 -->android:process=":remote"> <!-- 指定独立进程,全局唯一 --><intent-filter><action android:name="com.example.service.IRemoteService"/></intent-filter></service></application>
</manifest>
5. 客户端绑定与调用远程服务
- 通过隐式 Intent 指定服务端包名和 Action
- 使用
IRemoteService.Stub.asInterface()转换IBinder对象 - 所有跨进程方法调用需处理
RemoteException - 在
onServiceDisconnected()和onBindingDied()中,直接清理本地资源(如置空remoteService),不调用任何远程方法。 - 客户端无需在断开时调用
unregisterCallback(),服务端能正确处理死亡 Binder,其注册的回调会自动从列表中移除。 - 如果客户端维护了本地回调列表(如
localCallbackList),需在断开时直接清理,无需依赖服务端确认。
public class MainActivity extends AppCompatActivity {  private IRemoteService remoteService;  private boolean isBound = false;  private IRemoteCallback callback = new IRemoteCallback.Stub() {@Overridepublic void onResult(int result) {// 注意:此处运行在 Binder 线程,需切到主线程更新 UInew Handler(Looper.getMainLooper()).post(() -> {textView.setText("计算结果: " + result);});}};// 绑定服务方法(封装复用)private void bindService() {Intent intent = new Intent("com.example.service.IRemoteService");intent.setPackage("com.example.service"); // 显式指定包名// 判断是否 Android 11+ 需要添加 flagsif (Build.VERSION.SDK_INT >= Build.VERSION_CODES.R) {bindService(intent, connection,Context.BIND_AUTO_CREATE | Context.BIND_IMPORTANT);} else {bindService(intent, connection, Context.BIND_AUTO_CREATE);}}private ServiceConnection connection = new ServiceConnection() {  @Override  public void onServiceConnected(ComponentName name, IBinder service) {  remoteService = IRemoteService.Stub.asInterface(service);  isBound = true;  try {  remoteService.registerCallback(callback); // 注册回调int result = remoteService.add(3, 5);  Log.d("Client", "Result: " + result);  CustomData data = new CustomData("Hello from Client"); remoteService.sendData(data);} catch (RemoteException e) {  // 远程调用异常捕获e.printStackTrace();  Log.e("Client", "Remote call failed: " + e.getMessage());}  }  @Override  public void onServiceDisconnected(ComponentName name) {  isBound = false; remoteService = null; if (reconnectAttempts < MAX_RECONNECT_ATTEMPTS) {new Handler(Looper.getMainLooper()).postDelayed(() -> {reconnectAttempts++;Log.w(TAG, "尝试第 " + reconnectAttempts + " 次重连...");bindService(); // 调用绑定方法}, 3000); // 延迟 3 秒后重试(避免频繁请求)} else {Log.e(TAG, "已达到最大重连次数,停止尝试");}}  @Overridepublic void onBindingDied(ComponentName name) {// Android 10+ 新增回调,处理绑定失效场景onServiceDisconnected(name);}};  @Override  protected void onCreate(Bundle savedInstanceState) {  super.onCreate(savedInstanceState);  setContentView(R.layout.activity_main);  bindService(); }  @Override  protected void onDestroy() {  super.onDestroy();  try {if (remoteService != null && callback != null) {remoteService.unRegisterCallback(callback); // 主动注销remoteService = null;}} catch (RemoteException e) {e.printStackTrace();}if (isBound) {  unbindService(connection);  isBound = false;  }  }
}
6. 客户端声明权限
<!-- 客户端 AndroidManifest.xml -->
<manifest xmlns:android="http://schemas.android.com/apk/res/android"package="com.example.client"><!-- Android 11+ 跨应用通信需添加 queries(必选) --><queries><!-- 声明目标服务端包名 --><package android:name="com.example.service" /><!-- 若需要调用特定组件(如 Activity)可扩展为 --><!--<intent><action android:name="android.intent.action.VIEW" /><data android:scheme="https" /></intent>--></queries><application><!-- 其他组件声明(如 Activity) --></application>
</manifest>
六、服务保活
| 方法 | 适用场景 | 厂商兼容性 | 系统限制 |
|---|---|---|---|
| 前台服务+通知 | 用户感知型任务 | 高 | Android 8+ |
| JobScheduler 定时拉活 | 低频后台任务 | 中 | Android 5+ |
| 系统广播监听 | 紧急恢复场景 | 低 | Android 7+ |
| 独立进程守护 | 高稳定性要求场景 | 中 | 全版本 |
1. 前台服务 + 通知 (前面已介绍)
- 使用
startForeground()提升服务优先级至前台级别 - Android 9+ 需动态申请
FOREGROUND_SERVICE权限
public class PersistentService extends Service {@Overridepublic int onStartCommand(Intent intent, int flags, int startId) {// 创建前台通知(Android 8.0+ 需通知渠道)Notification notification = new NotificationCompat.Builder(this, "channel_id").setContentTitle("服务运行中").setSmallIcon(R.drawable.ic_notification).build();startForeground(1, notification); // 必须显示通知return START_STICKY; // 服务终止后尝试重启:// ml-citation{ref="1,6" data="citationList"}}
}
2. 粘性服务重启策略
覆盖生命周期方法:
@Override
public void onTaskRemoved(Intent rootIntent) {// 任务被移除时(如用户划掉最近任务)触发重启Intent restartIntent = new Intent(this, PersistentService.class);restartIntent.setPackage(getPackageName());startService(restartIntent);super.onTaskRemoved(rootIntent);
}@Override
public void onDestroy() {// 服务被系统杀死时触发重启逻辑// 发送广播,需要注册一个广播接收器sendBroadcast(new Intent("RESTART_SERVICE_ACTION")); super.onDestroy();
}
注册广播接收器,通过广播重新拉起服务 :
<receiver android:name=".RestartReceiver"><intent-filter><action android:name="RESTART_SERVICE_ACTION" /></intent-filter>
</receiver>
频繁调用
startService()可能导致 ANR,建议结合JobScheduler优化
3. 系统广播监听
听高频触发广播,利用网络变化、解锁等事件触发服务重启。
<receiver android:name=".SystemEventReceiver"><intent-filter><action android:android:name="android.intent.action.BOOT_COMPLETED" /><action android:name="android.net.conn.CONNECTIVITY_CHANGE" /><action android:name="android.intent.action.USER_PRESENT" /></intent-filter>
</receiver>
4. 进程守护与JobScheduler
独立进程运行,减少主进程崩溃对服务的影响。
<service android:name=".PersistentService"android:process=":persistent_process" />
JobScheduler 定时唤醒,定期检查服务状态并拉起。
ComponentName serviceComponent = new ComponentName(this, PersistentService.class);
JobInfo jobInfo = new JobInfo.Builder(1, serviceComponent).setPeriodic(15 * 60 * 1000)  // 15分钟间隔.setPersisted(true)  // 设备重启后保持任务.build();
JobScheduler scheduler = (JobScheduler) getSystemService(JOB_SCHEDULER_SERVICE);
scheduler.schedule(jobInfo);
七、服务启动方法混用
1. startService() 重复调用
- 首次调用:触发
onCreate()→onStartCommand() - 后续调用:仅触发
onStartCommand(),onCreate()不再执行
// 第一次调用
startService(intent); // onCreate() -> onStartCommand()// 第二次调用
startService(intent); // 仅 onStartCommand()
2. bindService() 重复调用
- 首次绑定:触发
onCreate()→onBind() - 后续绑定:若 Service 已存在,直接返回已创建的
IBinder对象,不再触发onBind()
// 第一次绑定
// onCreate() -> onBind()
bindService(intent, conn, BIND_AUTO_CREATE); // 第二次绑定(同一进程)
// 无生命周期方法调用,复用已有 IBinder
bindService(intent, conn2, BIND_AUTO_CREATE);
不同进程再次绑定:
- 同一 Service 实例:若
Service已在独立进程运行,后续绑定直接复用已有实例,不再触发onCreate()和onBind(),仅通过ServiceConnection返回IBinder代理对象。- 新 Service 实例:若应用配置多进程且未声明
android:process,不同组件进程可能触发多个Service实例(需避免此设计)
3. 混合调用场景
startService() 后 bindService():
Service 生命周期持续到 unbindService() 和 stopService()/stopSelf() 均被调用
startService(intent); // onCreate() -> onStartCommand()
bindService(intent, conn); // onBind(),Service 已存在无需创建同理,先bindService()后startService()
bindService(intent, conn); // 创建 Service 实例,onCreate() → onBind()
startService(intent); // onStartCommand(),Service 已存在无需创建
混合调用时需同时调用
stopService()和unbindService()才能销毁 Service


代替芯片——LHE7909)

使用什么激活函数?)
)


