目录
链表的介绍
单链表的手动实现
单链表的基本框架
打印链表:
获取表长:
头插法新增节点:
尾插法新增节点:
在指定下标插入:
链表的查找
删除链表中第一个出现的key:
删除链表中所有key值
链表置空
总代码
测试代码
链表相关的OJ题
1.反转单链表
思路:
2.查找链表中间节点
思路:1.判空;2.定义两个指针,都指向head;3.设置循环,每次循环一个指针走两步一个指针走一步,当走的快的那个指针到达最后一个节点时,慢的节点就在中间;
链表的介绍
基于顺序表具有,插入数据,空间不足时要扩容,扩容有性能消耗和插入删除数据时有时候需要大量的挪动数据,导致程序的执行效率低的缺点,延升出了链表。
链表,是一种逻辑结构连续物理结构不一定连续的一种数据结构;由一个个的节点组成,每个节点包含数据域和指针域,指针域指向下一个节点。
单链表的手动实现
单链表的基本框架
//不带头结点的单链表
public class MySingleList implements IList{//链表由若干个头结点组成,每个节点都是一个完整的部分,所以可以定义一个内部类static class ListNode{public int val;//数据域public ListNode next;//指针域 存放下一个节点的地址public ListNode(int val) {this.val = val;}}public ListNode head;//定义一个存放节点的变量,默认值为null@Overridepublic void addFirst(int data) {}@Overridepublic void addLast(int data) {}@Overridepublic void addIndex(int index, int data) {}@Overridepublic boolean contains(int key) {return false;}@Overridepublic void remove(int key) {}@Overridepublic void removeAllKey(int key) {}@Overridepublic int size() {return 0;}@Overridepublic void clear() {}@Overridepublic void display() {}
}
为了更好的理解这个单链表的操作,我们先创建单链表的方法:
public ListNode head;//定义一个存放节点的变量,默认值为nullpublic void createList(){//1.通过实例化ListNode创建几个节点ListNode node1 = new ListNode(12);ListNode node2 = new ListNode(22);ListNode node3 = new ListNode(32);ListNode node4 = new ListNode(42);//2.根据单链表的形态,把节点链接起来node1.next = node2;node2.next = node3;node3.next = node4;this.head = node1;}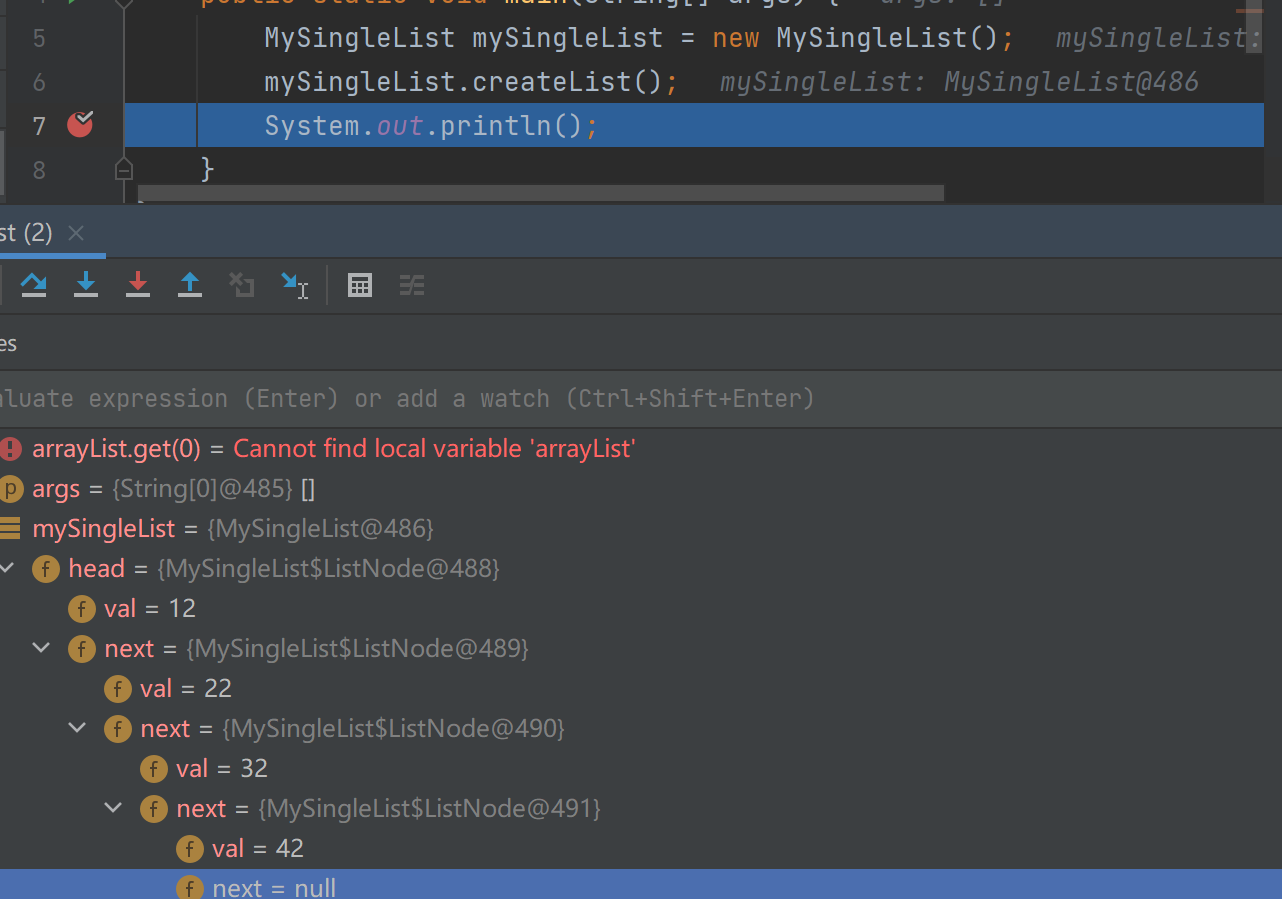
打印链表:
public void display() {//1.借助一个cur节点去遍历链表,移动cur的位置ListNode cur = head;while (cur !=null){//cur=null表示整个链表都走完了System.out.print(cur.val+" ");cur = cur.next;}System.out.println();}注意区分循环条件 cur !=null 和cur.next !=null
获取表长:
获取表长的方法是打印方法衍生出来的,无非就是打印的方法中加一个计数器去记表长:
public int size() {ListNode cur = head;int count = 0;while (cur != null){//注意这个循环条件count++;cur = cur.next;}return count;}头插法新增节点:
public void addFirst(int data) {//1.实例化一个节点ListNode node = new ListNode(data);//2.新增节点的指针域指向头节点更新头结点 顺序不可变node.next = head;this.head = node;}注意:
- 插入数据时先绑定后面,如果我们先绑定前面的话会发生什么呢?当this.head = node先执行的完后,新增节点指针域该指向谁了,为了防止数据丢失,插入数据时因先绑定后面
尾插法新增节点:
public void addLast(int data) {ListNode node = new ListNode(data);//1.找到链表最后一个节点if (head == null){head = node;}else {//遍历链表去找ListNode cur = head;while (cur.next != null) {cur = cur.next;}cur.next = node ;//增}}在指定下标插入:
public void addIndex(int index, int data) {//1.判断index的合法性if (index < 0 || index > size()){throw new IndexException("index非法"+index);}//表空的情况ListNode node = new ListNode(data);if (head == null){head = node;return;}//2.在0位置插入时调用头插if (index == 0 ){addFirst(data);return;}//3.index=size()尾插法if (index == size()){addLast(data);return;}//在index位置插入时,找到index位置的前一个节点去操作ListNode cur = findPrevIndex(index);node.next = cur.next;cur.next = node;}private ListNode findPrevIndex(int index){ListNode cur = head;int count = 0;while (count != index - 1){count++;cur = cur.next;}return cur;}链表的查找
public boolean contains(int key) {ListNode cur = head;while (cur !=null){if (cur.val == key){return true;}cur = cur.next;}return false;}删除链表中第一个出现的key:
public void remove(int key) {//1.表空if (head == null){return;}//2.头结点删除if (head.val == key){head = head.next;return;}//3.中间元素删除找key的前驱节点去操作ListNode cur = findPrevKey(key);cur.next = cur.next.next;//也可以借助一个变量去删除/*ListNode del = cur.next;cur.next = del.next;*/}//尽量以方法的方式去实现功能,降低代码的耦合度private ListNode findPrevKey(int key){ListNode cur = head;while (cur.next !=null){if (cur.next.val == key){return cur;}else {cur = cur.next;}}return null;}删除链表中所有key值
public void removeAllKey(int key) {if (head == null) {return;}//定义两个指针分别指向头和头的下一个ListNode prev = head;ListNode cur = head.next;//可能要被移除的元素while (cur != null) {//遍历if (cur.val == key) {prev.next = cur.next;cur = cur.next;} else {//不用删除就往后继续遍历prev = cur;cur = cur.next;}//此时除了头结点其他节点都遍历完了,就判断头节点if (head.val == key) {head = head.next;}}}链表置空
public void clear() {//法1:循环把每个节点都置空//法2:直接把最开始的节点中(只要是没有人引用的对象内存都会回收置空),这样就把整个链表置空了head = null;}
总代码
//不带头结点的单链表
public class MySingleList implements IList{//链表由若干个头结点组成,每个节点都是一个完整的部分,所以可以定义一个内部类static class ListNode{public int val;//数据域public ListNode next;//指针域 存放下一个节点的地址public ListNode(int val) {this.val = val;}}public ListNode head;//定义一个存放节点的变量,默认值为nullpublic void createList(){//1.通过实例化ListNode创建几个节点ListNode node1 = new ListNode(12);ListNode node2 = new ListNode(22);ListNode node3 = new ListNode(32);ListNode node4 = new ListNode(42);//2.根据单链表的形态,把节点链接起来node1.next = node2;node2.next = node3;node3.next = node4;this.head = node1;}@Overridepublic void addFirst(int data) {//1.实例化一个节点ListNode node = new ListNode(data);//2.新增节点的指针域指向头节点更新头结点node.next = head;this.head = node;}@Overridepublic void addLast(int data) {ListNode node = new ListNode(data);//1.找到链表最后一个节点if (head == null){head = node;}else {//遍历链表去找ListNode cur = head;while (cur.next != null) {cur = cur.next;}cur.next = node ;//增}}@Overridepublic void addIndex(int index, int data) {//1.判断index的合法性if (index < 0 || index > size()){throw new IndexException("index非法"+index);}//表空的情况ListNode node = new ListNode(data);if (head == null){head = node;return;}//2.在0位置插入时调用头插if (index == 0 ){addFirst(data);return;}//3.index=size()尾插法if (index == size()){addLast(data);return;}//在index位置插入时,找到index位置的前一个节点去操作ListNode cur = findPrevIndex(index);node.next = cur.next;cur.next = node;}private ListNode findPrevIndex(int index){ListNode cur = head;int count = 0;while (count != index - 1){count++;cur = cur.next;}return cur;}@Overridepublic boolean contains(int key) {ListNode cur = head;while (cur !=null){if (cur.val == key){return true;}cur = cur.next;}return false;}@Overridepublic void remove(int key) {//1.表空if (head == null){return;}//2.头结点删除if (head.val == key){head = head.next;return;}//3.中间元素删除找key的前驱节点去操作ListNode cur = findPrevKey(key);cur.next = cur.next.next;//也可以借助一个变量去删除/*ListNode del = cur.next;cur.next = del.next;*/}//尽量以方法的方式去实现功能,降低代码的耦合度private ListNode findPrevKey(int key){ListNode cur = head;while (cur.next !=null){if (cur.next.val == key){return cur;}else {cur = cur.next;}}return null;}@Overridepublic void removeAllKey(int key) {if (head == null) {return;}//定义两个指针分别指向头和头的下一个ListNode prev = head;ListNode cur = head.next;//可能要被移除的元素while (cur != null) {//遍历if (cur.val == key) {prev.next = cur.next;cur = cur.next;} else {//不用删除就往后继续遍历prev = cur;cur = cur.next;}//此时除了头结点其他节点都遍历完了,就判断头节点if (head.val == key) {head = head.next;}}}@Overridepublic int size() {ListNode cur = head;int count = 0;while (cur != null){count++;cur = cur.next;}return count;}@Overridepublic void clear() {//法1:循环把每个节点都置空//法2:直接把最开始的节点中(只要是没有人引用的对象内存都会回收置空),这样就把整个链表置空了head = null;}@Overridepublic void display() {if (head == null){System.out.println("链表为空");return;}//1.借助一个cur节点去遍历链表,移动cur的位置ListNode cur = head;while (cur !=null){//cur=null表示整个链表都走完了System.out.print(cur.val+" ");cur = cur.next;}System.out.println();}}
测试代码
public class Test {public static void main(String[] args) {MySingleList mySingleList = new MySingleList();mySingleList.createList();System.out.println();mySingleList.display();//12 22 32 42System.out.println(mySingleList.size());//4mySingleList.addFirst(2);mySingleList.display();//2 12 22 32 42mySingleList.addLast(52);mySingleList.display();//2 12 22 32 42 52mySingleList.addIndex(2,20);mySingleList.display();//2 12 20 22 32 42 52System.out.println(mySingleList.contains(52));//truemySingleList.remove(12);mySingleList.display();//2 20 22 32 42 52mySingleList.addLast(2);mySingleList.addIndex(3,2);mySingleList.display();//2 20 22 2 32 42 52 2mySingleList.removeAllKey(2);mySingleList.display();//20 22 32 42 52mySingleList.clear();mySingleList.display();//链表为空}
}
链表相关的OJ题
1.反转单链表
反转一个单链表
思路: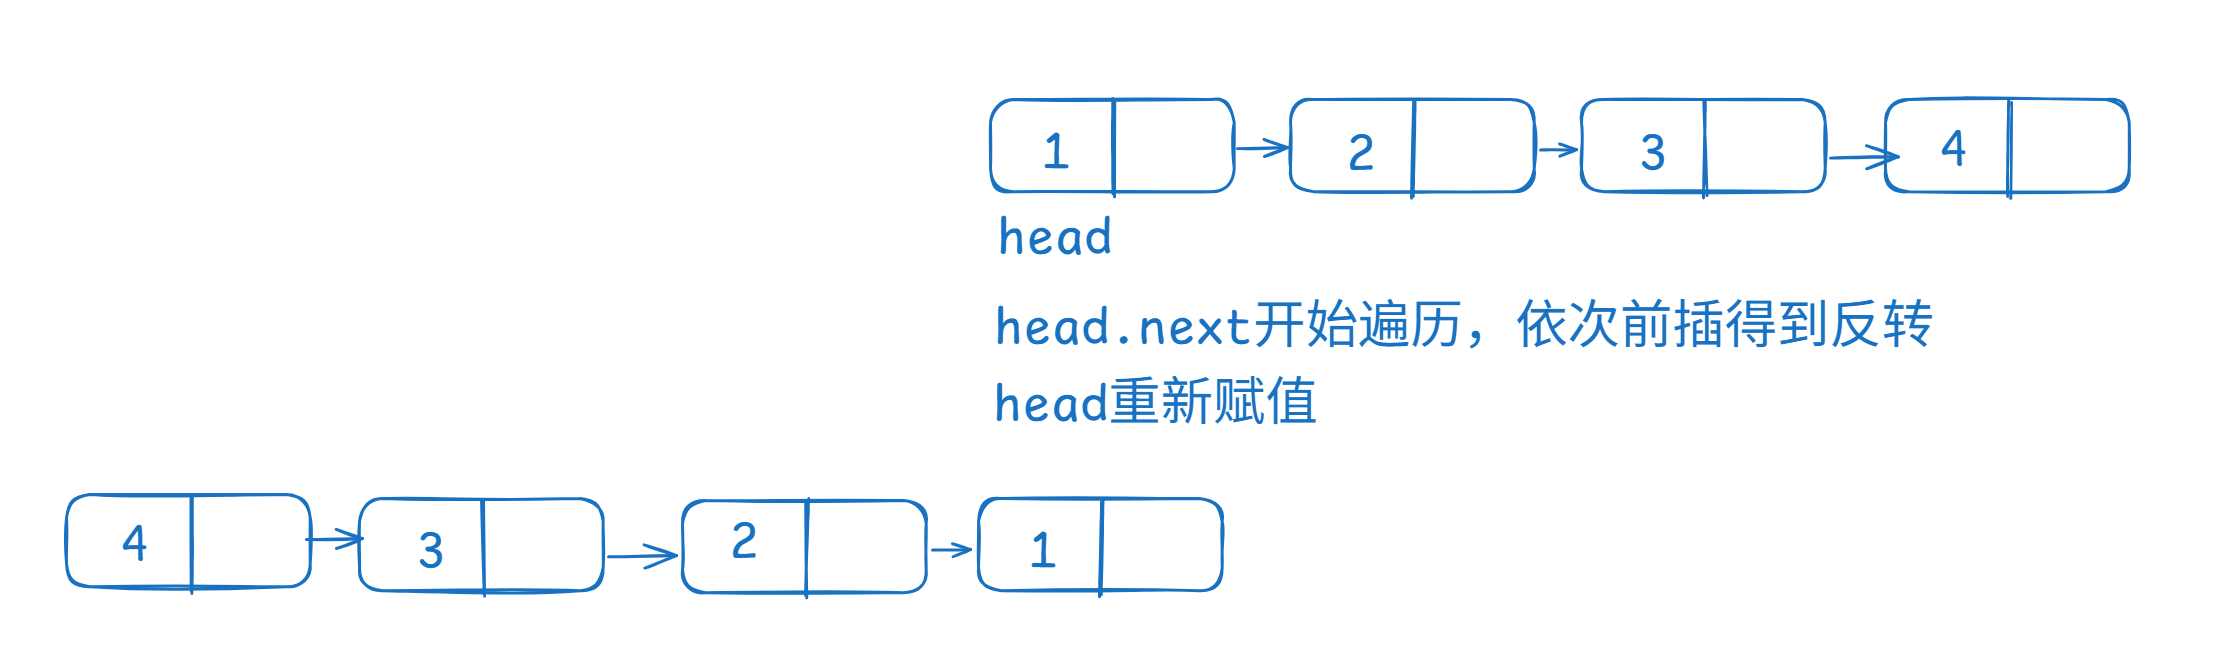
public ListNode reverseList(){if (head == null){return null;}if (head.next == null){return head;}//ListNode cur = head.next;//定义一个cur记录当前需要反转的节点head.next = null;while(cur != null){ListNode curNext = cur.next;//记录下一个反转点cur.next = head;//当前要反转的节点指向headhead = cur;//更新headcur = curNext;//更新cur}return head;}
2.查找链表中间节点
题目
思路:1.判空;2.定义两个指针,都指向head;3.设置循环,每次循环一个指针走两步一个指针走一步,当走的快的那个指针到达最后一个节点时,慢的节点就在中间;
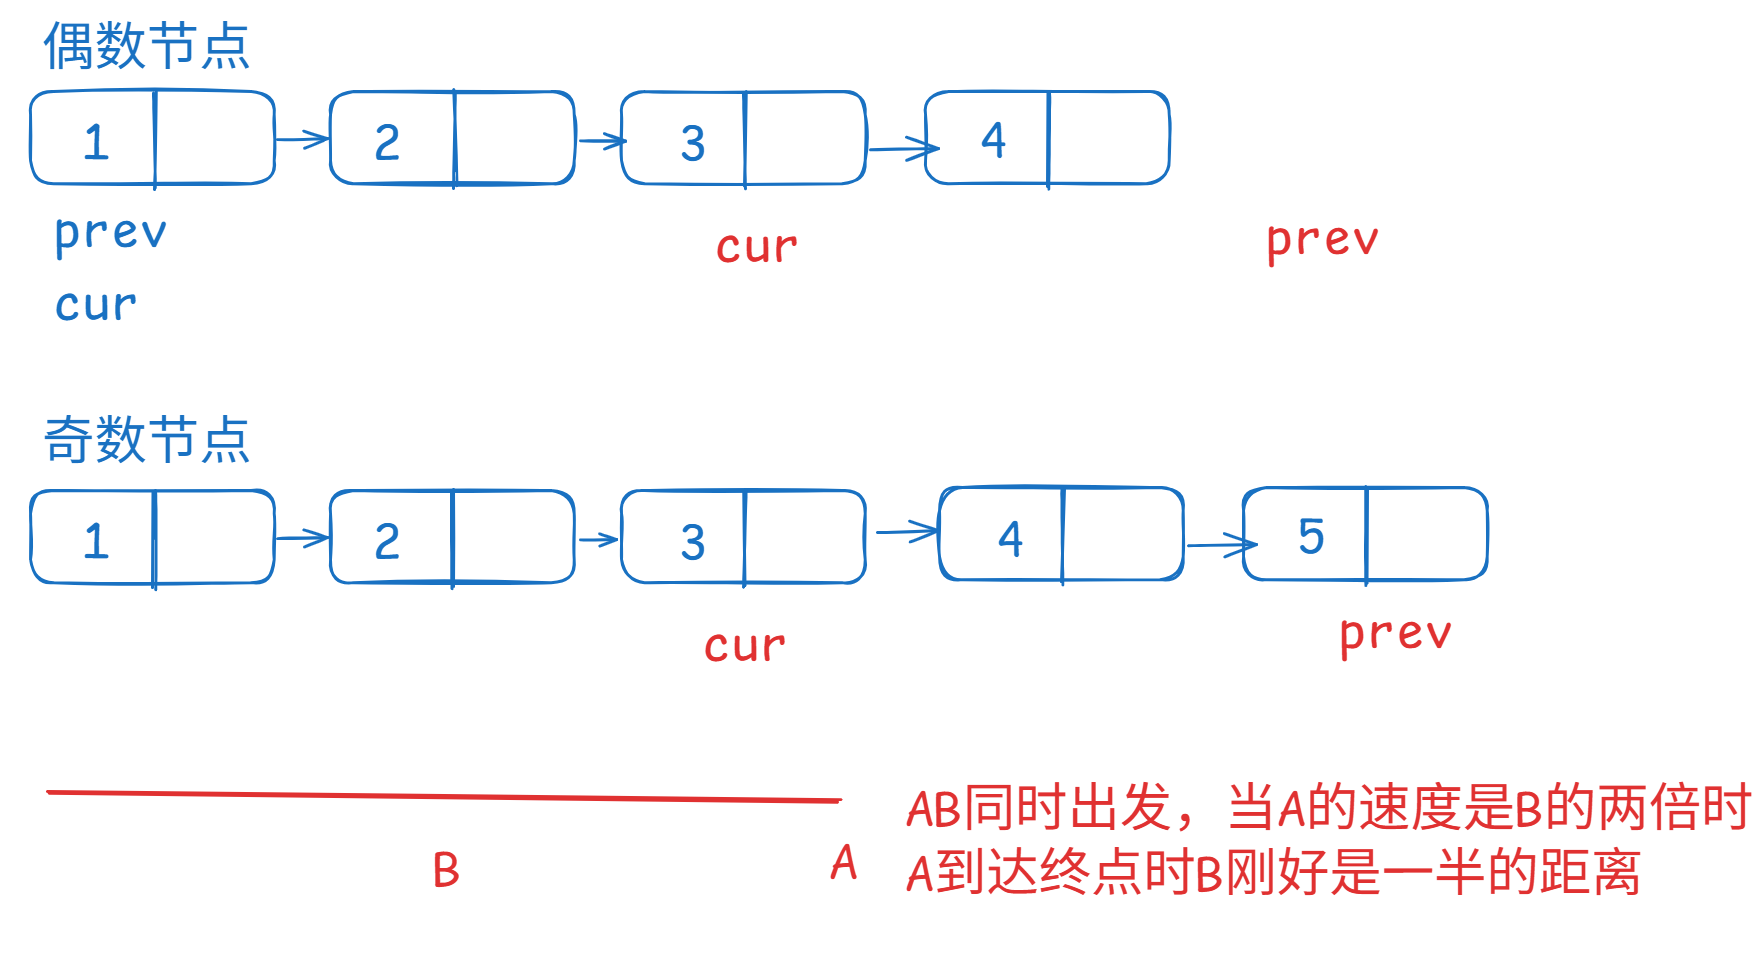
public ListNode middleNode(){if (head == null){return null;}ListNode fast = head;ListNode slow = head;while (fast != null && fast.next !=null){//顺序不能反,否则报空指针异常fast = fast.next.next;slow = slow.next;}return slow;}感谢大家阅读📚点赞👍收藏⭐评论✍关注❤
博客主页: 【长毛女士-CSDN博客】

![[学习] Hilbert变换:从数学原理到物理意义的深度解析与仿真实验(完整实验代码)](http://pic.xiahunao.cn/[学习] Hilbert变换:从数学原理到物理意义的深度解析与仿真实验(完整实验代码))


——CRUD基础)


)


