目录
Ant Design Pro 后端接口权限按钮系统
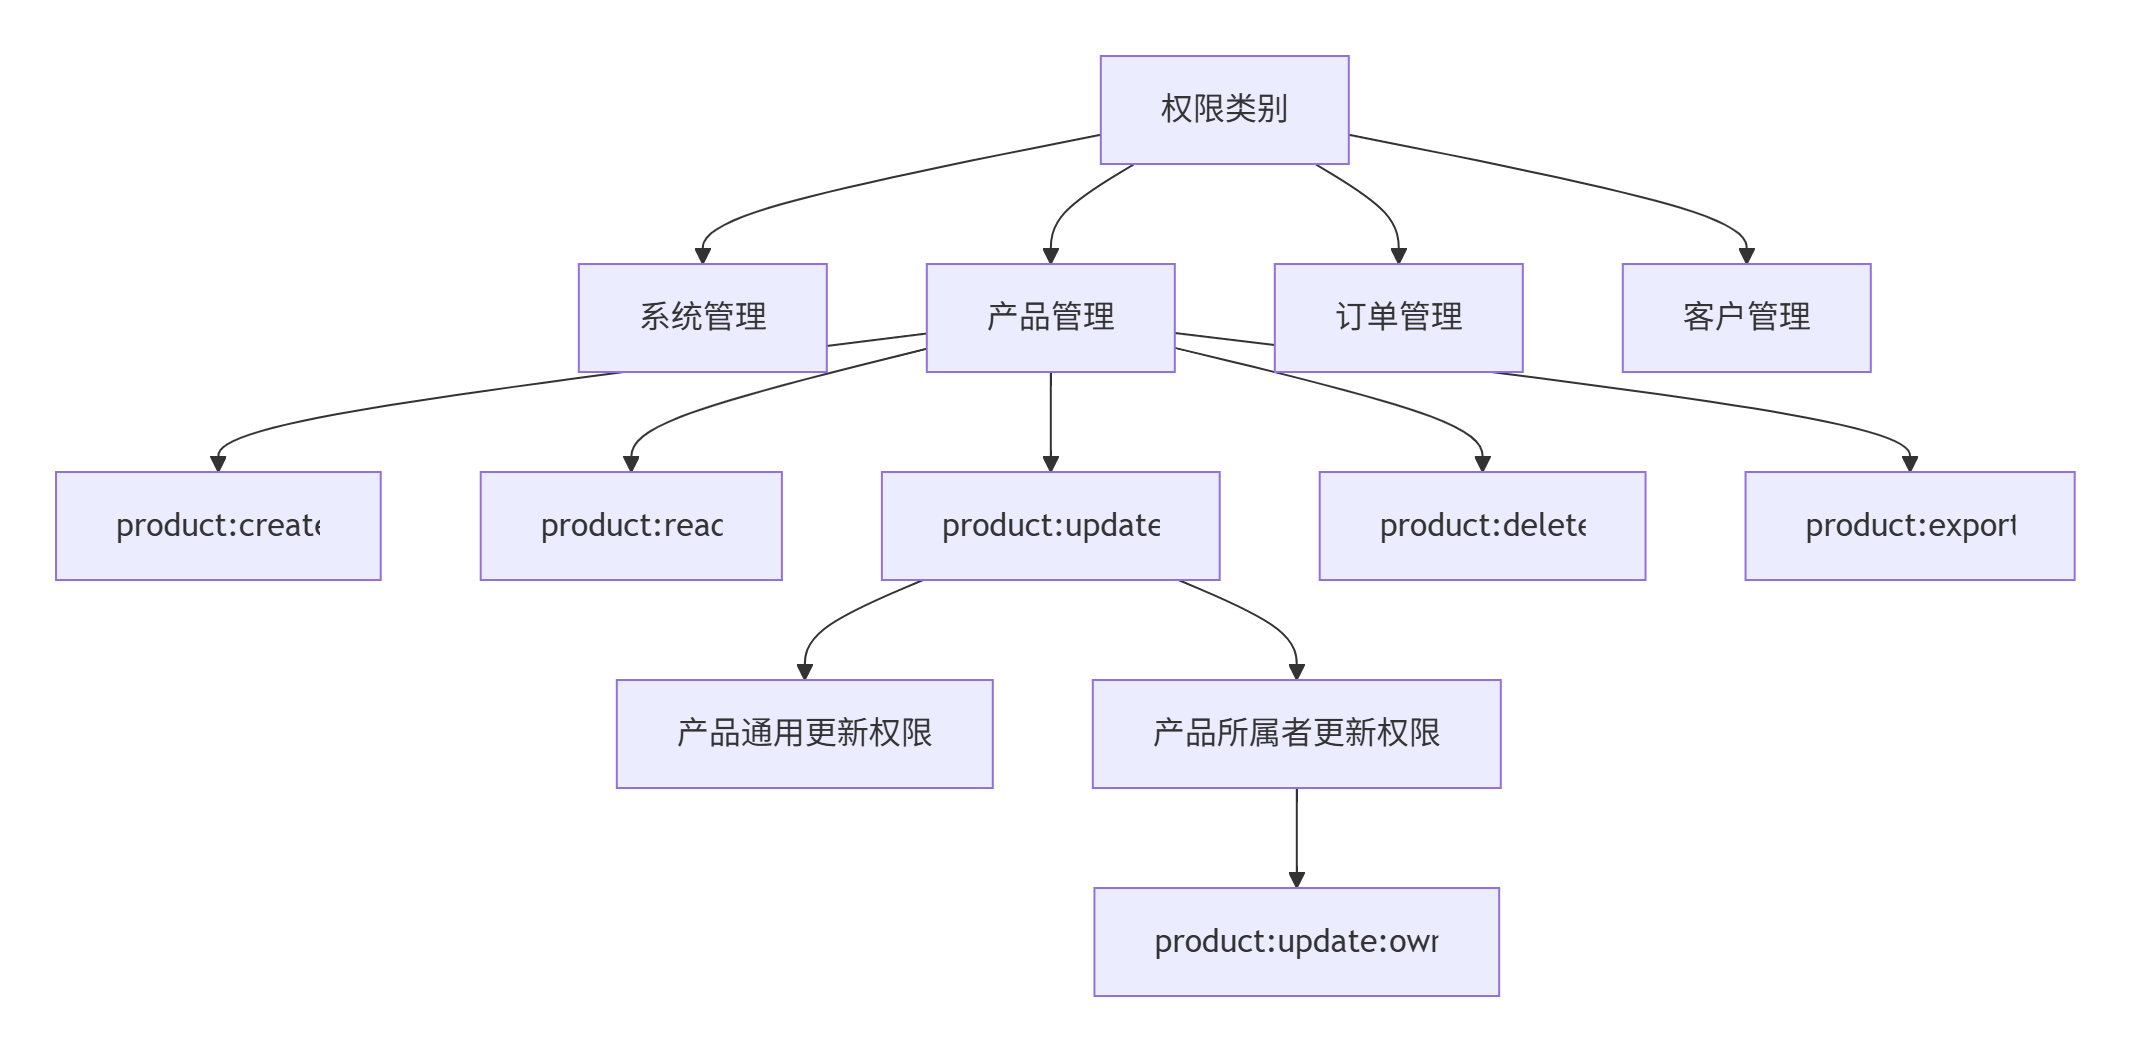
系统架构图
前端实现
权限按钮组件 (AuthButton.tsx)
权限钩子 (useAccess.ts)
权限服务 (permission.ts)
产品列表页面 (ProductList.tsx)
后端接口设计 (Node.js + Express 示例)
权限接口控制器 (permissionController.js)
权限接口路由 (permissionRoutes.js)
数据库模型 (models.js)
权限系统特点
1. 权限等级体系
2. 权限分类
3. 缓存策略
权限管理最佳实践
1. 权限按钮使用示例
2. 权限控制策略
3. 高级权限场景
权限审计与监控
Ant Design Pro 后端接口权限按钮系统
下面是一个完整的基于后端接口的权限按钮实现方案,包含前端页面、后端接口设计和权限控制系统。
系统架构图

前端实现
权限按钮组件 (AuthButton.tsx)
import React from 'react';
import { Button, ButtonProps, Tooltip } from 'antd';
import { useAccess, Access } from 'umi';
import { hasPermission } from '@/services/permission';
import type { PermissionAction } from '@/services/permission';interface AuthButtonProps extends ButtonProps {/** 权限标识 */permission: string;/** 无权限时提示信息 */noPermissionText?: string;/** 是否隐藏无权限按钮 */hideWhenDisabled?: boolean;/** 是否禁用而非隐藏 */disableWhenNoPermission?: boolean;/** 需要的数据权限上下文 */context?: any;
}const AuthButton: React.FC<AuthButtonProps> = ({permission,noPermissionText = '无操作权限',hideWhenDisabled = true,disableWhenNoPermission = false,context,children,...buttonProps
}) => {const { hasPermission } = useAccess();const hasAuth = hasPermission(permission, context);// 无权限时处理逻辑if (!hasAuth) {// 无权限时需要隐藏按钮if (hideWhenDisabled) return null;// 无权限但不禁用,添加提示const disabledButton = (<Button {...buttonProps} disabled={disableWhenNoPermission}>{children}</Button>);// 根据配置返回禁用按钮或带提示的按钮return disableWhenNoPermission ? (disabledButton) : (<Tooltip title={noPermissionText}>{disabledButton}</Tooltip>);}// 有权限,返回正常按钮return (<Button {...buttonProps}>{children}</Button>);
};export default AuthButton;
权限钩子 (useAccess.ts)
// src/hooks/useAccess.ts
import { useState, useEffect, useCallback } from 'react';
import { getPermissions } from '@/services/permission';type PermissionResult = {hasPermission: (permission: string, context?: any) => boolean;loading: boolean;permissions: string[];refreshPermissions: () => void;
};export default function useAccess(): PermissionResult {const [permissions, setPermissions] = useState<string[]>([]);const [loading, setLoading] = useState(true);// 获取权限数据const fetchPermissions = useCallback(async () => {setLoading(true);try {const res = await getPermissions();setPermissions(res?.permissions || []);} catch (error) {console.error('获取权限失败', error);setPermissions([]);} finally {setLoading(false);}}, []);// 初始化时获取权限useEffect(() => {fetchPermissions();}, [fetchPermissions]);// 检查是否有权限const hasPermission = useCallback((permission: string, context?: any): boolean => {// 如果权限列表包含通配符权限if (permissions.includes('*')) return true;// 精确匹配权限if (permissions.includes(permission)) return true;// 基于数据的权限检查(示例)if (context?.owner === currentUser.id && permissions.includes(`${permission}:own`)) {return true;}return false;}, [permissions]);return {hasPermission,loading,permissions,refreshPermissions: fetchPermissions};
}
权限服务 (permission.ts)
// src/services/permission.ts
import request from 'umi-request';
import type { RequestOptionsInit } from 'umi-request';// 权限类型定义
export type PermissionAction = | 'create' | 'read' | 'update' | 'delete' | 'export' | 'approve' | 'manage' | string;// 权限接口响应格式
export interface PermissionResponse {success: boolean;permissions: string[];
}// 获取当前用户权限
export async function getPermissions(options?: RequestOptionsInit
): Promise<PermissionResponse> {return request('/api/permissions', {method: 'GET',...(options || {}),});
}// 检查特定权限
export async function checkPermission(permission: string, context?: any,options?: RequestOptionsInit
): Promise<{ hasPermission: boolean }> {return request('/api/permissions/check', {method: 'POST',data: { permission, context },...(options || {}),});
}// 权限控制装饰器(用于页面组件)
export function withPermissions(WrappedComponent: React.ComponentType) {return (props: any) => {const { loading, permissions } = useAccess();if (loading) {return (<div style={{ textAlign: 'center', padding: 40 }}><Spin tip="权限验证中..." size="large" /></div>);}if (!permissions.length) {return (<Resultstatus="403"title="403"subTitle="抱歉,您没有访问权限,请联系管理员"/>);}return <WrappedComponent {...props} />;};
}
产品列表页面 (ProductList.tsx)
import React, { useState } from 'react';
import { PageContainer, ProTable } from '@ant-design/pro-components';
import AuthButton from '@/components/AuthButton';
import { PlusOutlined, EditOutlined, DeleteOutlined, ExportOutlined } from '@ant-design/icons';
import type { ProColumns } from '@ant-design/pro-components';
import { Modal, message } from 'antd';
import ProductForm from './ProductForm';interface Product {id: string;name: string;category: string;price: number;stock: number;owner: string;
}const ProductList: React.FC = () => {const [selectedRowKeys, setSelectedRowKeys] = useState<string[]>([]);const [createModalVisible, setCreateModalVisible] = useState(false);const [editRecord, setEditRecord] = useState<Product | null>(null);const columns: ProColumns<Product>[] = [{title: '产品名称',dataIndex: 'name',key: 'name',},{title: '类别',dataIndex: 'category',key: 'category',},{title: '价格',dataIndex: 'price',key: 'price',valueType: 'money',},{title: '库存',dataIndex: 'stock',key: 'stock',renderText: (val: number) => `${val}件`,},{title: '操作',key: 'action',render: (text, record) => (<span><AuthButton type="link" permission="product:update"context={{ owner: record.owner }}onClick={() => handleEdit(record)}><EditOutlined /> 编辑</AuthButton><AuthButton type="link" dangerpermission="product:delete"context={{ owner: record.owner }}noPermissionText="无法删除非本人创建的产品"onClick={() => handleDelete(record)}><DeleteOutlined /> 删除</AuthButton></span>),},];const handleCreate = () => {setCreateModalVisible(true);};const handleEdit = (record: Product) => {setEditRecord(record);};const handleDelete = (record: Product) => {Modal.confirm({title: '确认删除',content: `确定要删除产品【${record.name}】吗?`,onOk: () => {// 调用删除APImessage.success('删除成功');},});};const handleExport = () => {// 导出操作message.success('导出成功');};const handleBatchDelete = () => {Modal.confirm({title: '批量删除',content: `确定要删除选中的${selectedRowKeys.length}个产品吗?`,onOk: () => {// 调用批量删除APImessage.success('批量删除成功');setSelectedRowKeys([]);},});};return (<PageContainer><ProTable<Product>columns={columns}rowKey="id"headerTitle="产品列表"rowSelection={{selectedRowKeys,onChange: setSelectedRowKeys,}}toolBarRender={() => [<AuthButton key="create"type="primary" icon={<PlusOutlined />}permission="product:create"onClick={handleCreate}>新建产品</AuthButton>,<AuthButton key="export"icon={<ExportOutlined />}permission="product:export"onClick={handleExport}>导出数据</AuthButton>,selectedRowKeys.length > 0 && (<AuthButton key="batchDelete"dangerpermission="product:batch-delete"onClick={handleBatchDelete}noPermissionText="无批量删除权限"disableWhenNoPermission>批量删除</AuthButton>)]}request={async (params) => {// 模拟从后端获取产品数据return {data: mockProducts,success: true,total: mockProducts.length,};}}/>{/* 新建/编辑模态框 */}<Modaltitle={editRecord ? "编辑产品" : "新建产品"}open={createModalVisible || !!editRecord}onCancel={() => {setCreateModalVisible(false);setEditRecord(null);}}destroyOnClosefooter={null}><ProductForm initialValues={editRecord}onSuccess={() => {setCreateModalVisible(false);setEditRecord(null);// 刷新表格}}/></Modal></PageContainer>);
};// 模拟产品数据
const mockProducts: Product[] = [{ id: '1', name: 'MacBook Pro', category: 'Laptop', price: 14999, stock: 15, owner: 'user-001' },{ id: '2', name: 'iPhone 14', category: 'Phone', price: 7999, stock: 30, owner: 'user-002' },{ id: '3', name: 'iPad Air', category: 'Tablet', price: 4799, stock: 8, owner: 'user-003' },
];export default ProductList;
后端接口设计 (Node.js + Express 示例)
权限接口控制器 (permissionController.js)
// 后端控制层 - permissionController.js
const db = require('../models');
const { Op } = require('sequelize');class PermissionController {// 获取用户所有权限async getPermissions(req, res) {try {const userId = req.user.id; // 从认证信息中获取用户ID// 1. 获取用户角色const user = await db.User.findByPk(userId, {include: [{model: db.Role,as: 'roles',attributes: ['id', 'name'],through: { attributes: [] }}]});// 2. 获取角色关联的权限const roleIds = user.roles.map(role => role.id);const rolesWithPermissions = await db.Role.findAll({where: { id: { [Op.in]: roleIds } },include: [{model: db.Permission,as: 'permissions',attributes: ['code'],through: { attributes: [] }}]});// 3. 获取用户自定义权限const customPermissions = await db.UserPermission.findAll({where: { userId },include: [{model: db.Permission,attributes: ['code']}]});// 4. 合并权限并去重const permissions = new Set();// 角色权限rolesWithPermissions.forEach(role => {role.permissions.forEach(permission => {permissions.add(permission.code);});});// 自定义权限customPermissions.forEach(up => {permissions.add(up.Permission.code);});res.json({success: true,permissions: Array.from(permissions)});} catch (error) {console.error('获取权限失败', error);res.status(500).json({success: false,message: '获取权限失败'});}}// 检查特定权限async checkPermission(req, res) {try {const userId = req.user.id;const { permission, context } = req.body;// 1. 获取用户所有权限const { permissions } = await this._getAllPermissions(userId);// 2. 检查是否存在完全匹配的权限if (permissions.has(permission) {return res.json({ hasPermission: true });}// 3. 数据权限检查(示例:检查产品所有权)if (permission.startsWith('product:') && context?.productId) {const product = await db.Product.findByPk(context.productId);if (product && product.ownerId === userId) {// 检查拥有者的特殊权限(如 product:update:own)const ownPermission = `${permission}:own`;if (permissions.has(ownPermission)) {return res.json({ hasPermission: true });}}}res.json({ hasPermission: false });} catch (error) {console.error('权限检查失败', error);res.status(500).json({success: false,message: '权限检查失败'});}}// 内部方法:获取用户所有权限async _getAllPermissions(userId) {// ...与getPermissions方法类似// 返回Set对象包含所有权限}
}module.exports = new PermissionController();
权限接口路由 (permissionRoutes.js)
const express = require('express');
const router = express.Router();
const permissionController = require('../controllers/permissionController');
const authMiddleware = require('../middlewares/auth');// 权限认证中间件
router.use(authMiddleware);// 获取用户权限列表
router.get('/permissions', permissionController.getPermissions);// 检查特定权限
router.post('/permissions/check', permissionController.checkPermission);module.exports = router;
数据库模型 (models.js)
module.exports = (sequelize, DataTypes) => {const User = sequelize.define('User', {id: { type: DataTypes.UUID, primaryKey: true },username: DataTypes.STRING,email: DataTypes.STRING,// ...});const Role = sequelize.define('Role', {id: { type: DataTypes.UUID, primaryKey: true },name: DataTypes.STRING,description: DataTypes.STRING});const Permission = sequelize.define('Permission', {id: { type: DataTypes.UUID, primaryKey: true },code: { type: DataTypes.STRING, unique: true },name: DataTypes.STRING,category: DataTypes.STRING,description: DataTypes.TEXT});// 关联关系User.belongsToMany(Role, { through: 'UserRole' });Role.belongsToMany(User, { through: 'UserRole' });Role.belongsToMany(Permission, { through: 'RolePermission' });Permission.belongsToMany(Role, { through: 'RolePermission' });User.belongsToMany(Permission, { through: 'UserPermission' });Permission.belongsToMany(User, { through: 'UserPermission' });return { User, Role, Permission };
};
权限系统特点
1. 权限等级体系
2. 权限分类
| 权限类型 | 描述 | 示例 |
|---|---|---|
| 功能权限 | 控制操作入口 | product:create |
| 数据权限 | 控制数据访问范围 | product:read:department |
| 操作权限 | 控制特定操作 | order:approve |
| 状态权限 | 控制状态变更 | order:status:change |
3. 缓存策略
// 前端权限缓存机制
const PERMISSION_CACHE_KEY = 'user_permissions';
const CACHE_TTL = 30 * 60 * 1000; // 30分钟async function getPermissionsWithCache() {const cached = localStorage.getItem(PERMISSION_CACHE_KEY);if (cached) {const { permissions, timestamp } = JSON.parse(cached);if (Date.now() - timestamp < CACHE_TTL) {return permissions;}}// 后端获取新权限const res = await getPermissions();const dataToCache = {permissions: res.permissions,timestamp: Date.now()};localStorage.setItem(PERMISSION_CACHE_KEY, JSON.stringify(dataToCache));return res.permissions;
}// 强制刷新
function refreshPermissions() {localStorage.removeItem(PERMISSION_CACHE_KEY);getPermissionsWithCache();
}
权限管理最佳实践
1. 权限按钮使用示例
// 基本按钮
<AuthButton permission="product:create">创建产品</AuthButton>// 带图标和提示的按钮
<AuthButton permission="product:delete"icon={<DeleteOutlined />}noPermissionText="无删除权限"
>删除
</AuthButton>// 数据上下文权限
<AuthButton permission="product:update"context={{ owner: currentUser.id }}
>编辑我的产品
</AuthButton>
2. 权限控制策略
// 页面级别权限控制
const AdminPage = () => {return (<Access permission="system:admin"><div>管理员面板</div>{/* 管理员功能区域 */}</Access>);
};// 条件渲染多个元素
<div><Access permission="reports:view"><DashboardSection /><ReportChart /></Access><Access permission="user:manage"><UserManagementSection /></Access>
</div>
3. 高级权限场景
动态权限加载
const [dynamicPermissions, setDynamicPermissions] = useState(false);useEffect(() => {checkPermission('advanced:feature').then(res => {setDynamicPermissions(res.hasPermission);});
}, []);return (<div>{dynamicPermissions && (<Button>高级功能</Button>)}</div>
);批量权限检查
const [buttonsEnabled, setButtonsEnabled] = useState({});useEffect(() => {const permissionsToCheck = ['order:create','order:approve','order:export'];checkMultiplePermissions(permissionsToCheck).then(res => {setButtonsEnabled(res);});
}, []);// ...
<Button disabled={!buttonsEnabled['order:create']}>新建订单</Button>
权限审计与监控
// 前端操作日志记录
function logPermissionAction(action: string, hasPermission: boolean, context?: any
) {analytics.track('permission_action', {action,hasPermission,userId: currentUser.id,context,timestamp: new Date().toISOString(),pathname: window.location.pathname});
}// 在权限钩子中调用
const hasPermission = (perm: string, context?: any) => {const hasPerm = /* 权限检查逻辑 */;if (perm.startsWith('sensitive:')) {logPermissionAction(perm, hasPerm, context);}return hasPerm;
};
这个基于 Ant Design Pro 和 TypeScript 的权限按钮系统提供了完整的解决方案:
- 前后端分离:前端基于组件化设计,后端提供灵活的权限服务
- 细粒度控制:支持功能权限和数据权限
- 灵活配置:多种权限控制策略(隐藏、禁用、提示)
- 权限缓存:优化性能减少后端请求
- 权限继承:支持角色权限和直接用户权限
- 上下文权限:支持基于数据所有权的权限检查
- 完整审计:记录敏感操作便于追踪
在企业级项目中,这样的权限系统可以轻松集成到现有架构中,提供安全可靠的权限控制能力。


智能小车9(语音识别小车))


)
)


