1、React表单控制
1.1 受控绑定
概念:使用React组件的状态(useState)控制表单的状态

完整示例:
function App(){/* 1. 准备一个React状态值 */ const [value, setValue] = useState('')return (/* 2. 通过value属性绑定状态,通过onChange属性绑定状态同步的函数*/<input type="text" value={value} onChange={e => setValue(e.target.value)}/>)
}
1.2 非受控绑定
概念:通过获取DOM的方式获取表单的输入数据
- 使用useRef创建 ref 对象,并与 JSX 绑定
const inputRef = useRef(null)
<input  type="text" ref={inputRef} />
- 在DOM可用时,通过 inputRef.current 拿到 DOM 对象
console.log(inputRef.current)
示例:
// 渲染完毕之后dom才可用
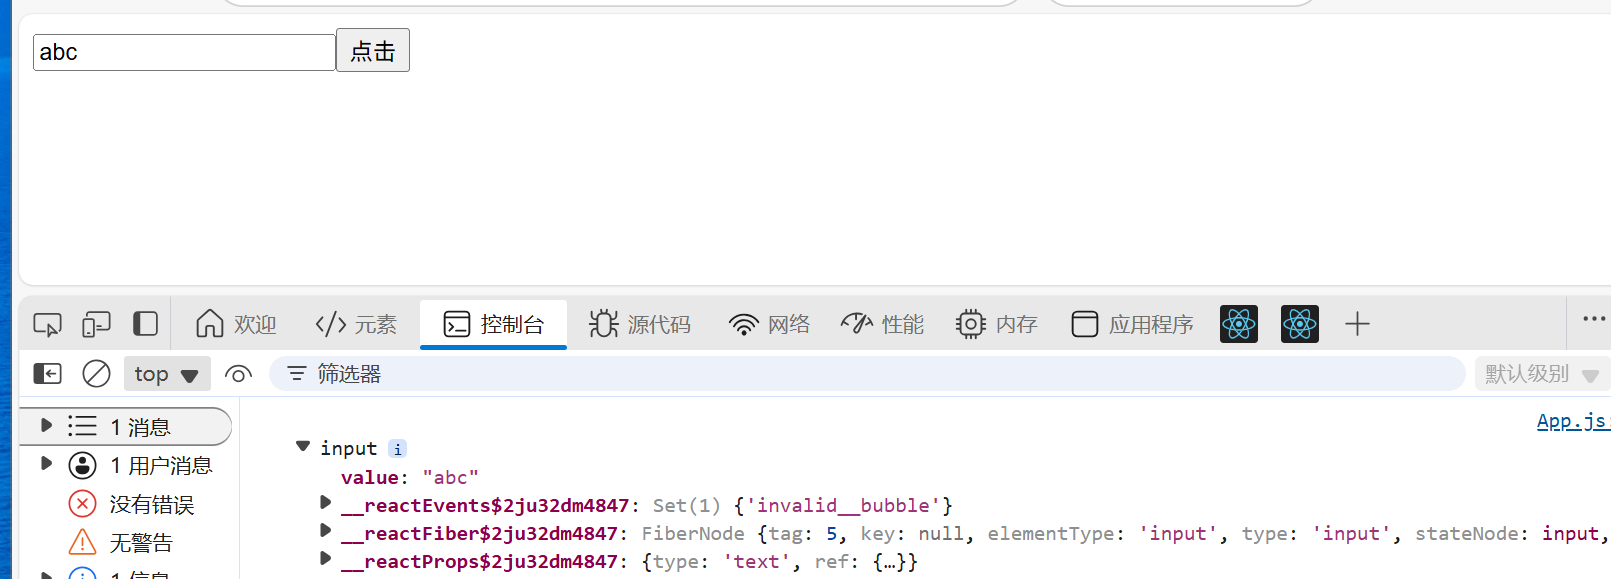
function App() {const inputRef = useRef(null)const showDom = () => {// console.log(inputRef.current);console.dir(inputRef.current); }return (<div className="App"><input type="text" ref={inputRef} /><button onClick={showDom}>点击</button></div>)
}
2、案例-B站评论案例

- 输入框评论内容,并发布评论
核心代码:
const App = () => {// 使用useState维护评论列表const [commentList, setCommentList] = useState(_.orderBy(defaultList,'like','desc'))// 1. 获取评论内容const[content, setContent] = useState('')// 2.点击发布评论内容const handPublish=()=>{// 在原始的评论列表中添加新增的setCommentList(...commentList,{rpid: 100,user: {uid: '30009257',avatar,uname: '学习前端',},content: content,ctime: '10-19 09:00',like: 66,})}return (<div className="app"><div className="reply-box-wrap">{/* 评论框 */}<textareaclassName="reply-box-textarea"placeholder="发一条友善的评论"value={content}onChange={(e)=>setContent(e.target.value)}/>{/* 发布按钮 */}<div className="reply-box-send"><div className="send-text" onClick={handPublish}>发布</div></div></div></div>}
- id处理和时间处理(uuid 和 day.js),使用方法看官方文档(安装—>导入–>使用)
核心代码:
// 1. 导入生成随机id的插件
import { v4 as uuid4 } from "uuid";
// 2.导入时间格式化插件
import dayjs from "dayjs";const handPublish=()=>{// 在原始的评论列表中添加新增的setCommentList(...commentList,{rpid: uuid4(),user: {uid: '30009257',avatar,uname: '黑马前端',},content: content,ctime: dayjs(new Date()).format('MM-DD HH:mm'), //时间格式化为  ’月-日 时:分‘like: 66,})}
- 清空内容并重新聚焦
const textRef = useRef(null)//1. 清空内容 - 把控制input框的value状态设置为空串setContent('')// 2. 重新聚焦 - 拿到input的dom元素,调用focus方法textRef.current.focus(){/*评论区*/}<textareaclassName="reply-box-textarea"placeholder="发一条友善的评论"value={content}ref={textRef} //绑定refonChange={(e)=>setContent(e.target.value)}/>
3、React组件通信
概念:组件通信就是
组件之间的数据传递, 根据组件嵌套关系的不同,有不同的通信手段和方法

- A-B 父子通信
- B-C 兄弟通信
- A-E 跨层通信
4、父子通信-父传子

4.1 基础实现
**实现步骤 **
- 父组件传递数据 - 在子组件标签上绑定属性
- 子组件接收数据 - 子组件通过props参数接收数据
// 子组件
function Son(props) {// console.log(props); // {name: '这是父组件的内容,将其绑定到子组件'}return <div>this is son,{props.name}</div>
}function App() {// 父组件定义变量const name = '这是父组件的内容,将其绑定到子组件'return (<div className="App"><Son name={name} /></div>)
}
4.2 props说明
props可以传递任意的合法数据,比如数字、字符串、布尔值、数组、对象、函数、JSX

需要使用什么,就在子组件里调用{props. } ,比如{props.age}
props是只读对象
子组件只能读取props中的数据,不能直接进行修改, 父组件的数据只能由父组件修改
4.3 特殊的prop-chilren
场景:当我们把内容嵌套在组件的标签内部时,组件会自动在名为children的prop属性中接收该内容
function Son(props) {console.log(props);//使用return <div>this is son,{ props.children}</div>
}function App() {return (<div className="App"><Son>// 传入特殊的prop-chilren<span>this is span</span></Son></div>)
}
5、父子通信-子传父

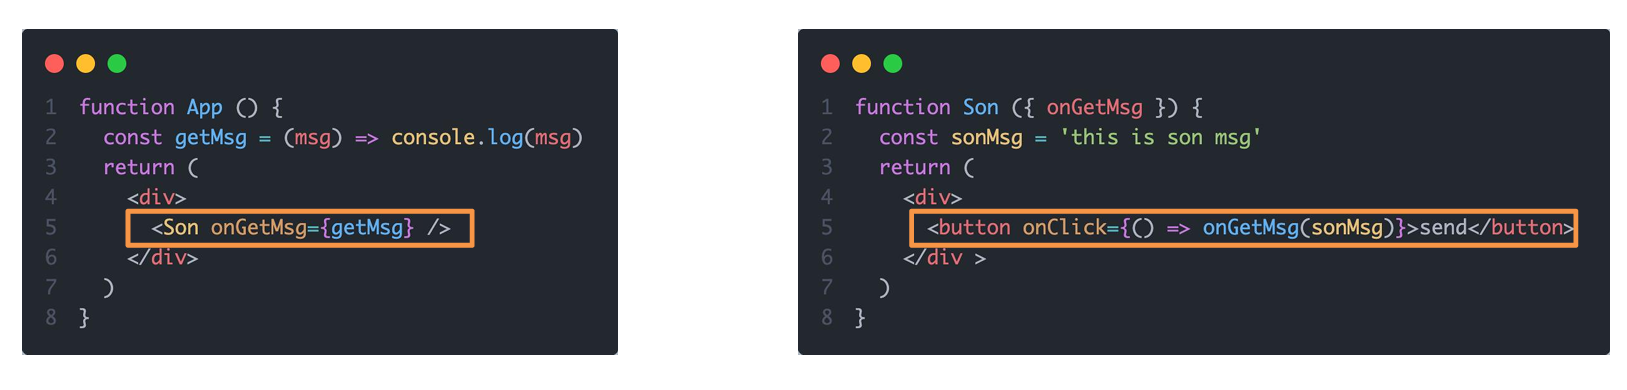
核心思路:在子组件中调用父组件中的函数并传递参数
function Son({ongetMsg}) {const sonMsg = 'this is son msg'return <div>this is son// 传递参数<button onClick={()=>{ongetMsg(sonMsg)}}>点击</button></div>
}function App() {const [msgs, setMsgs] = useState('')const getMsg = (msg) => {console.log(msg);setMsgs(msg)}return (<div className="App">{msgs}// 在子组件中传递父组件的函数<Son ongetMsg={ getMsg } /></div>)
}
6、兄弟组件通信

实现思路: 借助
状态提升机制,通过共同的父组件进行兄弟之间的数据传递
- A组件先通过子传父的方式把数据传递给父组件App
- App拿到数据之后通过父传子的方式再传递给B组件
子传父–>父传子
// 1. 通过子传父 A -> App
// 2. 通过父传子 App -> B
import { useState } from "react"function A({onGetname}) {const aname = 'this is A name'return <div>this is A component,{/* 子传父,传入参数 */}<button onClick={()=>onGetname(aname)}>send</button></div>
}
function B(props) {// 父传子,接收传递的数据return <div>this is B component,{props.name}</div>
}function App() {const[name, setName] = useState('')const getName = (fname)=> {console.log(fname);setName(fname)}return (<div className="App">this is app,{/* 子传父 ,定义函数*/}<A onGetname={getName} />{/* 父传子 */}<B name={name}/></div>)
}export default App
7、跨层组件通信

使我们App里得数据,跨过A直接传递给B
实现步骤:
- 使用
createContext方法创建一个上下文对象Ctx(这个名字可以随便取) - 在顶层组件(指App)中通过
Ctx.Provider组件提供数据 - 在底层组件(B)中通过
useContext钩子函数获取消费数据
// App -> A -> Bimport { createContext, useContext } from "react"// 1. createContext方法创建一个上下文对象const MsgContext = createContext()function A () {return (<div>this is A component<B /></div>)
}function B () {// 3. 在底层组件 通过useContext钩子函数使用数据const msg = useContext(MsgContext)return (<div>this is B compnent,{msg}</div>)
}function App () {const msg = 'this is app msg'return (<div>{/* 2. 在顶层组件 通过Provider组件提供数据 */}<MsgContext.Provider value={msg}>this is App<A /></MsgContext.Provider></div>)
}export default App
8、React副作用管理-useEffect
8.1 概念理解
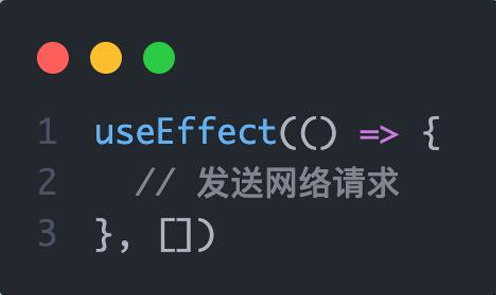
useEffect是一个React Hook函数,用于在React组件中创建不是由事件引起而是由渲染本身引起的操作(副作用), 比 如发送AJAX请求,更改DOM等等

说明:上面的组件中没有发生任何的用户事件,
组件渲染完毕之后就需要和服务器要数据,整个过程属于“只由渲染引起的操作”
8.2 基础使用
需求:在组件渲染完毕之后,立刻从服务端获取平道列表数据并显示到页面中

说明:
- 参数1是一个函数,可以把它叫做副作用函数,在函数内部可以
放置要执行的操作 - 参数2是一个数组(可选参),在数组里放置依赖项,不同依赖项会影响第一个参数函数的执行,当是一个空数组的时候,副作用函数只会在组件渲染完毕之后执行一次
接口地址:http://geek.itheima.net/v1_0/channels
import { useEffect,useState } from "react";function App() {const[list, setList]=useState([])const URL = 'http://geek.itheima.net/v1_0/channels'useEffect(() => {// 放置要执行的操作async function getlist() {const res = await fetch(URL)// console.log(res);// 转json字符串const jsonList = await res.json()console.log(jsonList);setList(jsonList.data.channels)}getlist()},[])return (<div className="App">this is app<ul>{list.map(item=><li key={item.id}>{item.name}</li>)}</ul></div>)
}
8.3 useEffect依赖说明
useEffect副作用函数的执行时机存在多种情况,根据传入依赖项的不同,会有不同的执行表现
| 依赖项 | 副作用功函数的执行时机 |
|---|---|
| 没有依赖项 | 组件初始渲染 + 组件更新时执行 |
| 空数组依赖 | 只在初始渲染时执行一次 |
| 添加特定依赖项 | 组件初始渲染 + 依赖项变化时执行 |
8.4 清除副作用
概念:在useEffect中编写的由渲染本身引起的对接组件外部的操作,社区也经常把它叫做副作用操作,比如在useEffect中开启了一个定时器,我们想在组件卸载时把这个定时器再清理掉,这个过程就是清理副作用

说明:清除副作用的函数最常见的执行时机是在组件卸载时自动执行
import { useEffect, useState } from "react"function Son () {// 1. 渲染时开启一个定时器useEffect(() => {const timer = setInterval(() => {console.log('定时器执行中...')}, 1000)return () => {// 清除副作用(组件卸载时)clearInterval(timer)}}, [])return <div>this is son</div>
}function App () {// 通过条件渲染模拟组件卸载const [show, setShow] = useState(true)return (<div>{show && <Son />}<button onClick={() => setShow(false)}>卸载Son组件</button></div>)
}export default App
?????此处没弄明白:
为什么没在第一次运行的时候就执行return?
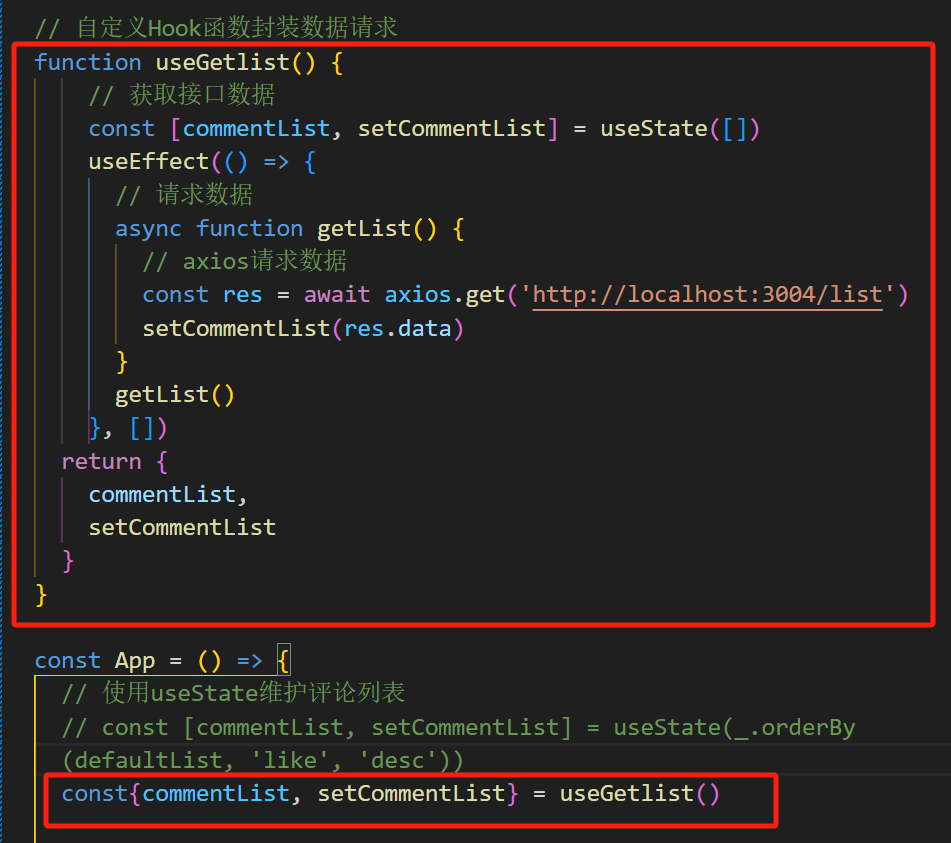
9、自定义Hook实现
概念:自定义Hook是以
use打头的函数,通过自定义Hook函数可以用来实现逻辑的封装和复用

封装自定义hook通用思路
- 声明一个以use打头的函数
- 在函数体内封装可复用的逻辑(只要是可复用的逻辑)
- 把组件中用到的状态或者回调return出去(以对象或者数组)
- 在哪个组件中要用到这个逻辑,就执行这个函数,解构出来状态和回调进行使用
// 封装自定义Hook// 问题: 布尔切换的逻辑 当前组件耦合在一起的 不方便复用// 解决思路: 自定义hookimport { useState } from "react"function useToggle () {// 可复用的逻辑代码const [value, setValue] = useState(true)const toggle = () => setValue(!value)// 哪些状态和回调函数需要在其他组件中使用 returnreturn {value,toggle}
}function App () {const { value, toggle } = useToggle()return (<div>{value && <div>this is div</div>}<button onClick={toggle}>toggle</button></div>)
}export default App
10、React Hooks使用规则
- 只能在组件中或者其他自定义Hook函数中调用
- 只能在组件的顶层调用,不能嵌套在if、for、其它的函数中

11、案例-优化B站评论案例

- 使用请求接口的方式获取评论列表并渲染
- 使用自定义Hook函数封装数据请求的逻辑
- 把评论中的每一项抽象成一个独立的组件实现渲染
准备工作:
-
使用 json-server (访问json-server 的 github官网进行安装、准备db.json文件)工具模拟接口服务,安装好后,在package.json文件下添加:
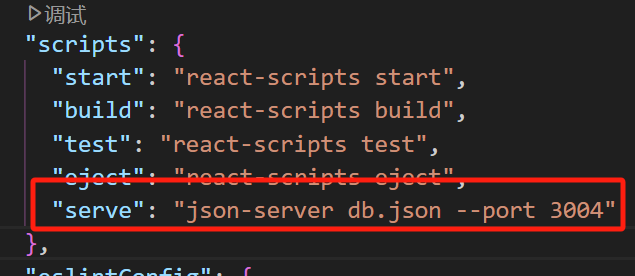
执行:npm ren serve
返回的接口链接,盖链接就是下面axios需要使用的接口链接 -
通过 axios 发送接口请求,axios是一个广泛使用的前端请求库(安装axios:
npm install axios) -
使用 useEffect 调用接口获取数据
实现:
1.使用请求接口的方式获取评论列表并渲染
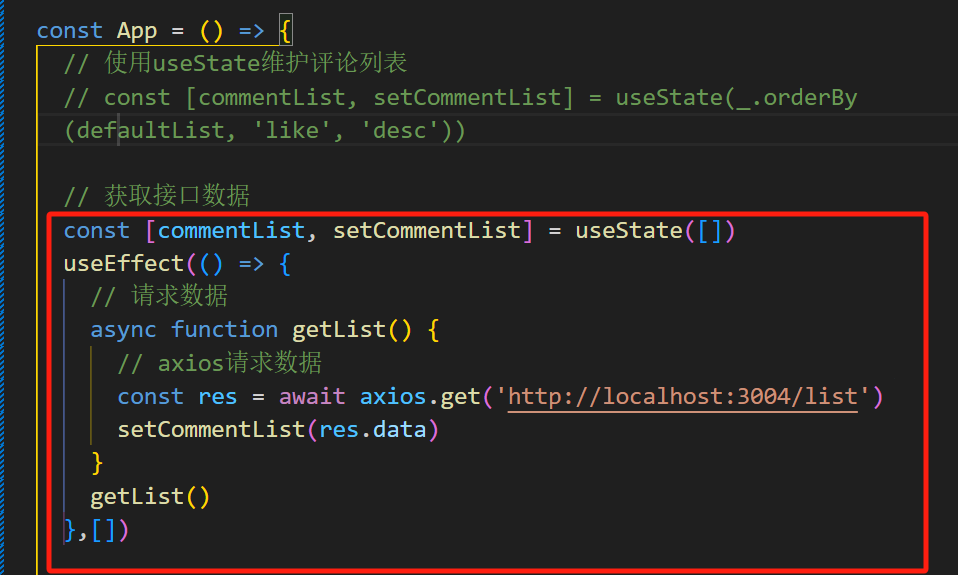
2.使用自定义Hook函数封装数据请求的逻辑
3. 把评论中的每一项抽象成一个独立的组件实现渲染
核心技术:
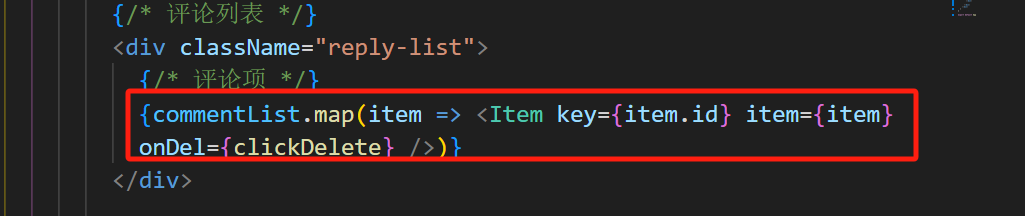
抽离评论列表
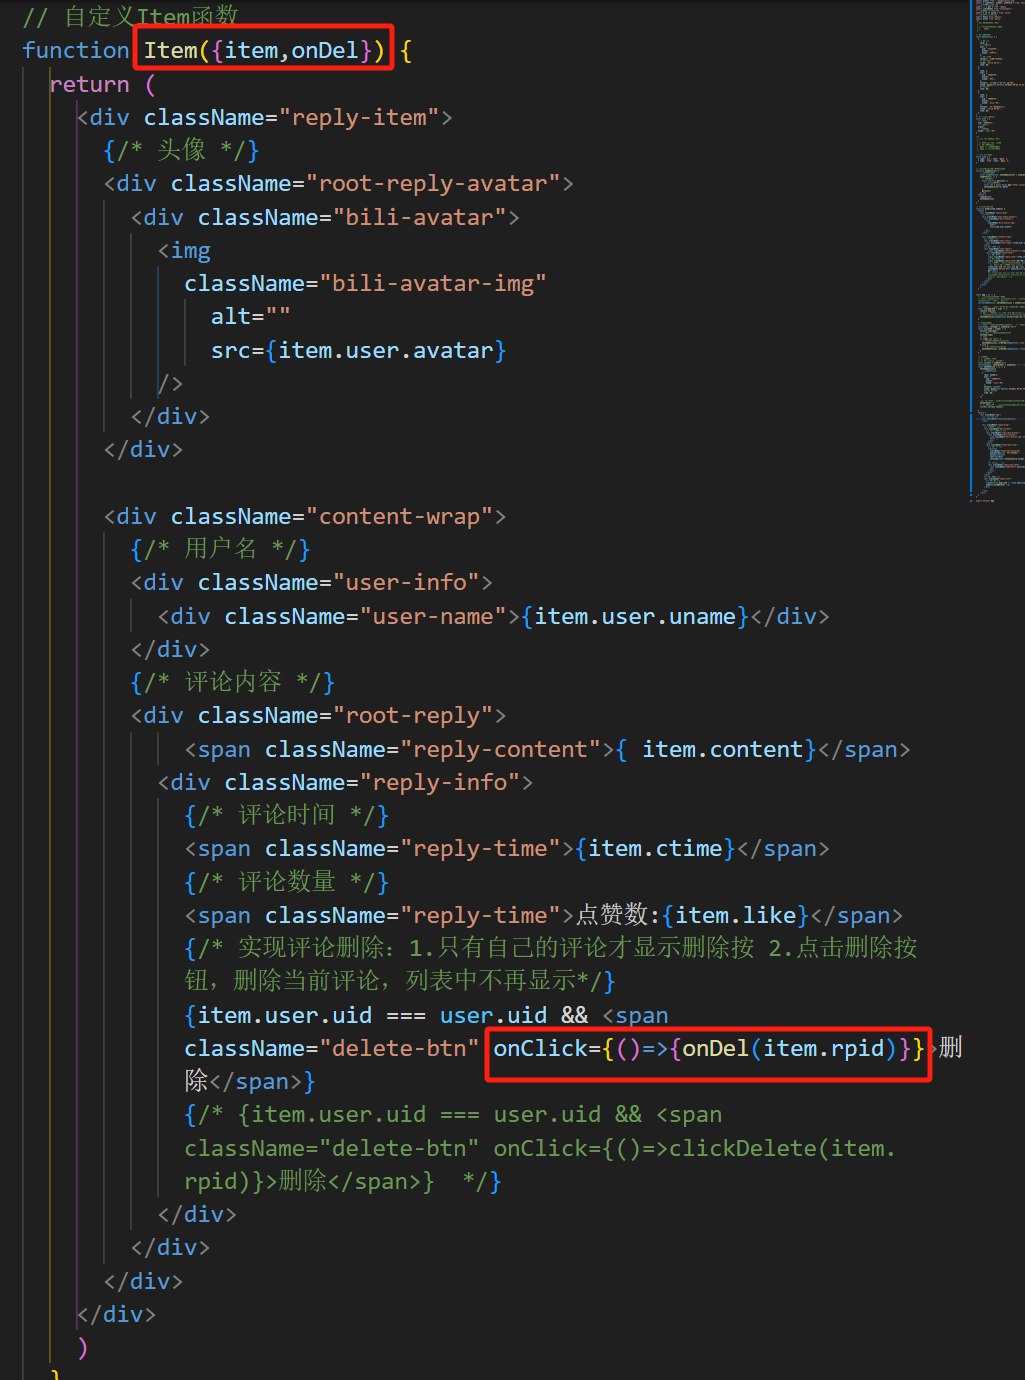
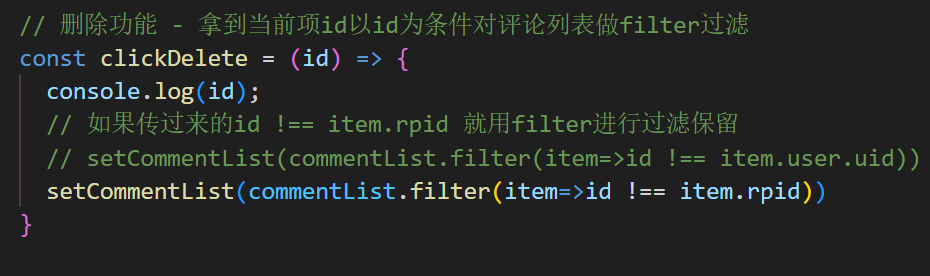
通过父传子,将父组件(App)的方法传递给子组件(Item)——>然后通过子传父,将子组件的item.rpid传递给父组件


 v6.20.0.24 专业便携版)


)

)


